
Mirror clusters are having a major moment, and for good reason: they amplify light, create visual interest, and make any wall feel curated and intentional without screaming “try-hard.” Whether you’re working with a tiny apartment or a sprawling living room, a clustered mirror arrangement gives you an instant focal point that feels both artistic and functional. The best part? You don’t need to be a designer to pull this off. We’ve gathered 25 specific ideas—from free rearrangement tricks to investment-worthy gallery walls—so you can create a arrangement that matches your style, budget, and space. Each approach works for renters and homeowners alike, and most can be completed in a weekend.
1. Create a Grid with Matching Frames
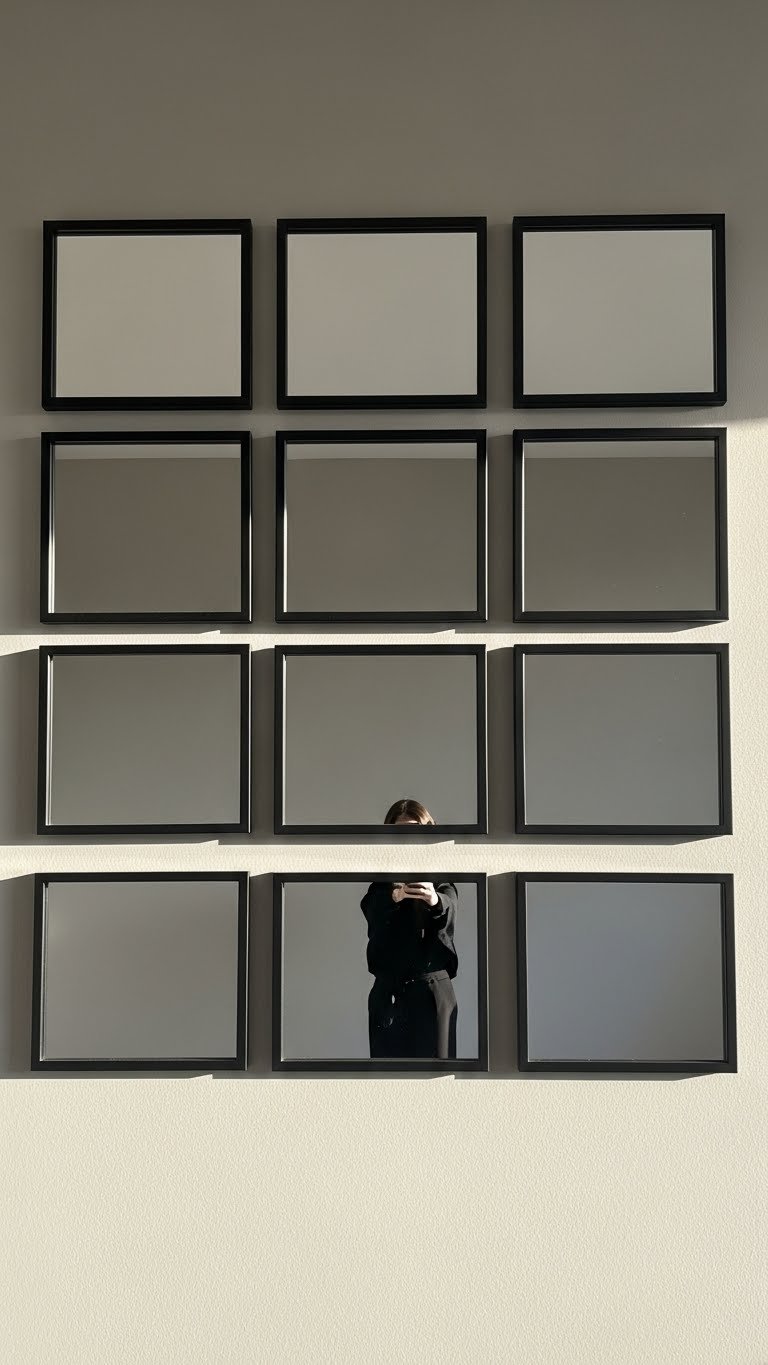
A perfect grid layout brings order and modern sophistication to any room. This arrangement works particularly well in bathrooms, bedrooms, or above console tables because it’s visually predictable and calming.
You’ll need four to nine mirrors in identical or similar frames. Measure your wall space first, then space each mirror evenly—aim for 2-3 inches between frames. Use a level and painter’s tape to mark your hanging points before drilling. Budget: $40–$150 depending on frame quality. IKEA, Target, and Amazon all carry affordable matching mirror sets. Time: 45 minutes to 1 hour including measurement and hanging.
The symmetry creates a polished look that photographs beautifully for social media, and the uniform design grounds a busy room.
2. Mix Round and Arched Shapes for Soft Flow

Combining curved shapes breaks rigidity and adds personality without chaos. The mix of round and arched mirrors mimics natural forms and softens contemporary spaces.
Start with one large arched mirror as your anchor (30–36 inches tall), then layer smaller rounds (12–20 inches) around it. Odd numbers (3, 5, 7) always look more intentional than even groupings. Vary frame finishes—wood, gold, and black together feel curated rather than random. Budget: $80–$250 for a five-piece cluster. Check Wayfair, West Elm, or local vintage shops for unique finds. Time: 1–2 hours to arrange, mark, and install.
This approach creates visual movement and draws the eye around the wall in a pleasing flow.
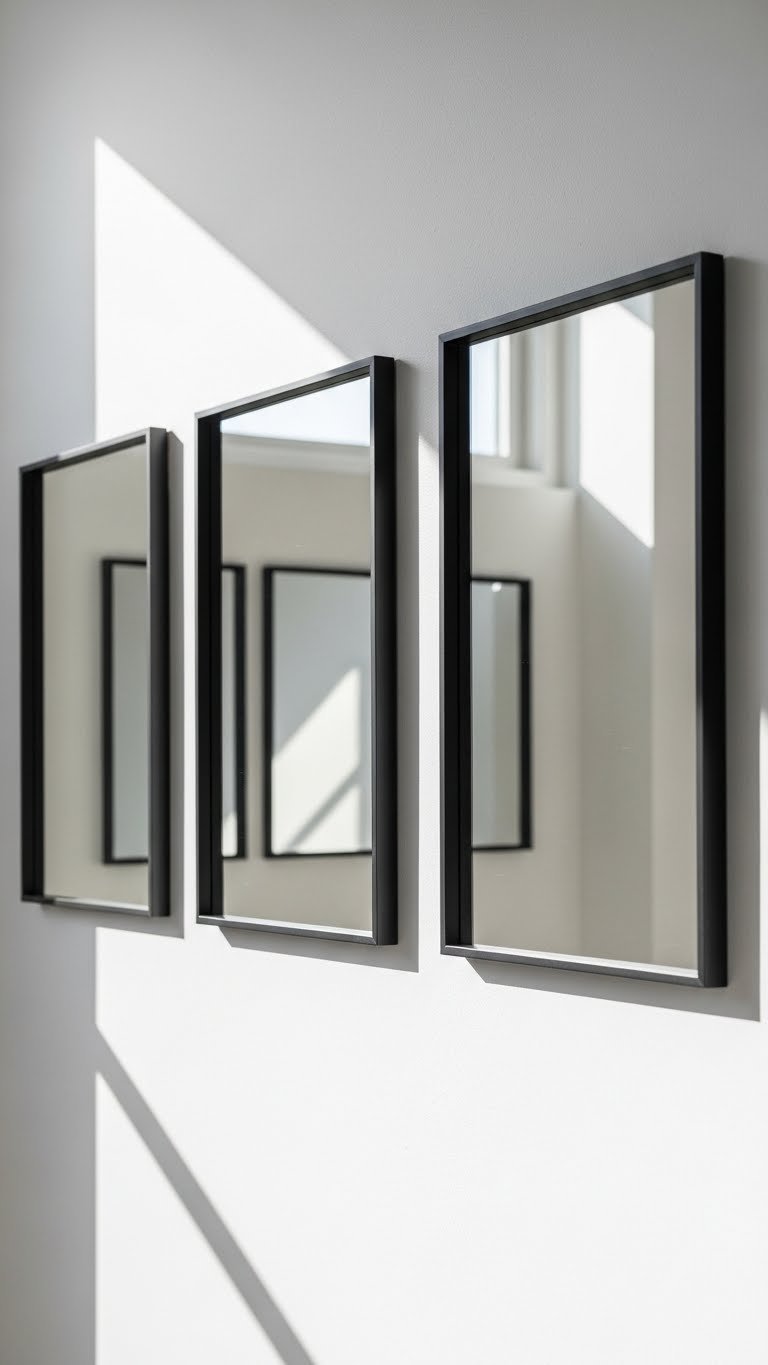
3. Stagger Heights for Dynamic Energy

Staggering your mirrors vertically (instead of in a straight line) creates dynamic tension and prevents the “too neat” feeling. This works beautifully in entryways and hallways.
Pick your tallest mirror and hang it slightly off-center. Then add shorter mirrors below and to the sides, varying the vertical spacing by 4–6 inches. Avoid perfect alignment—let some dip lower and others sit higher. Budget: $60–$200 depending on sizes and finishes. Time: 1.5 hours to plan your layout with painter’s tape first (seriously—map it out before any nails go in). This method works great in rentals because you can experiment with tape before committing.
The asymmetrical heights keep the eye moving and make the arrangement feel more art installation than basic décor.
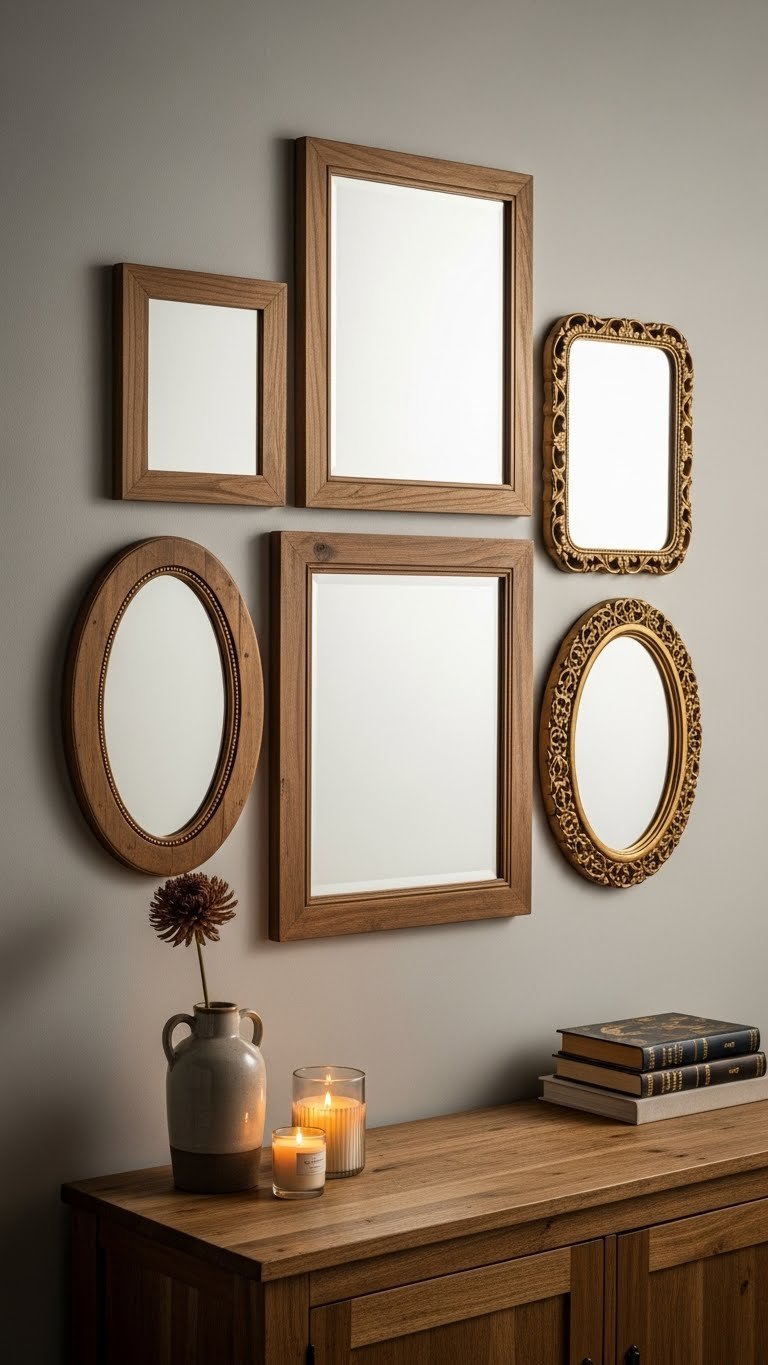
4. Go Bohemian with Mixed Vintage Frames
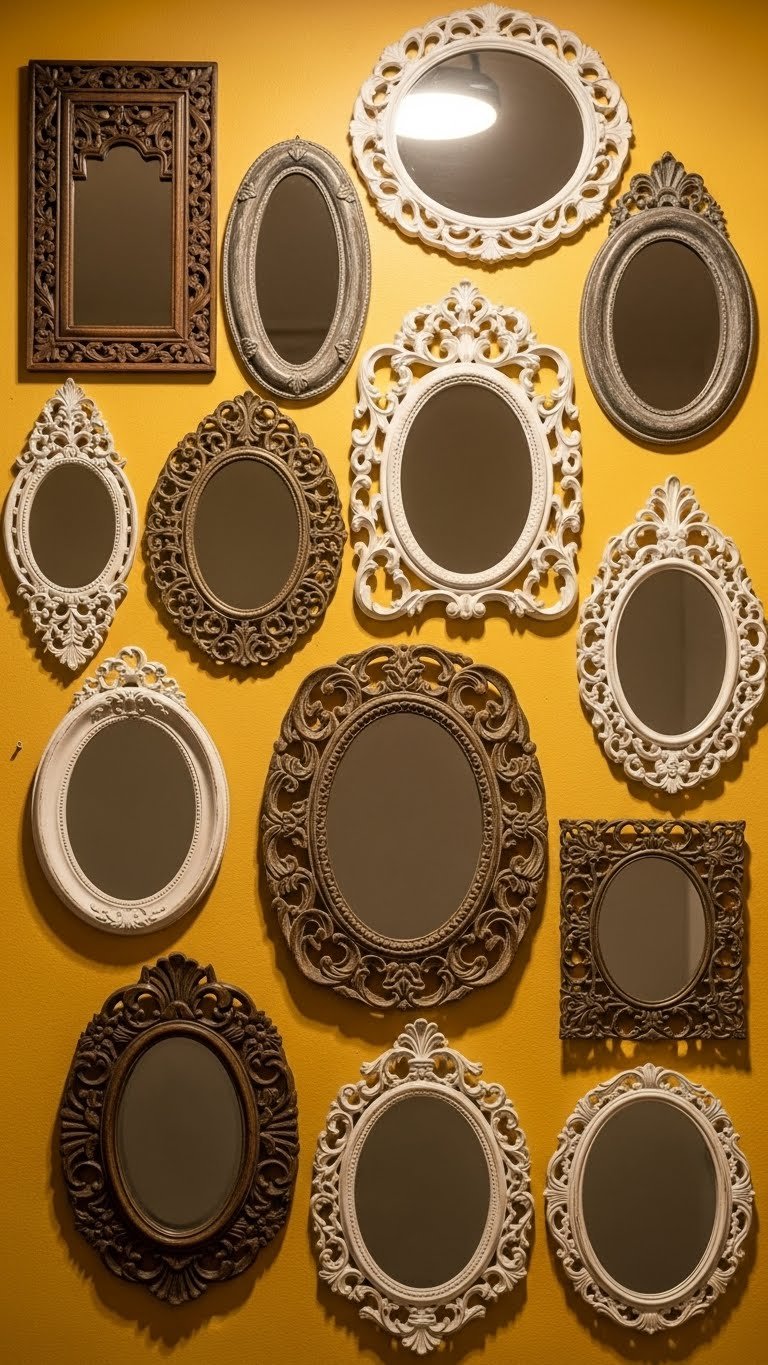
Thrifted and vintage mirrors bring character and history to a wall. This bohemian approach celebrates imperfection and tells a story.
Hunt at thrift stores, estate sales, and Facebook Marketplace for mirrors in varying ornate frames. Aim for a mix of frame styles—carved wood, ornate metal, painted finishes—in a loose color palette (neutrals with one accent color works well). Hang them close together to create a “wall within a wall” effect. Budget: $20–$100 total if thrifting; higher if buying from online vintage shops. Time: 2–3 hours sourcing, plus 1.5 hours hanging. This is a weekend project that feels like treasure hunting.
The collected, lived-in look adds soul and sparks conversation. Plus, you’re up-cycling, which feels good.
5. Create a Sunburst Focal Point

A sunburst mirror commands attention as a solo statement piece or can anchor a larger cluster. Its radial design draws the eye inward and feels both modern and timeless.
Position your sunburst mirror at eye level (57–60 inches from floor to center) in a space with good light. If you’re clustering, let it be the dominant piece with only 2–3 smaller supporting mirrors nearby—overcrowding diminishes its impact. Budget: $80–$400+ depending on size and material (some are investment pieces). Wayfair, West Elm, and Urban Outfitters carry options. Time: 30 minutes hanging if you’re working with a sturdy wall anchor. If renting, use heavy-duty adhesive strips (rated for 16+ pounds).
This single piece can refresh an entire room without any additional styling.
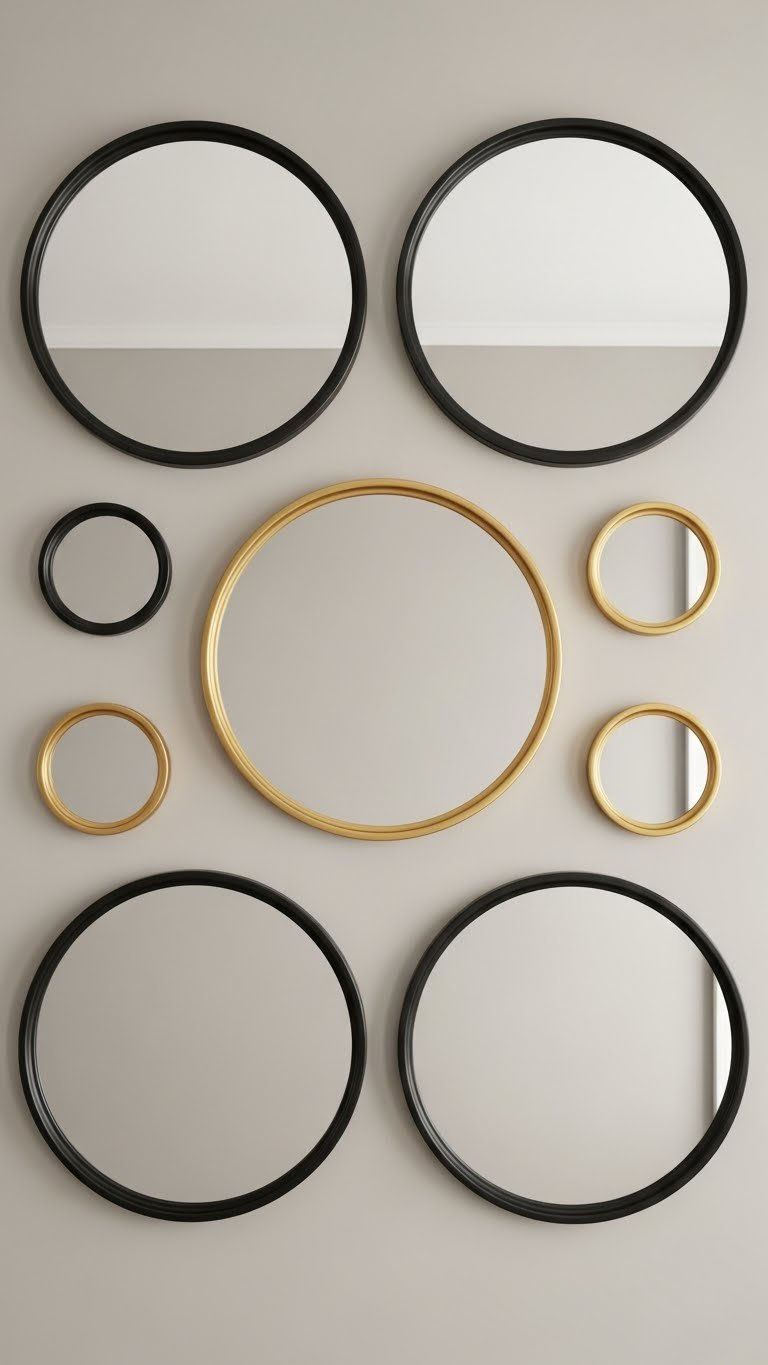
6. Layer Circles in Graduated Sizes
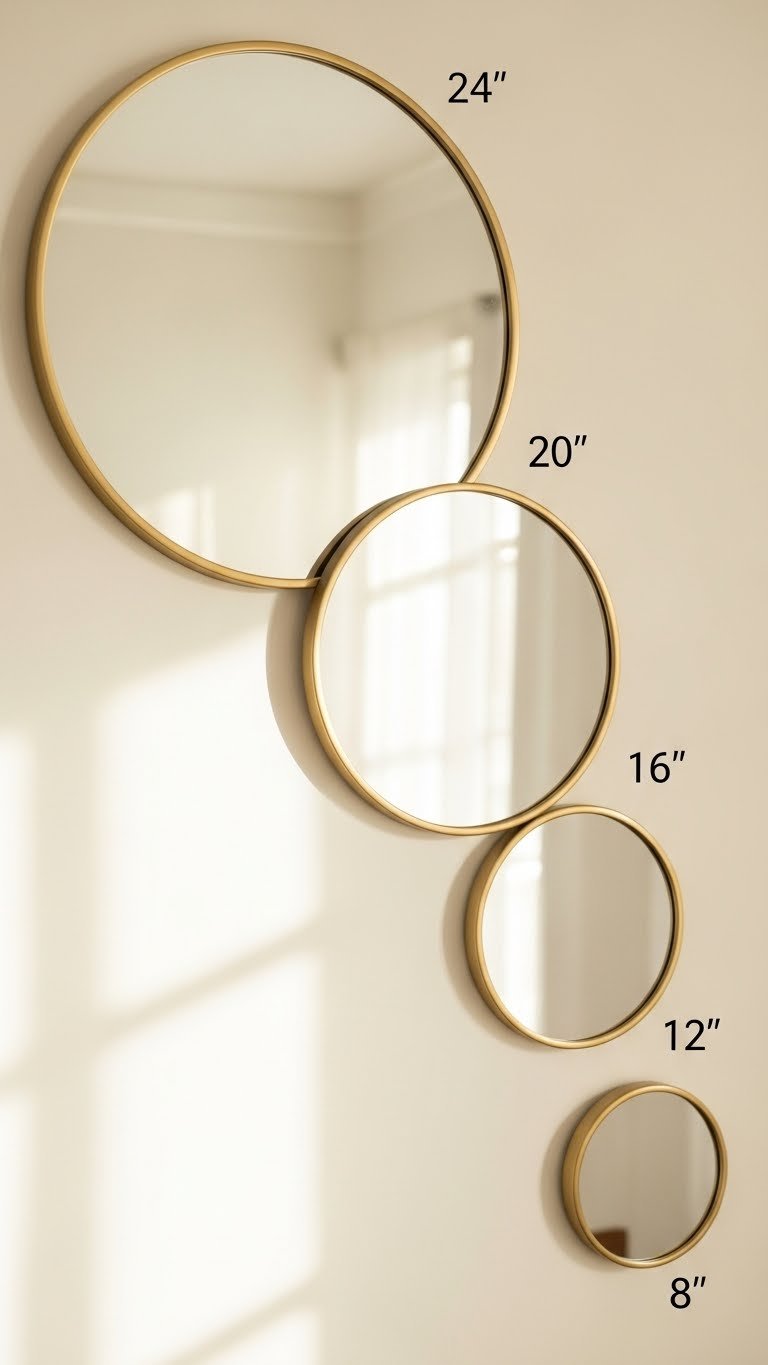
Graduating circle sizes from large to small creates visual rhythm and guides the viewer’s eye. This is particularly effective in narrow hallways or above sideboards.
Hang your largest circle first, then add progressively smaller ones below and slightly offset. Leave 3–4 inches between each mirror. The stair-step effect feels intentional without being rigid. Budget: $70–$180 for five mirrors. IKEA, Target, and Amazon have affordable round mirrors in various sizes. Time: 1 hour for layout and installation.
The graduated approach feels curated and gallery-like, elevating even affordable mirrors.
7. Build a Rattan-Framed Coastal Wall
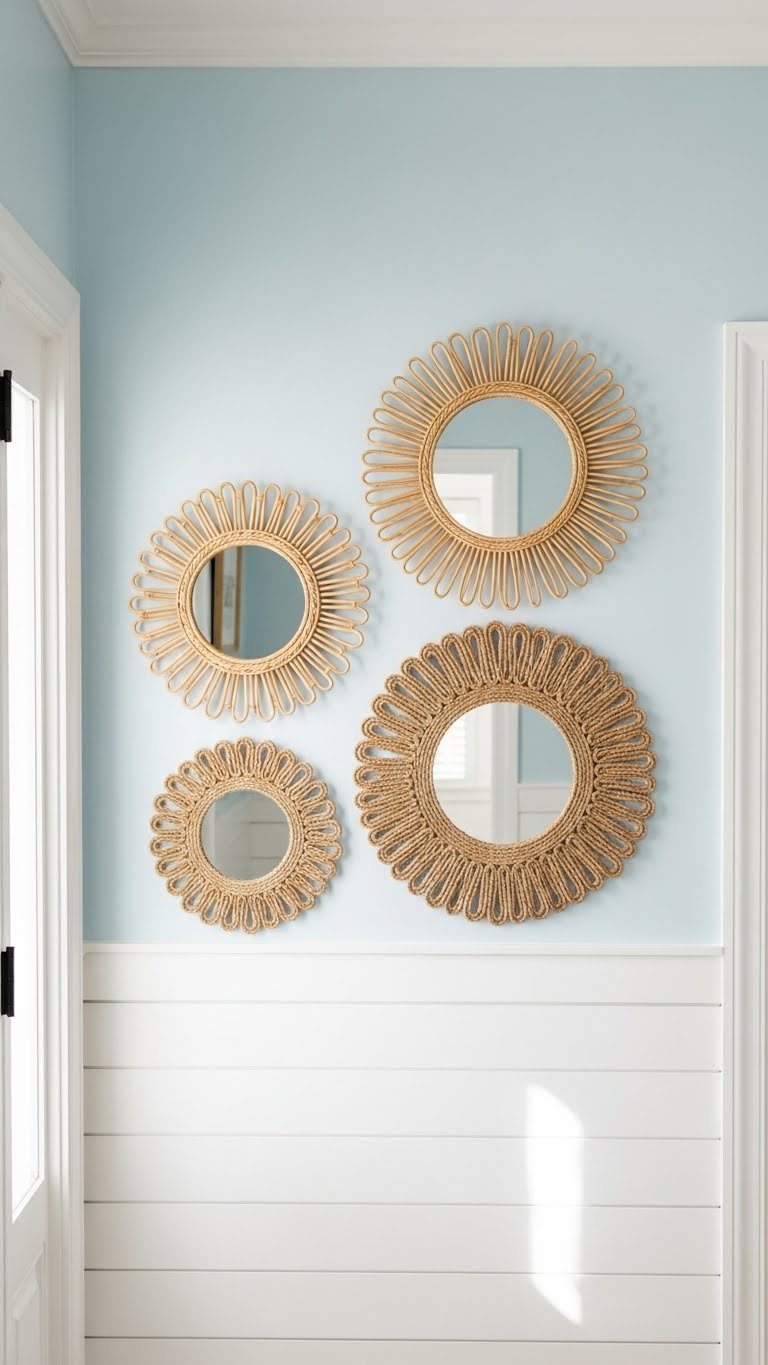
Rattan and woven textures bring warmth and a relaxed, coastal vibe. This style works perfectly for beach houses, bohemian interiors, or anyone wanting to soften a modern space.
Choose mirrors with natural rattan, jute, or seagrass frames in 16–24 inch sizes. Arrange in a loose cluster rather than strict grid. Pair with driftwood, woven baskets, or coastal-themed artwork nearby. Budget: $60–$150 for four mirrors. Check Wayfair, Etsy, or coastal home stores like Pottery Barn. Time: 45 minutes to an hour for hanging. This style is very on-trend for 2025 and photographs beautifully.
You’ll create an instant vacation-ready retreat that makes your entryway feel like a beach escape.
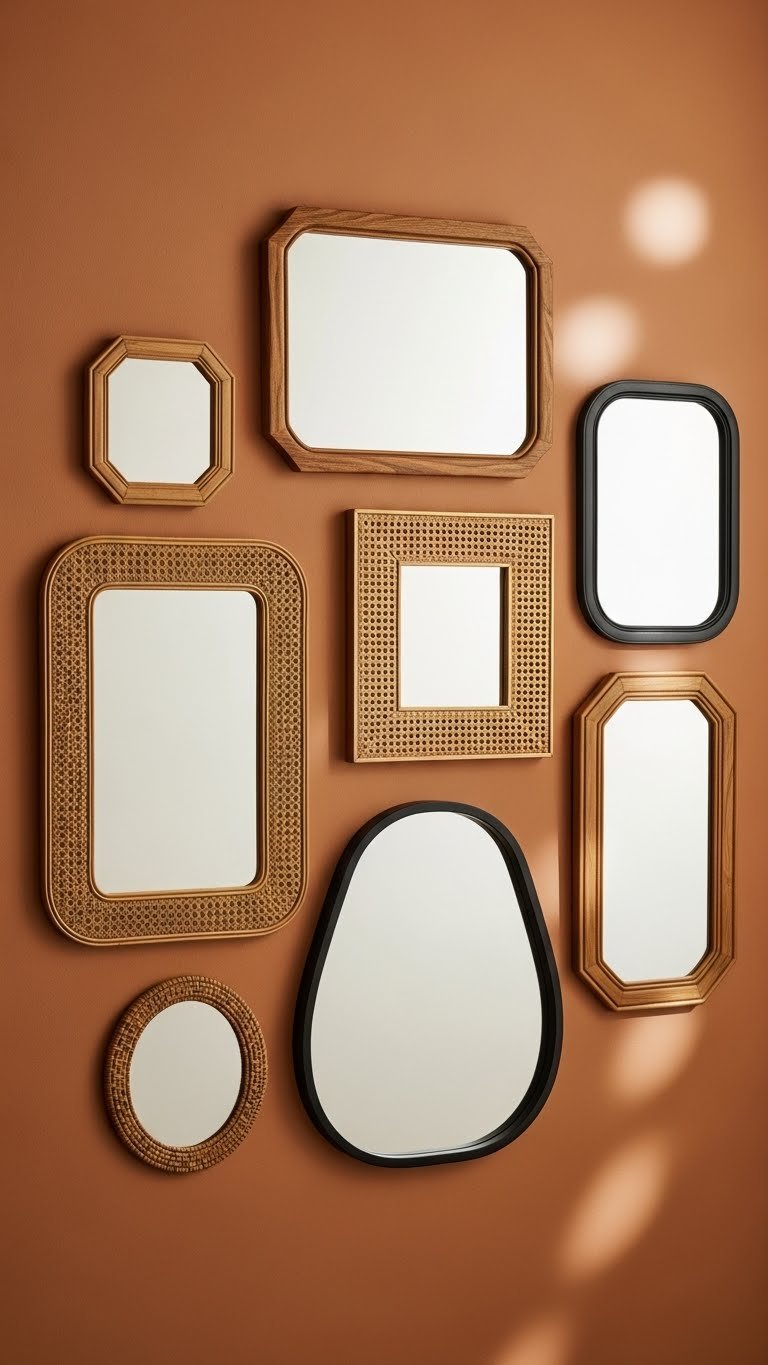
8. Hang an Asymmetrical Geometric Cluster

Geometric shapes bring modern edge to a wall while asymmetrical placement keeps it from feeling cold or corporate. This approach appeals to design-forward folks and works especially well in home offices or hallways.
Mix shapes (hexagons, triangles, ovals, rectangles) in the same frame color for cohesion while shapes vary for interest. Arrange without symmetry—let some angles point different directions. Budget: $90–$220 depending on size and frame quality. Check Etsy for custom geometric mirrors, or search “hexagon mirror” on Amazon. Time: 1.5–2 hours to arrange and install; take a photo of your layout first to reference.
The result feels curated and artistic without reading as chaotic.
9. Install a Mirror Accent Wall with Architectural Molding

Adding molding around a mirror cluster creates a “built-in” focal wall that feels architectural and high-end. This is a bigger project but absolutely transforms a space.
Map out your molding design using painter’s tape first. Install basic wooden trim (from Home Depot, $30–$80) around where your mirrors will hang, creating rectangular frames. Then install mirrors inside. Paint the molding to match your wall or go contrasting (black or gold edges create drama). Budget: $150–$400 including materials and molding. Time: 3–4 hours with basic DIY skills; consider hiring help if you’re uncomfortable with trimwork. This is a longer weekend project worth the effort.
The finished wall reads as a design investment and instantly elevates your entire room.
10. Pair Black Frames with Minimalist Spacing
Black frames against white walls create stark, modern drama. Generous spacing between pieces keeps the look sophisticated rather than cramped.
Select 2–4 rectangular mirrors (18–24 inches) in matte black frames. Hang them with 8–12 inches of white wall visible between each one—this negative space is key. Perfect for contemporary, minimalist, or Scandinavian-inspired spaces. Budget: $50–$150 for mirrors. IKEA’s black frames are a budget win. Time: 45 minutes including measurement and installation.
The clean, high-contrast arrangement feels architectural and intentional.
11. Float Mirrors at Varying Heights in One Column
Stacking mirrors vertically in a single column creates drama and works beautifully in narrow spaces like hallways or beside stairs. This arrangement feels gallery-like and draws the eye upward.
Select 4–6 mirrors in varying sizes (from 12 to 30 inches). Hang them along an imaginary vertical line, allowing some to overlap slightly for depth. Vary frame styles and finishes for interest. Budget: $80–$250 depending on sizes. Time: 1.5–2 hours to plan and hang carefully. Overlapping requires precise placement, so use painter’s tape to map it first.
This approach creates an almost sculptural wall that makes narrow spaces feel intentional rather than cramped.
12. Mix Matte Black and Gold for Two-Tone Drama
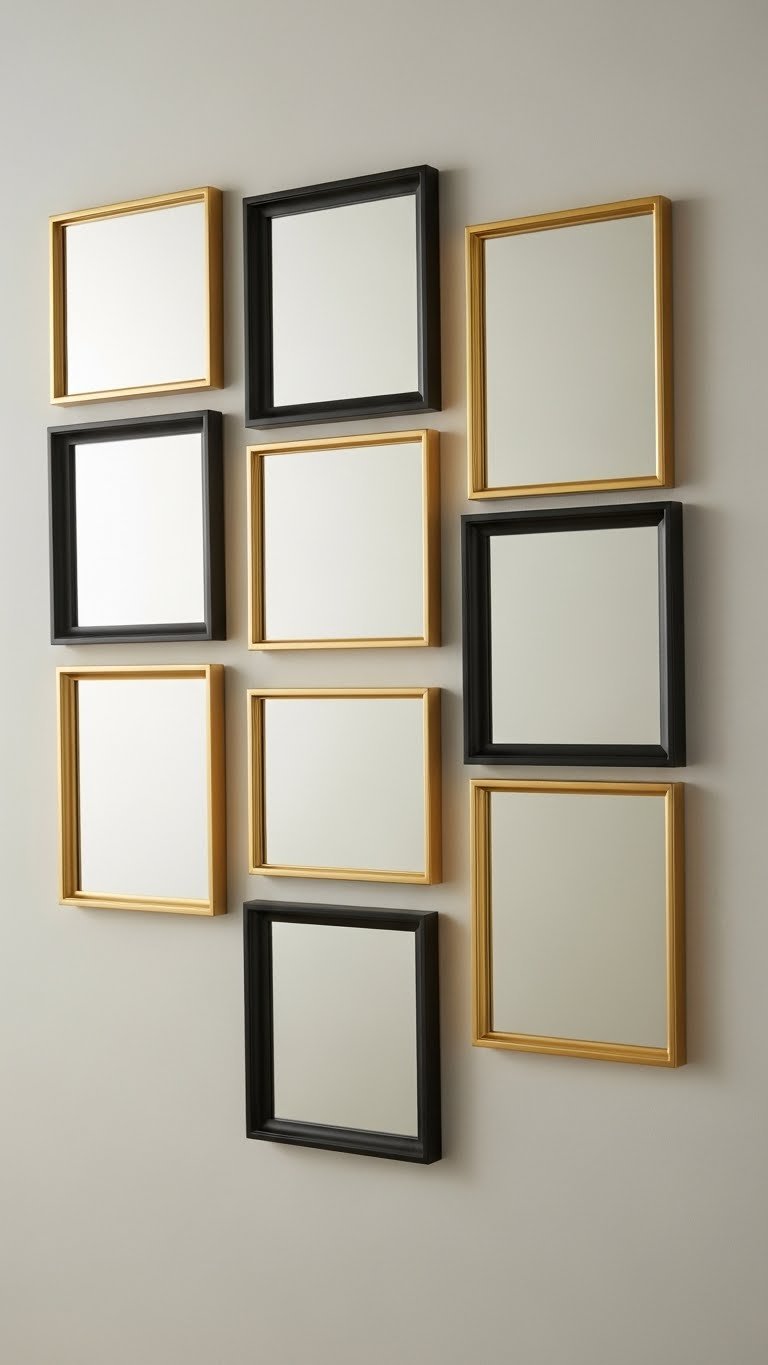
Alternating black and gold frames creates sophisticated contrast while the two metallic finishes together feel upscale and intentional. This works beautifully in dining rooms, entryways, or bedrooms.
Choose mirrors in similar sizes but alternate frame colors. Arrange in a checkerboard (black, gold, black, gold) or mix them more organically. Keep colors consistent within the blacks and golds—all matte or all shiny for each, not mixed. Budget: $100–$250 for eight mirrors. Time: 1 hour for layout and installation. This two-tone approach feels designer-curated.
The color contrast keeps the arrangement from feeling one-note while the metallic finishes add luxury.
13. Group Mirrors Above a Console Table
Positioning mirrors above a console creates a styled vignette and makes the entire arrangement feel more curated than random wall hanging. This works great in entryways or living rooms.
Select 4–6 mirrors ranging from 12–24 inches. Hang them 12–18 inches above a console table (leaving breathing room). The mirrors should be wider than the table below, creating visual weight. Add small décor pieces (candle, book, plant) on the table to ground the arrangement. Budget: $100–$300 depending on console and mirror quality. Time: 1.5 hours including hanging and styling.
The complete vignette reads as polished and intentional—like you hired a designer.
14. Create a Frameless Minimalist Wall

Frameless mirrors with beveled edges create a minimalist illusion that dissolves into the wall. This approach maximizes the sense of space and light—perfect for small rooms.
Choose frameless mirrors in 12–24 inch sizes with polished or beveled edges (the edges reflect light beautifully). Mount directly on the wall with minimal spacing—even let some edges nearly touch for a fluid look. Budget: $50–$150 for several frameless mirrors. IKEA, Wayfair, and Amazon carry affordable options. Time: 45 minutes to an hour, though precise spacing takes care. Use painter’s tape to map your layout first.
The barely-there aesthetic makes any room feel more spacious and modern.
15. Build a Scalloped-Edge Statement Cluster
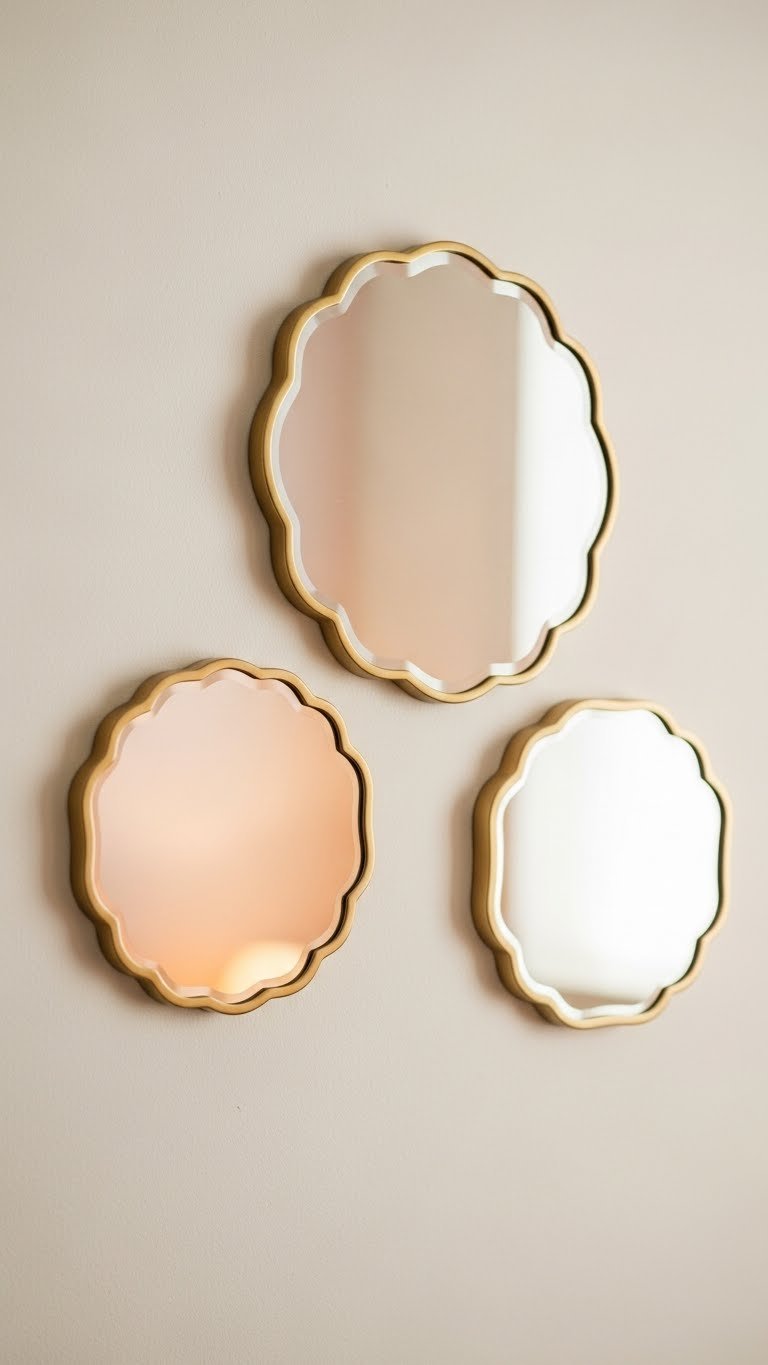
Scalloped edges balance playfulness with elegance—they’re whimsical without being kitschy. This style suits bedrooms, powder rooms, or anyone wanting feminine sophistication.
Choose 2–4 scalloped mirrors (16–28 inches) in gold, rose gold, or brass frames. Arrange in a loose cluster rather than strict grid—let each mirror breathe. This detail works particularly well in bedrooms and bathrooms. Budget: $80–$200 for quality scalloped mirrors. Check Wayfair, Anthropologie, or specialty home goods stores. Time: 1 hour for installation. The detail alone makes these mirrors special.
Scalloped edges add personality and a touch of glamour without overdoing it.
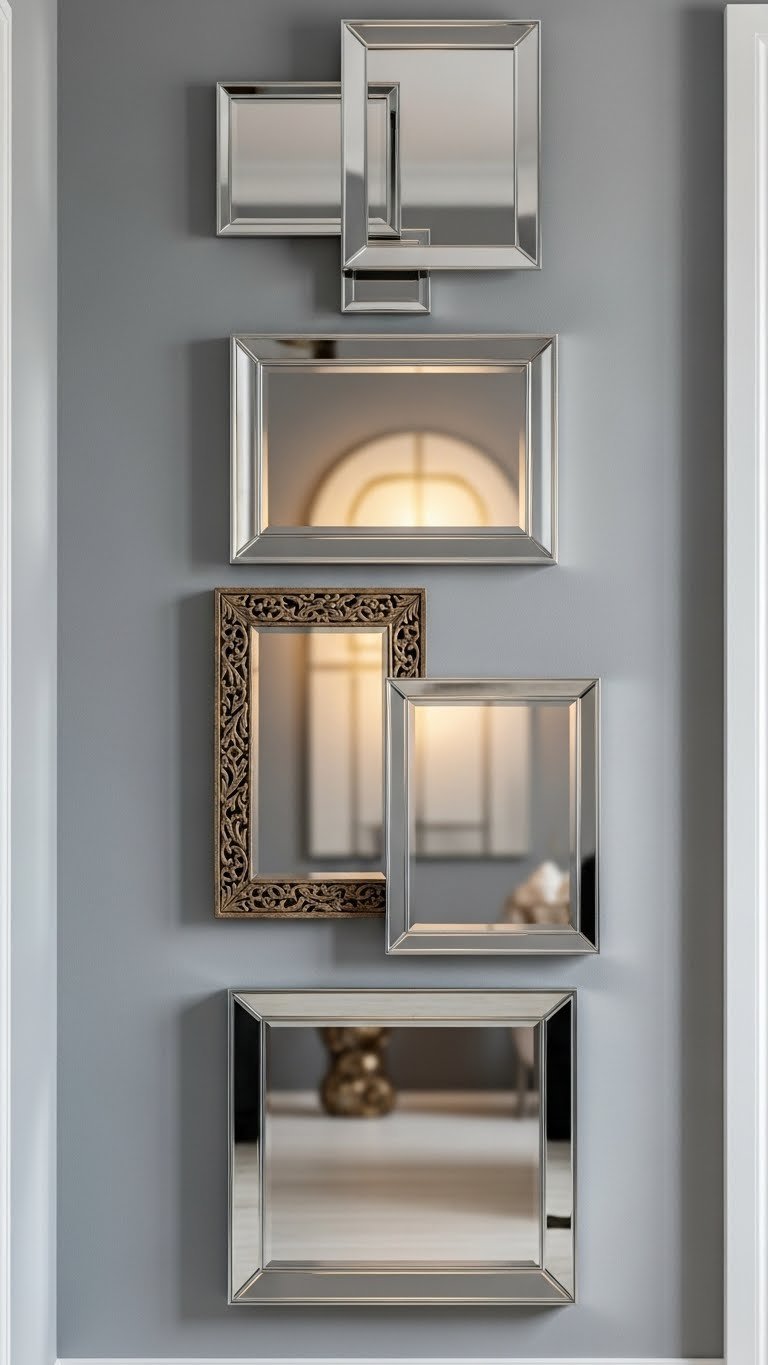
16. Arrange Mirrors in a Loose Organic Cluster
An organic cluster mimics how naturally collected items group together. This approach feels personal, artistic, and works in eclectic or bohemian spaces.
Start with one focal mirror, then add pieces around it without overthinking. Vary sizes, shapes, and finishes. Allow for interesting negative space rather than filling every gap. Budget: $80–$250 depending on sourcing (thrift, new, mix of both). Time: 1.5–2 hours to arrange and rearrange until it feels right. This is one of those projects where you live with painter’s tape for a day or two before committing.
The collected look feels curated by an artist, not assembled by algorithm.
17. Install Round Mirrors with Overlapping Layers

Overlapping round mirrors creates dimensional depth and a more sophisticated arrangement than simply spacing them apart. The layering effect is sculptural and gallery-like.
Hang your largest round mirror first (28–32 inches). Position two or three slightly smaller rounds (16–20 inches) so they partially overlap the large one, creating visual layers. Use painter’s tape first to map placement, then install. Budget: $100–$200 for three quality round mirrors. Time: 1.5 hours with careful placement. This technique reads as more intentional than it actually is—simple but impactful.
The overlap creates dimensional interest and makes a three-piece arrangement look carefully composed.
18. Mix Mirrors with Floating Shelves and Planters
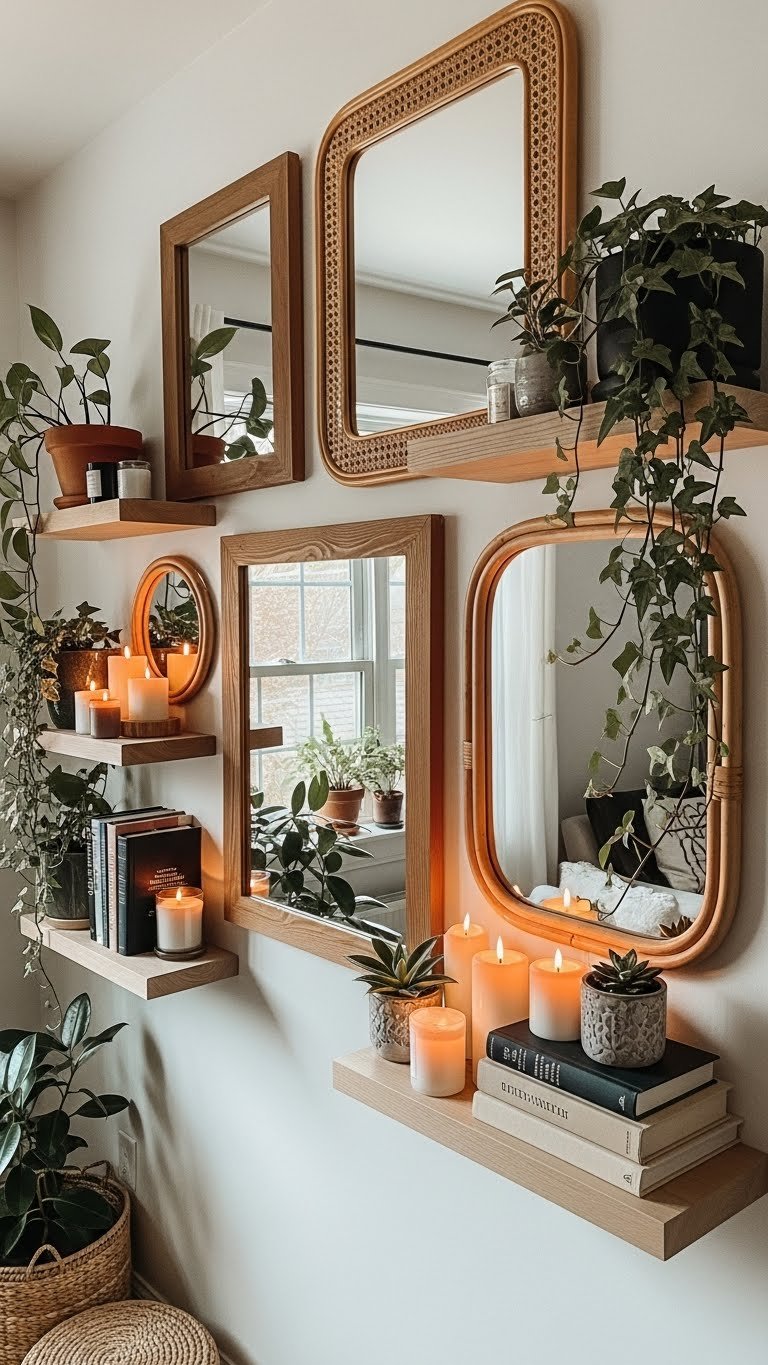
Mixing mirrors with functional floating shelves and plants creates a living wall that’s both beautiful and practical. This approach works well in living rooms and entryways.
Install 2–3 mirrors alongside 1–2 small floating shelves (12–18 inches). Style the shelves with small plants, books, candles, or meaningful objects. Vary heights and ensure good spacing. Budget: $100–$250 for mirrors, shelves, plants, and styling objects. Time: 2–3 hours including shelf installation and styling. This requires more planning but feels rewarding.
You create a curated wall that’s visually interesting and reflects your personality.
19. Hang Arched Mirrors in a Vertical Line
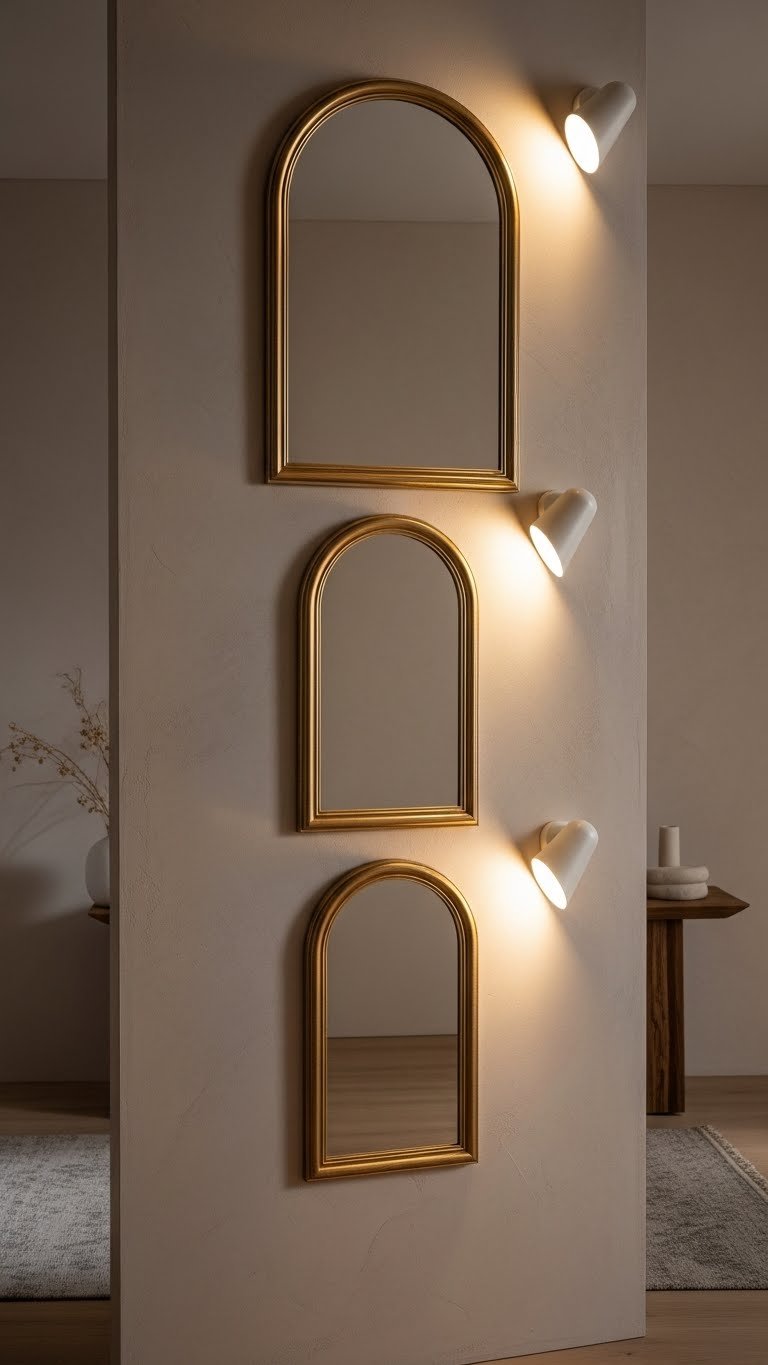
Stacking arched mirrors vertically emphasizes height and creates an elegant, almost ecclesiastical feel. The arch shape softens a vertical arrangement beautifully.
Select 3–4 arched mirrors (28, 22, 16 inches) in matching or similar frames. Stack vertically with 4–6 inches between each. The graduated sizes create visual interest without clutter. Budget: $120–$280 for three quality arched mirrors. Wayfair and West Elm have excellent arched options. Time: 1 hour for hanging. The arch detail alone makes this arrangement feel intentional.
Arched mirrors in a vertical stack read as both modern and timeless.
20. Create a Checker Pattern with Alternating Sizes
Alternating mirror sizes in a grid creates visual rhythm and keeps the arrangement from feeling too formal. This pattern works especially well with matching frame colors.
Arrange nine mirrors in a 3×3 grid, alternating sizes: large, small, large in row one; small, large, small in row two; and so on. Use the same frame color throughout for cohesion. Budget: $80–$160 for nine mirrors. IKEA and Target carry affordable mirror options. Time: 1.5 hours to map and hang precisely.
The checkerboard rhythm feels playful and modern without sacrificing sophistication.
21. Float Mirrors with Brass Frames and Patterned Wall

Layering brass-framed mirrors over a patterned wall creates richness and visual depth. The brass catches light and adds warmth to patterned backgrounds.
Choose mirrors with brushed brass or antique brass frames. Hang 3–5 mirrors on a subtly patterned wallpapered wall (geometric, damask, or subtle florals work best—avoid too-busy patterns). Let mirrors vary in size and spacing. Budget: $120–$280 for mirrors plus wallpaper if updating ($30–$80). Time: 2 hours if also installing wallpaper, or 1 hour if just hanging on existing wall.
The combination of pattern and brass feels collected and intentional—like a vintage collected wall.
22. Install a Full-Length Statement Mirror Surrounded by Smaller Pieces
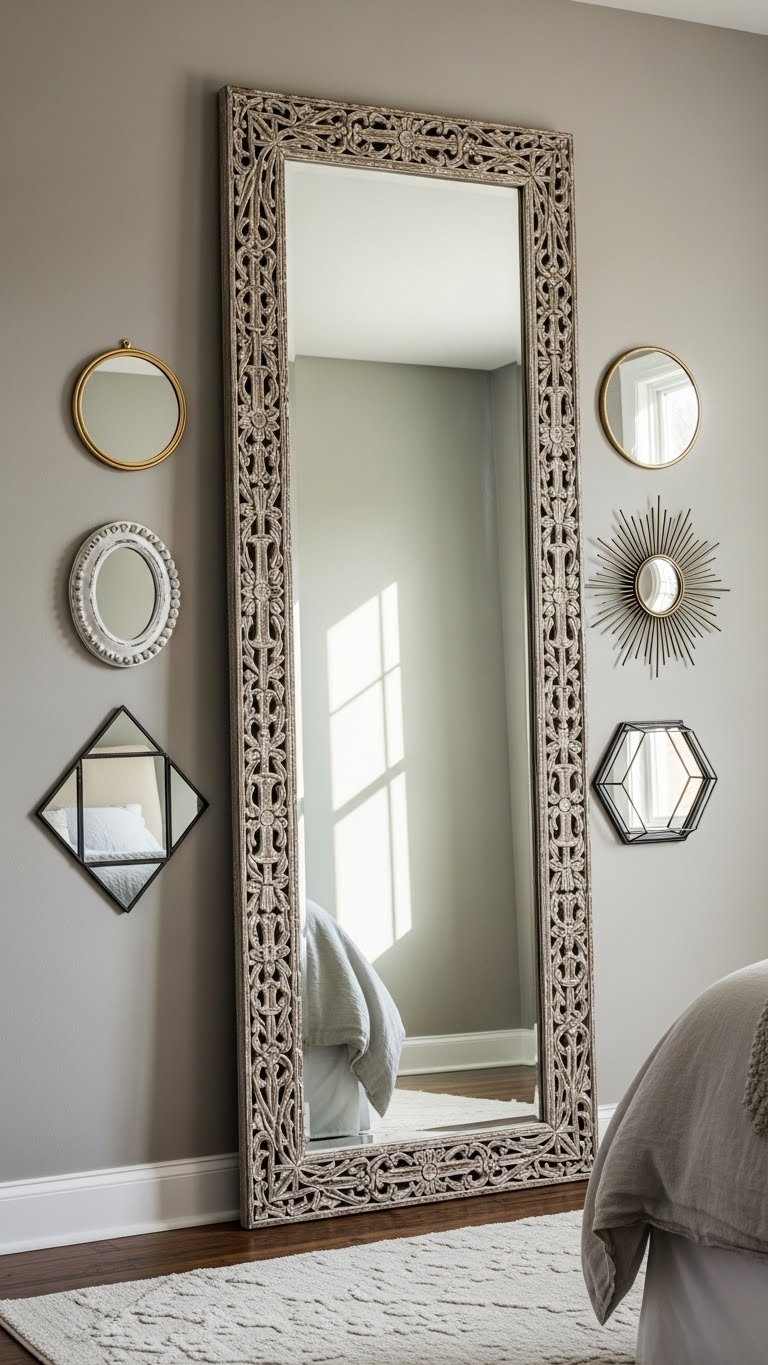
A full-length mirror as your anchor piece with smaller supporting mirrors creates a dramatic focal wall that’s both functional and artistic. This works beautifully in bedrooms, dressing rooms, or entryways.
Hang a full-length mirror (36–48 inches tall) in a bold frame (black, gold, or natural wood). Cluster 4–6 smaller decorative mirrors around it asymmetrically, varying sizes. The full-length piece commands attention while smaller mirrors add visual interest. Budget: $150–$350 for the full-length mirror plus several smaller pieces. Time: 2 hours for layout and installation. This arrangement works in rooms with decent wall space.
The combination of functional and decorative mirrors creates visual impact and serves a purpose.
23. Group Mirrors Above a Fireplace Mantel
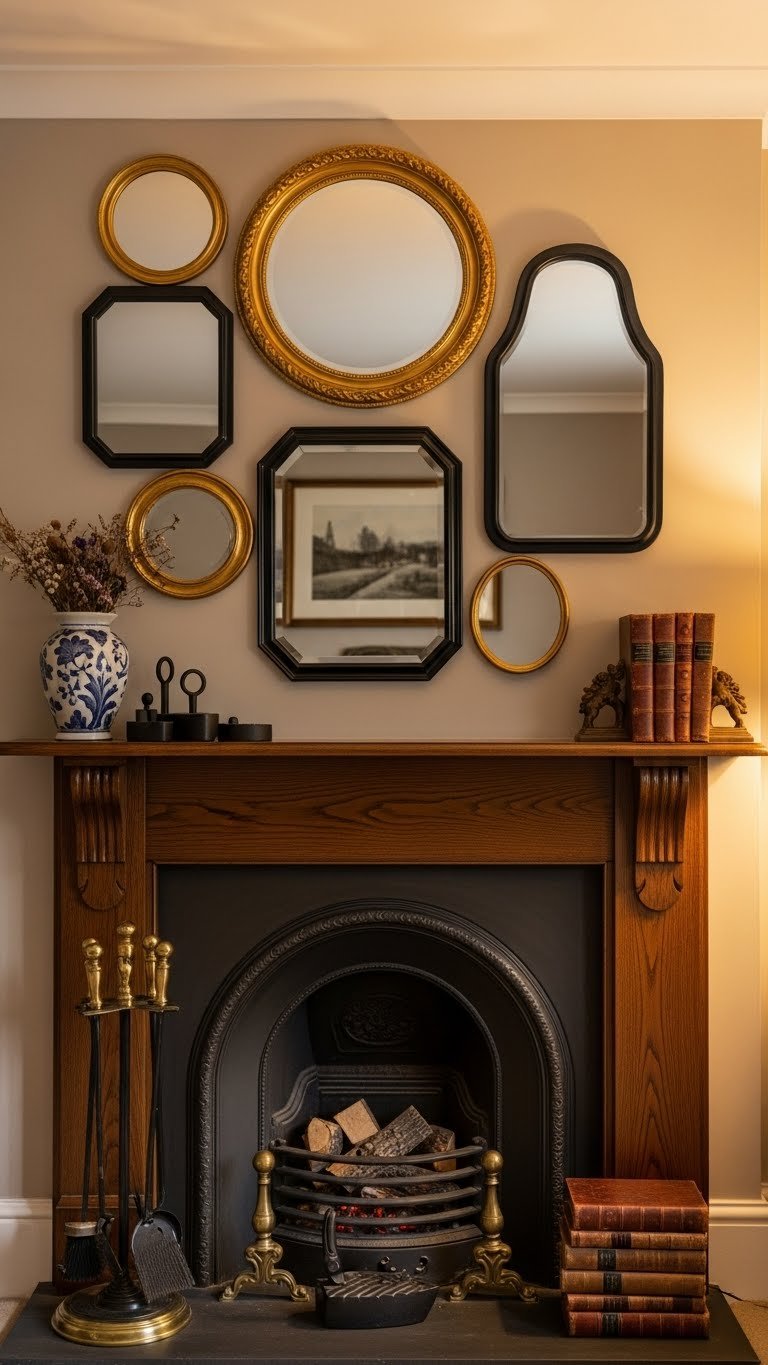
Mirrors above a fireplace amplify light and create a secondary focal point while making the room feel taller. Fireplaces pair beautifully with mirror clusters.
Hang mirrors 12–20 inches above your fireplace mantel, centering the arrangement. Mix frame styles and sizes, but aim for visual balance (heavier pieces on sides, lighter in center). Leave space for seasonal mantel décor below. Budget: $100–$250 depending on mirror sizes. Time: 1.5 hours to map, measure, and install. Consider hiring if your fireplace is high or your wall is tricky.
The arrangement draws attention upward and makes fireplaces feel more intentional and styled.
24. Mix Vintage Mirror Tiles for an Eclectic Wall
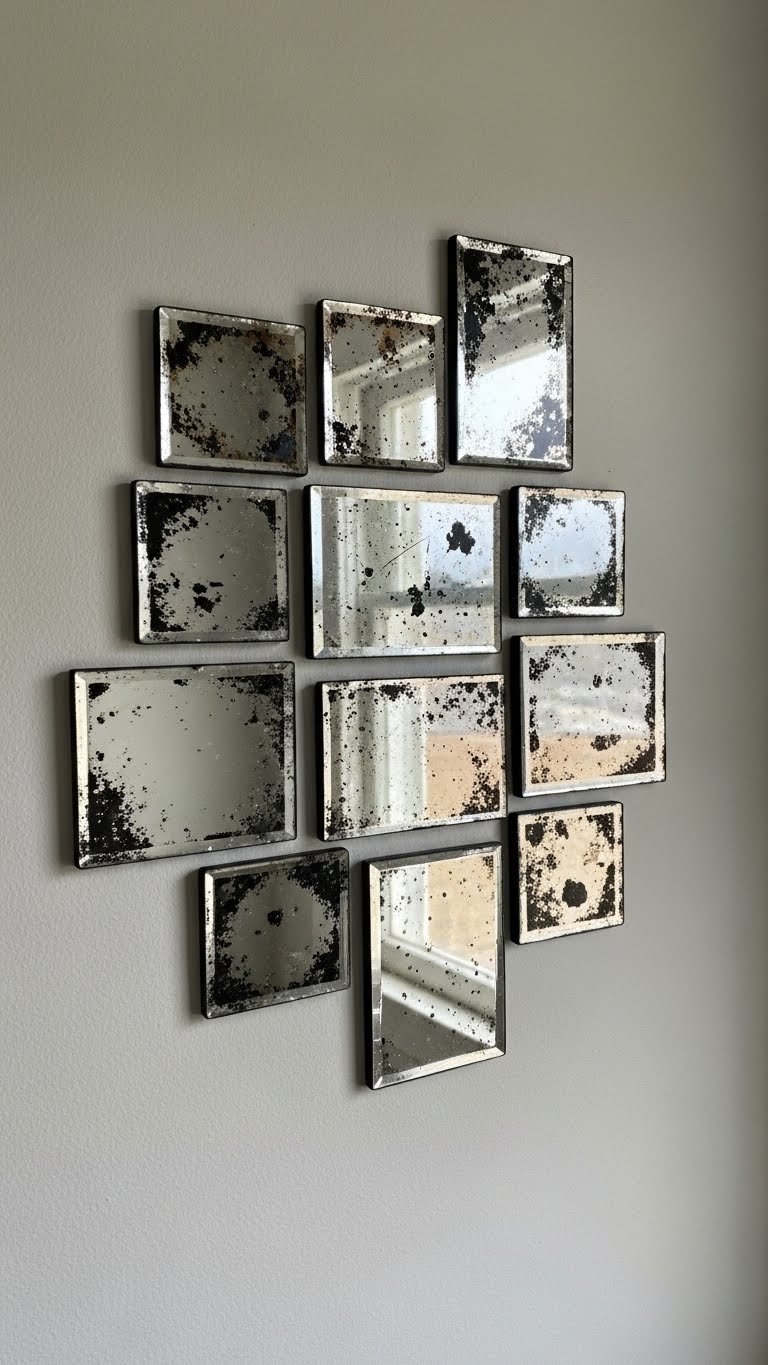
Vintage mirror tiles bring character and a collected, well-traveled feel. Their imperfections are part of the charm and cost less than frameless mirrors.
Source vintage or distressed mirror tiles from thrift stores, Etsy, or specialty shops ($5–$15 each). Arrange in a loose grid or organic cluster—imperfection is the point. Install with mirror adhesive or small nails. Budget: $40–$100 total if thrifting; $80–$150 if buying online. Time: 1.5 hours sourcing and hanging. This project has a treasure-hunt quality.
The eclectic vintage vibe creates conversation and reflects personality beautifully.
25. Create a Linear Hallway Mirror Installation
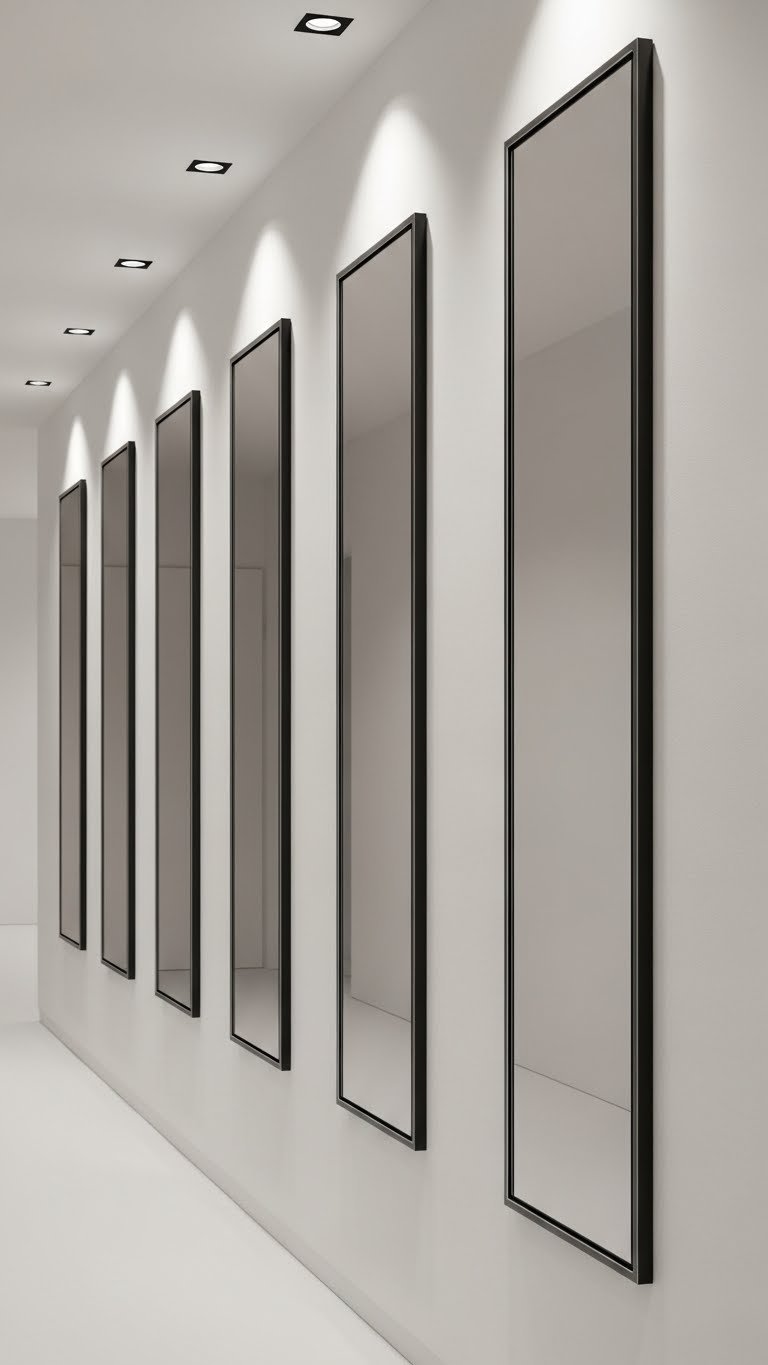
A linear installation of identical mirrors down a hallway creates rhythm and makes narrow spaces feel intentional and designed. The repetition is calming and sculptural.
Select 5–8 identical narrow rectangular mirrors (8×24 or 10×26 inches) in the same frame color. Install in a perfectly straight vertical line using a level—precision matters here. Spacing should be even (3–4 inches apart). Budget: $90–$180 for six mirrors. Time: 1.5 hours including careful measurement and installation. This works beautifully for renters using heavy-duty adhesive strips (rated for 16+ pounds per mirror).
The repetitive line creates visual flow and makes a hallway feel intentional rather than transitional.
Save this post and pick one arrangement style to start this weekend. Whether you go bold with sunbursts and gold or minimal with frameless pieces, your wall will thank you. Share this with anyone planning a refresh—they’ll be inspired.
Leave a Reply