
Introduction
Your home’s exterior transforms at sunset—but only if the lighting is right. After dark, your curb appeal doesn’t disappear; it either shines or fades completely. The good news? Strategic exterior lighting isn’t just about security or seeing your front door. It’s about creating ambiance, highlighting your home’s best architectural features, and making your outdoor space feel intentional and polished. Whether you’re working with a tight budget or ready to invest in a major upgrade, these 25 lighting ideas will help you illuminate your home like a pro. From cheap solar stakes to professional uplighting, you’ll find options that fit your style and wallet.
1. Install Solar Path Lights Along Walkways

Solar path lights are the easiest way to add welcoming illumination without rewiring anything. They charge during the day and glow automatically at night, making your walkway safe and visually interesting.
Stick solar lights into the ground on both sides of your path, spacing them 2–3 feet apart for consistent coverage. You’ll find quality options at Home Depot, Amazon, or Wayfair for $15–$40 for a set of 8–10. Installation takes about 30 minutes—just push them into soil or mulch. Look for models with warm white LED bulbs (not blue or green) for a natural, inviting glow. Renter tip: Use heavy-duty planters with solar lights inside instead of digging directly into the ground.
Your pathway becomes safer and more visually defined after dark, guiding guests and creating a layered nighttime aesthetic.
2. Add Matte Black Wall Sconces Flanking Your Front Door
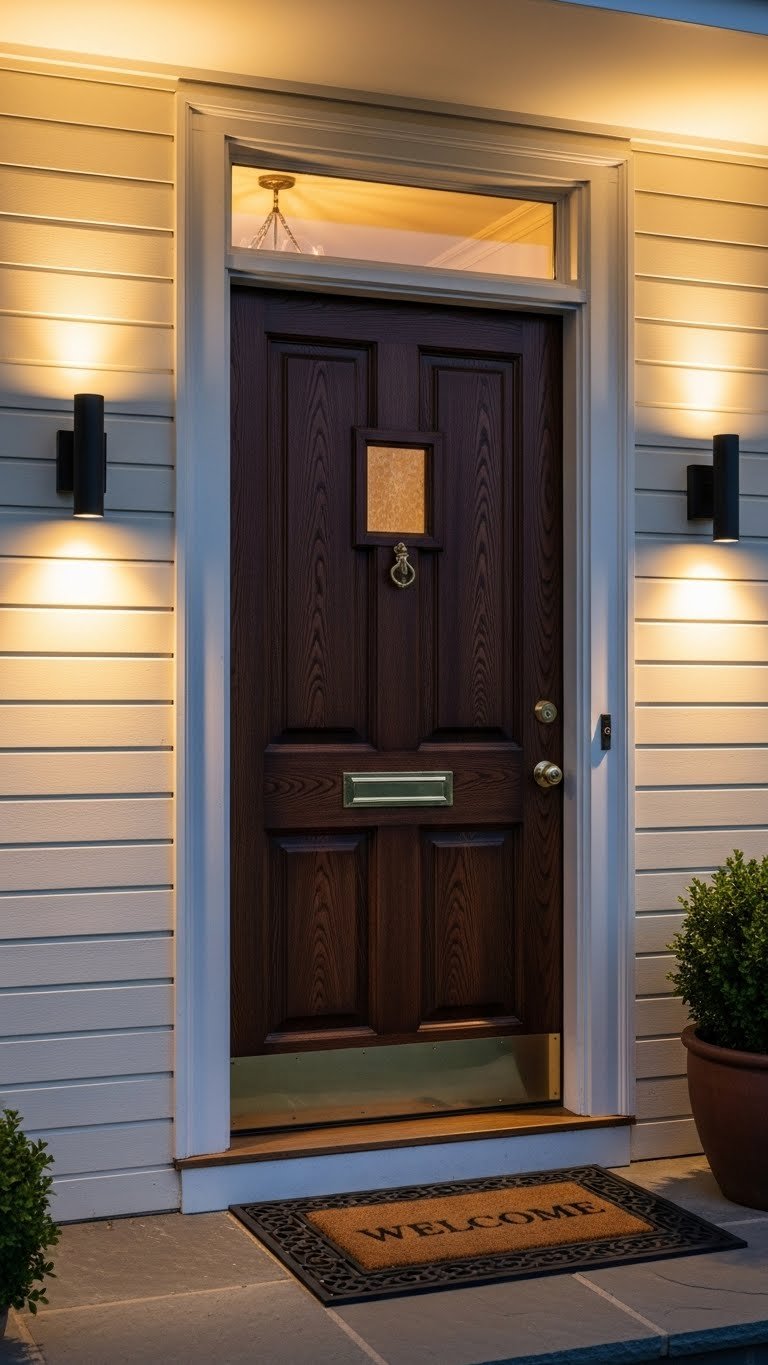
Paired wall sconces create symmetry and polish while flooding your entryway with functional light. This simple addition makes a huge difference in curb appeal and practicality.
Mount two matching sconces 12–18 inches above the door handle for proportion. You’ll need hardwired installation (or hire an electrician for $200–$400 total labor), but sconces themselves run $40–$150 each from IKEA, Wayfair, or Home Depot. Choose warm white or soft gold bulbs (2700K) for welcoming light, not harsh white. Set them on a dimmer so you can adjust brightness based on mood or security needs.
Your entryway looks intentional and finished, plus you’ll actually see your keys and guests clearly at night.
3. Use Uplighting to Highlight Architectural Features

Uplighting—shining light upward at a feature—makes ordinary walls look architectural and impressive. It’s a designer trick that feels fancy but is surprisingly simple to execute.
Place ground-level LED uplights (called “well lights”) 2–3 feet in front of your brick, stone, or siding. Angle them to graze the surface, which creates dramatic shadows and texture. Budget $80–$250 per light from Amazon or Home Depot; a typical front requires two to four fixtures. Wire them to a low-voltage transformer on a timer so they turn on at dusk automatically. Solar uplights exist but are weaker; hardwired versions deliver better results.
Your home’s most interesting details—texture, color, architectural elements—suddenly feel premium and intentional after dark.
4. Hang String Lights Over Patios or Entryways
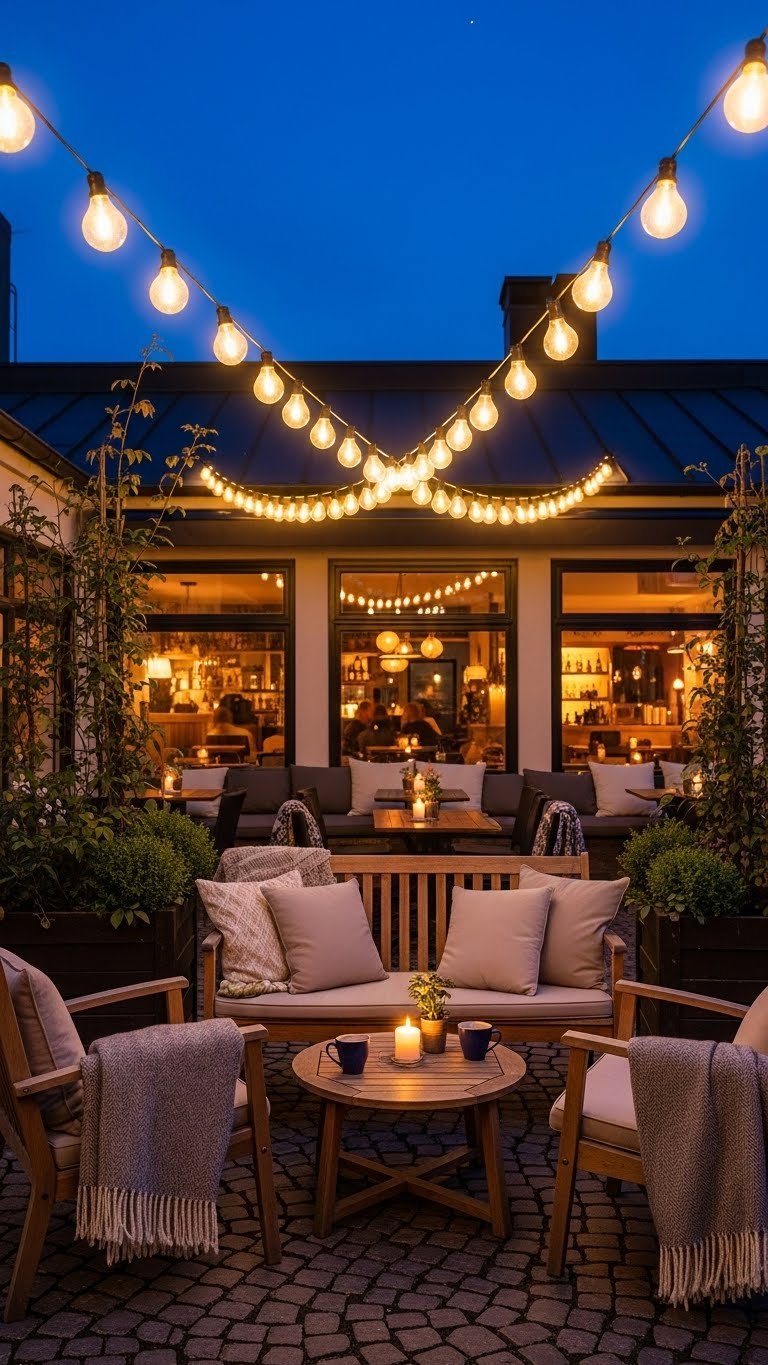
String lights bring warmth and celebration to outdoor spaces instantly. They’re affordable, flexible, and work for patios, deck railings, or along your front roofline.
Buy warm white Edison or cafe-style string lights (not cool white) for around $30–$80 for 20–30 feet at Target, Home Depot, or Wayfair. Drape them in gentle curves or geometric patterns between posts, walls, or trees. For renter-friendly setups, use adhesive hooks or zip ties; for permanence, screw in lag bolts and eye hooks. Plug into an outdoor-rated outlet with a timer ($15–$30) so lights activate automatically. Replace bulbs as needed—affordable and simple.
Your patio becomes an extension of your home’s entertaining space, with ambiance that photographs beautifully.
5. Install Recessed Step Lights for Deck or Porch Safety

Recessed step lights embed into your stair risers or deck fascia, creating safe, modern lighting that’s barely visible during the day. Perfect for preventing trips and falls.
Choose low-profile LED step lights with warm white output. Brands like Trex and Azek make them specifically for composite or wood decks ($8–$15 each, buy 6–12 depending on deck size). Installation takes one afternoon; drill or chisel a small pocket into each step, install the light, and wire to a transformer indoors. Alternatively, adhesive solar step lights exist ($30–$60 for a set) but deliver dimmer results. Hardwired options are brighter and more reliable.
Walking up your steps after dark feels safer and more sophisticated, with lighting that guides without glare.
6. Use Landscape Spotlights to Illuminate Trees or Shrubs
Spotlights highlight specimen trees, tall shrubs, or interesting plantings, making your landscaping work harder after dark. They’re the backbone of professional landscape lighting design.
Position adjustable LED spotlights 2–4 feet from the base of trees, angled upward to light the canopy without glare. Buy quality fixtures for $40–$100 each; you’ll likely need two to four for a typical front landscape. Wire to a low-voltage transformer (around $60–$150) on an outdoor timer. Install wiring in shallow trenches or along the ground (disguise with mulch). Solar spotlights are cheaper but noticeably dimmer in winter.
Your landscaping becomes a nighttime focal point, adding depth and dimension to your entire exterior.
7. Add a Programmable Smart Outdoor Timer
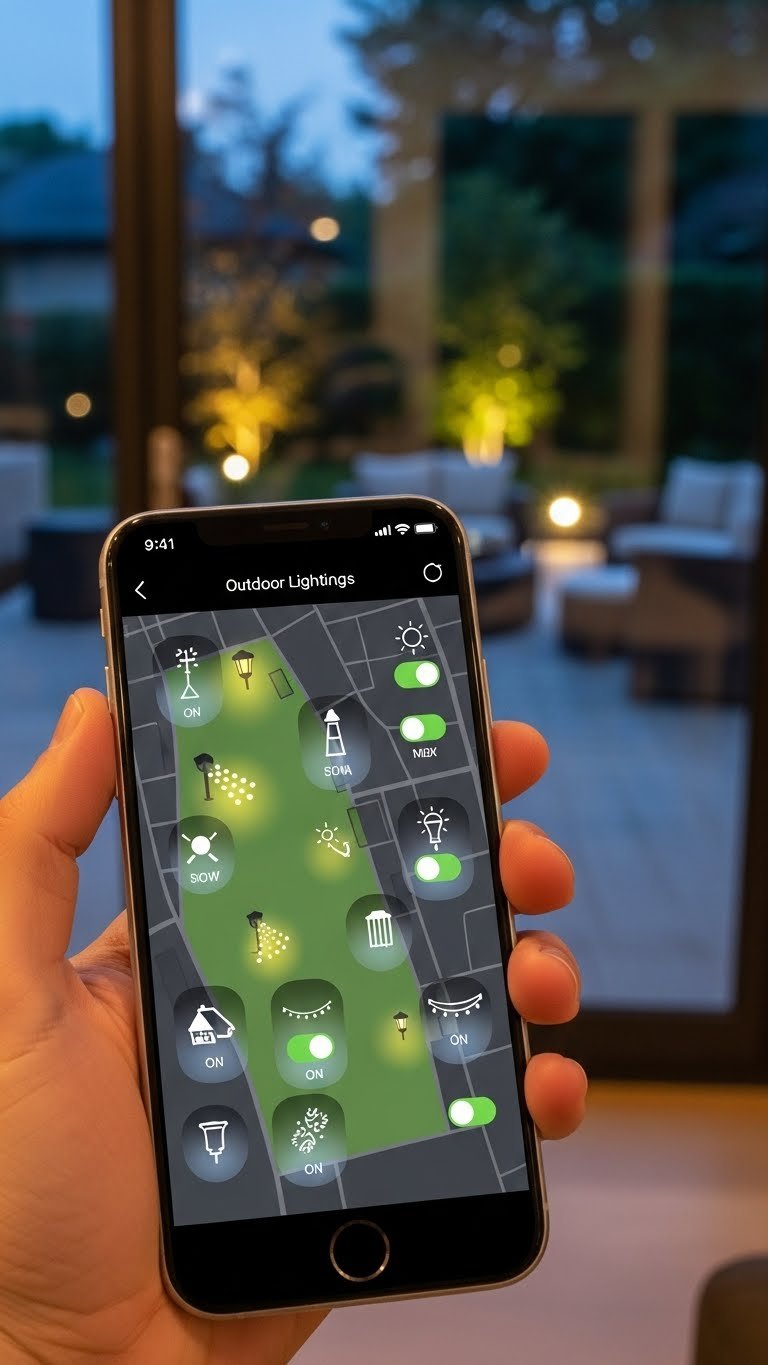
A smart timer or home automation system lets you control outdoor lights from your phone—turning them on before you arrive home, creating away-from-home appearance patterns, or adjusting brightness.
Install a WiFi-enabled outdoor timer ($25–$60) from Amazon, Home Depot, or Best Buy, or upgrade to a full smart system like Lutron or Philips Hue outdoor gear ($100–$300+). Most plug directly into existing outdoor outlets or wire into your exterior lighting circuit. Download the app, set schedules, and toggle lights remotely. Many systems integrate with Alexa or Google Home for voice control.
You’ll save energy, enhance security, and gain flexibility—dimming lights for ambiance or brightening them when you’re away.
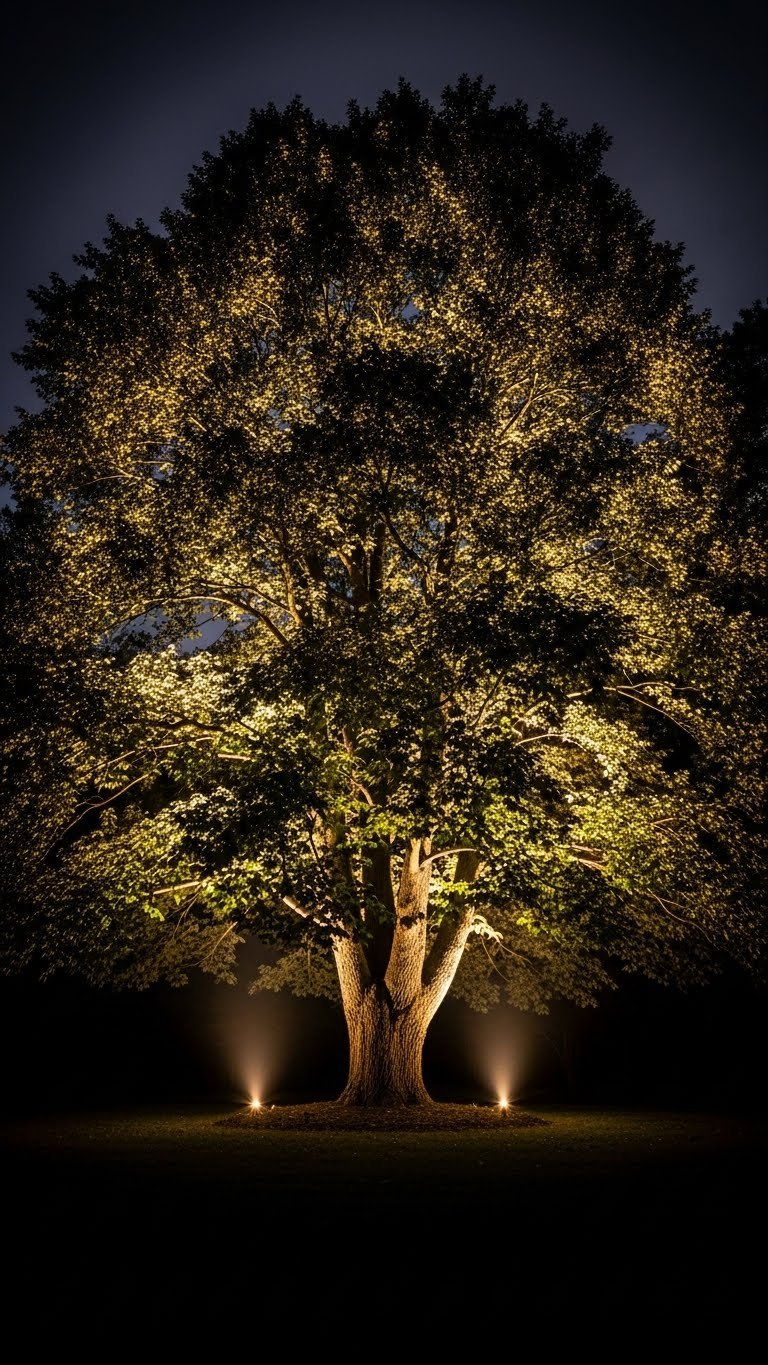
8. Create Moonlighting with High-Mounted Lights in Trees
Moonlighting mimics natural moonlight by placing lights high in trees, letting light filter through foliage and cast shadows below. It’s a subtle, elegant technique.
Mount small adjustable spotlights 8–12 feet high in sturdy tree branches, angled downward and slightly outward. Use LED fixtures rated for outdoor use ($30–$80 each). You’ll need two to four fixtures around your property for convincing moonlighting effect. Wire to a low-voltage system for safety and easy installation. A professional electrician can help; expect $300–$600 for full installation including transformer and timer.
Light filters naturally through leaves and branches, creating soft, romantic shadows that feel organic rather than installed.
9. Paint Your Exterior to Reflect Light Better

Lighter exterior paint colors—creams, pale grays, soft whites—naturally reflect ambient and artificial light, making your home appear brighter and more welcoming after dark.
Choose light, warm-toned paint in 55–60% LRV (light reflectance value) for maximum light bounce. Brands like Sherwin-Williams, Benjamin Moore, and Behr offer great options ($35–$65 per gallon). You’ll need two coats; plan $1,500–$3,000 for professional painting or DIY for half the cost over a long weekend. Matte finishes look better than glossy, which can appear washed out. Pair with warm-toned accent lighting to amplify the effect.
Your home appears naturally brighter and more inviting after dusk, with better light distribution across the facade.
10. Install Motion-Sensor Lights for Security
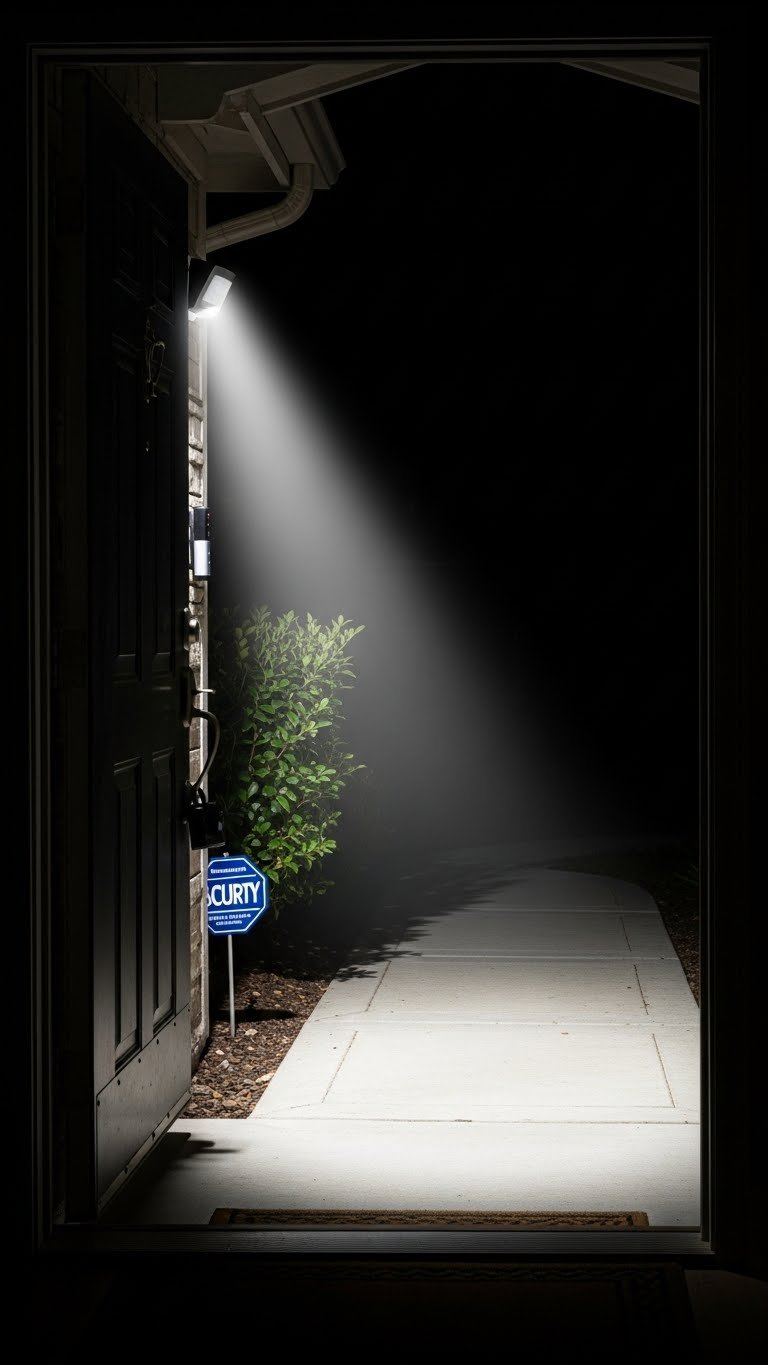
Motion-sensor lights turn on only when movement is detected, providing security without constant electricity use. Ideal for side yards, garages, or back entrances.
Buy LED motion-sensor fixtures ($25–$80) from Home Depot or Amazon. Hardwired versions are brighter ($50–$150 installed); plug-in or solar options are cheaper but less powerful. Adjust the sensor range (typically 20–30 feet) and duration (15–30 seconds) to match your needs. Position lights above doorways or along pathways where intruders might approach. Mount them 8–10 feet high for optimal coverage.
Intruders avoid well-lit entryways, and you won’t waste energy lighting empty spaces all night long.
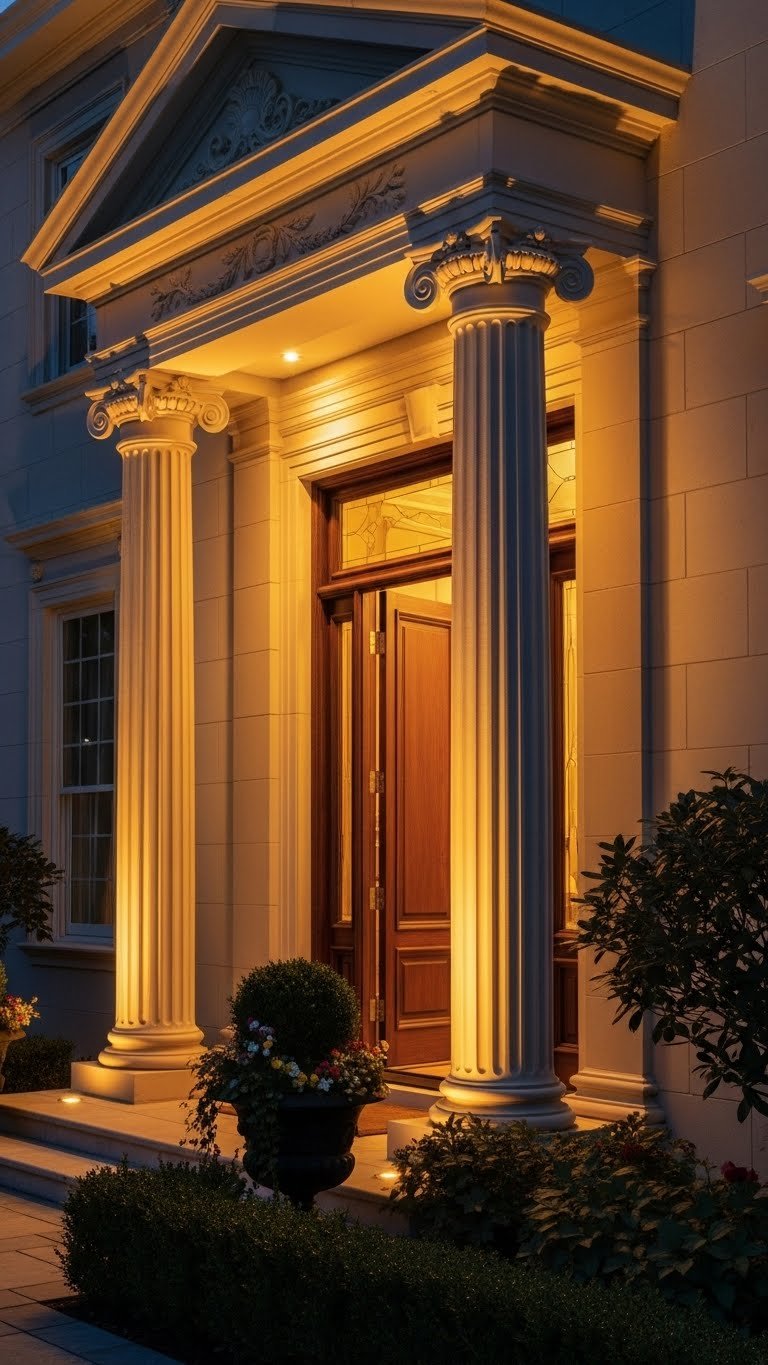
11. Use Accent Lighting on Your Front Door Color

If your front door is a bold color—deep green, burgundy, navy—accent lighting makes it a true focal point. This works especially well with modern or traditional-modern homes.
Mount two small uplights or picture lights directly above and below your door frame (or flanking it). Choose warm white LEDs ($30–$80 each) and position them to graze the door’s surface. Alternatively, install a single picture light ($40–$100) centered above the door. These need hardwiring or a plug-in option; professional install runs $150–$300. Adjust brightness with dimmers or timers to suit different occasions.
Your bold door color becomes a stunning nighttime feature, drawing the eye and signaling that your home is thoughtfully designed.
12. Line Your Driveway with Solar Lights

Driveway solar markers create a luxury hotel feel while improving safety and visibility. They’re solar-powered, so zero ongoing electricity cost.
Buy durable solar driveway lights ($1–$5 each; plan for 20–40 depending on length) from Amazon, Home Depot, or Target. Space them 4–6 feet apart along both edges of your driveway. Stick them into soil, gravel, or asphalt (some adhesive models for asphalt). Quality matters here; cheap lights dim quickly. Brands like Sunforce or Brightech offer reliable options ($40–$80 for a set of 12). Replace batteries annually for peak brightness.
Your driveway becomes defined and safe, while the lighting adds an unexpectedly upscale touch to your nighttime arrival experience.
13. Install Wall Washers to Highlight Siding or Stonework

Wall washers spread light evenly across a large wall surface, emphasizing texture and color without harsh shadows. They’re professional-grade but achievable for DIYers.
Mount adjustable LED wall washers 2–3 feet from the wall you want to illuminate, angled to graze the surface evenly. Choose fixtures rated for outdoor use ($60–$150 each); you’ll likely need two to four. Wire to a low-voltage transformer on a timer. Alternatively, solar wall washers exist ($40–$80 each) but are noticeably dimmer and less even. Hardwired versions deliver professional results and are worth the installation investment.
Your home’s texture—whether brick, stone, or shiplap—becomes a dramatic architectural feature after dark.
14. Use Colored Accent Lights Sparingly for Seasonal Drama

Colored lights (amber, soft blue, or green) can add drama and personality without looking garish—but use restraint. One strategic colored fixture is striking; too many overwhelm.
Buy one or two programmable color-change LED spotlights ($40–$100) from Philips Hue or similar brands. Position them to highlight a tree, architectural detail, or landscaping element. Use the app to change colors seasonally: warm amber for fall, soft blue for winter, green for spring. Stick with warm tones most of the year; save fun colors for holidays or parties.
Your exterior gains a playful, dynamic quality without ever looking overdone or tacky.
15. Mount Downlights in Your Soffit or Fascia

Soffit and fascia downlights shine downward along your home’s upper exterior, creating even illumination without visible fixtures. This is high-end exterior lighting done subtly.
Install recessed LED downlights in your soffit (the underside of roof overhang) or fascia board. Hire an electrician for this; expect $400–$800 total for materials and labor (typically four to six fixtures). This work requires roof access and wiring, so DIY is not recommended. Once installed, these lights create a polished, professional look that’s nearly invisible during the day.
Your home’s facade glows evenly and sophisticatedly at night, with lighting that feels integrated rather than added.
16. Add Pendant Lights Over an Outdoor Bar or Seating Area
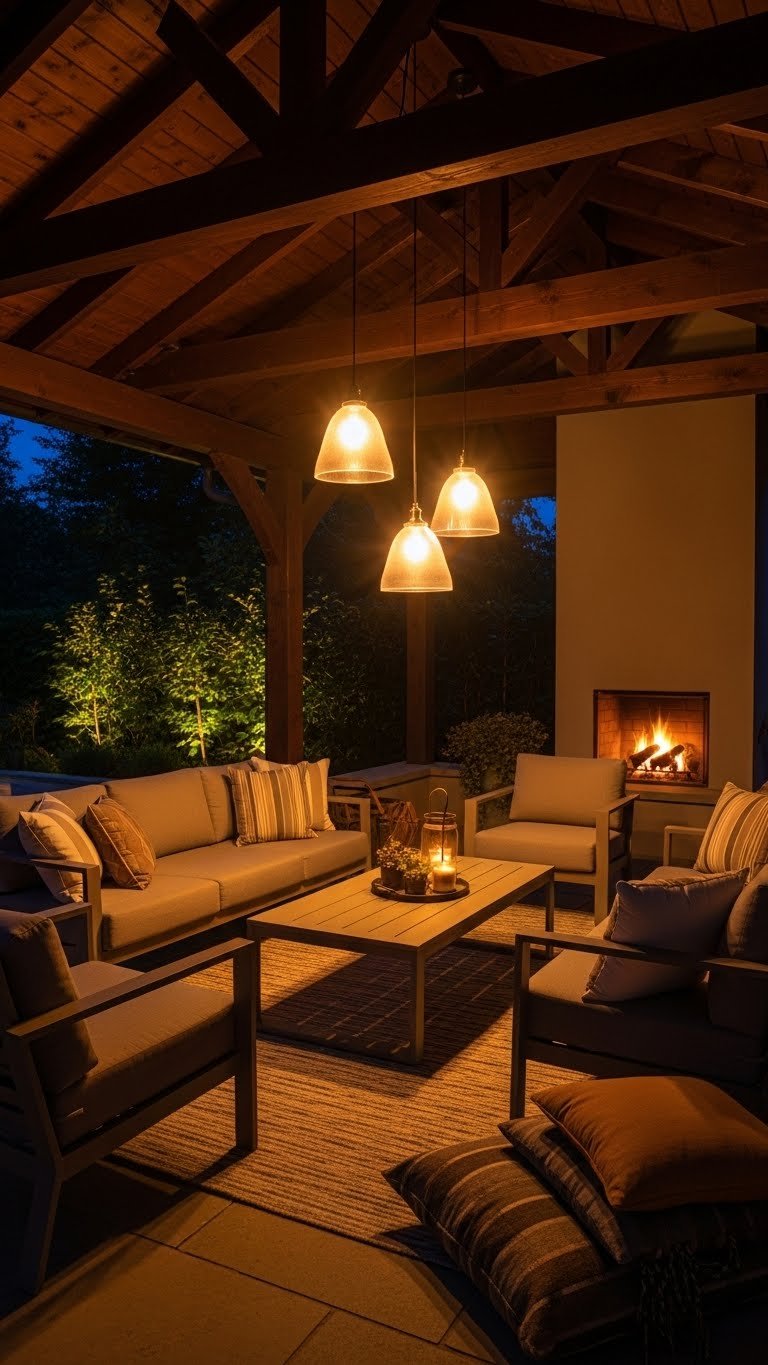
Hanging pendants bring restaurant-quality lighting to entertaining spaces. They’re especially effective over outdoor bars, dining tables, or seating areas.
Choose weather-rated pendant lights ($30–$100 each) from Wayfair, West Elm Outdoor, or Restoration Hardware. Hang them 24–36 inches above your bar or table surface using sturdy chains or rods. You’ll need hardwiring; hire an electrician for $250–$500. Use warm white bulbs (2700K) and consider installing a dimmer ($50–$100) so you can adjust ambiance during dinner or parties. Alternatively, plug-in pendant options exist for renters or temporary setups.
Your entertaining space becomes a destination after dark, with lighting that encourages lingering and gathering.
17. Install Bollard Lights Along Pathways or Garden Edges

Bollard lights are short, cylindrical fixtures that emit low-level light, perfect for defining pathways, garden edges, or separating entertaining zones without creating harsh overhead light.
Buy durable LED bollards ($20–$60 each) from Home Depot, Amazon, or landscape suppliers. Space them 3–4 feet apart along walkways or garden borders. Hardwired bollards are brighter and more reliable; solar versions are cheaper but dimmer. Installation depth is typically 12–18 inches; bury wiring in shallow trenches and disguise with mulch. A typical front pathway needs six to ten bollards.
Your landscape becomes clearly defined and safe to navigate at night, while the lighting enhances rather than dominates the space.
18. Create Silhouette Lighting by Backlighting Focal Points

Backlighting—shining light behind an object—creates dramatic silhouettes that draw the eye. Perfect for statement trees, sculptures, or architectural details.
Position a strong LED light (100+ watts equivalent) directly behind your focal point, shining toward the viewer. Use uplights or spotlights angled away from the home. Budget $80–$200 per fixture; you’ll typically need one to two. This is dramatic, so use restraint—one powerful backlighting effect is more impactful than multiple scattered lights. Pair with uplighting on other elements for balanced design.
Your most striking architectural or landscape feature becomes a nighttime focal point, creating depth and visual interest.
19. Use Warm-Toned Landscape Lighting Throughout
Consistency matters: if all your landscape lights are warm-toned (2700K or 3000K color temperature), your entire yard feels cohesive and intentional. Avoid mixing warm and cool tones.
Audit all your exterior lights and replace any cool-white (5000K+) bulbs with warm alternatives. Budget $2–$5 per bulb; a typical property needs eight to fifteen. When shopping for new fixtures, always specify warm white or soft gold. This single decision—warm color temperature—makes your nighttime exterior feel premium and curated rather than random.
Your entire landscape glows harmoniously after dark, with light that feels intentional rather than mismatched.
20. Install a Recessed Light Above Your Garage Door

Garage door lighting is often overlooked but impacts nighttime curb appeal and safety. A single recessed light above the door transforms this utility feature.
Install a recessed LED downlight in your soffit or fascia directly above the garage door. Choose warm white, dimmable options ($40–$80). Hire an electrician to hardwire it; expect $150–$300 total labor. This light should illuminate the door and driveway below without creating glare in your eyes. Consider a motion sensor add-on ($50–$100) so the light activates only when someone approaches.
Your garage door becomes visible and intentional at night, plus you can see safely when arriving or leaving.
21. Add Subtle Pathway Markers with Rope or Tube Lights
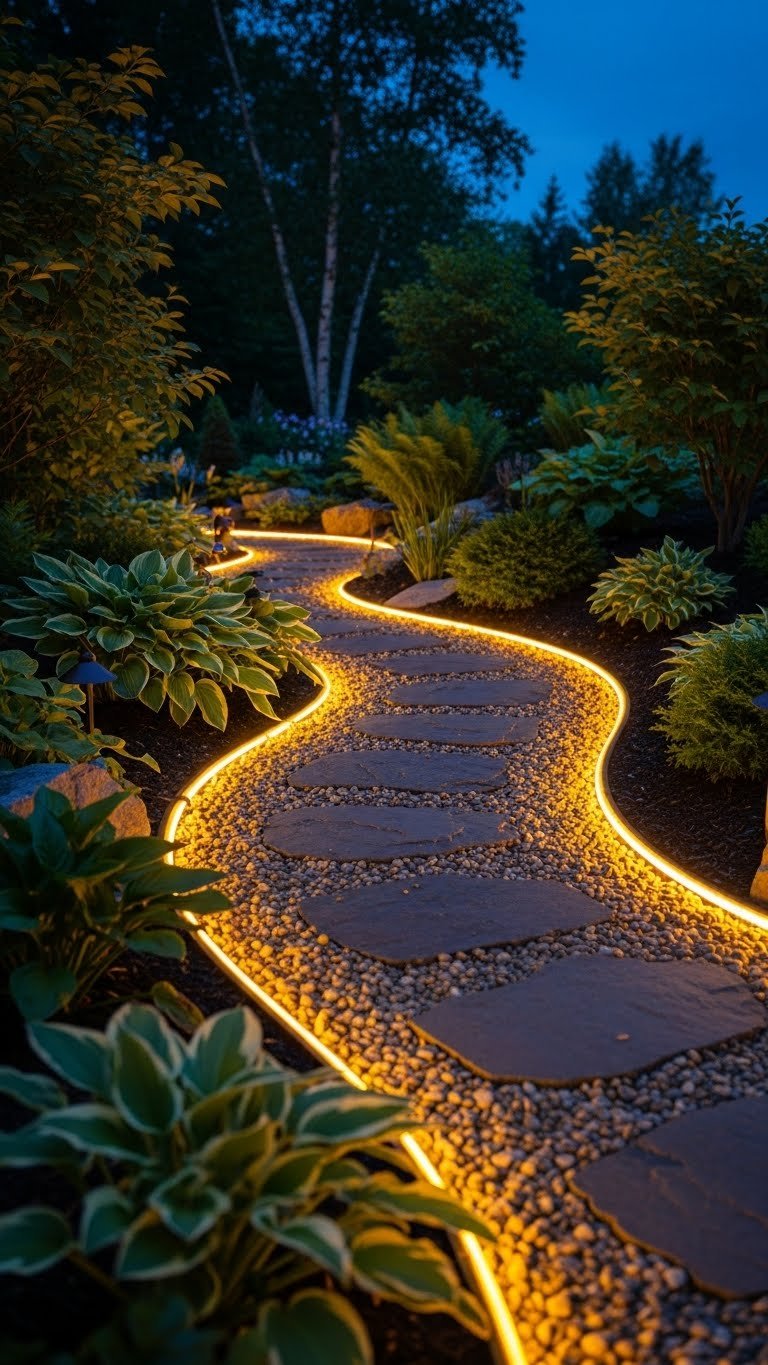
Rope lights or tube lights create a gentle, continuous glow along pathways or garden beds. They’re more modern and flowing than individual markers.
Buy outdoor-rated LED rope lights ($15–$40 for 16–33 feet) from Amazon or Home Depot. Mount them along pathway edges using clips or adhesive tracks. Plug into an outdoor outlet with a timer ($15–$30) or hardwire to a transformer for permanent installation. Warm white is essential; blue or multicolored options look cheesy. Rope lights work especially well in modern, minimalist landscapes where clean lines matter.
Your pathways glow continuously and invitingly, with lighting that feels architectural rather than cluttered.
22. Illuminate Architectural Details Like Columns or Corbels
Columns, corbels, and other architectural details deserve their own lighting. Highlighting these elements makes your home look custom-designed.
Position small adjustable spotlights or uplights directly below or beside your architectural details, angled to emphasize their three-dimensional form. Choose low-glare, warm-toned fixtures ($30–$80 each). You’ll likely need two to four depending on how many details you want to highlight. Wire them to a low-voltage system or install hardwired for permanent, reliable light. This detail work signals that your home is thoughtfully designed.
Your home’s craftsmanship and architectural character shine literally—elevated details become visually significant at night.
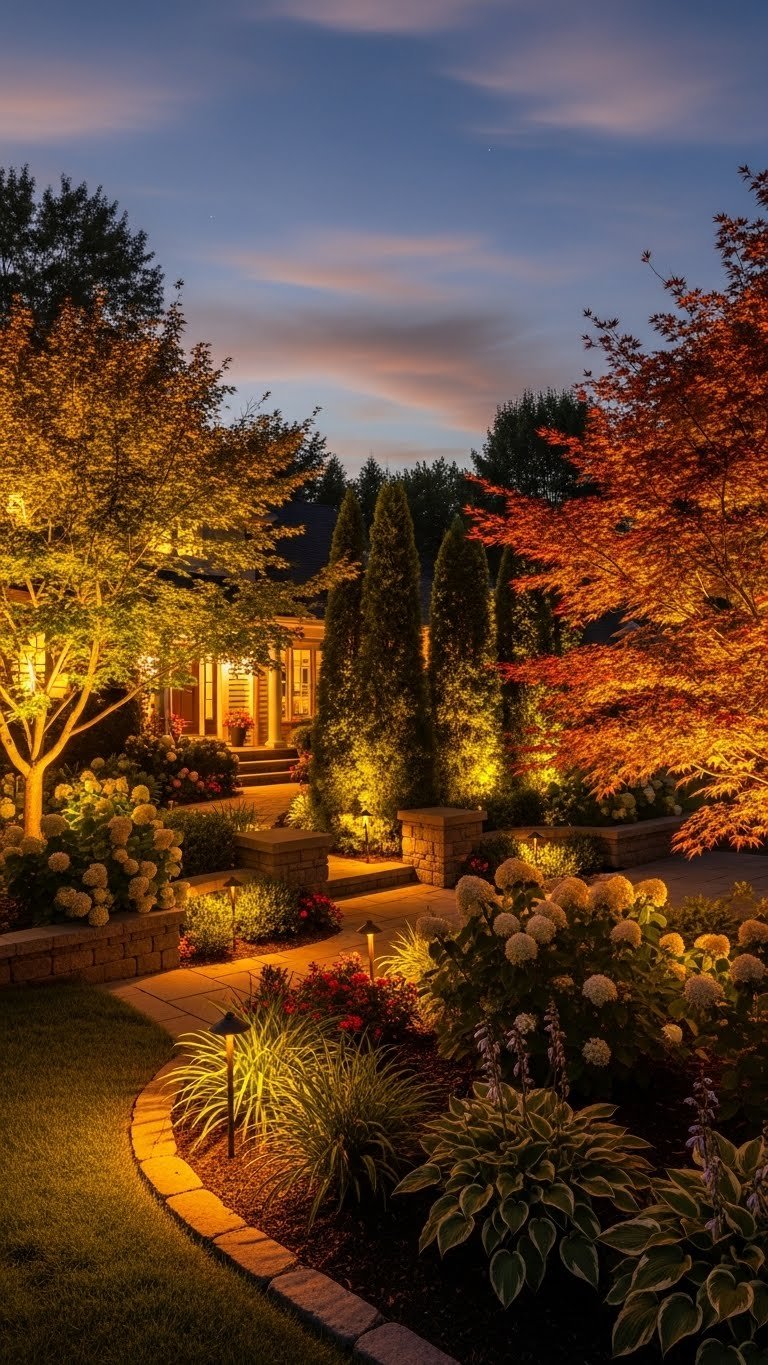
23. Use Uplighting on Landscaping for Depth and Dimension

Multiple uplights on different landscape layers—ground-level plantings, mid-height shrubs, tall trees—create depth that makes your yard feel larger and more interesting after dark.
Start with a foundation of ground-level uplights ($30–$60 each) on low shrubs closest to the home. Add mid-level uplights ($40–$100 each) on taller plantings. Top it with tree uplighting ($60–$150 each) on specimen trees or tall specimens. Space lights 2–4 feet apart and vary angles so light doesn’t feel uniform or artificial. Budget $500–$1,500 for a typical front with professional installation.
Your landscape transforms into a layered, dimensional composition, with depth that draws visitors in and signals you care about your outdoor space.
24. Install Recessed Tread Lights in Stone Steps or Walkways
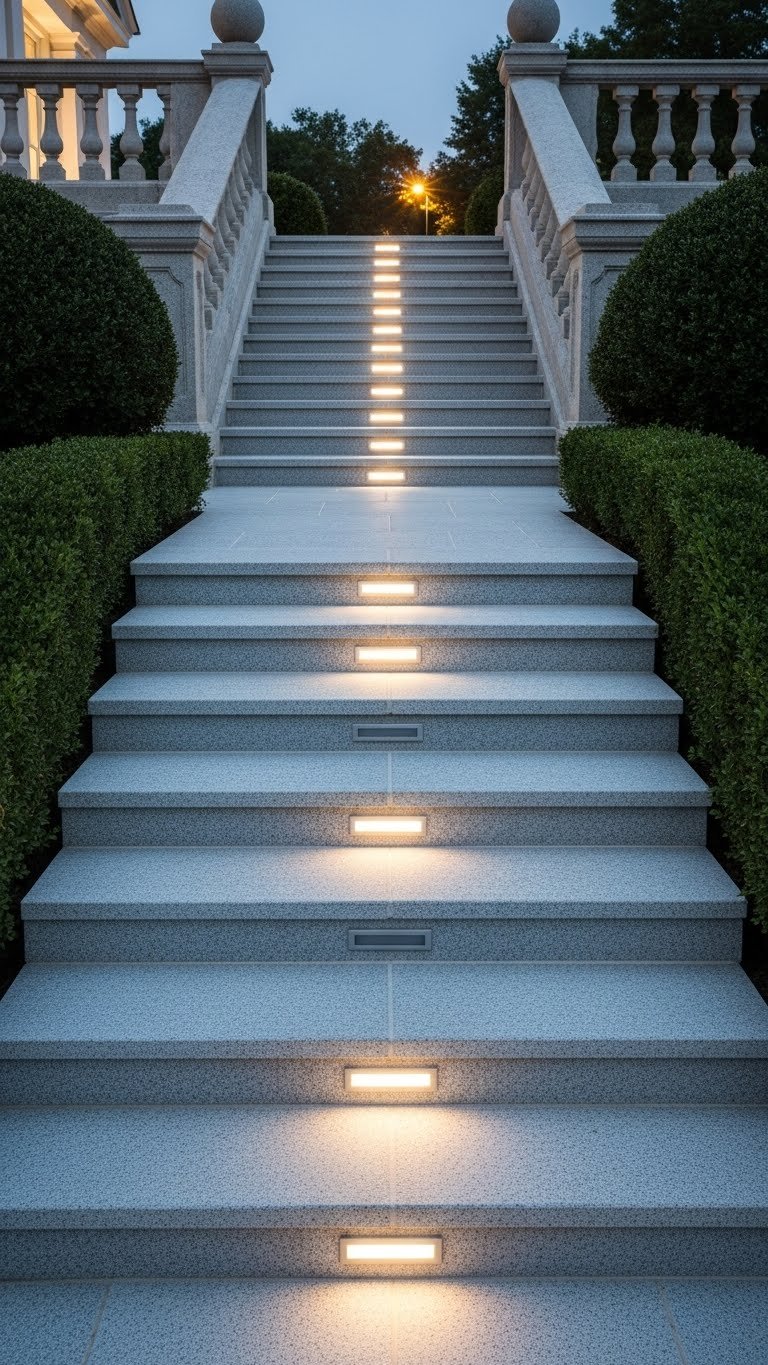
Recessed tread lights embed directly into hardscape, creating seamless, high-end lighting with zero tripping hazards. These are particularly stunning on stone or formal walkways.
Choose low-profile LED tread lights designed for hardscape installation ($10–$25 each). Install them by cutting shallow pockets into stone or concrete and setting lights flush with the surface. This is precision work; hire a hardscape contractor or skilled DIYer. Budget $400–$800 for a typical front walkway (materials plus installation). Alternatively, adhesive surface-mounted lights exist ($30–$60 each) but are less polished-looking.
Your walkway glows seamlessly, with lighting that’s nearly invisible until nightfall—ultimate sophistication.
25. Layer Lighting at Multiple Heights for Visual Interest
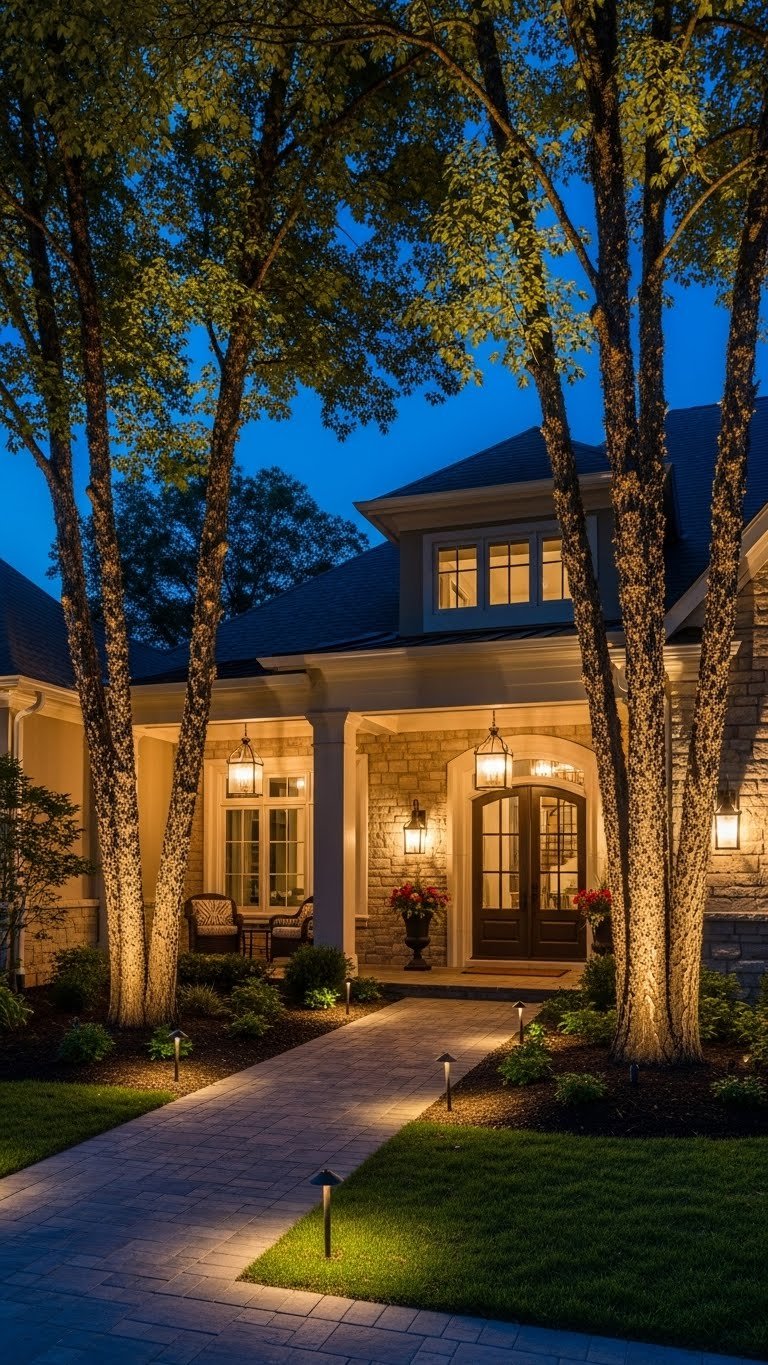
Professional outdoor lighting always uses multiple light sources at different heights and distances. This layering creates depth, interest, and a polished look that single-source lighting can’t achieve.
Plan your lighting in layers: ground level (path and landscape lights), mid-level (wall sconces, bollards), high level (tree uplighting, roof-mounted lights). Choose a consistent warm color temperature (2700K) across all fixtures. Install lights on separate switches or circuits so you can adjust ambiance—bright for entertaining, dimmed for evening relaxation. Start with budget items (solar path lights, string lights) and add investment pieces (hardwired uplighting, architectural lighting) over time.
Your home glows with intentional, sophisticated lighting that looks like it was designed by professionals—and feels welcoming every single night.
Save this post and start with one idea this weekend—path lights are the easiest entry point and deliver immediate impact. Which lighting style speaks to you?
Leave a Reply