Small bathrooms don’t need to feel cramped or cluttered. With the right layout tweaks, storage solutions, and design choices, you can create a space that feels bigger, flows better, and actually works for your daily routine. Whether you’re renting, renovating on a budget, or just tired of your current setup, these 23 ideas range from free styling fixes to smart upgrades that maximize every inch. You’ll discover how floating vanities, strategic lighting, and clever corner usage can completely shift how your bathroom functions—without needing to knock down walls. Let’s dig into solutions that make small spaces feel open, organized, and genuinely enjoyable to spend time in.
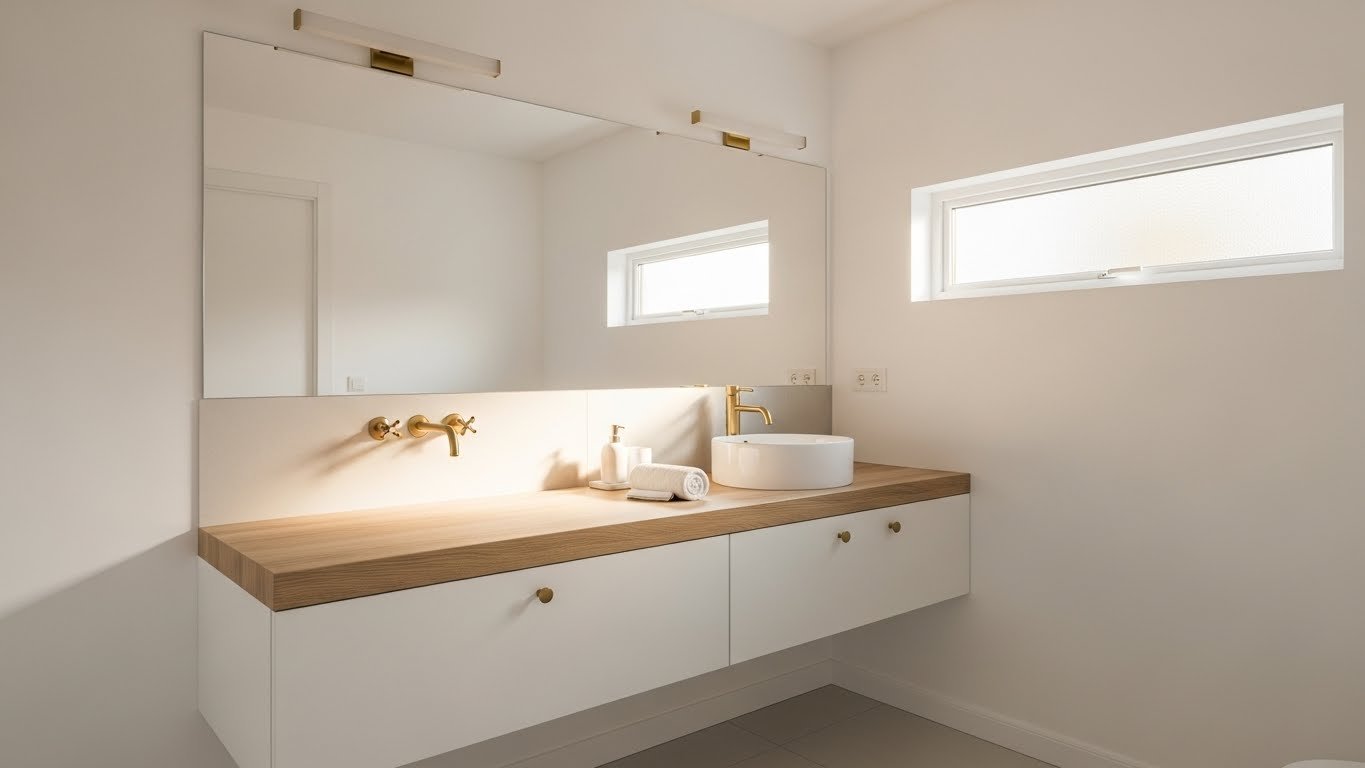
1. Install a Floating Vanity to Open Up Floor Space
Floating vanities instantly make bathrooms feel bigger because you can see the floor underneath, creating visual continuity and real walking room. This is one of the smartest layout tricks for small spaces—it removes that heavy, grounded feeling that traditional pedestals or cabinets create.
You can find pre-made floating vanity units at IKEA ($150–$400), Wayfair ($200–$600), or Home Depot ($300–$800). Installation takes a weekend with basic tools—you’ll need a stud finder, drill, and wall anchors. If you’re renting, ask your landlord about temporary options or mount-and-patch systems. For a budget hack, grab a reclaimed wood shelf ($40–$100) and pair it with wall-mounted faucet ($50–$150)—total under $200 if you DIY.
The result? Your bathroom looks and feels 20% larger, movement flows easier, and cleaning underneath becomes simpler. Plus, the open shelving below naturally draws the eye downward, making ceilings seem higher.
2. Upgrade to a Corner Shower to Reclaim Wall Space
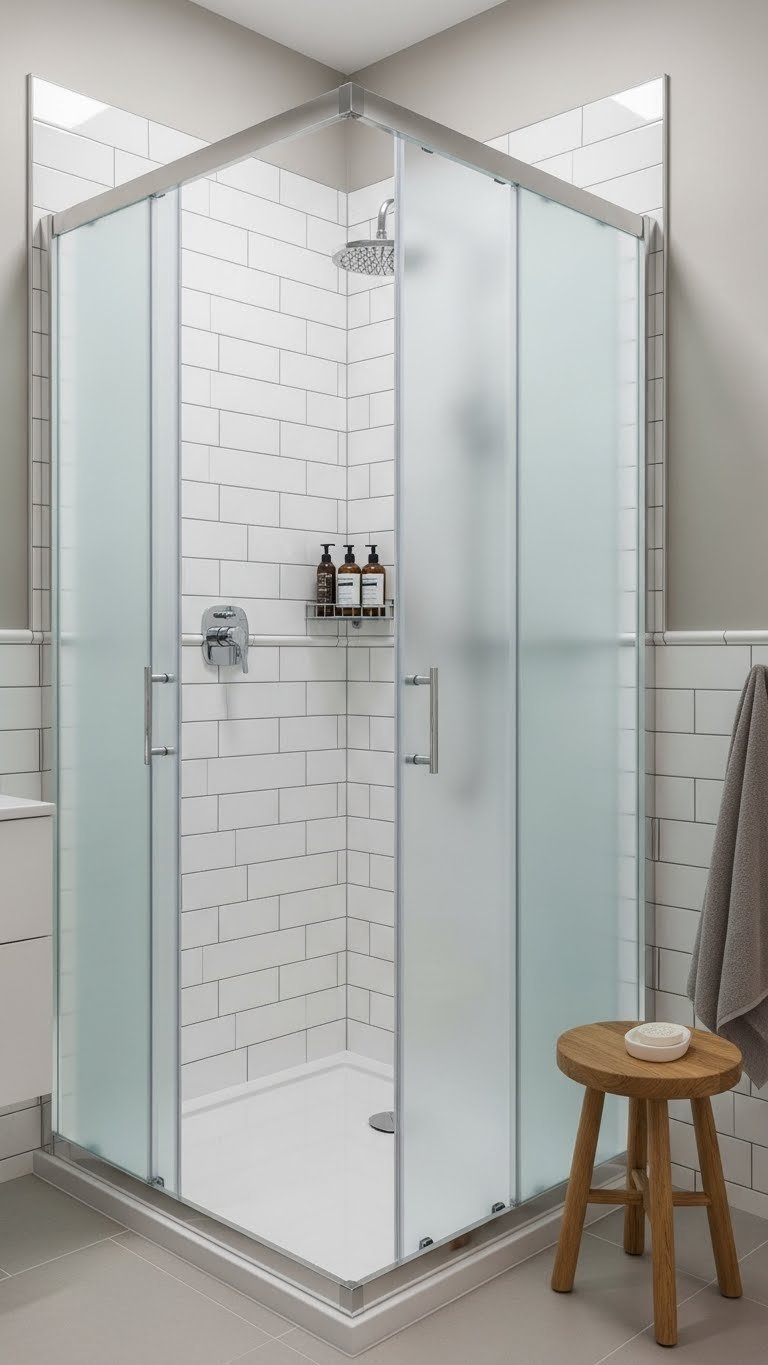
Corner showers eliminate the clunky bathtub-shower combo that dominates small bathrooms, freeing up an entire wall for storage or movement. By using corner real estate, you’re not sacrificing square footage—you’re redirecting it.
Compact corner shower kits run $400–$1,200 installed or $200–$600 DIY. Look for models with low or no thresholds (the latest trend) at Home Depot or Wayfair. A standard corner unit fits a 3×3 or 4×4 space. For renters, frameless corner shower doors ($150–$300) can replace existing enclosures without permanent changes. The installation is a weekend project if you’re comfortable with basic plumbing; otherwise, hire a pro ($300–$600 labor).
You’ll reclaim enough wall space for a medicine cabinet, shelving, or just open breathing room. The geometry of a corner shower also creates a natural visual anchor, making your bathroom layout feel intentional rather than improvised.
3. Add Open Shelving Above the Toilet

Toilets sit in the middle of wasted vertical real estate—the wall space above them is perfect for open shelving. This is free or nearly free storage that doesn’t eat floor space and actually looks intentional when styled well.
Floating shelves cost $20–$80 each at Target, IKEA, or Amazon. Install 2–3 shelves about 12 inches apart using basic wall anchors (takes 30 minutes). Renter-friendly mounting strips like Command ($15–$25) work if walls are smooth. Style with rolled towels, small plants, or storage baskets to keep clutter hidden. A single shelf holds 20–30 pounds safely.
Your bathroom gains valuable real estate for daily essentials without taking up an inch of floor or counter space. It’s especially smart in smaller bathrooms where wall storage is your only option beyond cabinets.
4. Use Vertical Mirrors to Bounce Light and Space
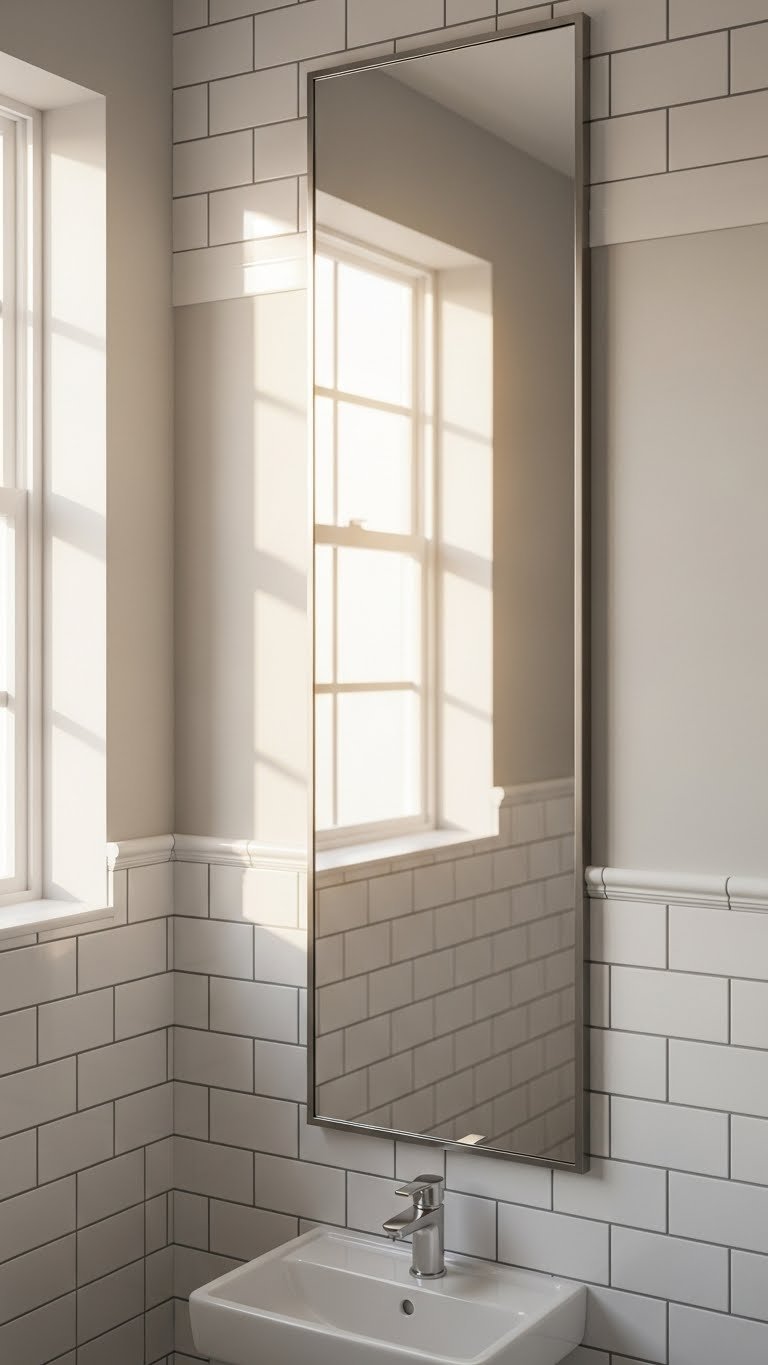
Mirrors are layout magic in small bathrooms—they bounce light around, making the space feel deeper and brighter than it actually is. A large vertical mirror can change how your entire bathroom functions, not just aesthetically.
Mount a full-height mirror (24″–36″ wide) directly on one wall for $40–$150 at Target, Home Depot, or IKEA. Use a level and wall anchors for renters. If you want to go big, a ceiling-to-counter mirror ($100–$300) creates a stunning illusion of height. Alternatively, lean a frameless mirror against the wall for a temporary, renter-approved option ($50–$150).
The result is brighter mornings, a visually spacious room, and honestly better selfies. Mirrors also reflect any plants or décor you add, multiplying their visual impact and making your bathroom feel less utilitarian.
5. Paint Walls in Soft, Light Colors to Expand Perception
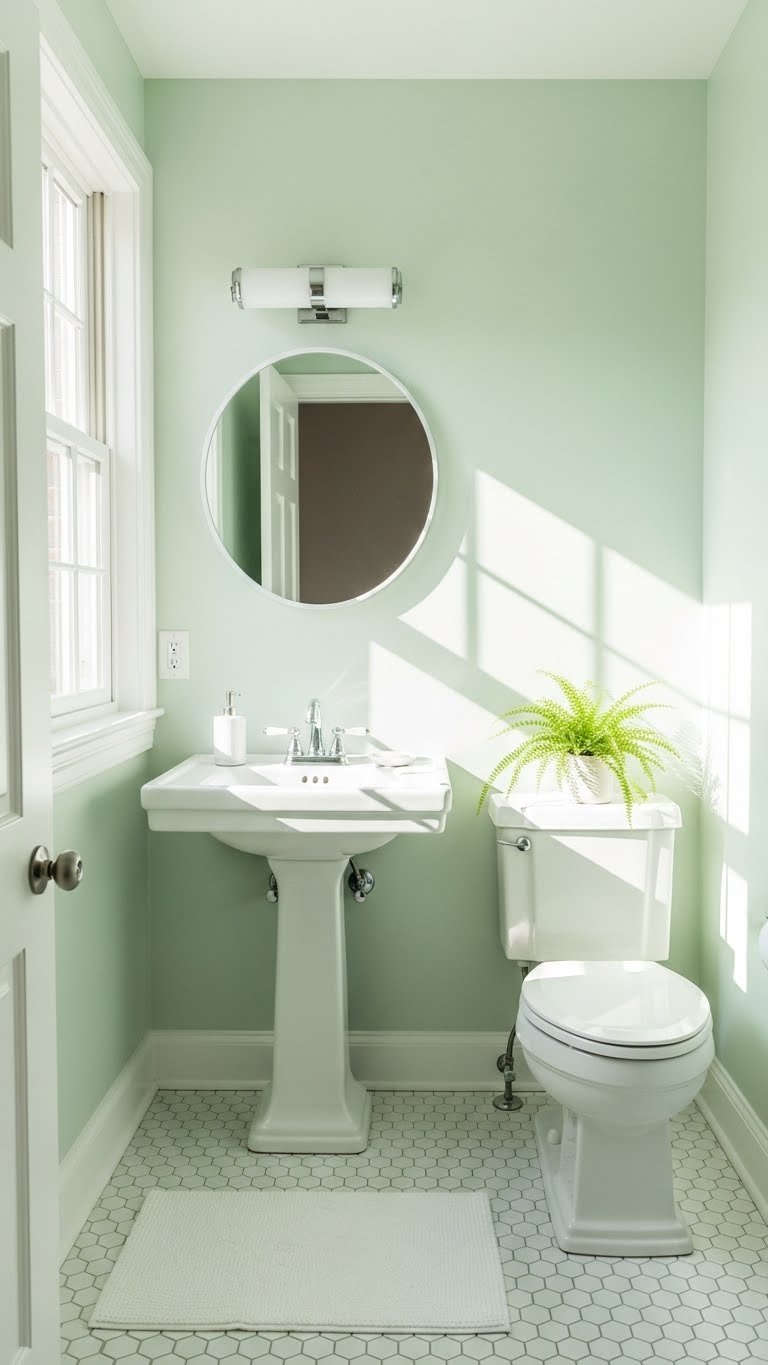
Color sets the tone for how spacious a room feels. Light, muted shades like pale sage, soft gray, warm white, or seafoam trick the eye into perceiving more square footage. Dark colors in small spaces feel suffocating.
Paint costs $30–$50 per gallon; one gallon covers a small bathroom. Choose eggshell or satin finish (more washable than flat). Brands like Benjamin Moore, Sherwin-Williams, or budget-friendly Behr (at Home Depot) offer hundreds of soft options. Paint it yourself in a Saturday afternoon or hire pros ($200–$400).
Your small bathroom suddenly feels airier, lighter, and more like a retreat than a closet. This single change often makes people feel like they have more space without moving a single fixture.
6. Install Recessed Lighting to Hide Fixtures
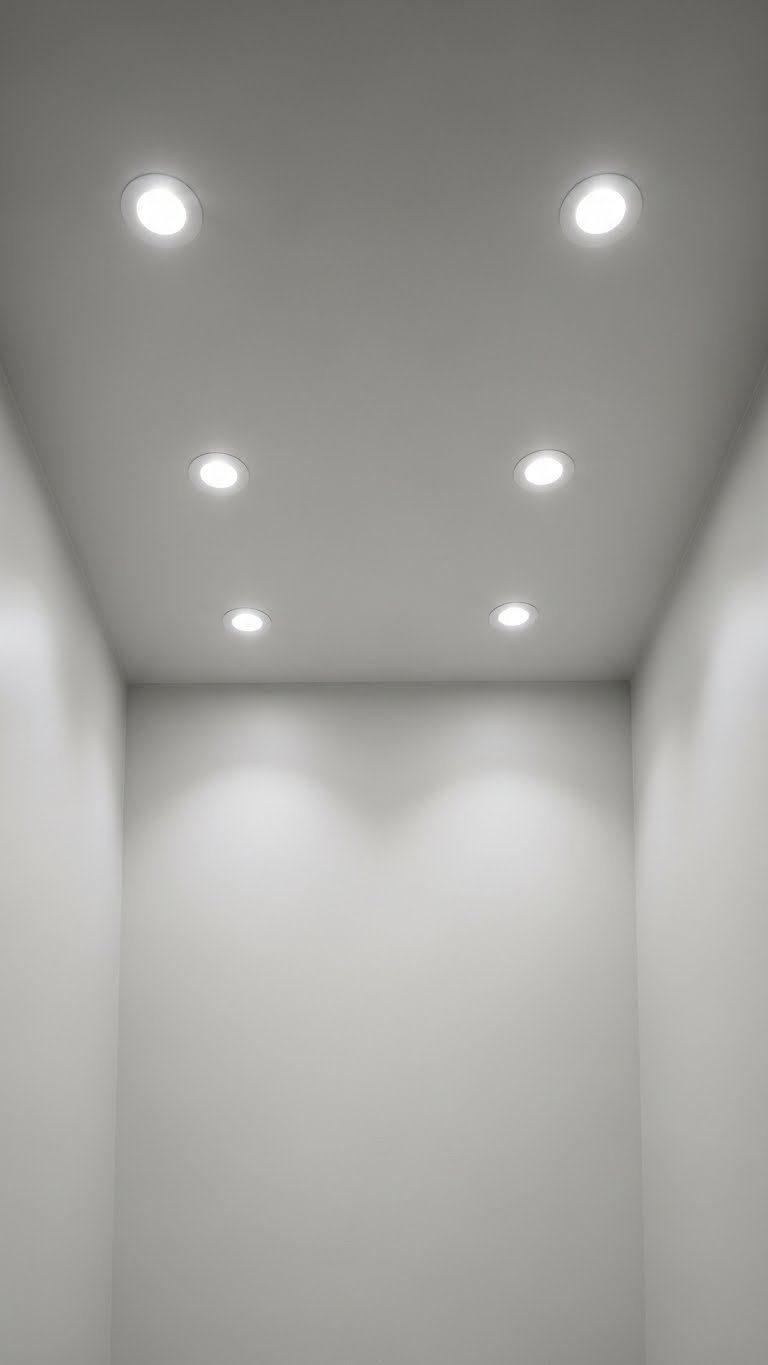
Surface-mounted light fixtures and exhaust fans eat visual real estate in small bathrooms. Recessed lighting (can lights) sits flush in the ceiling, opening up sightlines and making ceilings feel higher.
Recessed light kits cost $15–$40 per fixture; a small bathroom needs 3–4. Installation involves cutting holes in drywall and running wiring—this is a job for electricians ($300–$600 total) or confident DIYers. For renters or budget-conscious folks, stick-on LED ceiling spots ($20–$50) create a similar effect without wiring.
The transformation is instant: your ceiling feels cleaner, higher, and the room breathes more. Combined with light-colored walls, recessed lighting makes compact bathrooms feel genuinely spacious.
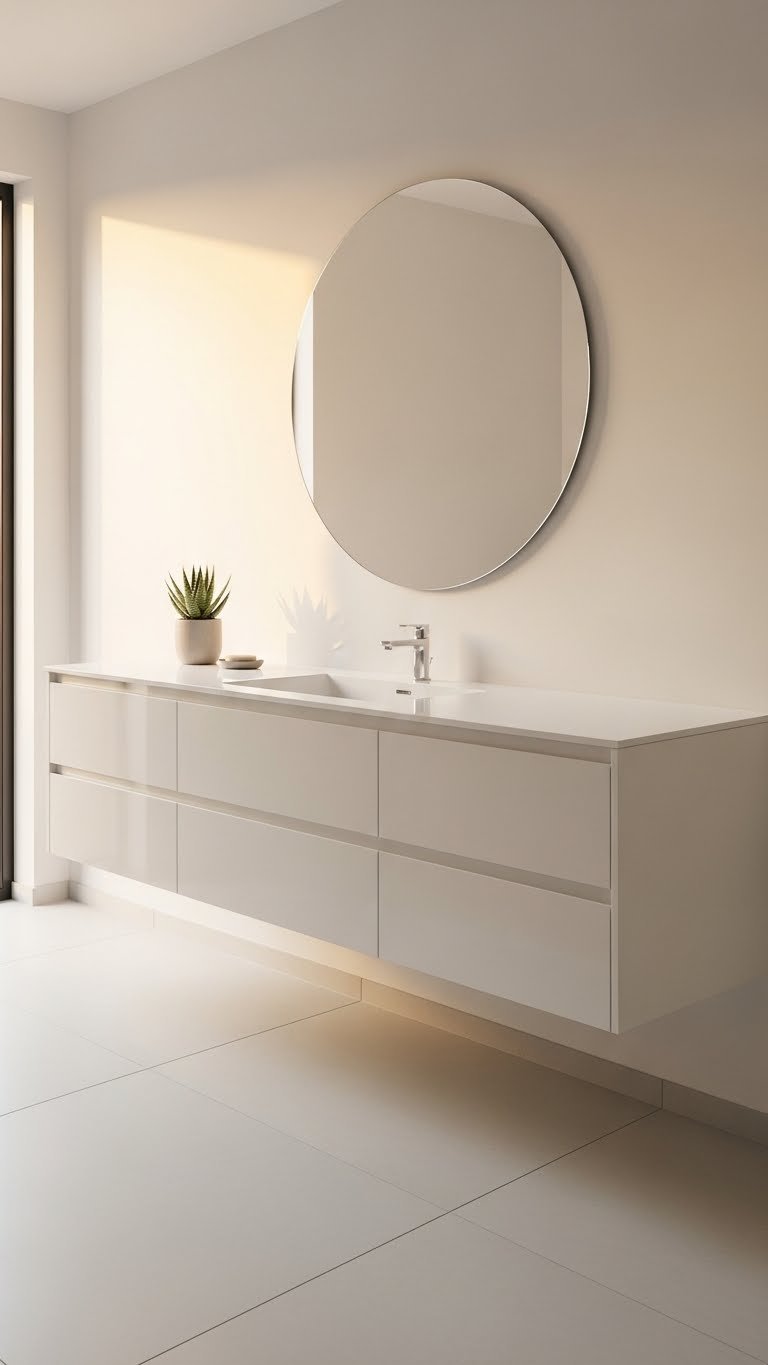
7. Replace a Bulky Vanity with a Pedestal Sink

If your current vanity is oversized or cabinet-heavy, a pedestal sink frees up massive visual and physical space. Pedestals work beautifully in small bathrooms where floor space matters more than storage.
Quality pedestal sinks run $150–$400; budget-friendly options exist at Home Depot or IKEA ($80–$250). Installation requires turning off water, removing the old vanity, and connecting new plumbing—a plumber charges $200–$400, or DIYers can handle it in 2–3 hours. You’ll lose under-sink storage, so pair this with wall cabinets or shelving elsewhere.
Your bathroom feels 30% more spacious because the entire floor is visible. Pedestal sinks also have a timeless quality that photographs well and works with nearly any style, from vintage to modern.
8. Add a Ladder Shelf for Stylish Vertical Storage

Ladder shelves are renter-friendly, affordable, and brilliant for small bathrooms. They provide multiple storage tiers without wall-mounting holes, and they lean rather than hang, making them portable and temporary-friendly.
Wooden ladder shelves cost $40–$120 at Target, IKEA, or Amazon. They take zero installation—just lean them against a wall or in a corner. Style each rung with rolled towels, small baskets, or plant pots. A standard ladder shelf holds 40–60 pounds across all rungs safely.
This simple addition creates a focal point, adds storage, and uses awkward corner or wall space that otherwise goes unused. It’s the perfect solution if you’re not ready to commit to permanent shelving.
9. Install a Wall-Mounted Faucet to Maximize Counter Space
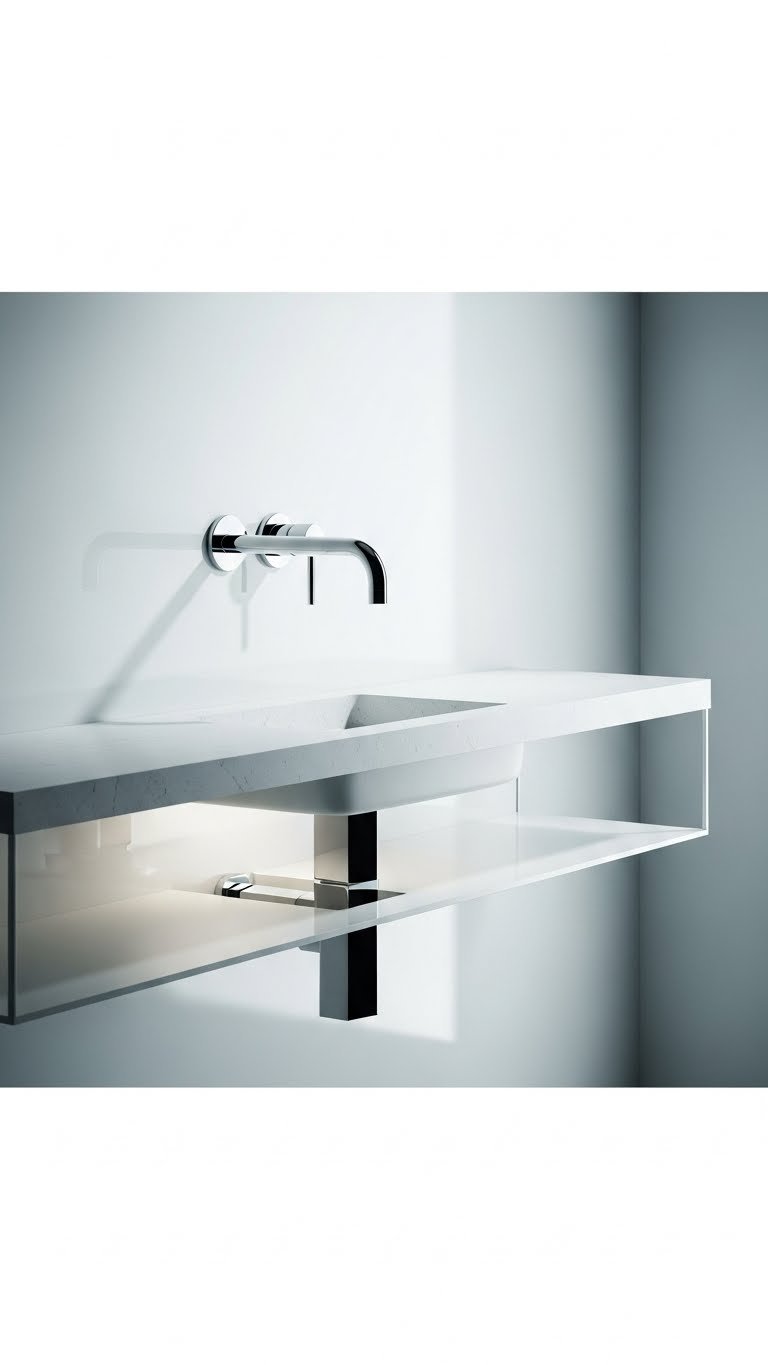
Countertop faucets eat into precious counter real estate. Wall-mounted faucets free up that space while creating a cleaner, more modern aesthetic. Plus, they’re easier to clean around.
Wall-mounted faucets run $60–$200 at Home Depot, Wayfair, or Lowe’s (budget to luxury options available). Installation requires turning off water and drilling into tile or drywall—a plumber handles it in 1–2 hours ($150–$300), or confident DIYers can do it themselves. Choose brushed nickel or chrome for timeless appeal.
You reclaim 6–12 inches of counter space and gain a designer touch that makes your bathroom feel intentional. The open counter feels luxurious and functional, even in the tiniest bathrooms.
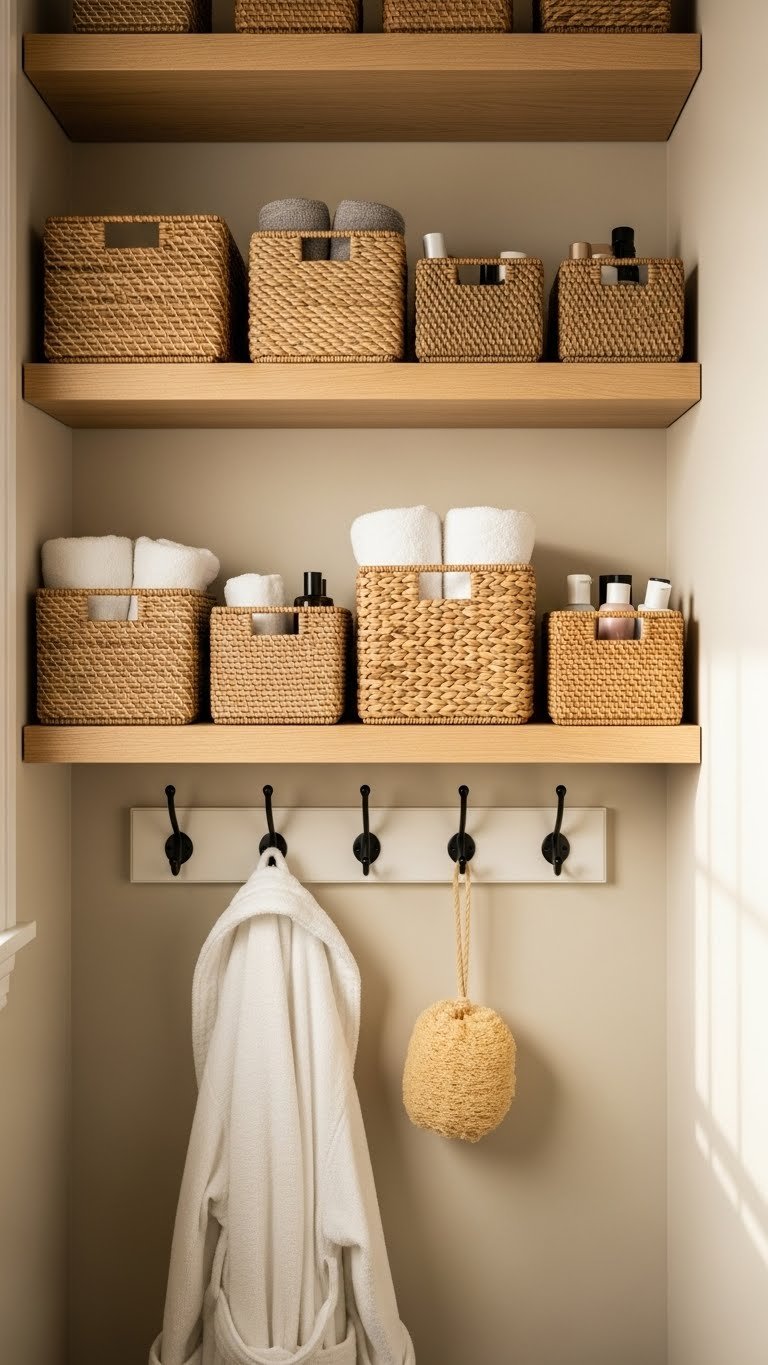
10. Use Drawer Dividers and Baskets for Hidden Organization
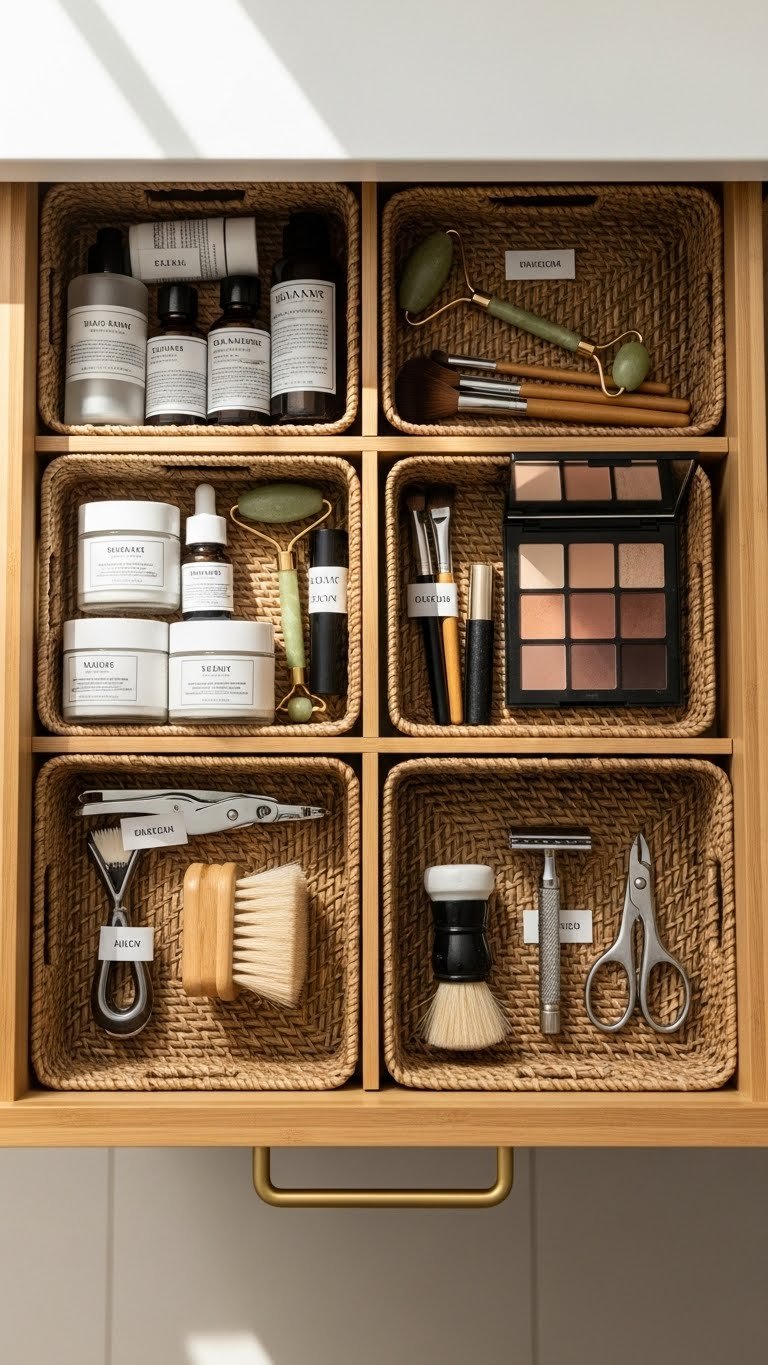
Small bathrooms fill up fast. Drawer dividers and fabric baskets keep clutter contained so your space looks calm and organized. Hidden storage is key when every inch counts.
Bamboo drawer dividers cost $10–$25; fabric storage baskets run $5–$20 each at Target, IKEA, or Amazon. Spend an hour organizing your existing drawers and cabinets with these tools. No installation needed—just place them in existing storage.
Your bathroom instantly looks tidier, which makes it feel bigger. When visitors can see open counters and organized spaces, small bathrooms read as intentional and calm rather than cramped.
11. Mount a Corner Medicine Cabinet for Double Duty Storage

Corner medicine cabinets maximize space that normally goes unused. They provide storage and a mirror in one compact footprint, perfect for small bathrooms where square footage is precious.
Recessed corner medicine cabinets cost $80–$250 at Home Depot or Amazon. Installation involves cutting into the wall (between studs in a corner) and securing the cabinet—a weekend project for handy DIYers or a job for a handyperson ($100–$200). The mirror doubles your reflection functionality while keeping essentials organized inside.
You gain valuable storage without stealing counter or wall space. A single corner cabinet holds medications, skincare, grooming supplies, and first aid—everything out of sight but within arm’s reach.
12. Add a Tension Rod Under the Sink for Hanging Storage
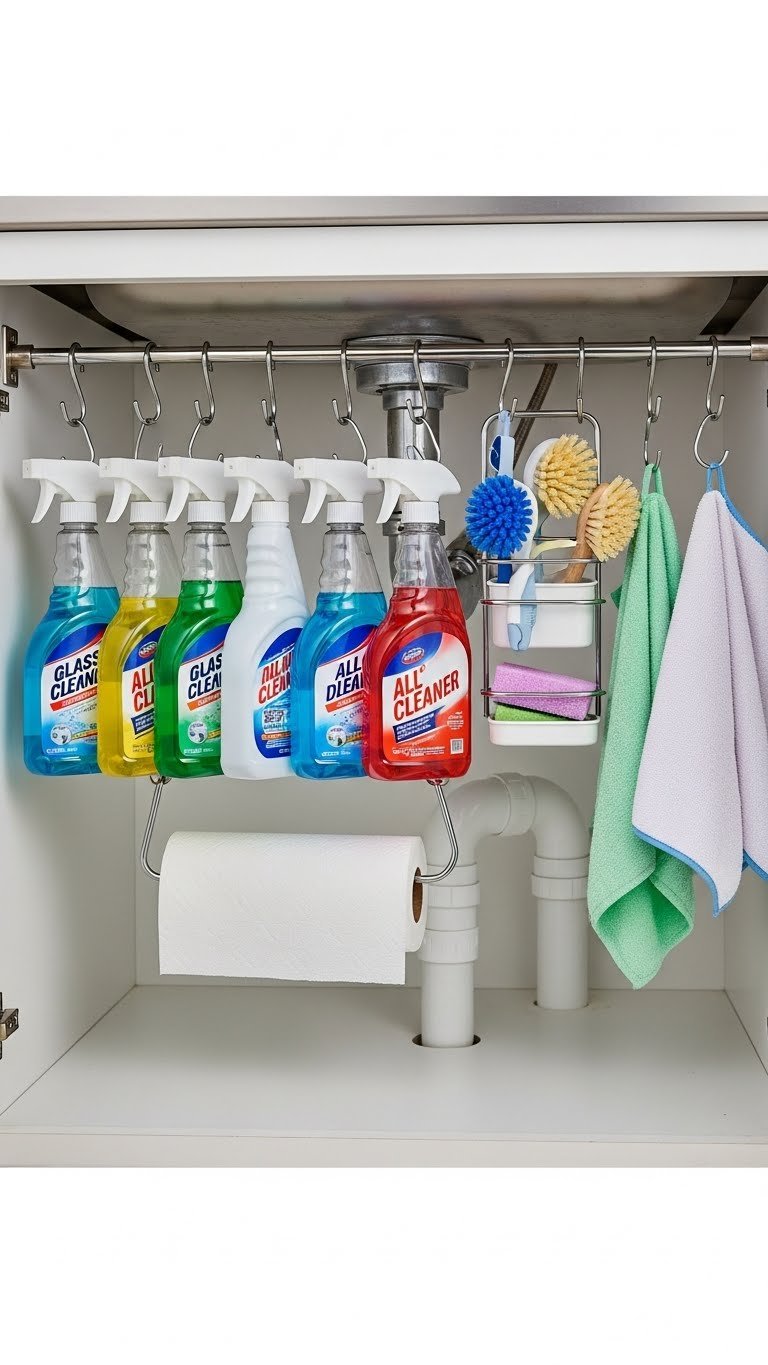
The underside of your sink is wasted storage unless you use it strategically. A simple tension rod creates hanging space for spray bottles, cleaning supplies, or cloth towels, doubling your under-sink capacity.
A tension rod costs $5–$15 at Target, IKEA, or Amazon. Install it under your sink in 5 minutes—just twist it to fit snugly between the cabinet walls. Use small hooks ($2–$5 each) to hang items.
Your under-sink area transforms from chaotic to organized. Cleaning supplies are accessible but hidden, and spray bottles stay upright instead of rolling around. This $15 hack feels ridiculously effective in small bathrooms.
13. Swap Out a Full Bathtub for a Shower-Only Layout

If you rarely take baths, a shower-only layout reclaims 30–50% of your bathroom footprint. This is the single biggest layout shift for small bathrooms that don’t need dual functionality.
Removing a tub and installing a shower runs $1,500–$4,000 professionally or $500–$1,500 DIY if you’re plumbing-confident. The payoff is enormous: you gain usable floor space, storage opportunities, and a bathroom that feels genuinely open. A simple shower enclosure ($200–$600) plus tile work ($300–$1,000) creates a functional, modern space.
Your small bathroom becomes an efficient, spa-like retreat. Walking in feels less cramped, cleaning becomes faster, and the layout supports actual movement rather than squeezing around fixtures.
14. Use a Sliding Barn Door Instead of a Swing Door

Swing doors steal floor space every time you open them—critical wasted real estate in tiny bathrooms. Sliding doors slide flush against the wall, reclaiming those precious inches.
Sliding barn door hardware kits run $40–$150 at Home Depot or Amazon; the door itself costs $50–$300 depending on material. Installation takes a weekend with basic tools. If you’re renting, removable track systems ($50–$100) exist but require landlord approval. The total project runs $100–$400 DIY.
You immediately gain 2–3 feet of floor space because the door no longer swings into the room. Bathrooms with limited square footage feel noticeably more open, and sliding doors have a design appeal that adds character.
15. Install a Wall Niche for Recessed Shower Storage

Wall niches are built-in shower storage that doesn’t eat floor space. By recessing shelving into the shower wall itself, you create functional storage that feels like part of the architecture rather than clutter.
Shower niches cost $60–$200 pre-made or $200–$500 installed if built custom. Installation involves cutting into the wall between studs and framing the niche—a job for plumbers or experienced DIYers. The payoff is huge: no shower caddies cluttering the tub, and bottles stay organized and accessible.
Your shower looks intentional and organized. No hanging caddies means visual clean lines, making even tiny shower spaces feel luxurious and spa-like.
16. Hang Towels Vertically on a Bar or Ladder Hook

How you display towels dramatically changes bathroom perception. Vertical towel storage takes up less space than traditional towel bars and looks intentional rather than utilitarian when styled right.
A tall vertical towel bar costs $15–$50 at IKEA or Target; ladder hooks run $8–$20. Installation is 15 minutes with basic wall anchors. Roll your towels tightly and stand them upright on a shelf or hang them on hooks. This takes 60% less visual space than draping towels flat.
Your bathroom looks organized, spa-like, and bigger because rolled towels take up less footprint than traditional towel displays. It’s a simple styling trick that costs almost nothing but changes how your space reads.
17. Create a Corner Caddy with Baskets and Hooks
Corners are often dead space in small bathrooms. A targeted corner caddy system (shelves + hooks + baskets) transforms wasted square footage into organized, functional storage.
Build a DIY corner caddy with two floating shelves ($30–$60), two hooks ($10–$20), and woven baskets ($20–$40). Installation takes 45 minutes with a drill and level. Alternatively, buy a corner shelf unit ($40–$100) at IKEA or Target.
Your corner transforms from empty to intentional. Baskets hide clutter, hooks hold daily-use items, and the whole system feels designed rather than improvised. Corners suddenly work for you instead of against you.
18. Install Grab Bars Styled as Towel Racks

Grab bars serve safety and function, but modern styles now work as intentional design elements that hold towels. This dual-purpose approach saves space while adding a contemporary look.
Modern grab bars cost $20–$60 each at Home Depot or Wayfair. Mount them at different heights (24″, 36″, 48″) to create a dynamic, interesting look while maintaining safety. Installation takes 30 minutes and requires wall anchors or studs.
These bars serve multiple purposes—safety, towel storage, and visual interest—in a space where every element needs to earn its keep. They’re practical and look like intentional design, not an afterthought.
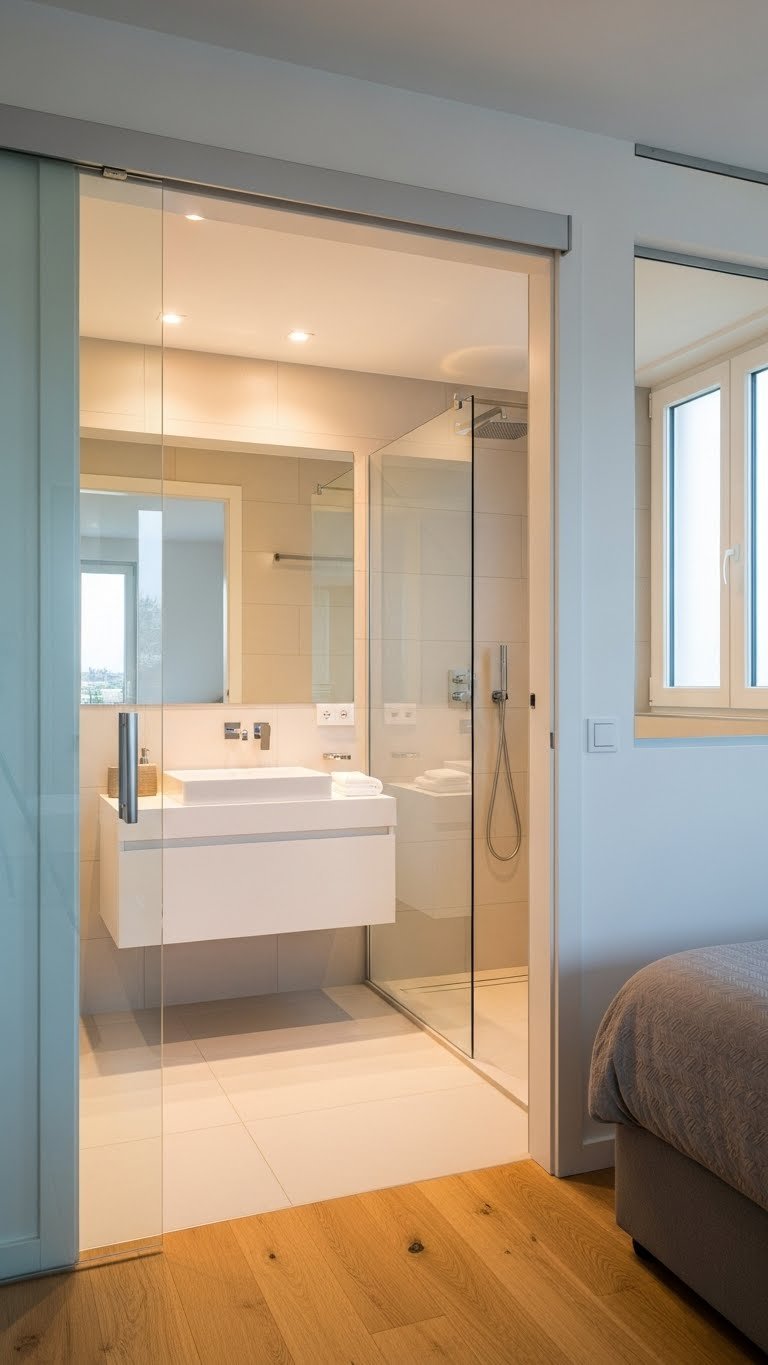
19. Use Glass Shower Enclosures to Maintain Visual Flow
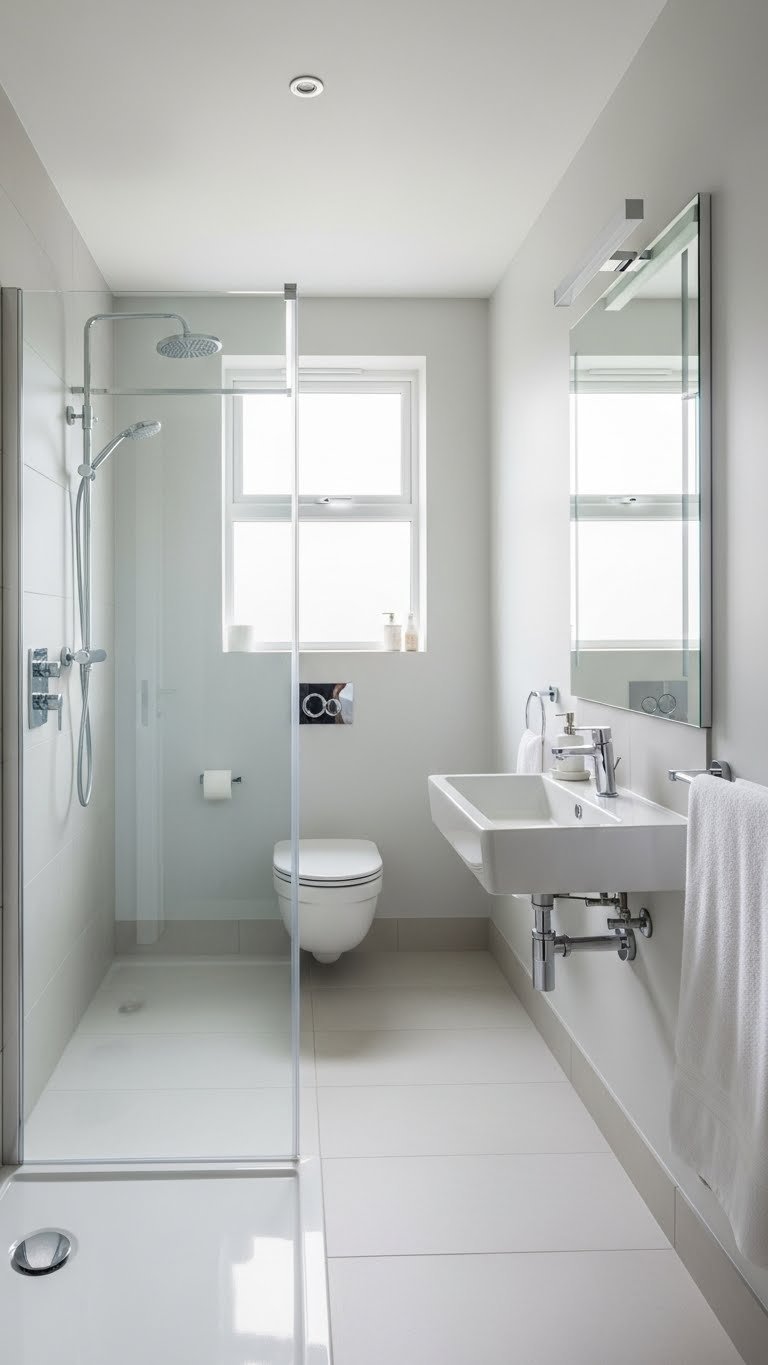
Opaque shower curtains visually chop small bathrooms in half. Glass enclosures (clear or frosted) maintain sightlines, making the entire space feel bigger and brighter.
Frameless glass shower doors run $300–$800 installed; semi-frameless units cost $200–$500. Installation is a half-day job for glass professionals. The investment pays off: light flows through the entire bathroom, and the space reads as one cohesive room rather than fragmented zones.
Your small bathroom feels 20–30% larger because there’s no visual barrier breaking up the space. Frosted glass offers privacy while maintaining that open feel—the best of both worlds.
20. Mount Shelves at Varying Heights for Visual Interest
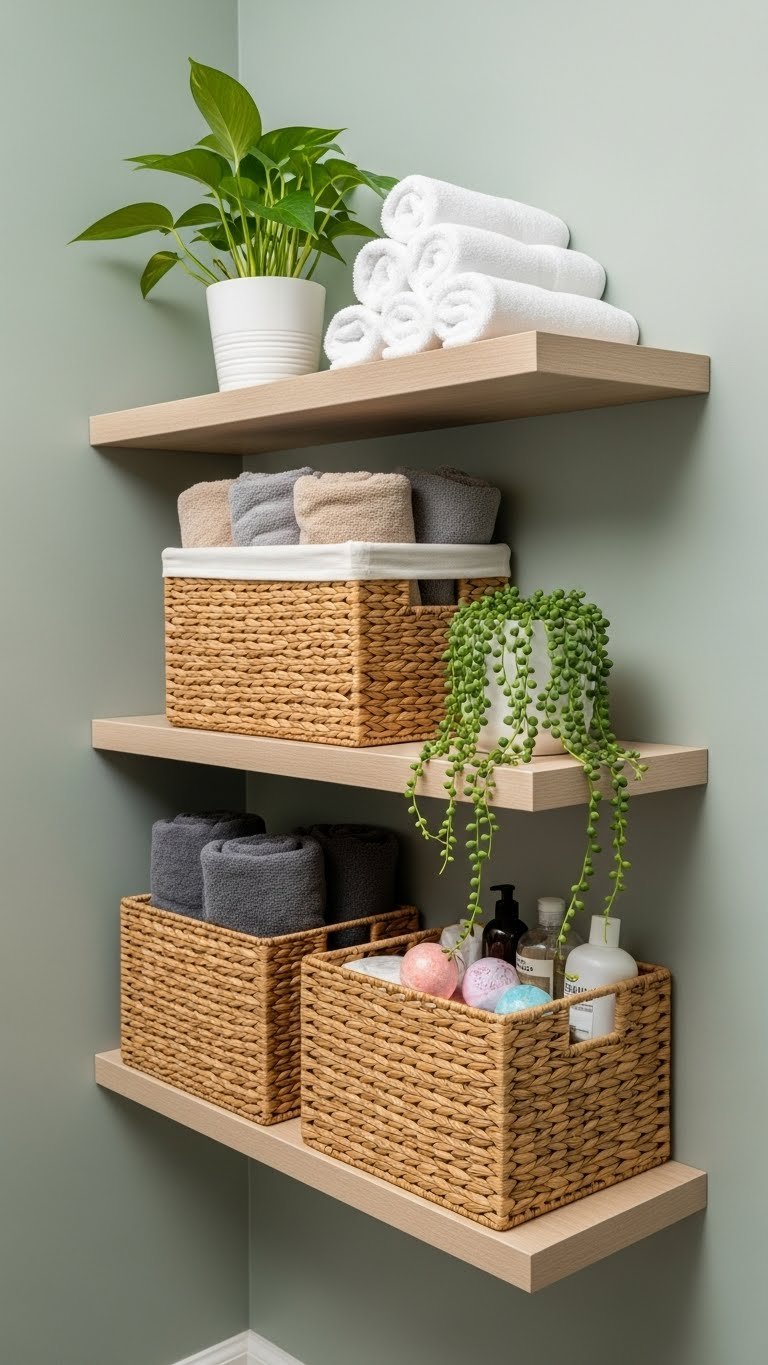
Shelves at the same height feel boring and don’t maximize small spaces. Staggered, varying heights create visual interest while allowing flexible storage for items of different sizes.
Floating shelves cost $20–$80 each; install 4–6 at varying heights between 12″–72″ from the floor. Use a level and stud finder ($100–$200 total with hardware). Mix shelf sizes: a 24″ shelf below, then 36″ above, creating a dynamic pattern.
Your bathroom looks intentional and modern rather than standard. The varied heights prevent the space from feeling monotonous and allow you to display items thoughtfully—baskets on lower shelves, decorative items on upper ones.
21. Add a Small Stool or Bench for Seating and Storage

A bench or ottoman serves dual purposes: seating (or a place to set items while bathing) and hidden storage. In small bathrooms, multifunctional pieces are non-negotiable.
Compact storage benches cost $50–$200 at IKEA, Target, or Amazon (search “bathroom storage bench”). A woven stool with hidden storage runs $40–$120. Place it under a window, in a corner, or beside the toilet. Installation is none—just position it.
You gain a functional, stylish piece that serves multiple needs without taking up dedicated space. It’s especially smart in bathrooms where you shower before bed (a place to set pajamas) or for spa rituals (a place to sit with a foot soak).
22. Install a Slim, Wall-Mounted Toilet Brush Caddy
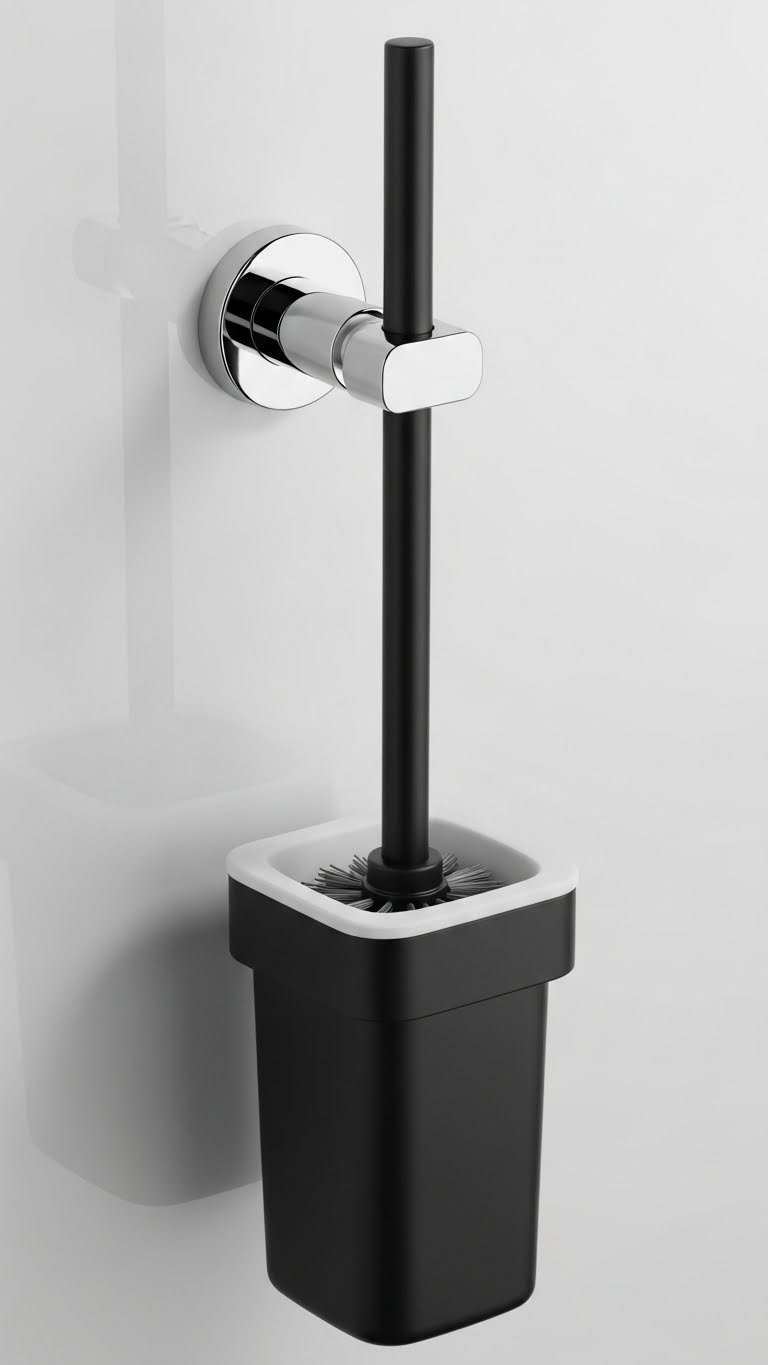
Toilet brush holders on the floor eat space and look clunky. Wall-mounted versions ($10–$30) keep everything organized and off the floor, maintaining that open-air feeling critical to small bathrooms.
Installation takes 10 minutes with adhesive or small wall anchors. Choose brushed nickel, chrome, or matte black to match your fixtures. The brush stays upright, dries properly, and looks intentional rather than like a necessary evil.
This small detail keeps your bathroom visually clean and organized. When floor space is precious, keeping every item off it (even toilet brush holders) makes a cumulative difference.
23. Create an Open-Concept Bathroom-Bedroom Flow with Glass Doors
If you have an ensuite or walk-through bathroom, glass doors between the bedroom and bath maintain visual flow and light, making both spaces feel bigger. This is a niche upgrade for specific layouts but powerful for small homes.
Frosted sliding glass doors cost $400–$1,200 installed; clear doors run similar prices depending on hardware. This is a contractor job requiring wall modification and proper framing ($1,000–$2,500 total). The investment opens up your entire suite visually.
Your small bathroom and bedroom feel like one expanded space rather than separate boxes. Light flows through, visual continuity makes everything feel bigger, and the design feels intentional and modern.
SAVE THIS FOR YOUR NEXT PROJECT. Pick just one or two ideas and tackle them this weekend—even small changes create a noticeably better bathroom. Which idea speaks to your space?
Leave a Reply