Your dorm room doesn’t need to feel like a temporary afterthought. Whether you’re working with a shoebox-sized space or awkward furniture placement, small rooms have huge potential when you know where to focus your energy and budget. The right upgrades can make your space feel intentional, comfortable, and genuinely yours—without requiring landlord permission or breaking the bank. We’ve gathered 25 realistic ideas that deliver major impact for minimal investment. From renter-friendly wall tricks to smart storage that actually holds your stuff, these tips work for every style and budget level. Ready to make your room feel way bigger and way better? Let’s dive in.
1. Layer Peel-and-Stick Wallpaper on One Accent Wall
Peel-and-stick wallpaper gives you a total accent wall without the commitment or damage deposits. One patterned wall completely changes how the whole room feels, and you’re not drilling holes or touching actual drywall. Most designs stick cleanly to flat surfaces and peel off without residue—game-changing for renters.
Measure your wall carefully and order from Wayfair, Amazon, or Spoonflower. Geometric patterns, botanical prints, or subtle texture work well in small rooms without overwhelming the space. Installation takes about 30-45 minutes and costs $25-$60 depending on coverage. Smooth the air bubbles as you go, and take your time along the edges—rushing here shows. You can even layer a second, complementary wallpaper pattern on a smaller section for more visual interest.
The result? Your room instantly looks designed instead of default. Plus, when you move out, removal takes under 10 minutes and leaves no marks behind.
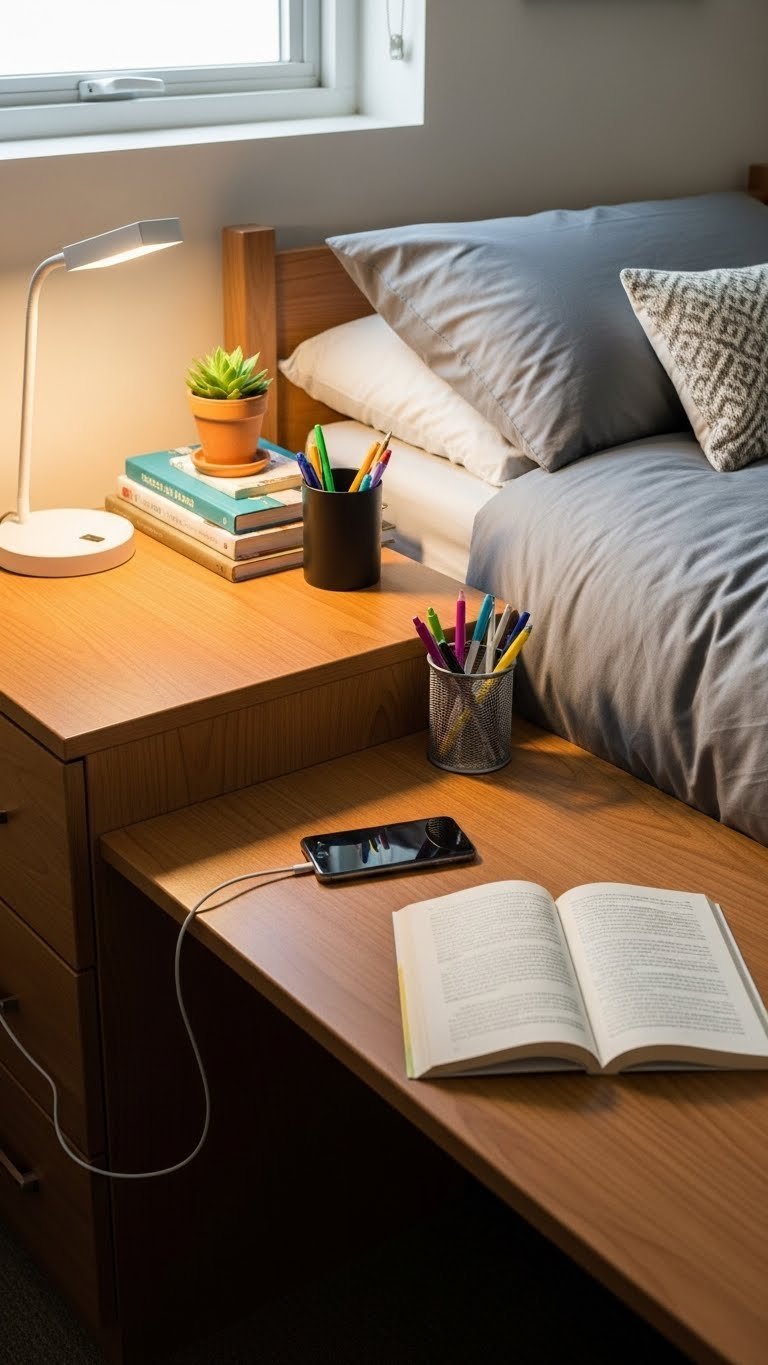
2. Install Floating Shelves Above Your Desk or Bed
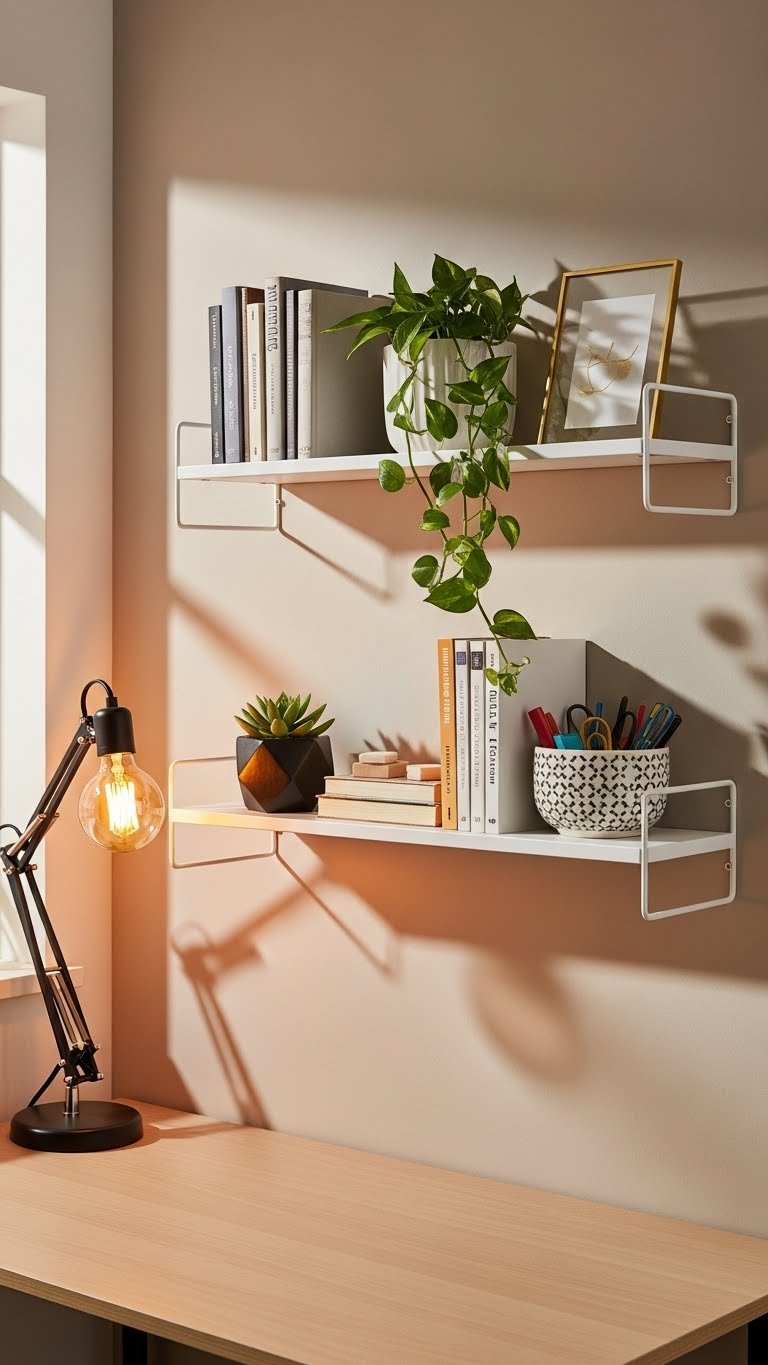
Floating shelves solve the “I have nowhere to put my stuff” problem while keeping floor space clear. They’re especially valuable in tiny rooms where every inch counts, and they work on any wall type. You can mount them above your bed for nighttime storage or behind your desk to keep supplies visible and accessible.
Pick shelves 12-24 inches long from IKEA, Target, or Home Depot—costs run $15-$40 per shelf plus bracket hardware. Installation requires a level and stud finder (or toggle bolts for drywall), taking about 20-30 minutes per shelf. Load them with books, plants, photos, and small baskets to add personality while staying organized. Layer items at different heights so they don’t look flat or cluttered.
You’ll reclaim cubic feet of storage without eating into floor space. This change makes your room feel intentional, and visitors notice the storage innovation immediately.
3. Use Under-Bed Storage Bins to Maximize Hidden Space
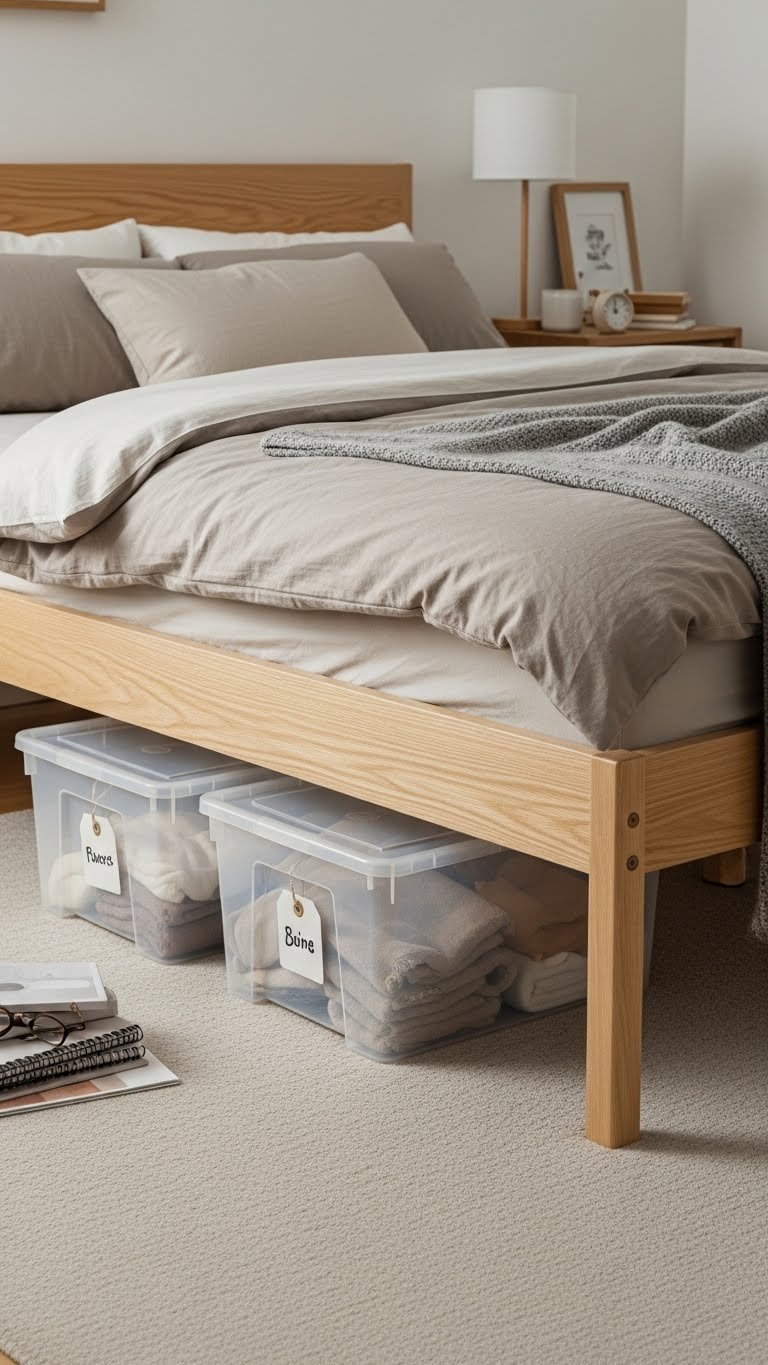
Under-bed storage is the oldest trick in the tiny-space playbook, but it works because it actually works. Clear plastic bins let you see what’s inside without pulling everything out, and they slide easily in and out as needed. This is where seasonal clothes, extra bedding, and off-season décor go to live.
Buy clear stackable storage containers from Container Store, Target, or Amazon for $10-$25 per bin. Standard twin-bed clearance works with low-profile bins up to about 6 inches tall. Label each bin on the front so you don’t forget what’s stored inside. Use a wheeled cart underneath if you want something extra moveable, especially when it’s time to deep-clean or switch out seasons.
The payoff? Your floor looks cleaner, your closet isn’t bursting, and you actually know where your things are. Plus, pulling out a bin takes literally two seconds—no digging through a mountain of stuff.
4. Hang a Large Statement Mirror to Reflect Light and Space
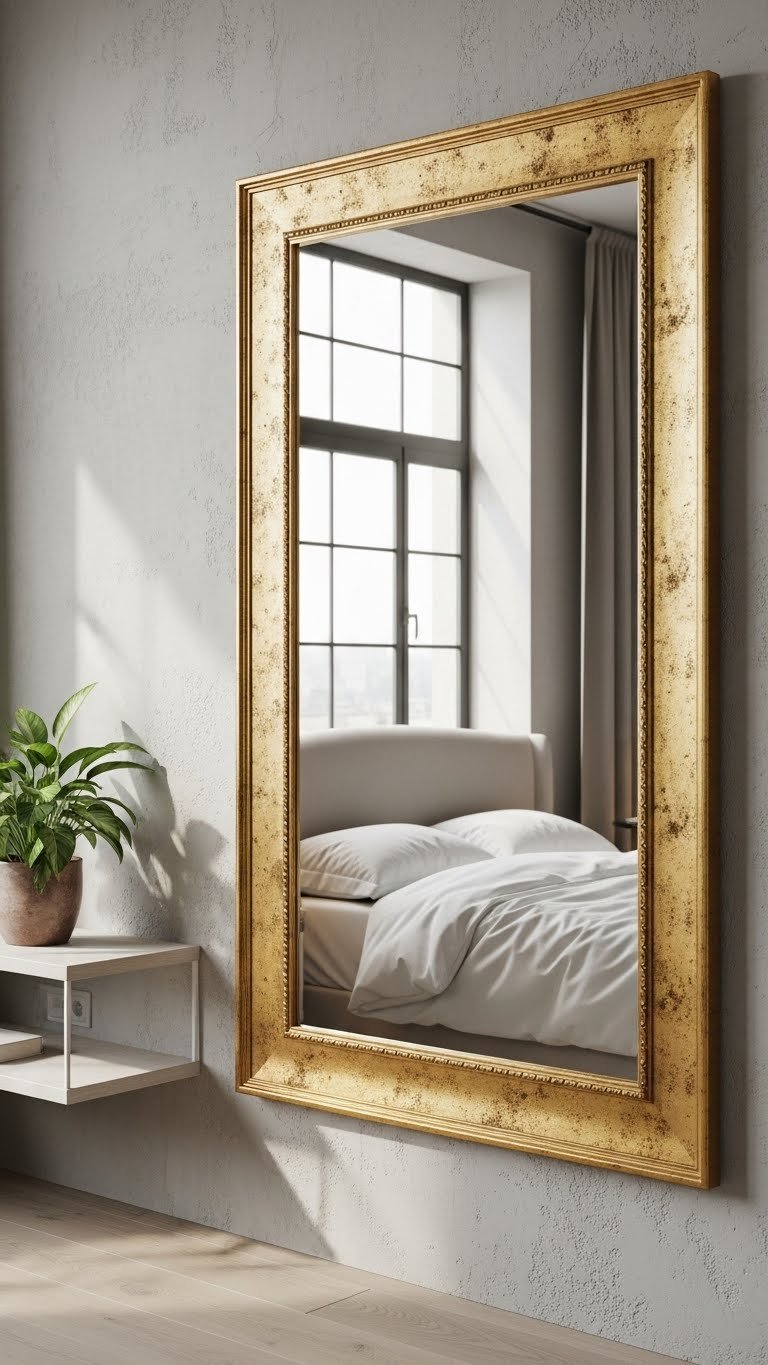
A strategically placed mirror bounces light around and makes cramped rooms feel exponentially larger. It’s pure optics, but it works every single time. Position your mirror across from a window or light source to maximize its reflective power, and suddenly your 100-square-foot room reads as roomy.
Pick a mirror with an interesting frame from Wayfair, Urban Outfitters, or IKEA—prices range $30-$150 depending on size and material. A 24-30-inch mirror works best for most dorm rooms. Mount it securely with appropriate hardware (not just adhesive), taking about 15 minutes. Avoid placing it directly behind your bed, as that can feel odd spatially. Instead, mount it on a wall perpendicular to your bed or opposite your main seating area.
The result is immediate: your room looks brighter, bigger, and more polished. Plus, you get practical value from it daily—your actual mirror for getting ready.
5. Swap Your Overhead Light for a Soft, Dimmable LED Option
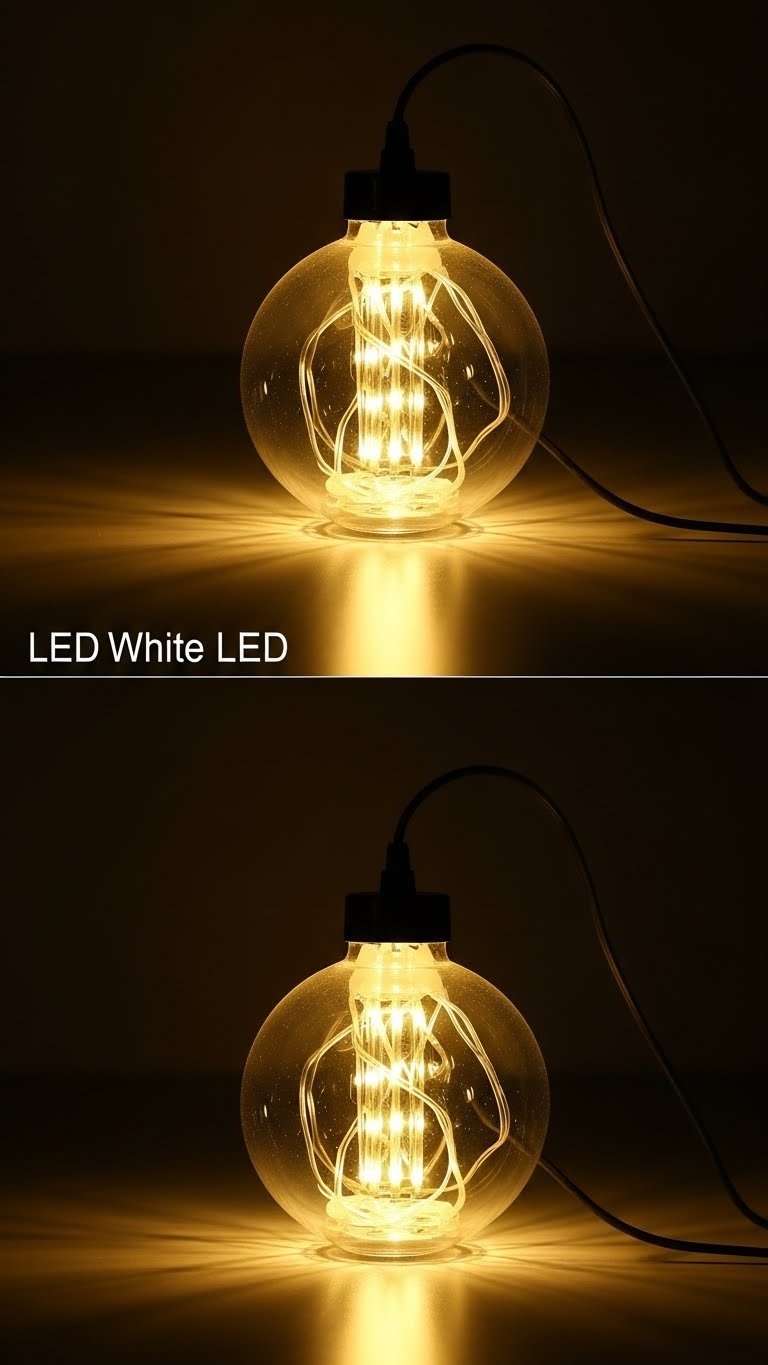
Overhead dorms lights are institutional and harsh—they drain your energy and make your room feel temporary. A single upgrade to a dimmable LED fixture or smart bulb changes your entire vibe and gives you control over your environment. You can work during the day with bright light, then dim everything down for relaxation or sleep.
Install a dimmable ceiling fixture ($20-$40) or swap in a smart LED bulb like LIFX ($15-$25) that works with most standard sockets. If you can’t modify the fixture (strict housing rules), plug-in pendant lights or a track light are alternatives. No installation needed for smart bulbs—just screw and go. The whole setup takes 5-10 minutes and requires zero contractor skills.
You’ll sleep better with dimmer evening light, focus better during study sessions with brightness, and your room suddenly feels like a place you actually want to be. Color temperature matters more than people realize.
6. Create a Cozy Reading Nook with a Small Chair and Throw Blanket
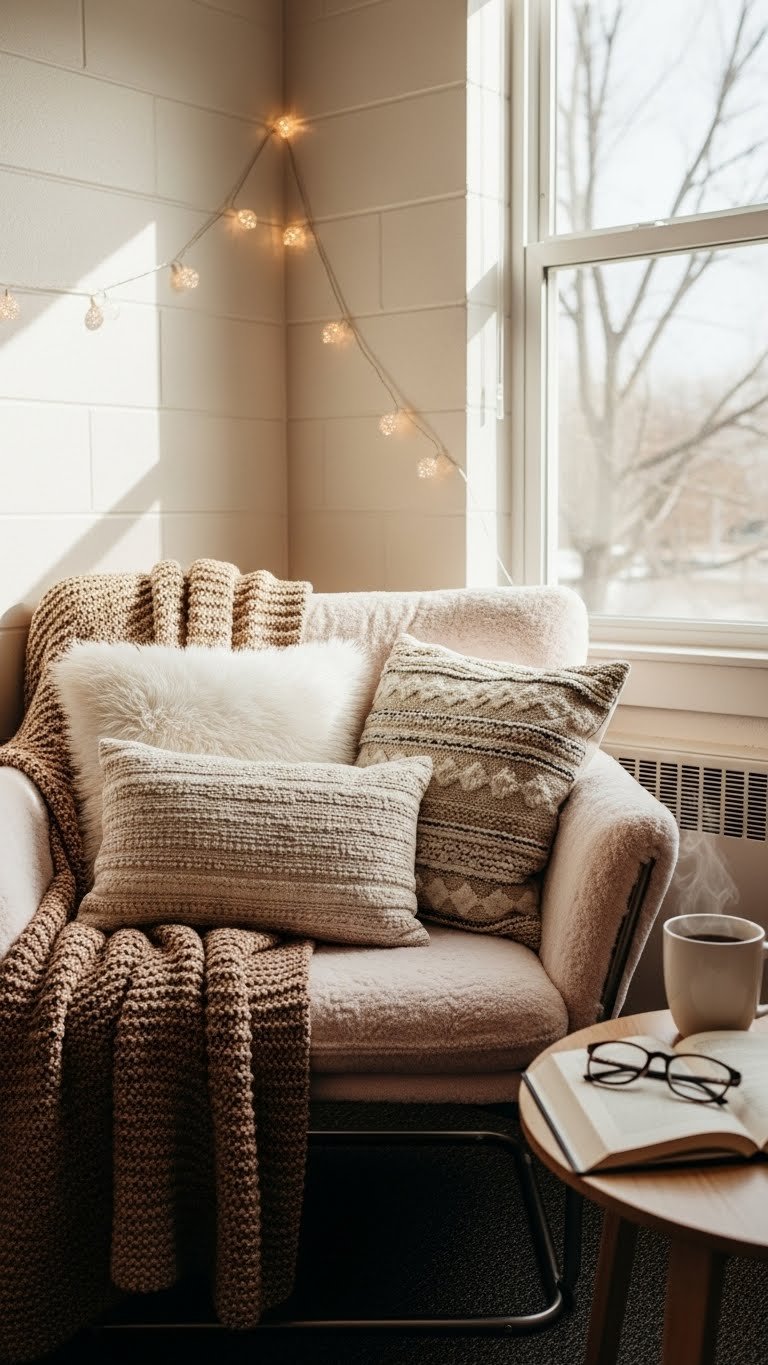
A dedicated relaxation corner makes your room do double duty—study zone and sanctuary. Even a 2-foot-by-3-foot corner works when you use vertical space and layered textures. This becomes your mental reset button when studying gets intense or you need five minutes to decompress.
Pick a compact chair like a faux fur saucer chair ($40-$80 on Amazon or Urban Outfitters) or a simple pouf ($25-$50). Add a throw blanket ($15-$30) and a tiny side table ($20-$40). String lights or a clip-on reading lamp overhead complete the mood. Total setup costs $100-$200 and takes about 30 minutes to arrange.
Layer in pillows, keep a book or journal there, and suddenly you have a retreat within your room. You’ll actually use it—this isn’t decorative. It becomes the place you go to recharge between classes and social commitments.
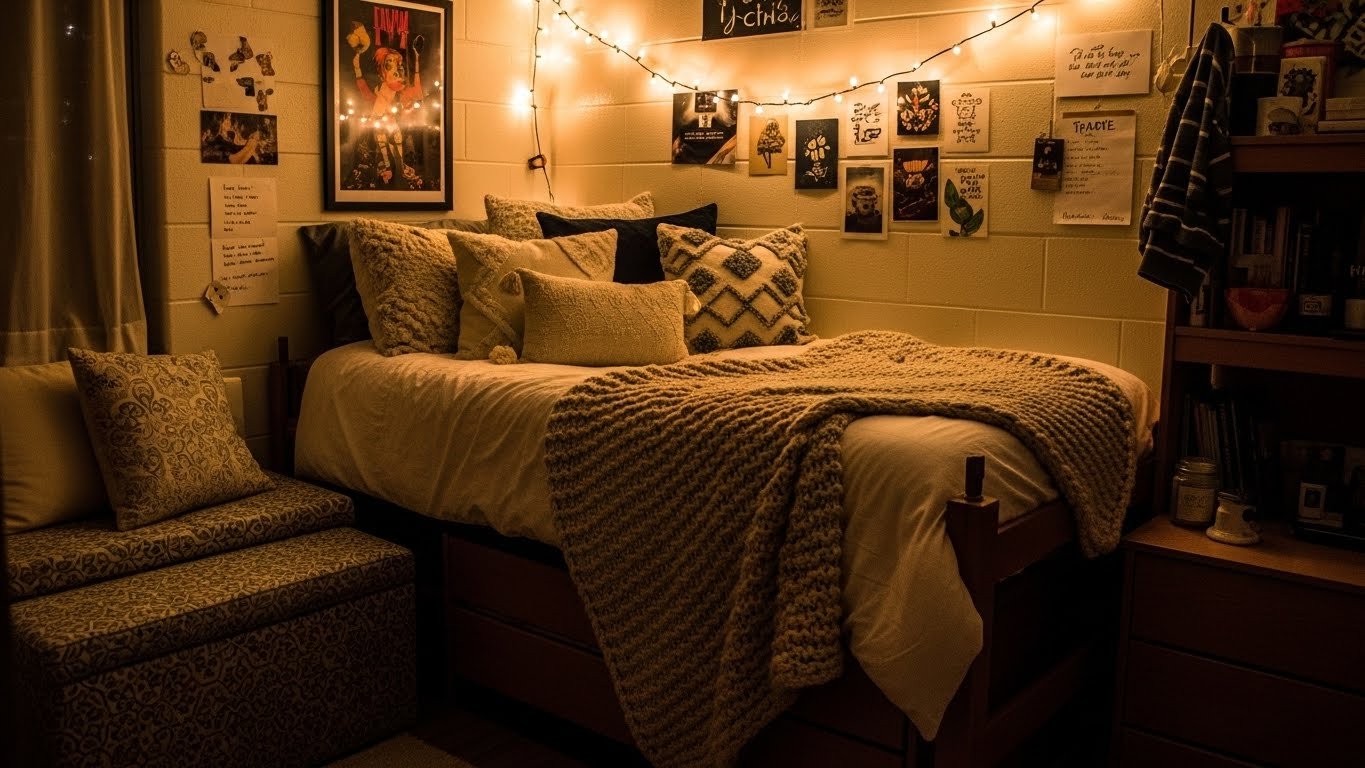
7. Add Velvet or Textured Throw Pillows to Your Bed
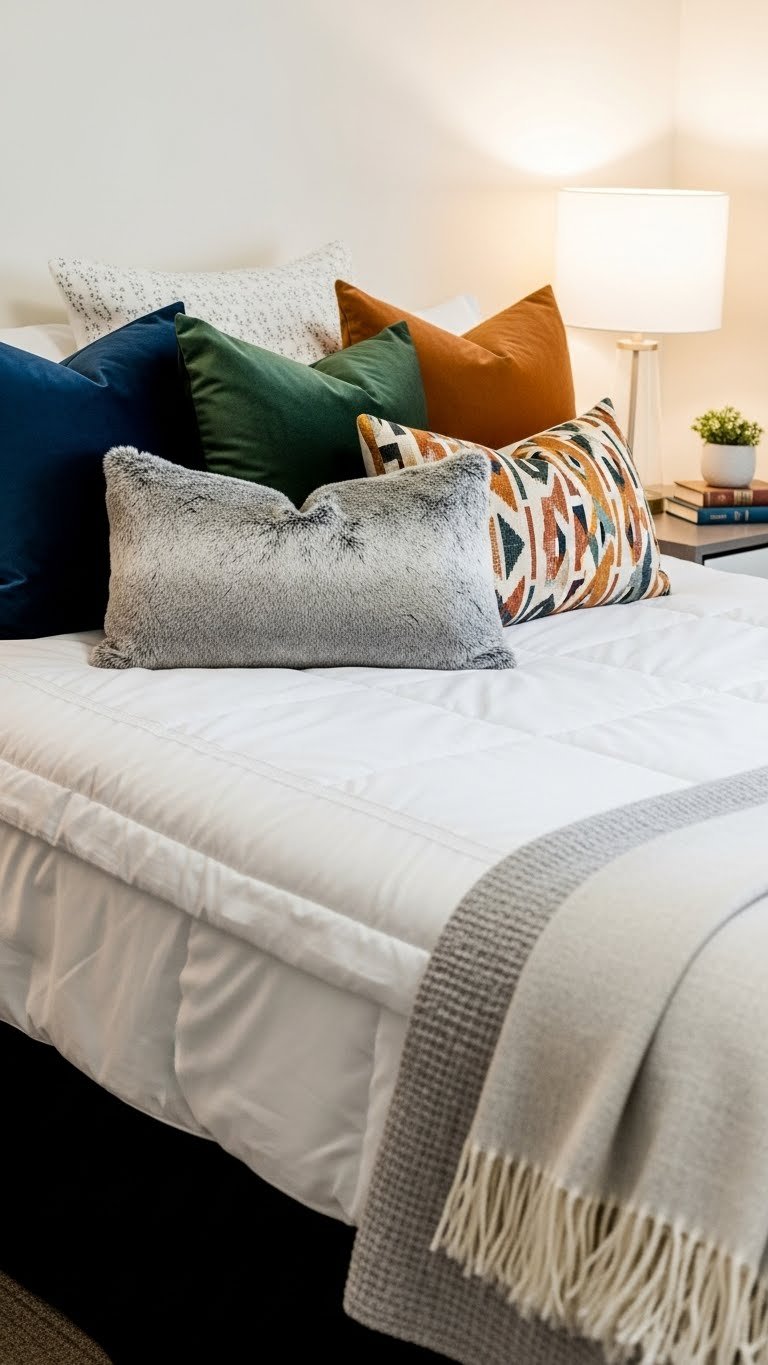
Throw pillows are the easiest way to add luxury, depth, and personality to your bed setup. Mix textures—velvet, faux fur, soft cotton—to create visual interest that elevates an otherwise plain bed. They’re also incredibly Instagrammable, which matters if your dorm room shows up in your content.
Buy 2-4 throw pillows from Target, Amazon, or West Elm (prices: $15-$50 each depending on quality). Mix sizes, shapes, and textures to avoid a matchy-matchy look. Stick with a color palette (2-3 main colors plus neutrals) so it feels cohesive instead of chaotic. Arrange them on your bed during the day, pile them on a shelf at night if space is tight.
Your bed transforms into a focal point that looks intentional and curated. Guests notice immediately, and you feel like you’re sleeping in a real room, not a college dorm. This one change makes the biggest visual difference for the lowest investment.
8. Use Removable Command Hooks for Hanging Without Holes
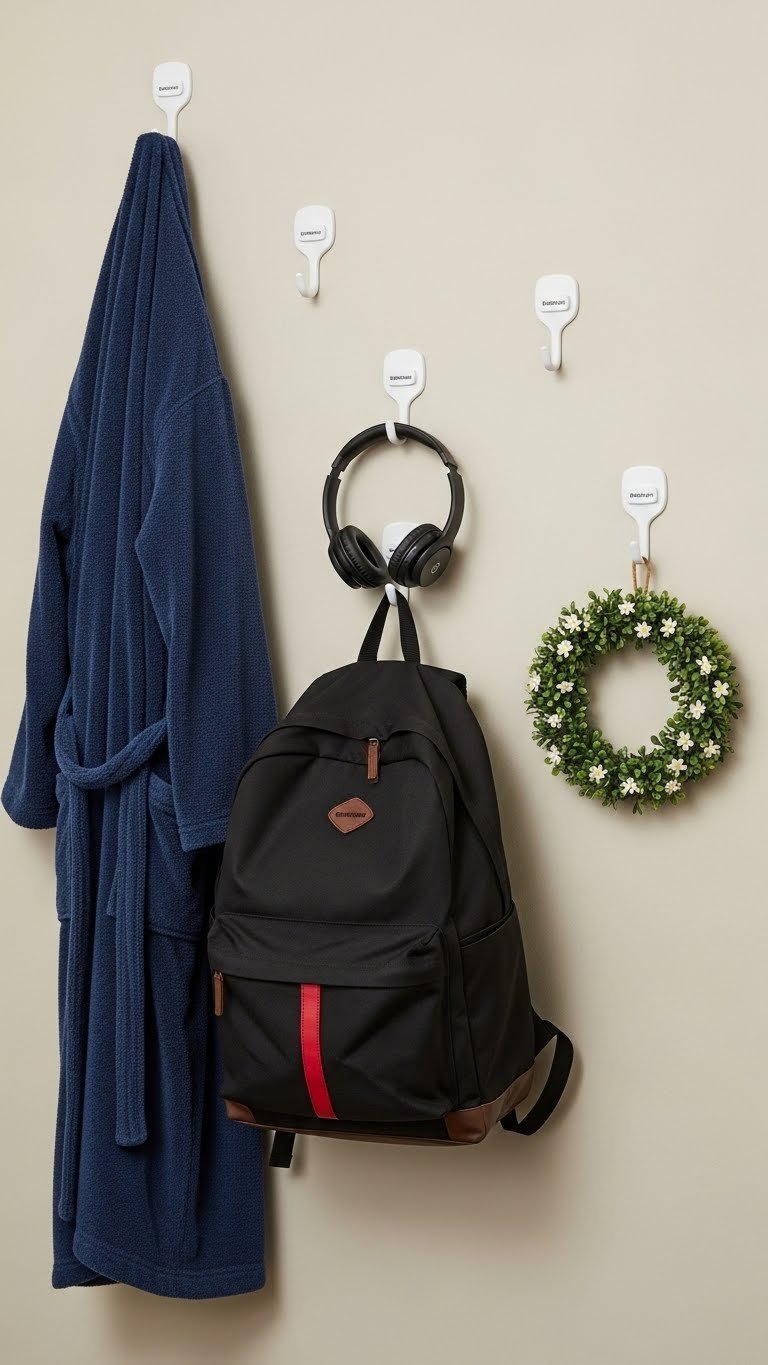
Command hooks are your renter’s best friend because they actually come off clean. Unlike cheap adhesive hooks that strip paint, these are designed for damage-free removal. Use them to hang bags, belts, headphones, hats, and lightweight decor—instantly clearing floor clutter and adding functional organization.
Buy a multi-pack of Command hooks ($10-$15 per pack) from Amazon, Target, or Home Depot—you’ll get assorted sizes. Installation takes literally one minute per hook: clean the wall, peel, and press. They hold surprisingly well (up to 7.5 lbs per hook depending on the style), and removal leaves zero residue. Place them at different heights to create visual interest and maximize coverage.
Your floor stays cleaner, your bags have homes, and your walls stay intact. This is one of those “why didn’t I do this sooner?” upgrades that costs almost nothing.
9. Organize with Labeled Storage Boxes and Clear Containers
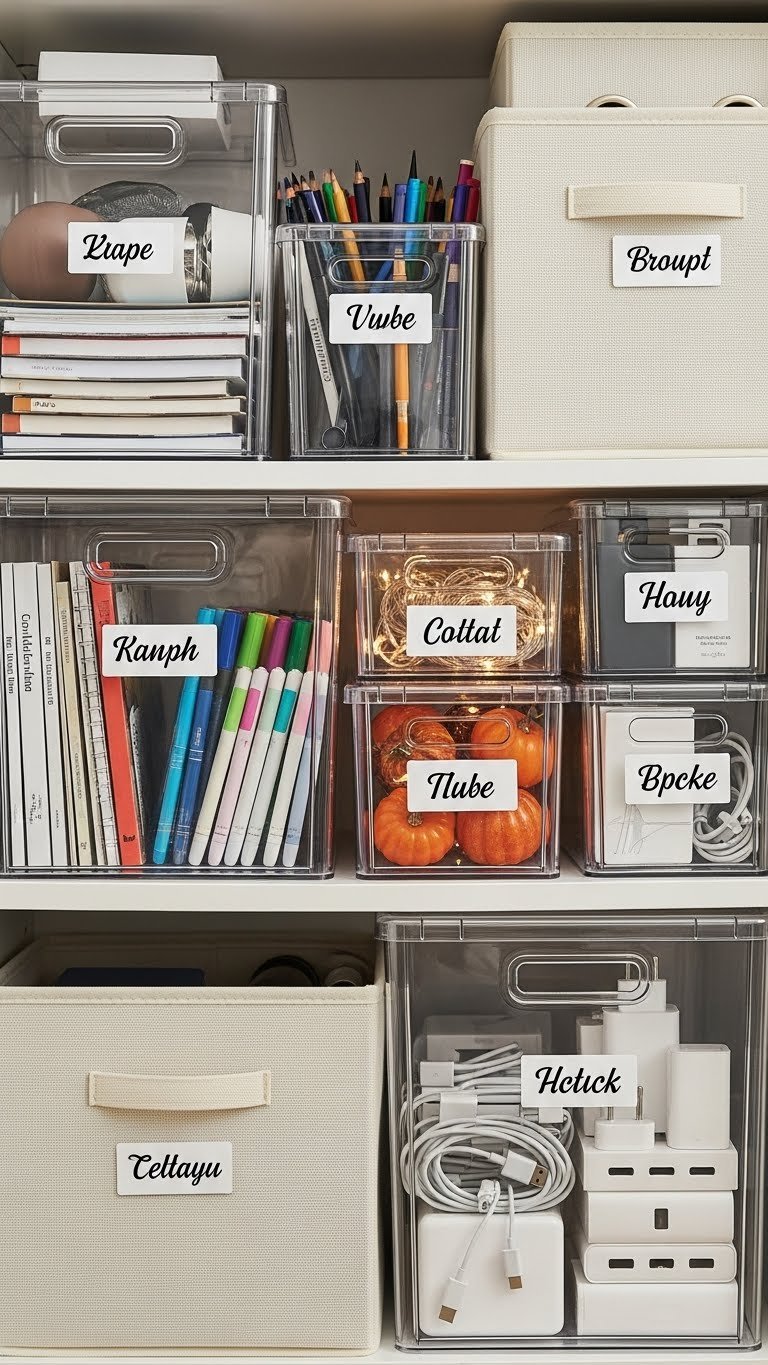
Organization looks good and makes your life easier—when you can find things, you waste way less time searching. Clear containers let you see what’s inside without opening everything, while labels prevent the “I know this is in here somewhere” panic. This system compounds in value as the semester goes on.
Invest in a set of clear storage boxes ($20-$40 for a multi-pack) and a label maker ($15-$25) from Container Store, Target, or Amazon. Alternatively, handwrite labels on white sticker tape for a personal touch. Sort by category: school supplies, tech, seasonal, gifts, hobby items. Take 30-45 minutes to set up the system the first time, then it maintains itself. Color-code bins if you want extra visual organization (blue for tech, white for documents, etc.).
Everything you own has a designated spot, so your room stays tidy even when you’re busy. Plus, you’ll stop buying duplicates of things you already own because you can actually see your inventory.
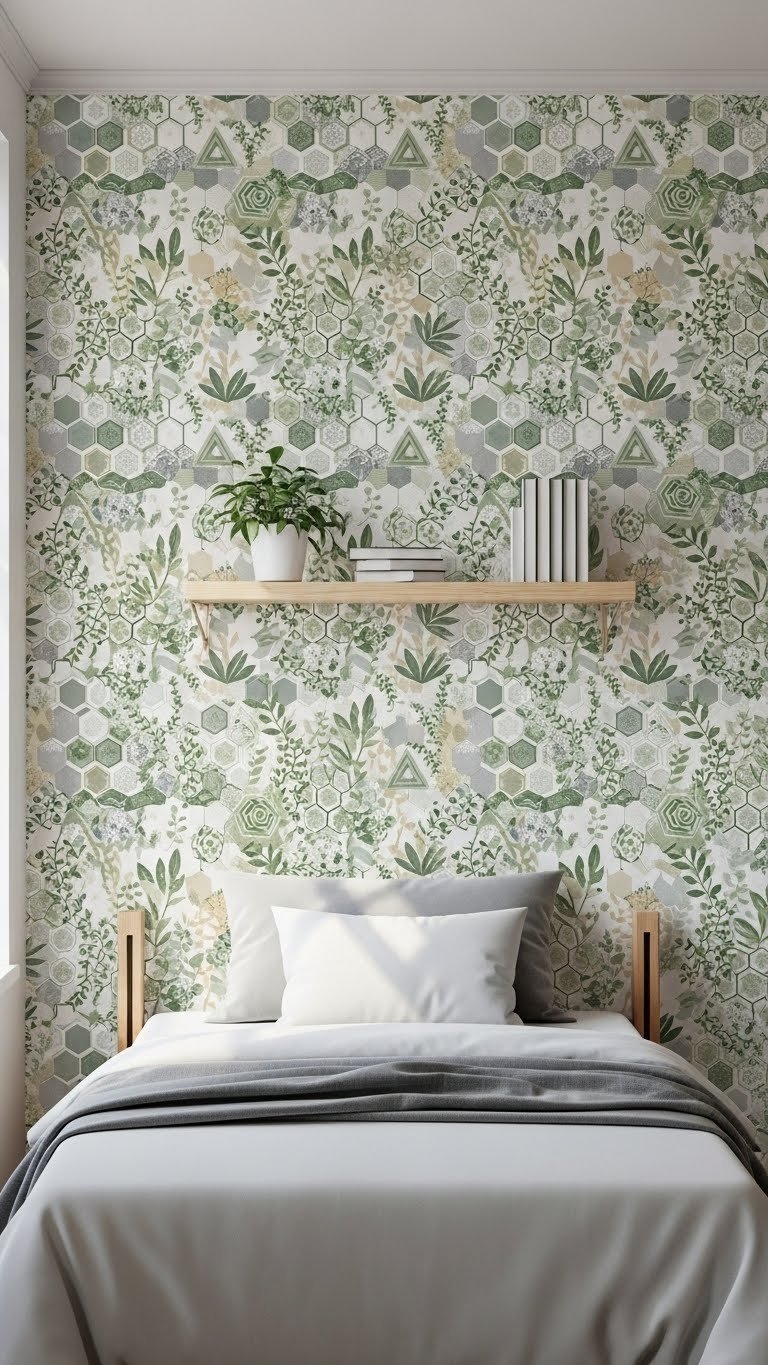
10. Paint Your Door or Wall With Removable Wallpaper Patterns

Your door is a huge, easy-to-modify surface that most people ignore. Painting it or covering it with peel-and-stick wallpaper creates an instant focal point and signals that your room is intentional, not default. It’s especially effective in otherwise neutral spaces.
If painting: use removable wall paint (like Tempaper or Clare Paint, $50-$80 per gallon) that peels off cleanly, or ask your RA about temporary paint options. If wallpaper: apply peel-and-stick patterns ($15-$40 per roll) over existing door. Painting takes 1-2 hours (including drying time), while wallpaper takes 20-30 minutes. Both give you a bold statement without permanent damage.
Your room instantly reads as “someone who has taste lives here.” The door becomes a conversation piece, and the whole space feels more curated because of one strategic choice.
11. Maximize Closet Space With Slim Hangers and Shelf Dividers
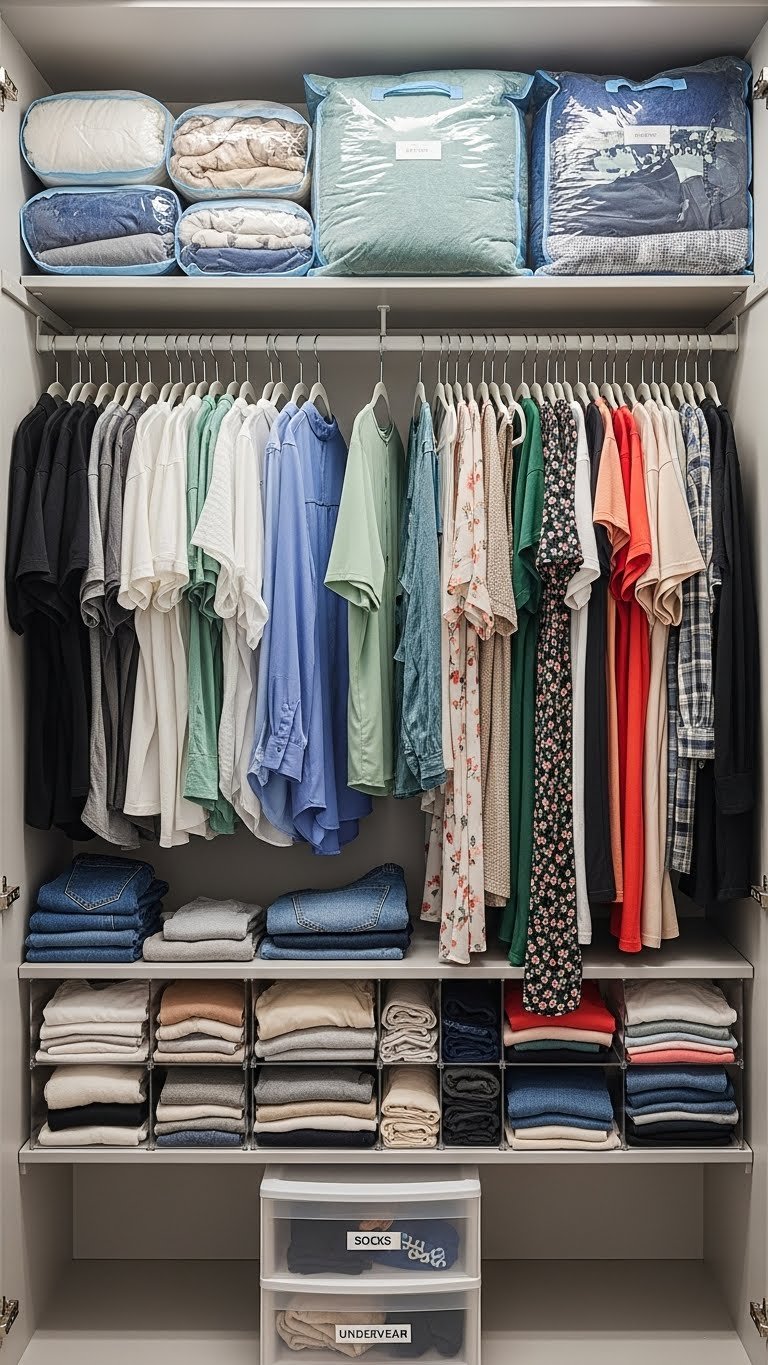
Closet space in dorms is criminally small, so every inch needs to work hard. Slim hangers free up horizontal space, shelf dividers prevent the “pile avalanche” when you pull one thing out, and smart folding maximizes vertical storage. This system actually lets you find and wear more of your clothes.
Buy velvet slim hangers ($10-$20 per pack of 10) from Target or Amazon—they prevent clothes from sliding off and take up half the space of chunky plastic hangers. Add shelf dividers ($8-$15 per pair) to keep stacks from toppling. Use vacuum storage bags ($10-$15 for a set) for off-season items on your top shelf. Total investment: $40-$60, setup time: 45-60 minutes.
You’ll suddenly discover clothes you forgot you owned. Getting ready becomes faster because you can see your actual options, and your closet doesn’t turn into chaos when you’re in a rush.
12. Layer Your Bedding for Maximum Texture and Impact
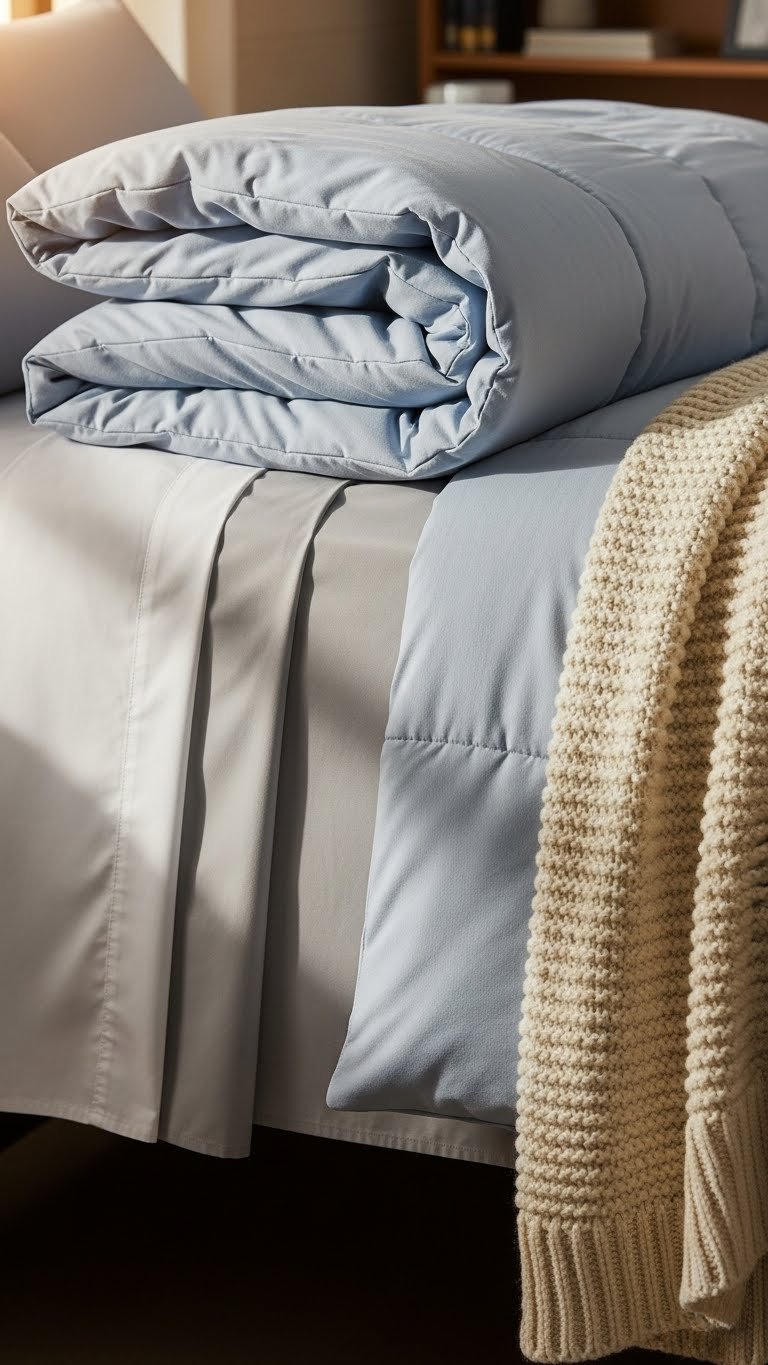
Layering bedding adds visual depth, practicality, and a sense of luxury that transforms how your bed reads. Instead of a flat comforter, you build a story with textures—crisp sheets, a warm blanket, a soft throw draped across the foot. It’s the easiest upgrade for the biggest visual payoff.
Start with quality sheets ($25-$50 per set) in a neutral color—Egyptian cotton or a microfiber blend that feels good. Add a lightweight quilt or comforter ($40-$80). Layer on a textured throw blanket ($20-$40) draped over the foot or end. Mix finishes: matte, velvet, linen, cotton. Total spend: $85-$170, but you’re upgrading comfort too, not just looks.
Your bed becomes the focal point of your room instead of just a place to sleep. This layering trick photographs beautifully and makes your space feel intentional and curated. You’ll also sleep better with the layering options for different seasons.
13. Install a Tall Tension Rod Curtain Divider for Extra Privacy
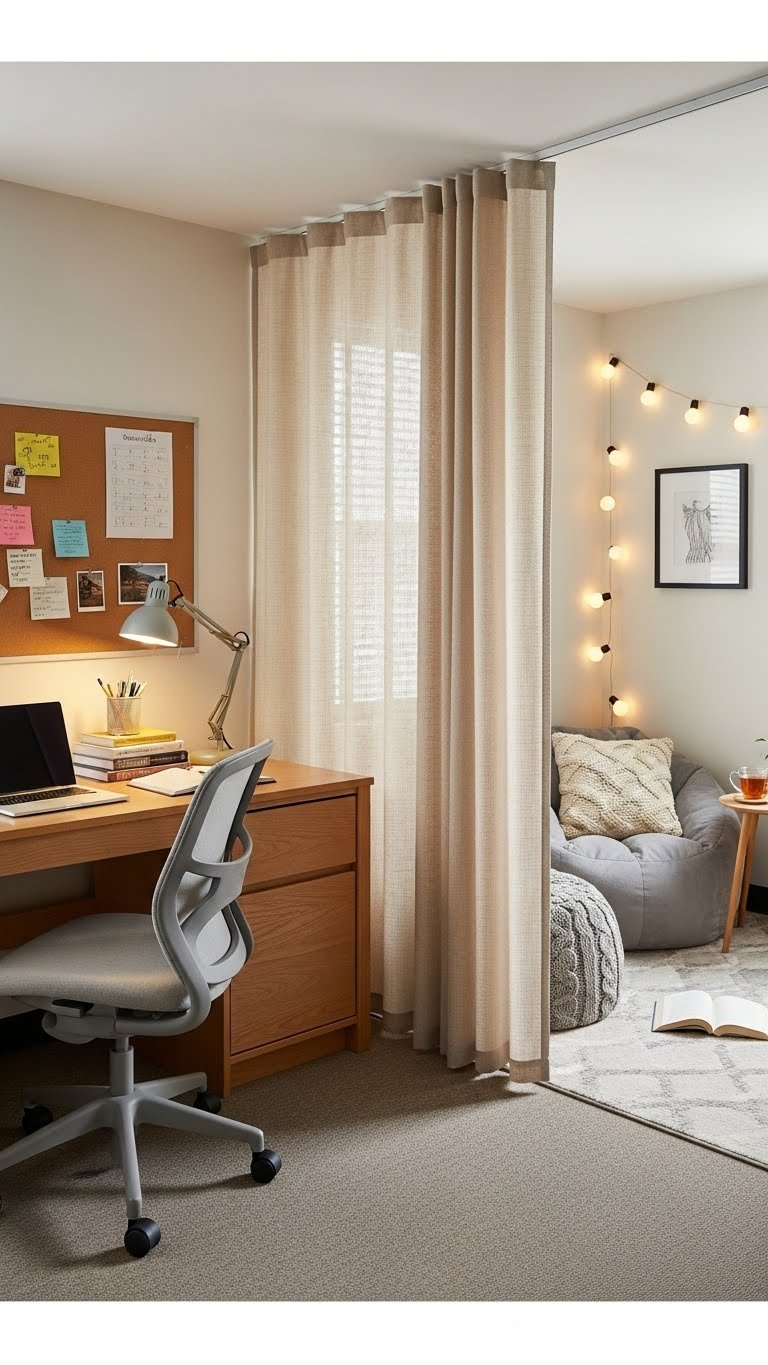
If you’re sharing a tiny room or want visual separation between zones, a tension rod curtain divider is genius. It costs almost nothing, takes five minutes to install, and instantly makes your room feel bigger psychologically. Use it as a backdrop behind your bed or to create a separate study zone.
Pick a tension rod ($15-$25) from Target or Amazon that fits your space. Choose curtain fabric ($20-$40 for enough to divide your room) in a color or pattern that complements your room. Installation takes literally 5 minutes—no tools required. Use sheer fabric to filter light without fully blocking it, or heavier linen for more privacy and drama.
Your room functionally becomes two spaces, which is huge when space is limited. You can study without your sleep area being visible, and you can relax without visual clutter from your workspace. It’s a psychological game-changer.
14. Create a Photo Wall or Collage Display With Peel-and-Stick Frames
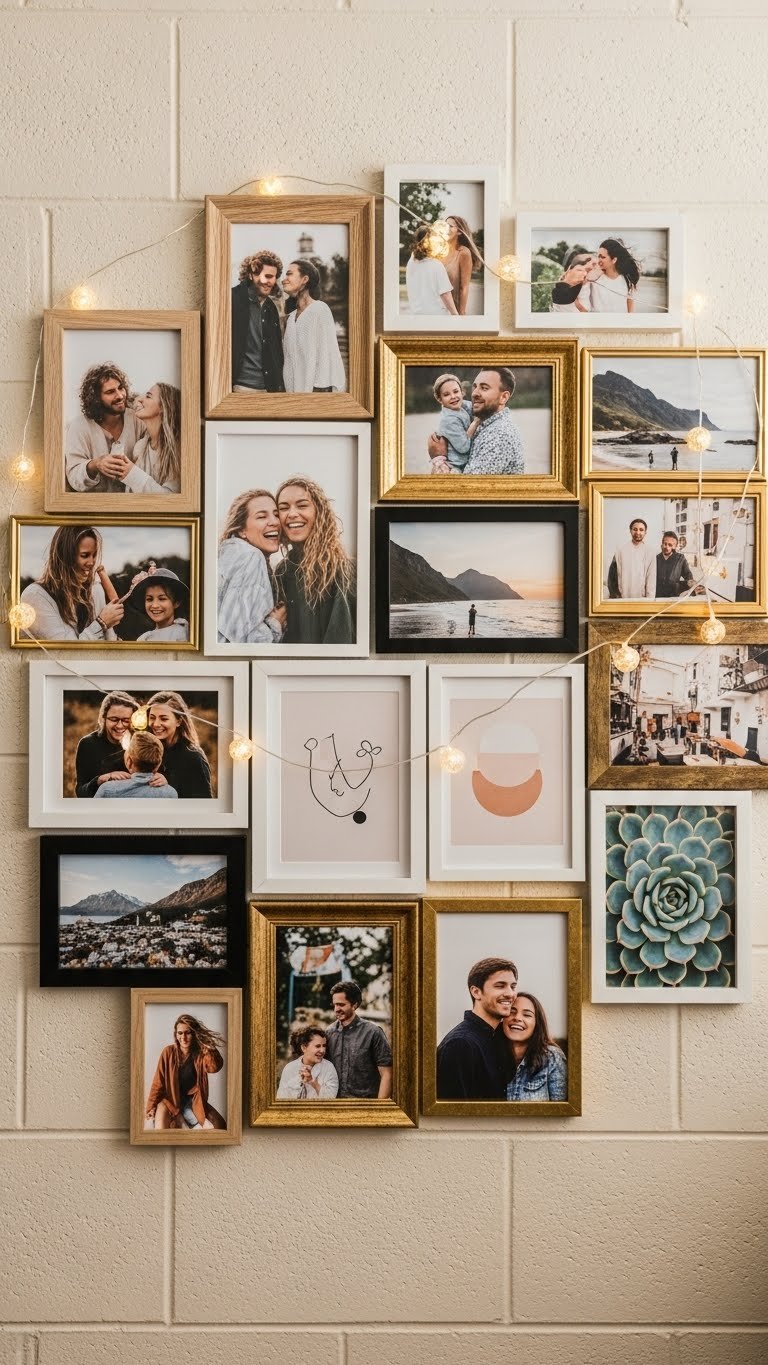
A photo wall makes your room feel personal and lived-in—it’s an instant mood boost and conversation starter. Peel-and-stick frames mean zero wall damage, and mixing frame sizes and styles creates visual interest. This is one of the easiest ways to “own” your temporary space.
Buy assorted peel-and-stick frames ($15-$30 for a pack of 8-12) from Amazon, Urban Outfitters, or IKEA. Print photos from your phone ($0.15-$0.50 each at Walgreens or CVS, or print at home). Arrange frames on your wall in a loose grid or organic cluster, then swap photos seasonally. Takes 30-45 minutes to install and arrange. This costs $30-$50 total and requires zero drilling.
Your room instantly feels like yours instead of generic dorm space. Plus, you have a visual reminder of people and places you love, which matters during stressful times.
15. Use Adhesive Caulk to Hang Lightweight Décor on Any Surface
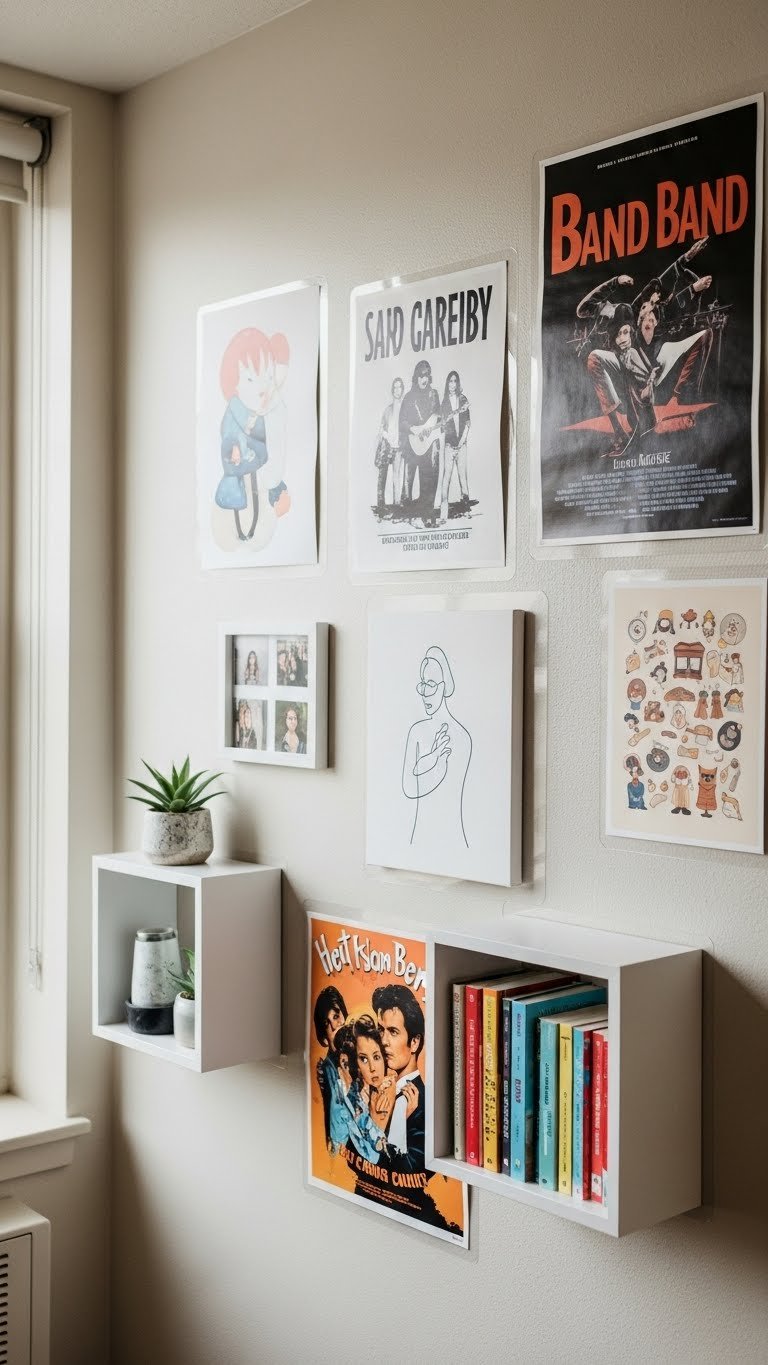
If peel-and-stick doesn’t work for your specific items, adhesive caulk (like Poster Putty or removable caulk) holds posters and lightweight decor safely without holes. It’s stronger than typical putty and releases cleanly when you leave. This opens up decorating options beyond peel-and-stick products.
Buy a pack of removable caulk ($5-$10) from Amazon or Target. Apply small dots to the back of posters, prints, or lightweight shelving. Press firmly and let cure for 24 hours. It holds surprisingly well—up to 8 lbs in some cases. Removal is clean: just peel off slowly and any residue wipes away.
You now have endless décor flexibility without any permanent commitment. Posters, prints, lightweight tapestries, and small shelves all stay secure. It’s the renter’s secret weapon for personalizing walls.
16. Hang Sheer Fabric From the Ceiling to Create a Canopy Effect
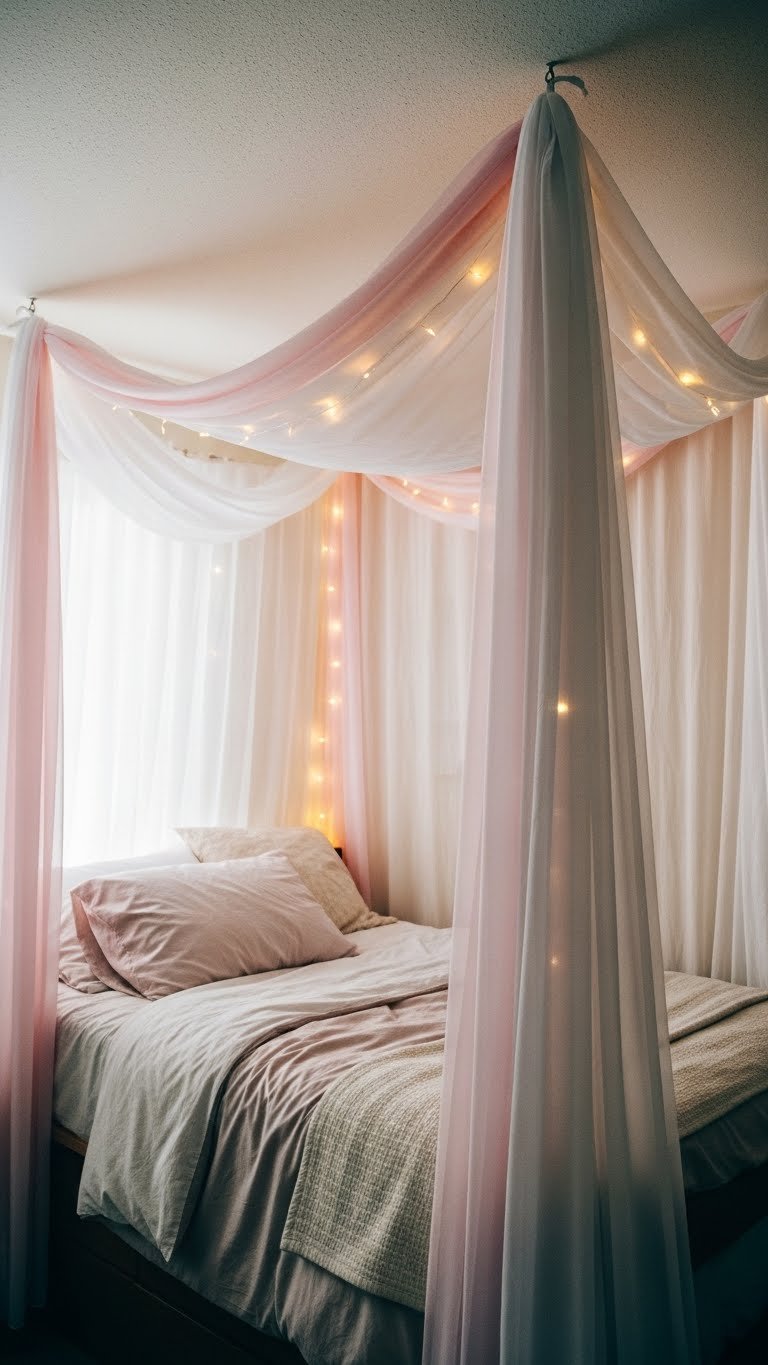
A fabric canopy creates a cozy nest and transforms your bed into a focal point. Unlike a permanent canopy, you’re just hanging lightweight fabric from the ceiling, which creates visual magic without structural changes. It instantly makes your room feel more designed and intimate.
Get sheer fabric ($10-$20 per yard) from a craft store or use lightweight curtain material. Buy adhesive hooks ($5-$10 per pack) to hang from ceiling corners. Drape and arrange fabric loosely, letting it flow naturally rather than looking stiff. Add string lights or fairy lights ($15-$25) strung through for extra ambiance. Total investment: $40-$80, installation time: 20-30 minutes.
Your bed becomes a sanctuary and the most inviting spot in your room. This tiny change has an outsized impact on how comfortable and personal your space feels. Plus it photographs beautifully for social media.
17. Set Up a Desk Lamp and Task Lighting to Improve Focus and Mood
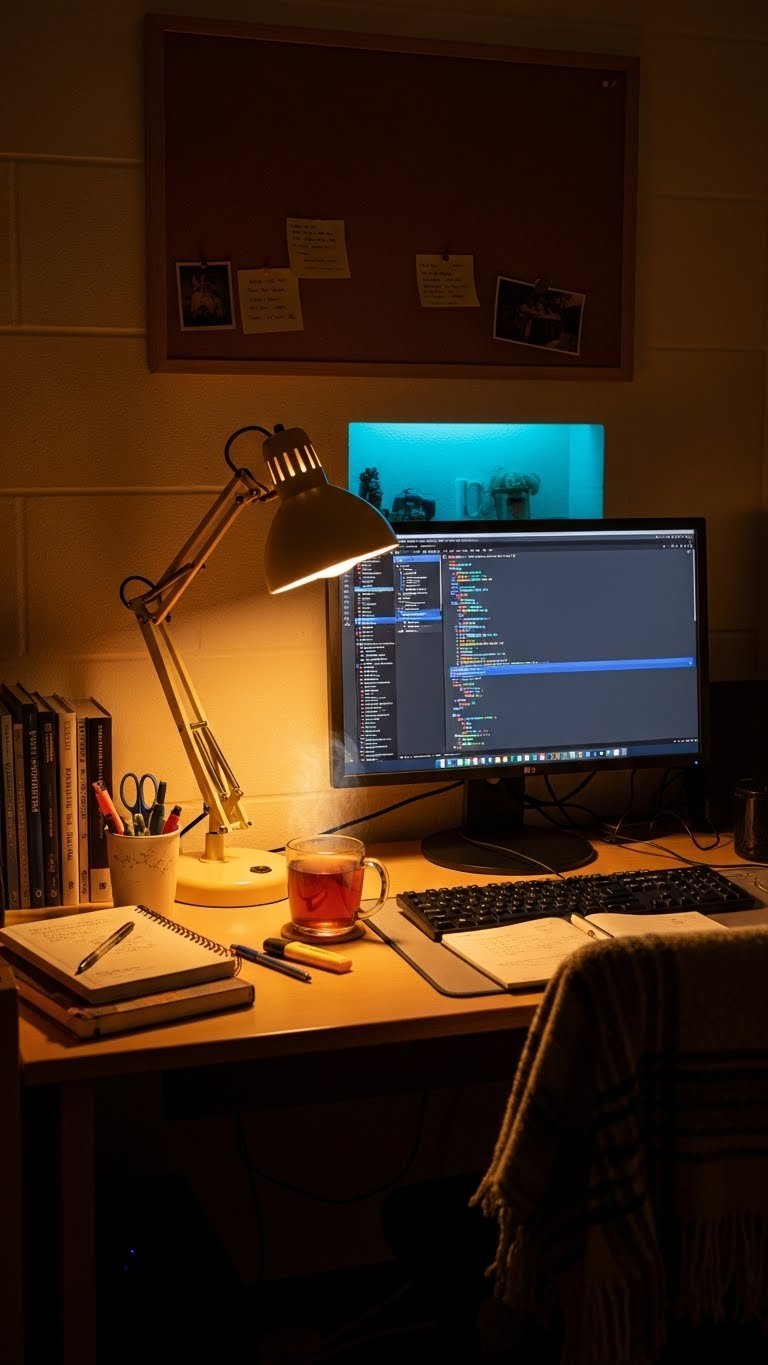
Desk lamps are practical and emotional—they make focusing easier and create ambiance that overhead lights can’t match. A good desk lamp transforms your study space from institutional to intentional. Plus, proper task lighting actually reduces eye strain and helps you work longer without fatigue.
Pick a modern desk lamp ($25-$60) from Target, IKEA, or Amazon. Look for warmish tones (2700K color temperature) to avoid that harsh fluorescent feeling. LED bulbs are cheaper to run and last longer. Mount it to the side of your desk (not directly behind your monitor), taking about 5 minutes to set up and adjust the angle.
Your study sessions become more productive, your eyes feel less strained, and your desk area looks way more intentional. This one tool alone makes a noticeable difference in how long you can comfortably work.
18. Use Washi Tape to Create Geometric Patterns on Plain Furniture
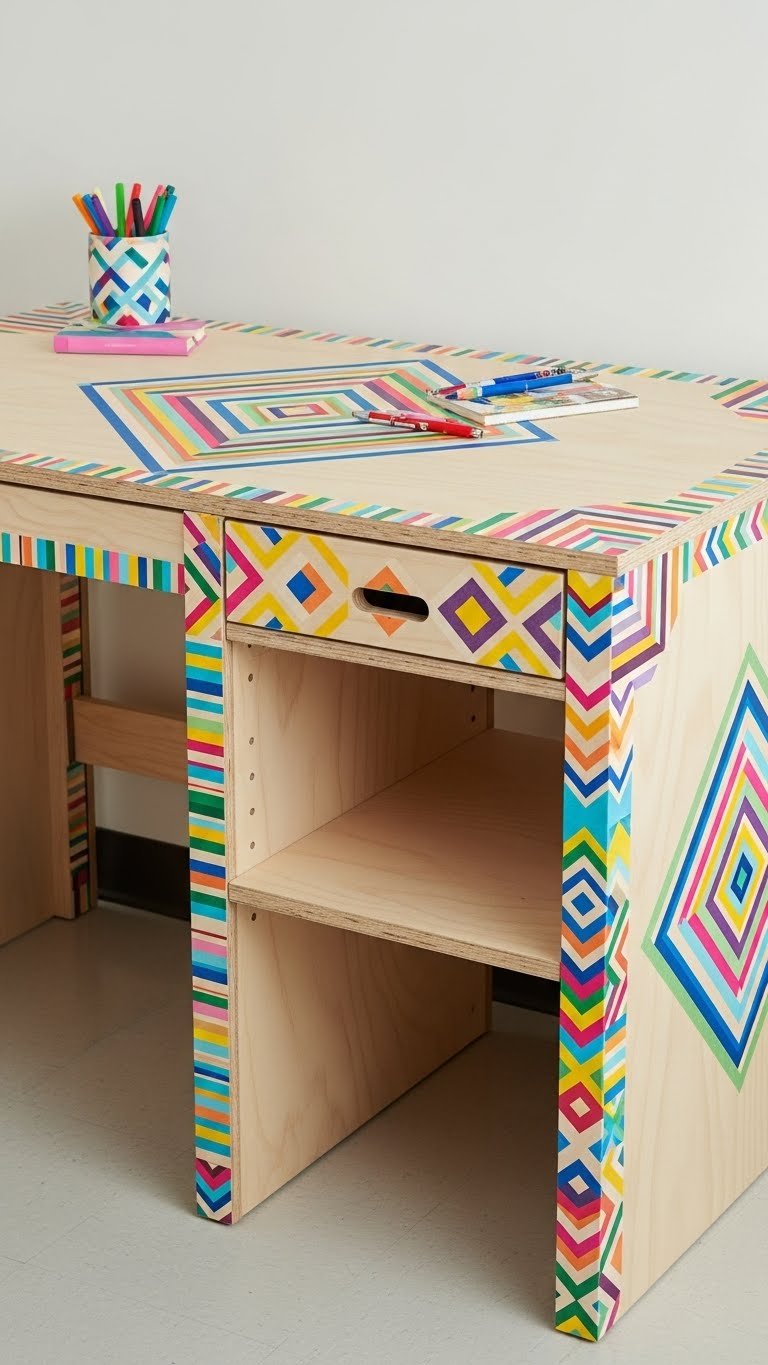
Washi tape is the perfect no-commitment decoration hack for dorm furniture. It costs almost nothing, looks intentional when applied thoughtfully, and peels off cleanly if you want to change it. Use it to hide dings in furniture or create geometric patterns that look custom-designed.
Buy assorted washi tape ($10-$15 for a multi-pack) from Target, Michaels, or Amazon. Plan your pattern (stripes, geometric shapes, or borders work best), then apply tape carefully along edges or across surfaces. Takes 15-30 minutes depending on complexity. This costs practically nothing and looks like you spent way more effort than you did.
Your basic dorm furniture suddenly looks intentional and stylish. It’s especially effective on plain desks, dressers, and shelving to hide institutional vibes. Plus, if you hate it, you peel it off with zero consequences.
19. Create a Small Plant Corner for Freshness and Visual Interest
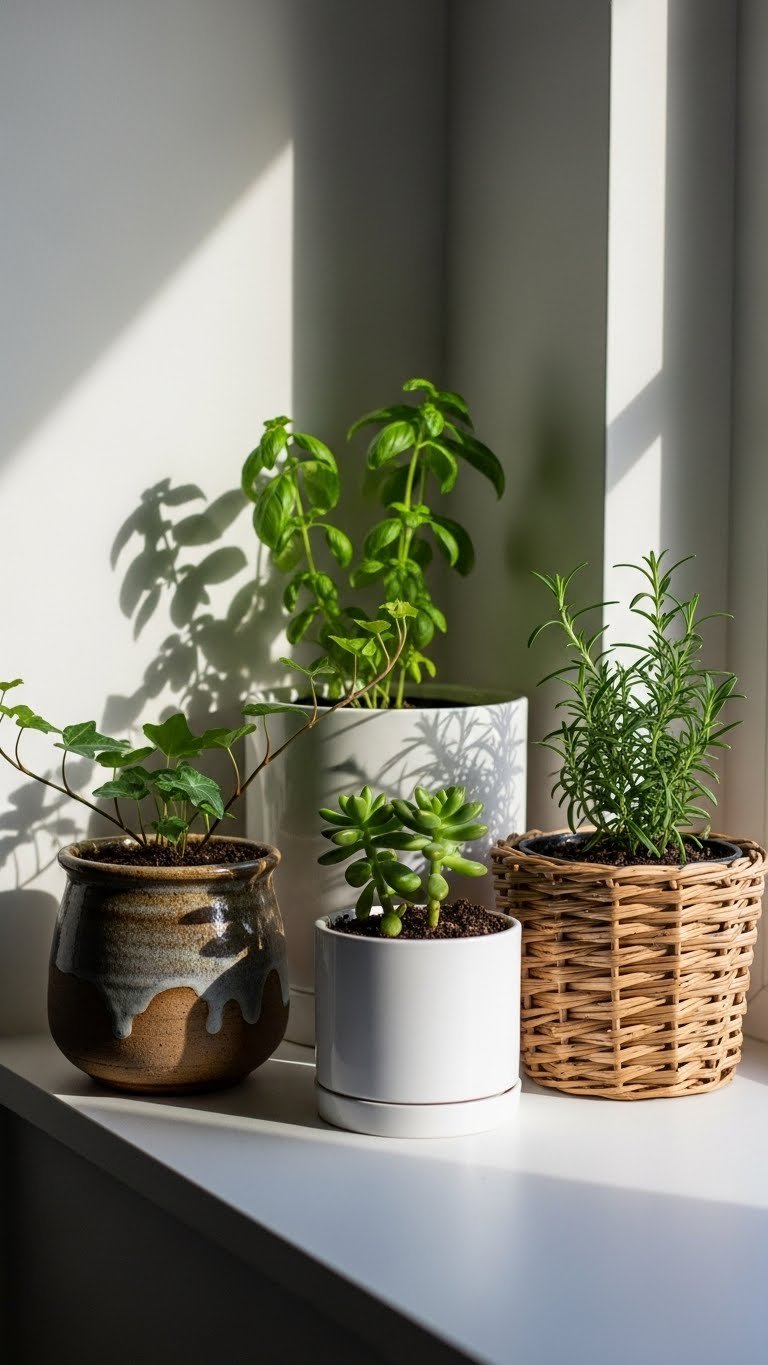
Plants do triple duty: they look beautiful, purify air, and give you something to nurture. Even small dorm rooms have room for 2-3 small plants. Low-maintenance varieties like pothos, snake plants, and ZZ plants thrive in dorm conditions and don’t require green thumbs.
Buy small plants ($5-$15 each) from a local nursery, Trader Joe’s, or Target. Pick small pots ($5-$10 each) that match your aesthetic. Find a spot with natural light (south or west-facing windows are ideal, or use a grow light for $20-$40). Water when soil is dry to the touch—most dorm-friendly plants are forgiving.
Your room instantly feels fresher and more mature. Plus, caring for plants is weirdly grounding during stressful semesters. This is self-care disguised as decoration.
20. Swap Plain Curtains for Textured or Patterned Panels
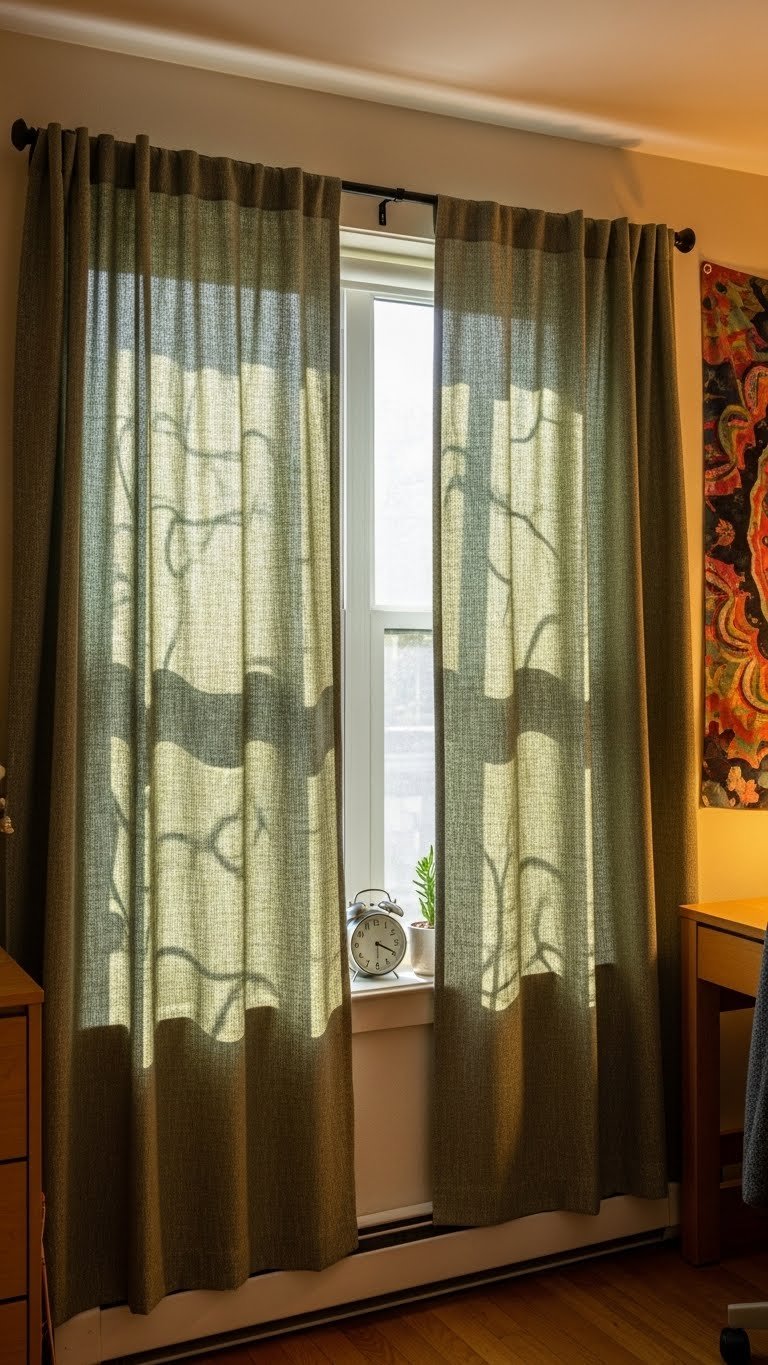
Curtains frame your window and set the tone for your entire room. Upgrading from basic dorm-issue to textured or patterned panels is an easy swap that completely changes your vibe. They also help with light control and provide insulation (extra cozy in winter).
Measure your window and find curtain panels ($20-$50 per panel) from Target, Urban Outfitters, or Wayfair in a pattern or texture you love. Installation takes 15-20 minutes—just hang the rod and insert panels. You don’t need permanent fixtures; tension rods work in rental situations.
Your window becomes a design feature instead of an afterthought. The right curtains anchor your whole room’s aesthetic and make the space feel polished and intentional. Bonus: they help regulate temperature and light for better sleep and focus.
21. Combine Your Desk and Nightstand Into One Multi-Functional Surface
In tiny rooms, furniture that does double duty is non-negotiable. A desk-nightstand combo or a floating shelf that works for both functions saves crucial floor space. This trick makes rooms feel bigger because you’re using fewer pieces to accomplish more.
Pick a compact desk ($80-$150) from IKEA or a floating shelf system ($40-$80) that can stretch the width of your bed or beside it. This becomes your study surface by day and your bedside hub by night. Takes about 30-45 minutes to set up and mount. Organize it so school supplies are on one end and personal items on the other.
You cut down on furniture clutter while keeping everything accessible. Your room feels less crowded, and you’re using your limited square footage smarter. It’s a practical upgrade that also looks intentional.
22. Use Gradient or Ombré Lighting to Create Depth and Mood

Layered lighting with different colors and brightness levels makes rooms feel more spacious and allows you to adjust the vibe for different activities. This is the “grown-up dorm room” secret that nobody talks about. Smart bulbs or LED strips let you shift from study mode to chill mode instantly.
Invest in smart LED bulbs ($20-$40 each) or LED light strips ($15-$30) from Amazon or Best Buy. Set up at least three light sources: overhead ambient light, warm desk lamp, and optional accent lighting. Costs run $50-$100 total for a comprehensive system. Installation takes 30-40 minutes depending on complexity.
Your room becomes infinitely more functional—bright for studying, warm for relaxing, colorful for socializing. You feel like you actually control your environment instead of being stuck with institutional lighting.
23. Arrange Your Furniture in a Corner Layout to Create Zones

How you arrange furniture impacts how big your room feels. Pushing pieces into corners and creating clear zones (sleep area, work area, chill area) makes the space feel intentional and bigger. It also improves traffic flow when friends visit.
Sketch a layout before moving heavy items (takes 5-10 minutes to plan). Push your bed, desk, and dresser into corners or against walls, leaving the center of the room more open. Try an L-shaped setup with your bed along one wall and desk along another. Rearrange takes 30-60 minutes depending on what you’re moving.
The psychological impact is huge—your room feels airier and more intentional immediately. Plus, you have a visual hierarchy that guides guests and creates a natural flow when multiple people are in the space.
24. Add a Rug to Define Space and Add Texture Underfoot
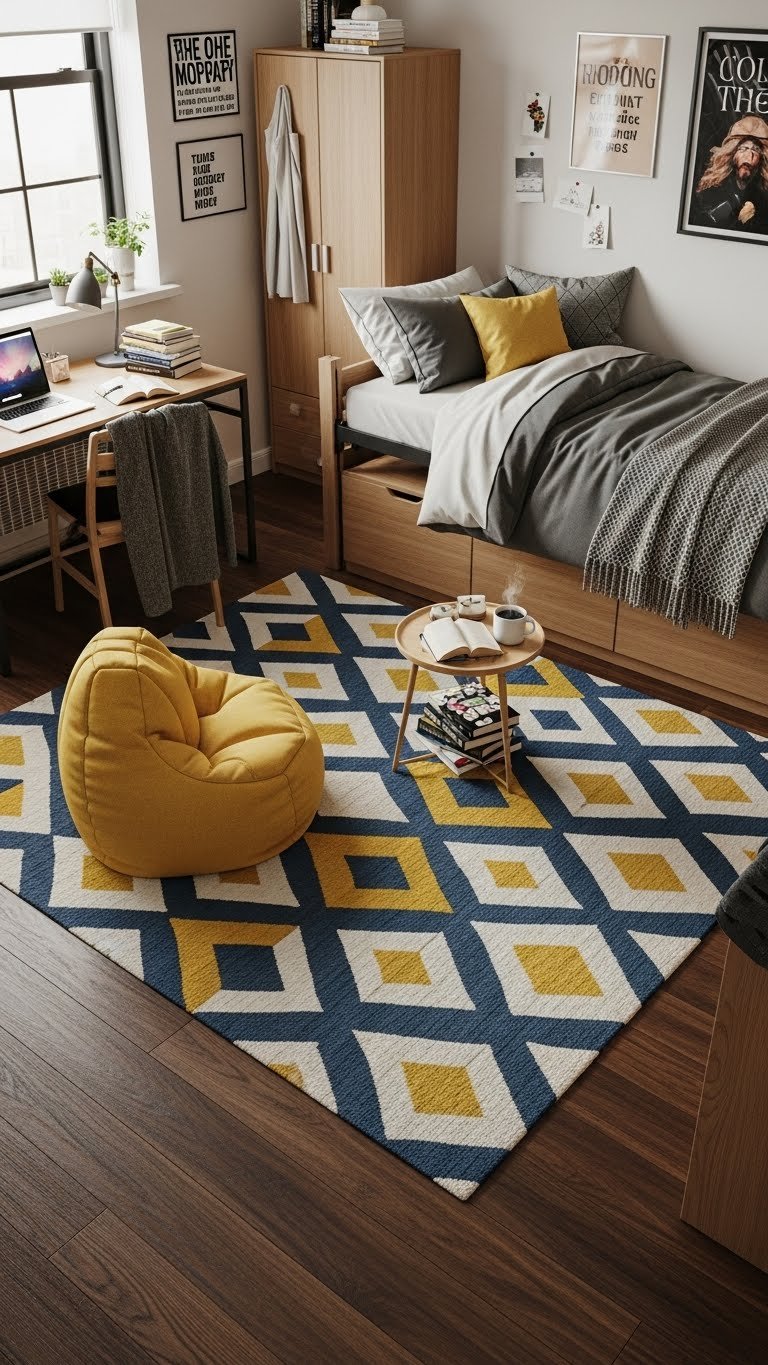
A rug instantly adds warmth and defines space. Even a small 5-by-7-foot rug makes your room feel more intentional and homey. It also dampens noise, adds texture underfoot, and anchors your furniture arrangement. This is one of those upgrades that affects how the room feels, not just how it looks.
Pick a durable rug ($30-$80) from Target, IKEA, or Wayfair in a color that complements your palette. Size matters: go for 5×7 or 6×8 for small dorm rooms so it doesn’t overwhelm the space. Place it where you want to define a zone—under your bed, in front of your desk, or in a sitting area. No installation needed; just lay it down.
Your floor instantly feels warmer and more intentional. The rug grounds your furniture arrangement and makes the space feel complete. Plus, hardwood dorms are loud, so this is a practical upgrade disguised as decoration.
25. Create a “Getting Ready Station” With Mirror and Organized Drawers
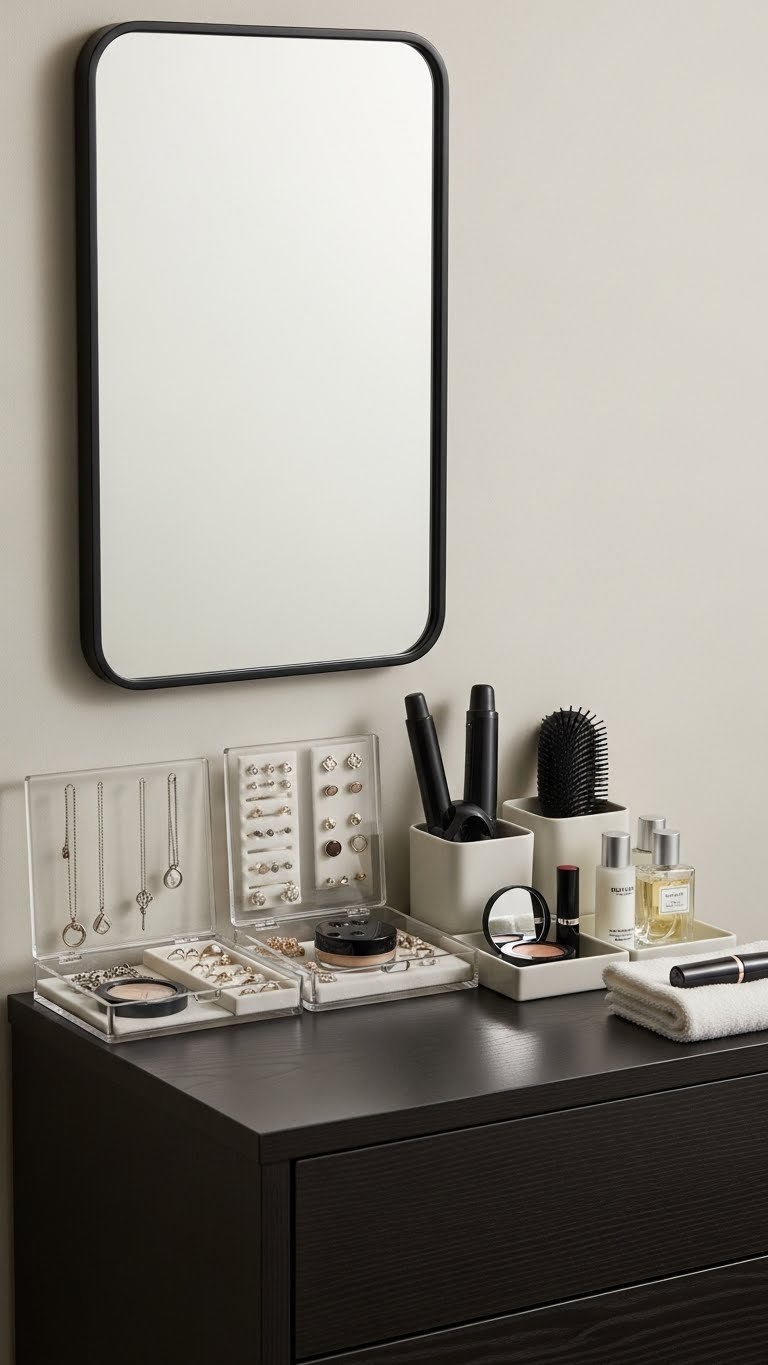
A dedicated getting-ready station keeps all your personal items in one accessible spot, making mornings faster and your room less cluttered. This is especially valuable when you’re sharing a tight space and need everything within arm’s reach of your mirror.
Designate a small dresser or floating shelf ($40-$100) as your station. Add a desk mirror ($20-$40) or use an existing wall mirror. Organize items in small open containers or drawer organizers ($10-$20 total). Arrange items by category: jewelry, hair stuff, skincare, daily accessories. Setup takes about 30 minutes the first time.
Getting ready becomes faster and easier because everything is exactly where you need it. Your room feels more organized, and you’re not scrambling for things on rough mornings. This station becomes your favorite corner of the room.
26. Use LED Marquee Letters or Signs for Personalized Ambiance
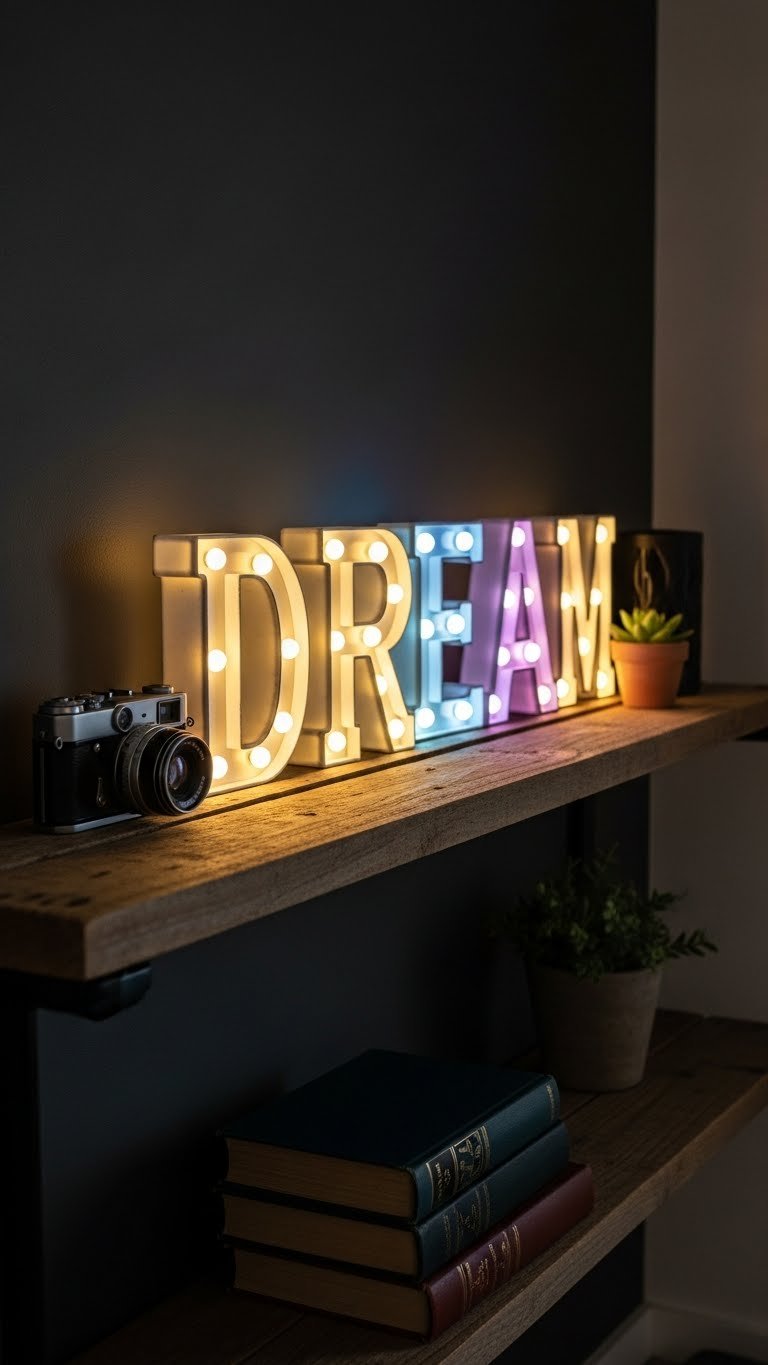
LED marquee letters add personality, ambiance, and a touch of whimsy that photographs beautifully. They’re the TikTok darling of dorm décor for a reason—they’re customizable, relatively affordable, and they create instant mood. Use them to spell your name, an initial, or a favorite word.
Buy LED marquee letters or signs ($20-$50 per letter) from Amazon, Urban Outfitters, or West Elm. Plug them in and arrange on a shelf, desk, or wall. Some come with color-changing options; stick with warm white for a cozy vibe. Takes about 5 minutes to unbox and plug in. You can rearrange them or swap letters if you want to change it up seasonally.
Your room gets an instant personality boost and a piece that genuinely works as both décor and lighting. Visitors comment on these immediately, and they photograph so well that your room becomes the backdrop for better social media posts.
Save this for your next room refresh and try just one idea this weekend. Pick whichever speaks to you first—whether that’s the practical storage hack or the cozy lighting vibe—and watch how one small change shifts everything about how your space feels.
Leave a Reply