Small kitchens don’t have to feel cramped or frustrating. With the right design choices, you can make every inch work harder—and feel bigger—without a major renovation. Whether you’re renting, living in a studio, or working with a galley kitchen, these 24 ideas combine practical storage solutions, visual tricks, and smart styling to maximize your tight space. You’ll learn budget-friendly hacks alongside investment pieces, plus renter-approved options that don’t require landlord permission. Let’s turn your small kitchen into a space that’s both functional and genuinely enjoyable to cook in.
1. Paint Walls Light to Expand Space
Paint is the fastest way to make a small kitchen feel bigger—light colors literally bounce light around and create visual openness. Choose whites, soft grays, or pale cream for walls; these shades make the room breathe without feeling sterile.
Go for a flat or eggshell finish to hide imperfections (glossy finishes can highlight flaws in small spaces). Benjamin Moore’s “Cloud White” or Sherwin-Williams’ “Alabaster” work beautifully and cost $25–$40 per gallon. A single-wall project takes 2–4 hours including prep. If you’re renting, peel-and-stick wallpaper in light tones offers the same effect without landlord pushback ($15–$30 per roll).
The payoff is immediate: your kitchen opens up visually, and cooking feels less like working in a box.
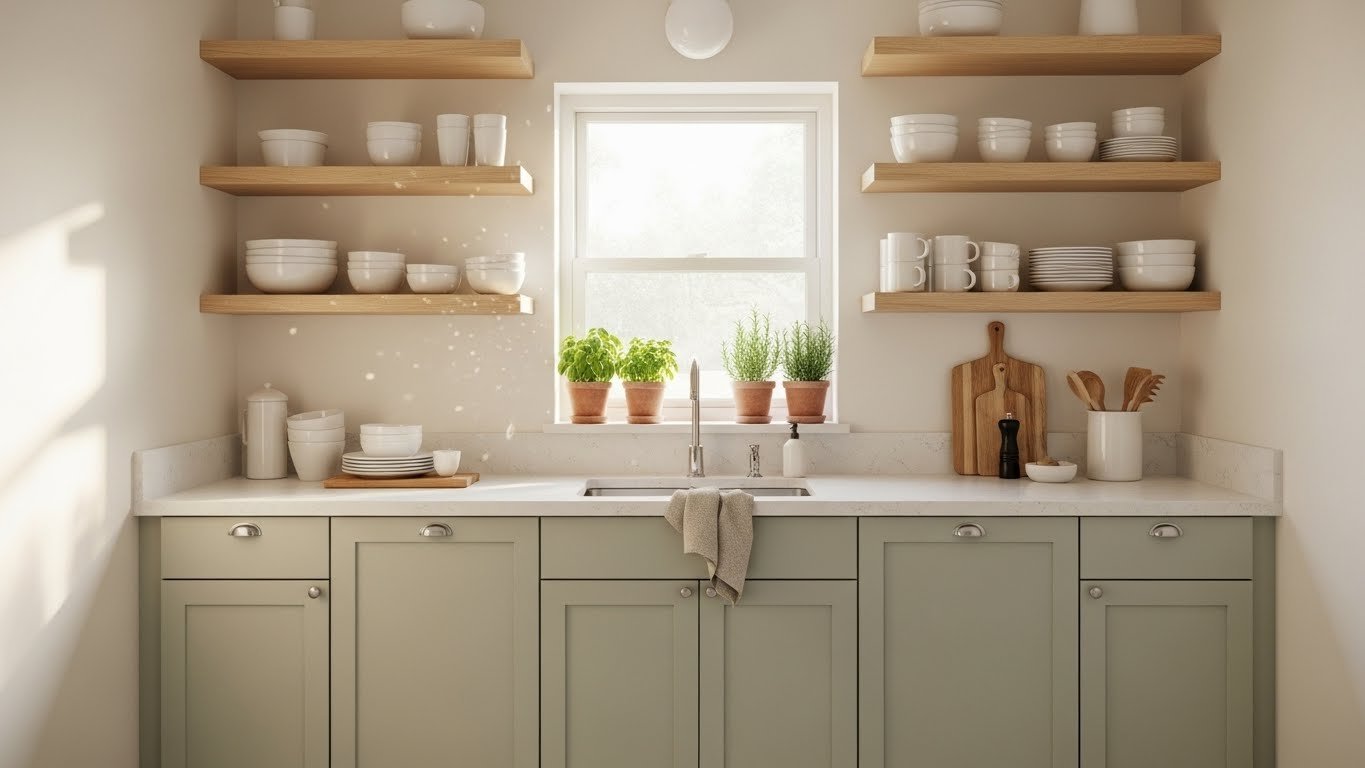
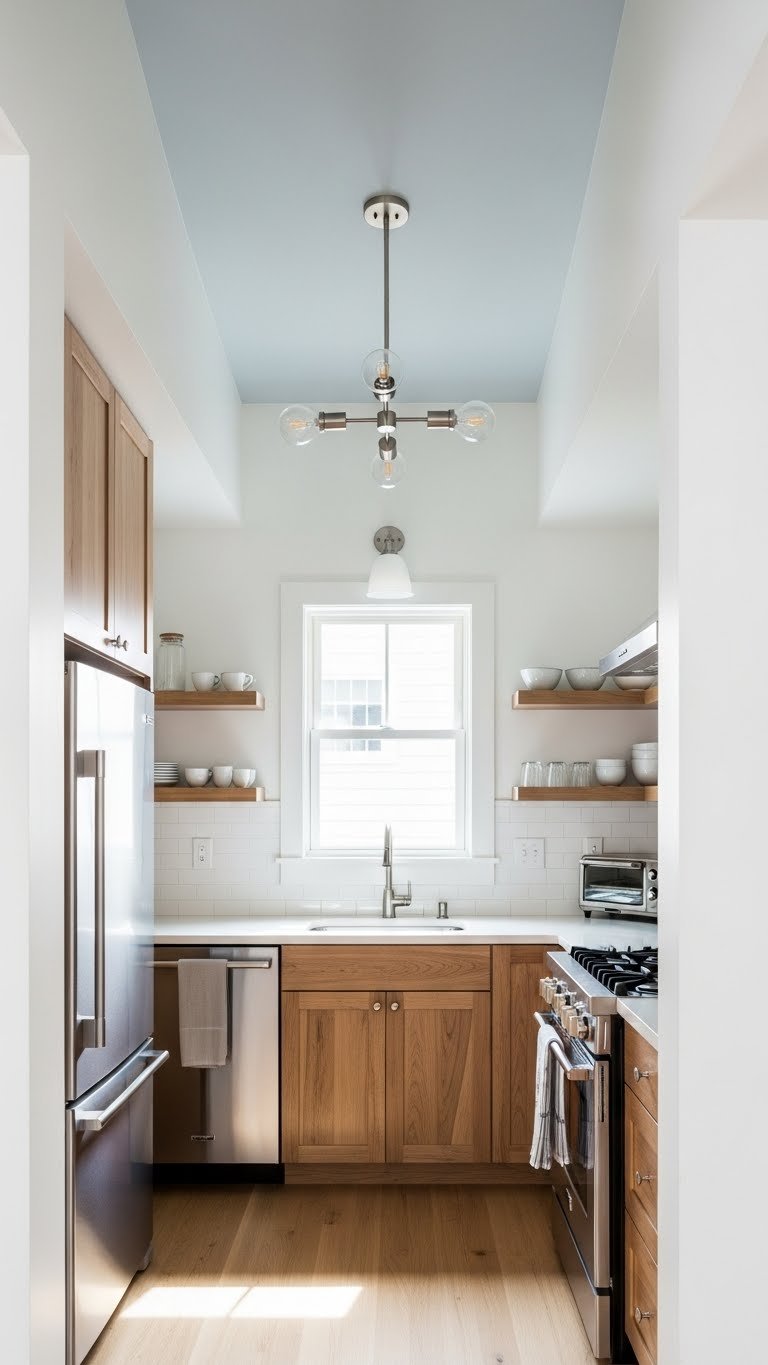
2. Install Open Shelving Instead of Upper Cabinets
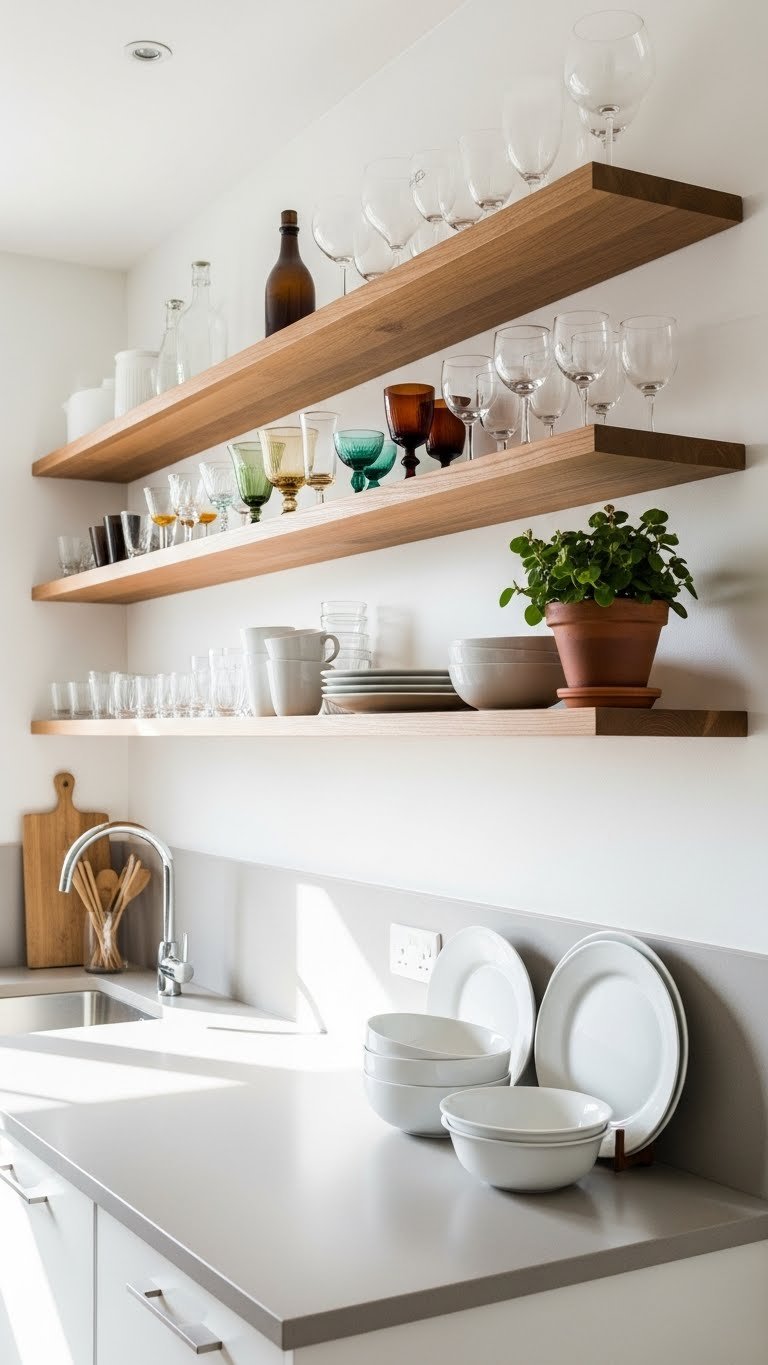
Open shelving removes visual weight and makes small kitchens feel airier—plus you gain easy access to everyday dishes without door swings. This works especially well if you don’t have tons of clutter or if you’re willing to display only items you love.
Replace one or both upper cabinet runs with floating shelves (6–12 inches deep). Expect to pay $50–$150 per shelf installed, or $20–$60 for DIY floating shelves from IKEA or Home Depot. Installation takes 1–2 hours if you’re comfortable with a level and screws; hire help if you need wall studs located. Style with white dishes, a few cookbooks, and small plants—gaps matter here. Renter? Lean large shelves against walls and secure them with earthquake-proof brackets instead.
You’ll instantly see how this opens up the room and makes daily cooking more streamlined.
3. Add a Narrow Rolling Cart for Extra Storage
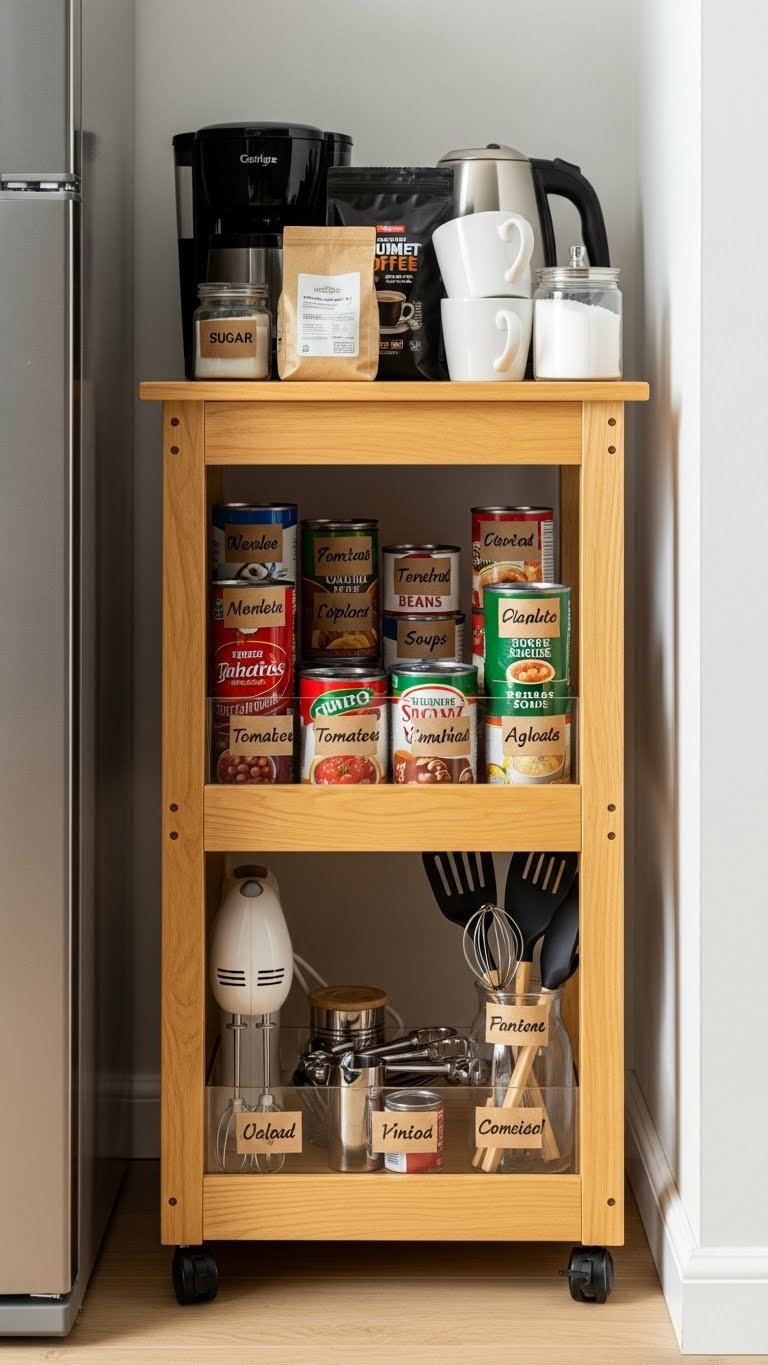
Rolling carts slide into gaps that cabinets can’t fit—between the fridge and a wall, next to the stove, or in a corner. They’re mobile, affordable, and perfect for small spaces because you move them around seasonally.
Pick a 3-tier slim cart (12–16 inches wide) from IKEA Råskog ($30–$40), Target, or Amazon. Stock the top tier with frequently used items like oils and spices, the middle with canned goods, and the bottom with bulkier appliances like a slow cooker. Costs just $30–$60 and needs no installation. If you move or redecorate, take it with you—totally renter-friendly.
This small addition gives you functional storage without eating into precious counter or cabinet real estate.
4. Use Vertical Wall Space for Magnetic Knife Strips
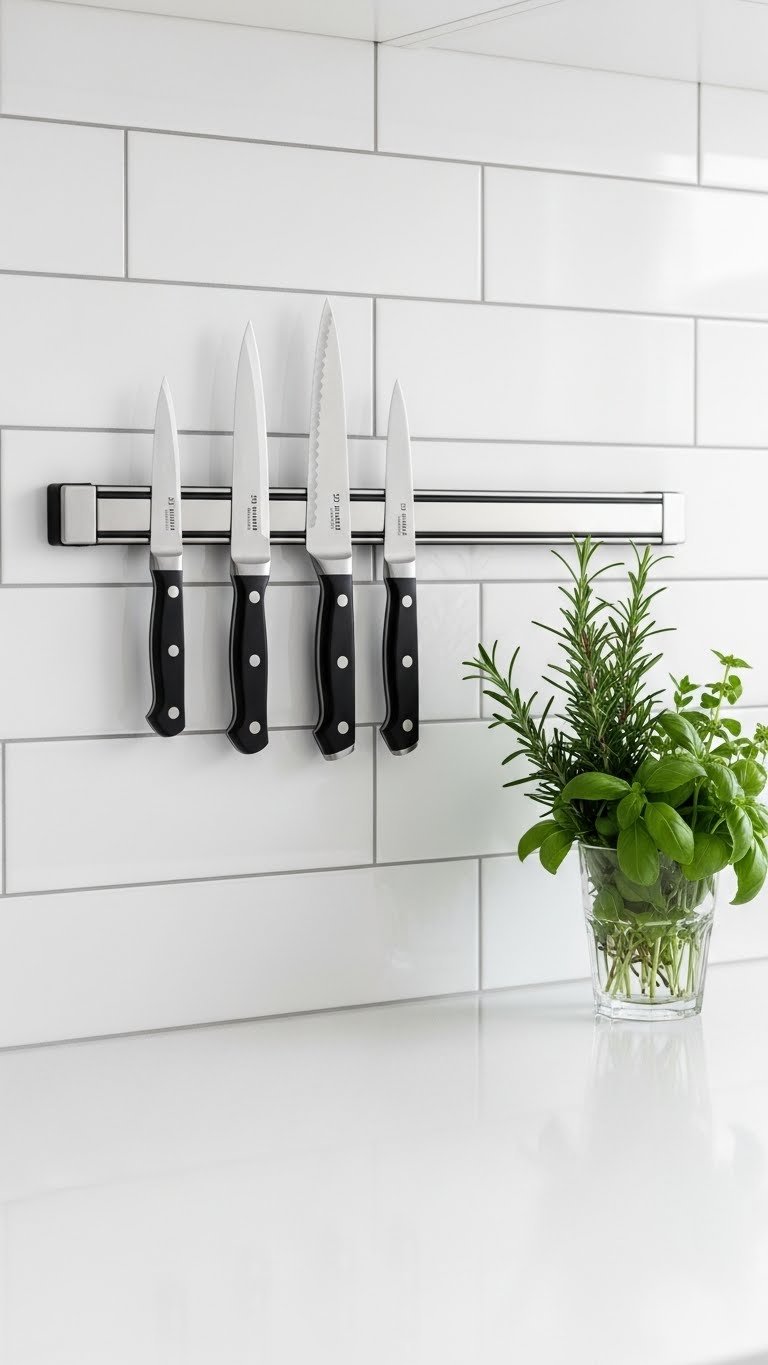
Knives taking up drawer space are wasted real estate in a small kitchen. A magnetic strip on the wall frees up drawer storage while keeping knives accessible and safely organized.
Mount a stainless steel magnetic strip (18–24 inches) at eye level on your backsplash or wall. Zwilling J.A. Henckels or Victorinox strips run $20–$50 and install with two screws in 10 minutes (renter-friendly if you use removable adhesive strips instead, $8–$15). Only knives with metal blades stick, so stainless steel works best. Avoid mounting above a stove where heat might affect the magnet.
You reclaim drawer space while giving knives a styled, functional home that looks great in photos.
5. Go Vertical with Wall-Mounted Pot Racks
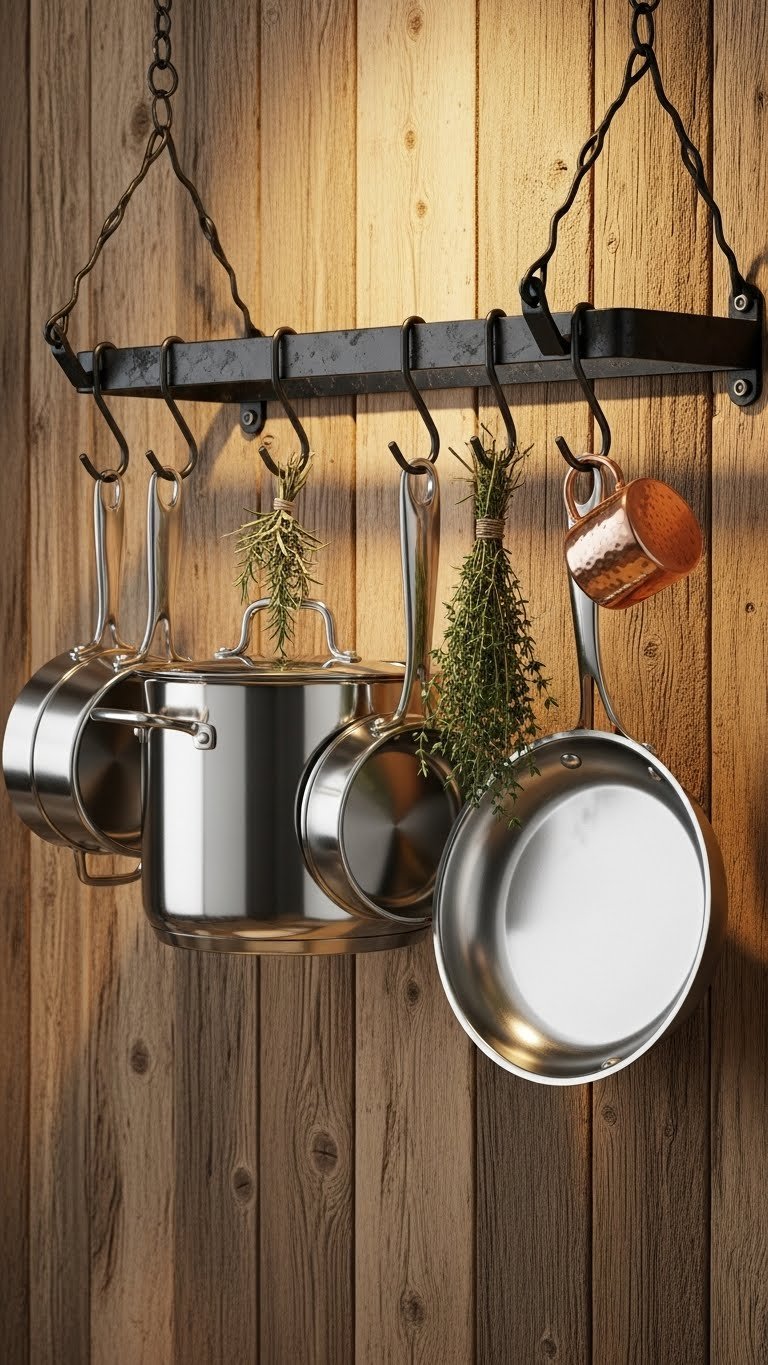
Pots and pans are bulky; wall-mounted or ceiling racks keep them visible and accessible without devouring cabinet space. This especially helps if your cabinets are already maxed out.
Choose a wall-mounted or ceiling-hanging pot rack in black iron or brushed nickel ($40–$120 from IKEA, Home Depot, or Wayfair). Installation takes 1–2 hours with basic tools (or hire help for ceiling work—$100–$200 labor). Only hang cookware you use regularly; aesthetics matter since it’s visible. Renter? Adhesive wall hooks ($15–$30) can hold a few pans without drilling.
Your cooking gear becomes décor while freeing up valuable cabinet inches below.
6. Install Pocket Doors to Save Swing Space
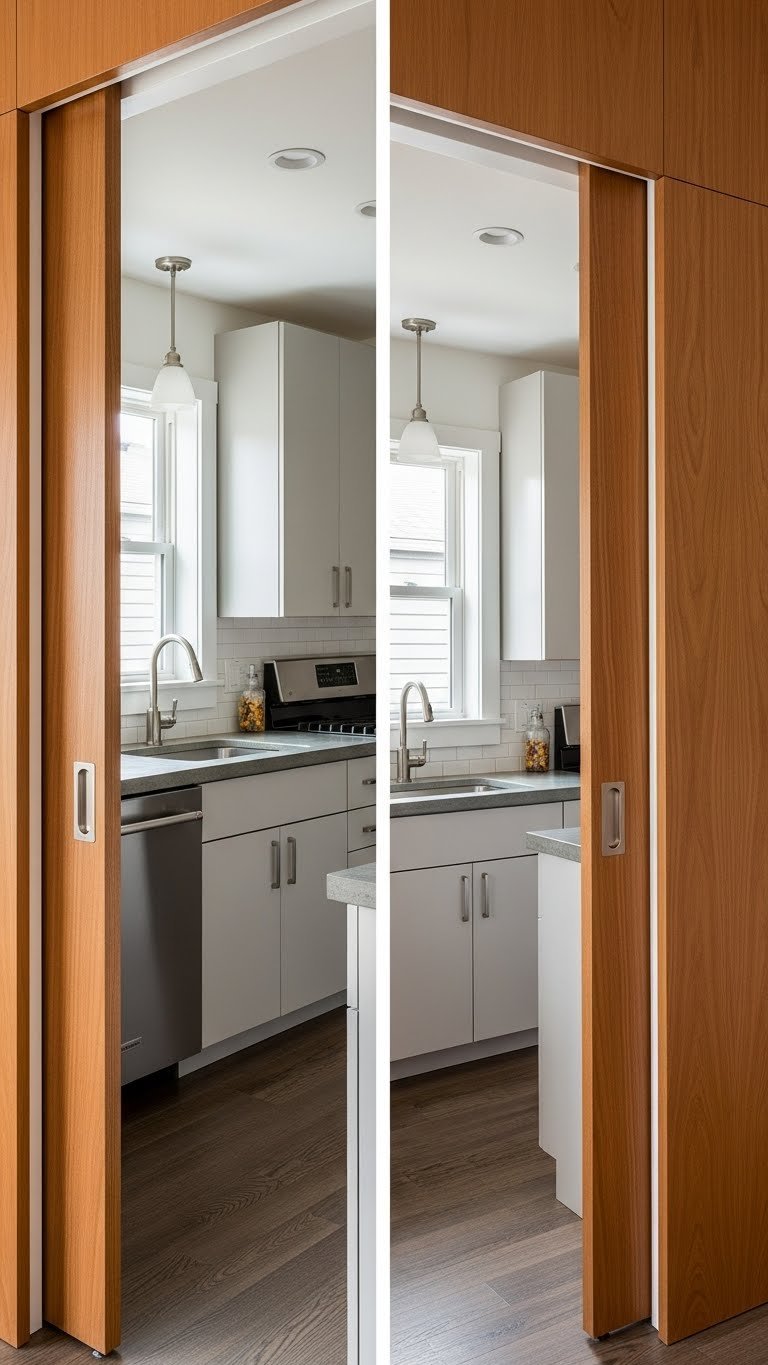
In tight kitchens, a door swing eats precious floor space. Pocket doors slide into walls instead, reclaiming inches.
If your kitchen leads to another room via a traditional door, consider a pocket door installation ($500–$1,500 installed, depending on wall type). Installation takes a full day or two. This is a bigger project (not renter-friendly without landlord approval) but pays off immediately in how the space flows. Alternatively, replace a swinging door with a barn door on a track ($100–$300 DIY, 4–6 hours) for similar results with less structural work.
The space you gain feels surprising—suddenly the kitchen opens up to the next room without a door constantly blocking your path.
7. Choose Compact Appliances Sized for Small Spaces

Standard appliances are too big for many small kitchens. Compact versions (24 inches instead of 30+) are designed for apartments and small homes and work just as well.
Replace oversized appliances with 24-inch refrigerators ($600–$1,200), compact dishwashers ($400–$800), or slimline microwaves. Brands like GE, LG, and Samsung make quality compact lines. Measure your space first—this isn’t a quick project (budget half a day to a full day for removal and installation), and you’ll need professional help for gas or complex electrical ($200–$500 labor). Buying used saves money ($300–$700).
Trading bulky appliances for right-sized ones changes everything—suddenly there’s actual counter space and the kitchen doesn’t feel like appliances with a sink attached.
8. Layer Lighting to Brighten Dark Corners
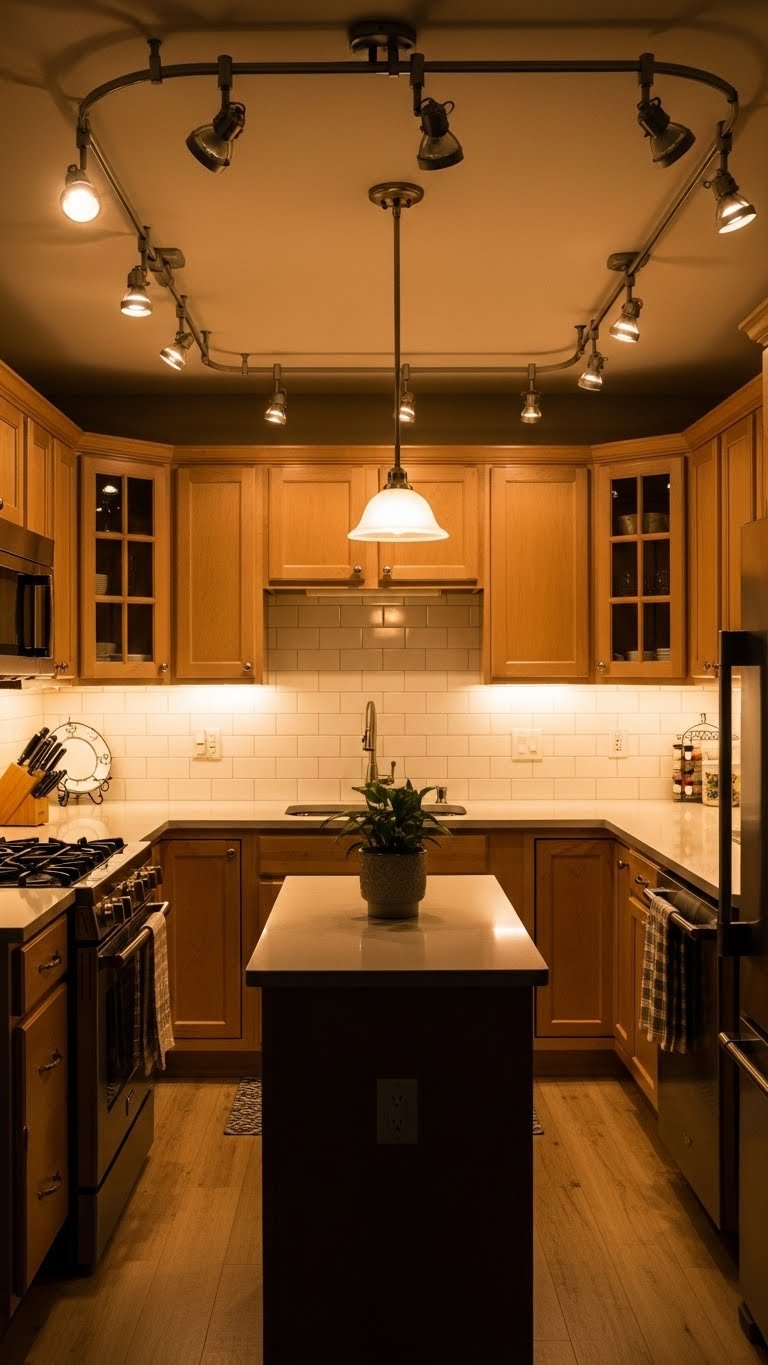
Small kitchens often feel dark because they have fewer windows and less natural light. Layered lighting (overhead, task, and accent) makes the space feel bigger and more welcoming.
Start with LED under-cabinet strips ($25–$60 for a kit, 20 minutes to install). Add track lighting or recessed lights overhead ($40–$100 per fixture, plus $200–$400 installation). Finish with pendant lights over an island or counter ($50–$150 each). All together, budget $300–$600 for a full lighting refresh. Use warm LED bulbs (2700K color temp) to keep the space feeling cozy rather than clinical.
Better lighting makes counters visible, hides shadows, and transforms how spacious the kitchen feels.
9. Use Corner Organizers to Capture Wasted Space
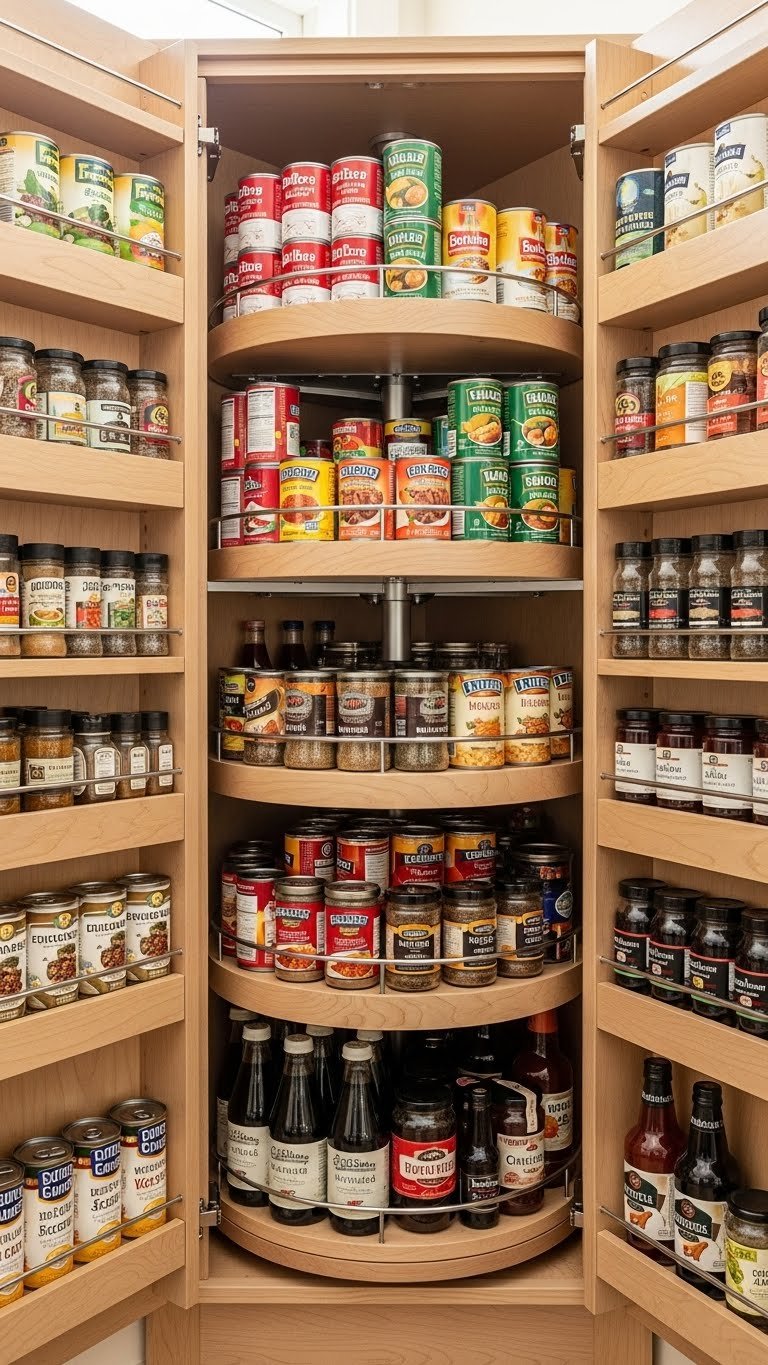
Corner cabinets are notorious storage black holes where things get lost. Organizers make that dead space actually useful.
Install a lazy Susan turntable ($15–$30) or pull-out corner organizer ($40–$80) in existing corner cabinets. For upper cabinets, try stackable shelves or tiered risers ($20–$50). Most install in 15–30 minutes with no tools needed. Works for renters since you’re not modifying anything permanent. Stores like Target, Amazon, and The Container Store stock multiple options.
Suddenly that useless corner becomes your go-to spot for spices, canned goods, or small appliances—no more reaching to the back of a dark cavity.
10. Paint Cabinets a Bold Earth Tone
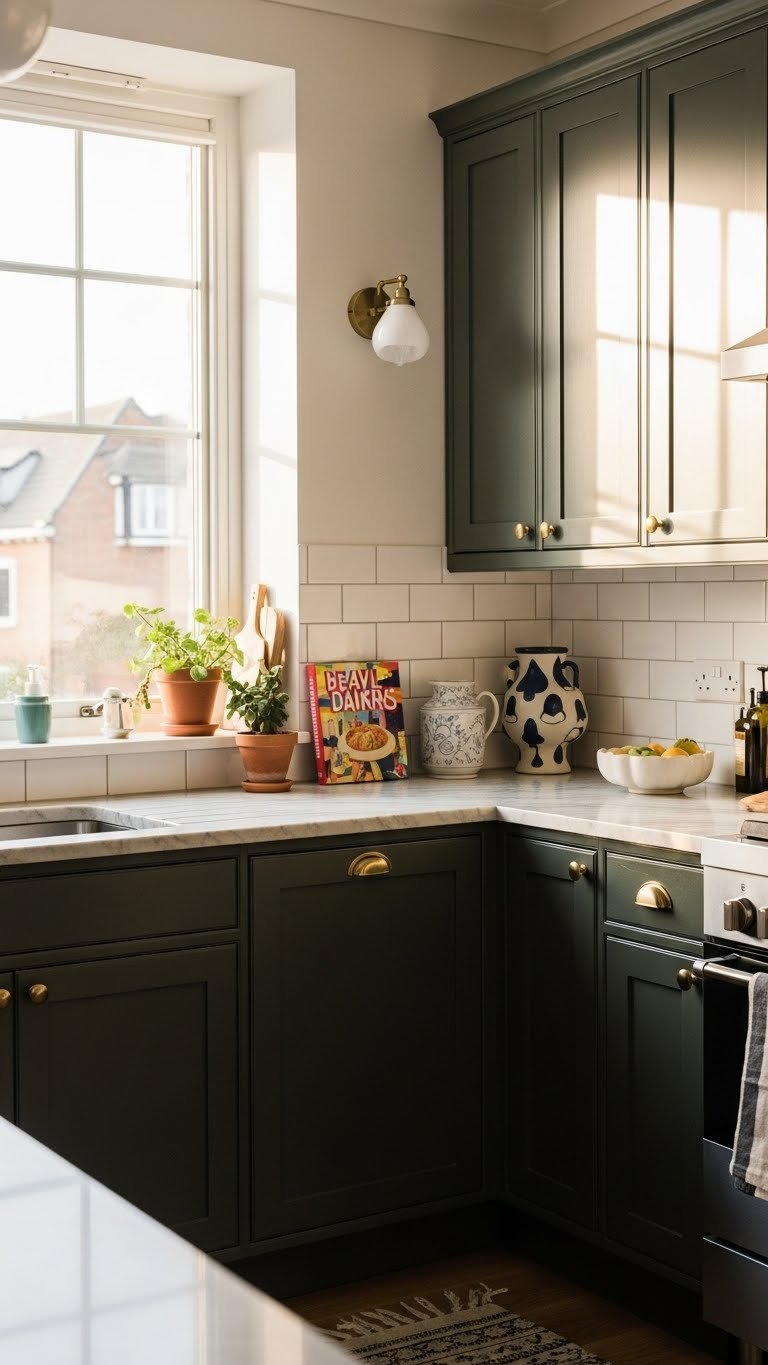
All-white cabinets feel impersonal and, honestly, bland in 2025. A bold, warm color adds personality and surprisingly makes the space feel intentional rather than cramped.
Choose forest green, sage, deep navy, or warm brown for cabinets. Brands like Benjamin Moore, Farrow & Ball, or Sherwin-Williams have excellent earth-tone options ($30–$50 per quart). Paint takes a full day to a weekend depending on cabinet count and your skill level. Hire a painter for a polished finish ($800–$1,500). Renter? Use peel-and-stick cabinet film instead ($50–$150).
Color choice makes your kitchen feel curated—like it actually has character—while keeping the space from feeling sterile or too small.
11. Install a Fold-Down Wall-Mounted Table
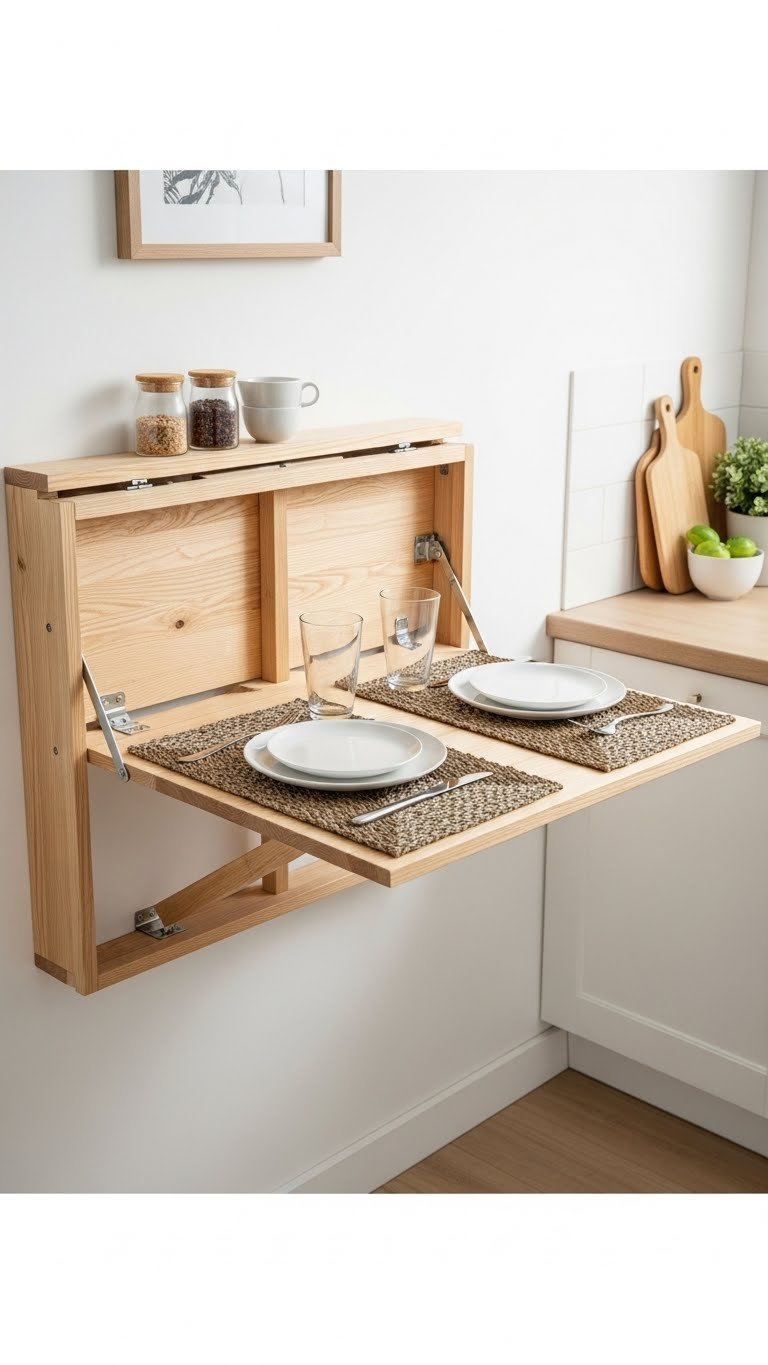
Small kitchens often lack dining space. A fold-down table gives you seating when needed and disappears when you don’t, freeing up floor space.
Mount a wall-folding table (24–36 inches wide) at elbow height above a counter or against a wall. Options like IKEA Norberg cost $60–$80 and install in 1–2 hours with a level and basic tools. Sturdier wood versions run $100–$200. It seats two comfortably and folds flat against the wall. Perfect for renters using heavy-duty adhesive strips to avoid drilling.
Suddenly you have dining seating that doesn’t take up real estate—you eat at a proper table instead of balancing bowls on the counter.
12. Add Glass-Front Cabinet Doors for Openness

Glass-front cabinet doors let light pass through and create visual openness—even though there’s stuff inside, you see through rather than at solid wood.
Replace some solid cabinet doors with glass-front doors. Custom doors run $50–$150 each, but IKEA has budget options ($25–$40 each). Handles or hinges often need upgrading ($10–$30 per piece. Installation takes 2–4 hours depending on your skill level. Only do this if you’re happy with what’s inside—style matters. You must keep dishes and items organized and visually appealing.
The kitchen opens up visually while you gain the ability to see what you have at a glance—less fumbling through cabinets.
13. Use Tiered Shelf Risers to Double Cabinet Space
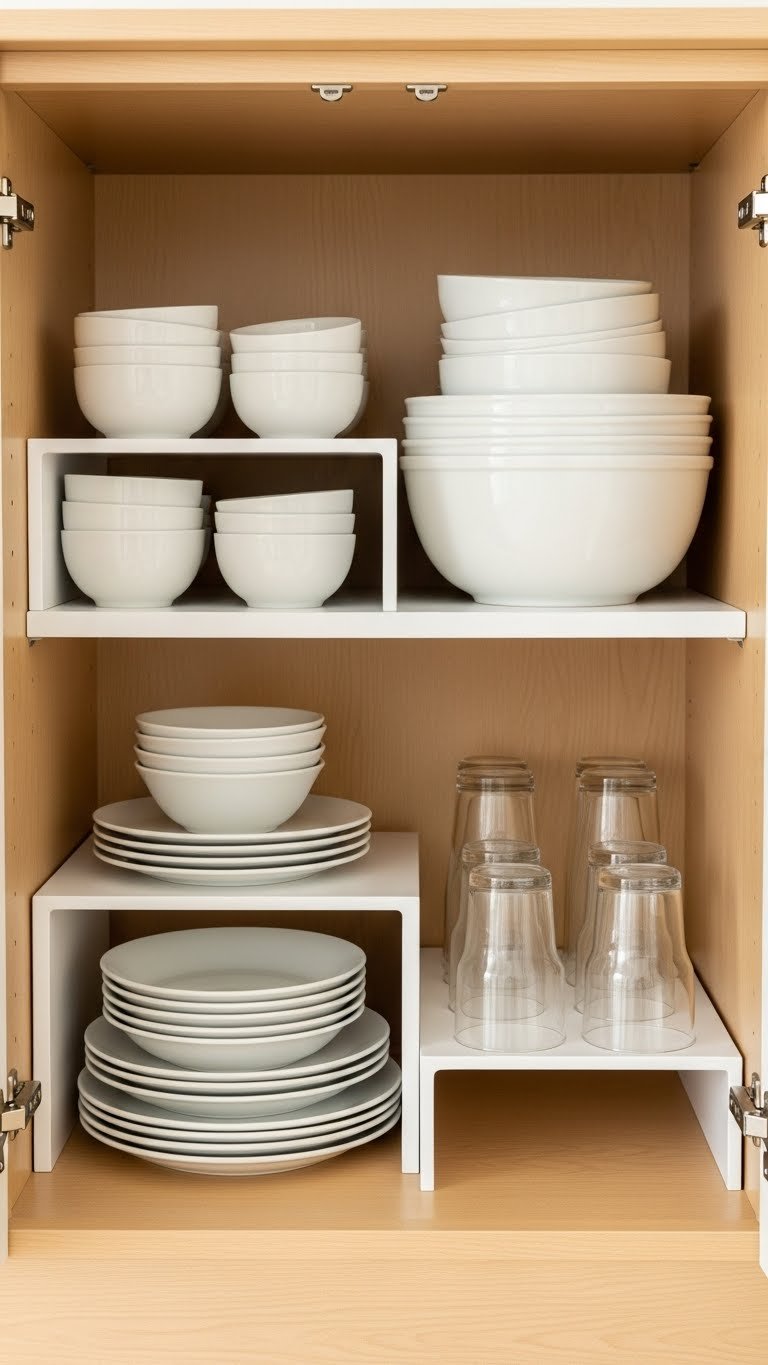
Tall stacks of plates and bowls waste vertical cabinet space. Tiered risers let you store more in the same footprint.
Buy stackable shelf risers ($15–$40 per set) from The Container Store, Target, or Amazon. These sit inside existing cabinets and create a second tier—no installation needed, takes 5 minutes to arrange. Works for dishes, glasses, bowls, and canned goods. Renters love these since you’re not modifying anything.
You’ll store roughly twice as much in the same cabinet space, opening up drawers and lower cabinets for other items.
14. Install a Backsplash with Texture or Pattern
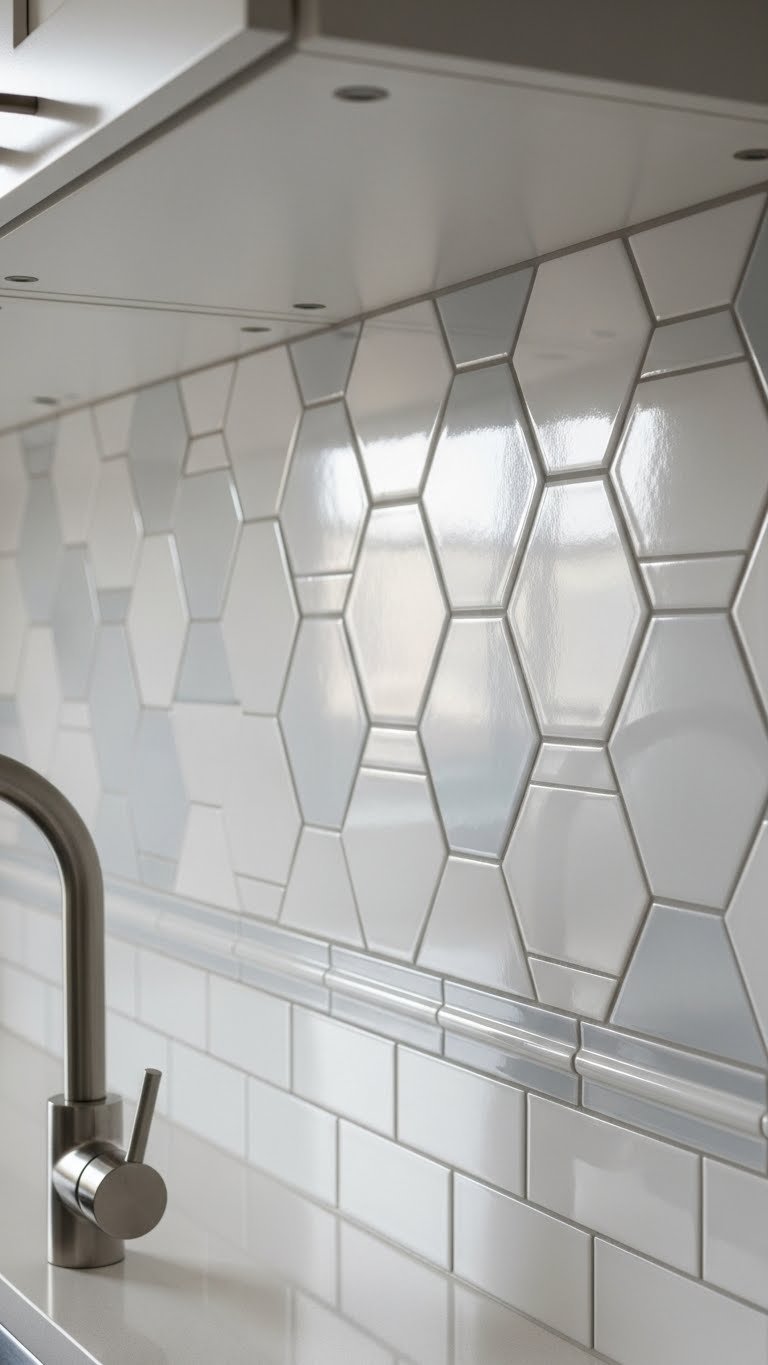
A textured or patterned backsplash adds visual depth to a small space—it’s like wall art but functional. Tile also protects against splashes.
Choose small tiles like subway tiles, hexagons, or mosaics in whites, soft grays, or pale greens ($2–$8 per square foot. DIY tiling takes 6–10 hours for a small kitchen; hire pros for $800–$2,000 installed. Budget $300–$600 total materials and labor for a basic backsplash. Peel-and-stick tile alternatives exist ($30–$80) if you’re renting and want a temporary upgrade.
A detailed backsplash draws the eye upward and creates visual interest, making the kitchen feel intentional rather than sparse.
15. Create Pull-Out Pantry Shelves for Deep Cabinets
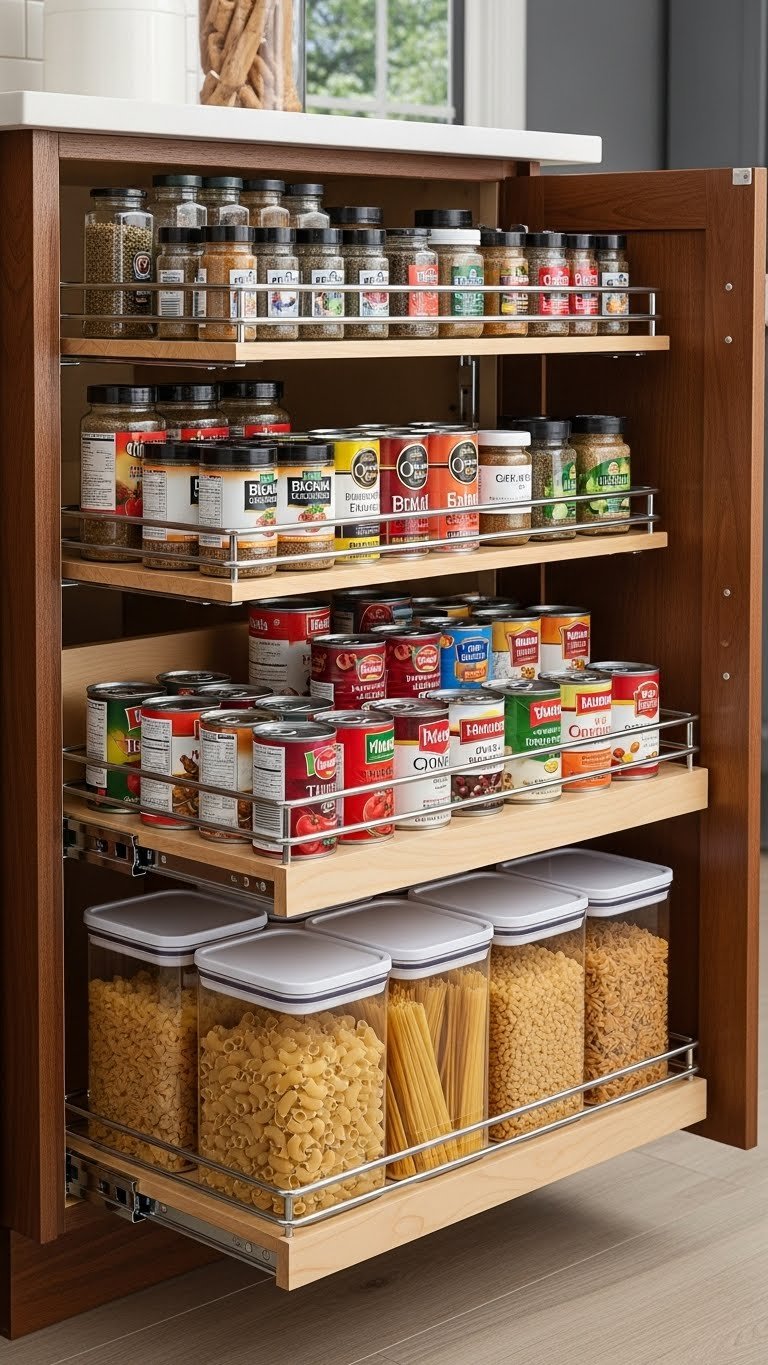
Deep cabinets hide things at the back where you forget about them. Pull-out shelves bring everything forward.
Install pull-out or sliding shelf kits ($40–$100 per set) inside existing cabinets. These take 2–4 hours to install with basic tools and create multiple accessible storage levels. Brands like Rev-A-Shelf or Knape & Vogt offer durable options. Renters can use pull-out shelving trays ($15–$40 each) that sit inside cabinets without modification.
Everything you store becomes visible and reachable—no more digging to the back or forgetting about half-full containers.
16. Mount a Pegboard for Hooks and Hanging Storage
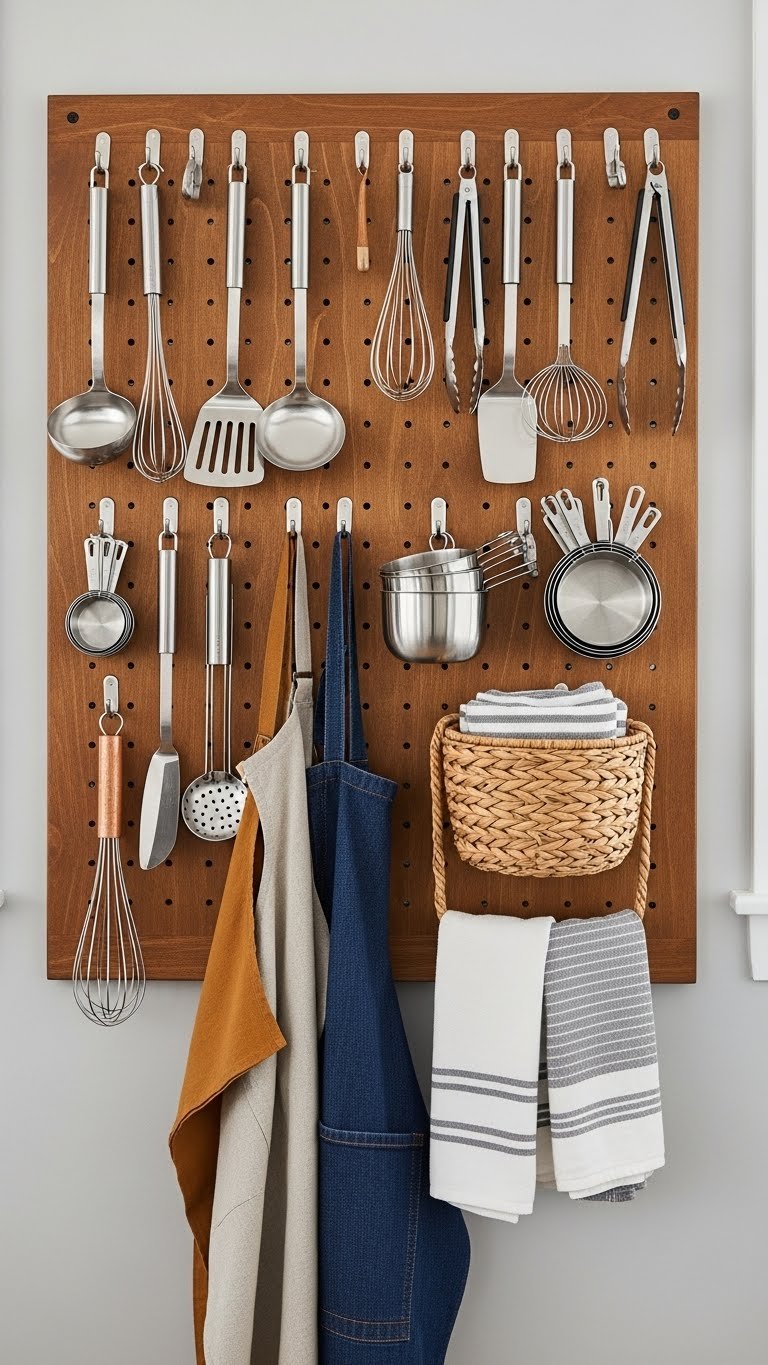
Pegboard is affordable, customizable, and visually interesting—perfect for small kitchens where wall space is the only space left.
Buy a pegboard sheet (4’x2′ or 4’x4′, $15–$30) and hooks ($10–$25 for a set) from Home Depot or Lowe’s. Paint or stain it first for a finished look. Installation takes 1–2 hours with basic wall anchors (no studs needed for light items). Style with cooking utensils, measuring cups, kitchen towels, and small baskets. Super renter-friendly if you use adhesive strips to avoid drilling.
You reclaim wall space for storage while creating a styled, industrial-chic feature that works harder than regular walls.
17. Choose a Slim Island with Open Shelving Below
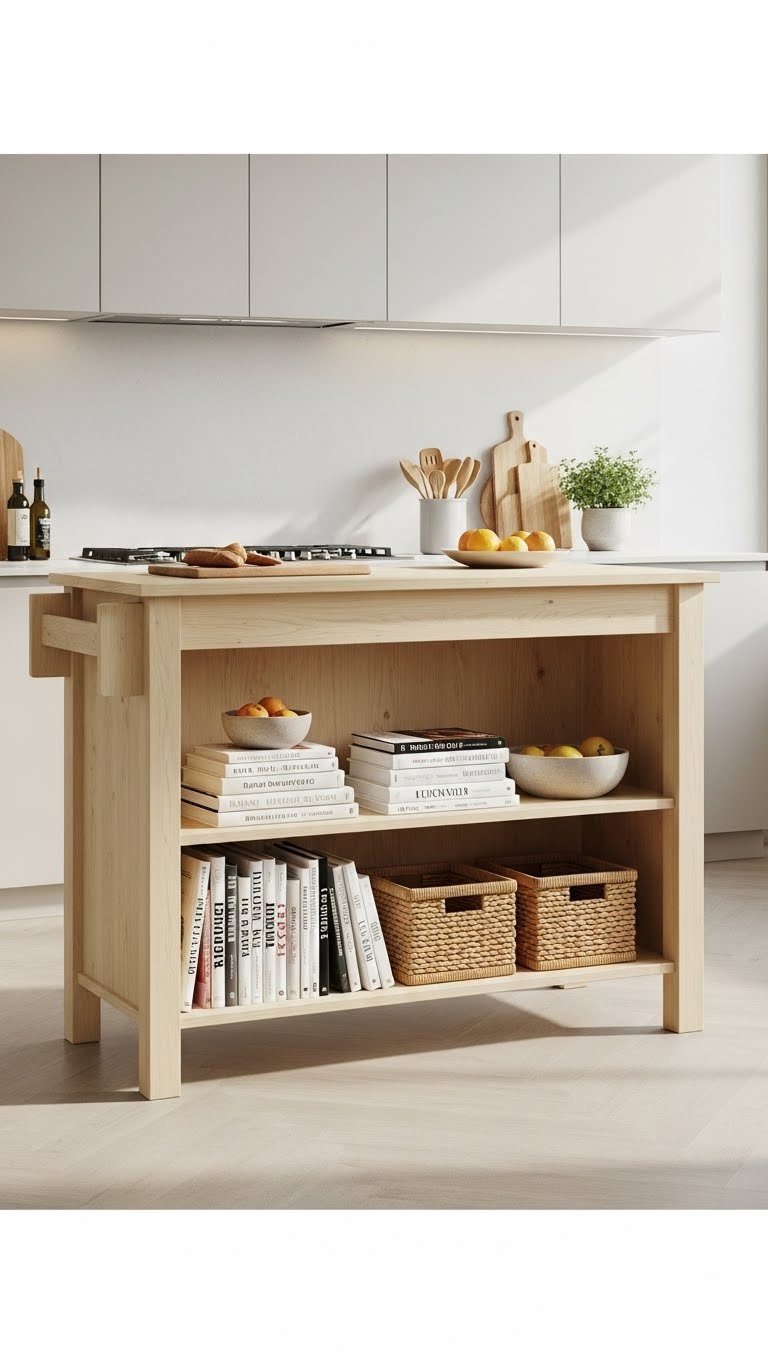
Islands can overwhelm small kitchens, but a slim version with open storage underneath works. You get counter space and storage without blocking sightlines.
Opt for 24–30-inch-wide islands (narrower than standard) with open shelving or legs instead of solid bases ($200–$600 from IKEA, Wayfair, or local builders). This costs more than a cart but feels more permanent and built-in. Leaves 36+ inches on either side so you can move around. Renter? Skip the island; use a narrow cart instead ($40–$80).
An open-base island adds counter workspace and storage without making the kitchen feel cramped—you can still see across the room.
18. Add a Narrow Wine Rack or Beverage Cooler

Beverage storage often overflows cabinets. A compact wine rack or small cooler handles it while adding a style accent.
Choose a narrow wine rack (6–12 inches wide, $30–$60) or compact beverage cooler (18–24 inches, $150–$400). Both install in corner gaps or under counters. Wine racks attach to walls or sit on counters (no installation). Coolers need an outlet but fit where standard cabinets won’t. Budget accordingly based on style and size.
Your everyday bottles stay accessible, out of cabinets, and on display—turning a functional item into a décor accent.
19. Install a Narrow Open Shelf Above the Sink

Above the sink is prime real estate—easy access to water for rinsing and watering, plus it catches natural light if you have a window.
Mount a 12–18 inch floating shelf ($20–$40) directly above the sink at comfortable reach height. Installation takes 1–2 hours. Style with small potted herbs, a soap dispenser, and glasses. This makes the mundane space feel intentional and garden-like. Renter? Use adhesive strips ($10–$15) instead of drilling into walls.
You gain functional storage in a spot you use constantly, and herbs on the shelf feel fresh and inviting—plus you water them while washing dishes.
20. Paint the Ceiling a Soft Color to Feel Taller
White ceilings can make small kitchens feel boxed-in. A soft, subtle color on the ceiling draws the eye upward and creates perceived height.
Paint the ceiling the same color as walls but 20% lighter, or try soft gray, pale blue, or warm cream. Use ceiling paint (it hides imperfections better than wall paint) from Benjamin Moore or Sherwin-Williams ($25–$40 per gallon). Painting takes 2–4 hours depending on room size. Renter? Skip this; it’s too involved.
This small color choice makes the room feel less compressed—your eye travels up instead of stopping at the ceiling.
21. Use Magnetic Spice Jars on the Fridge
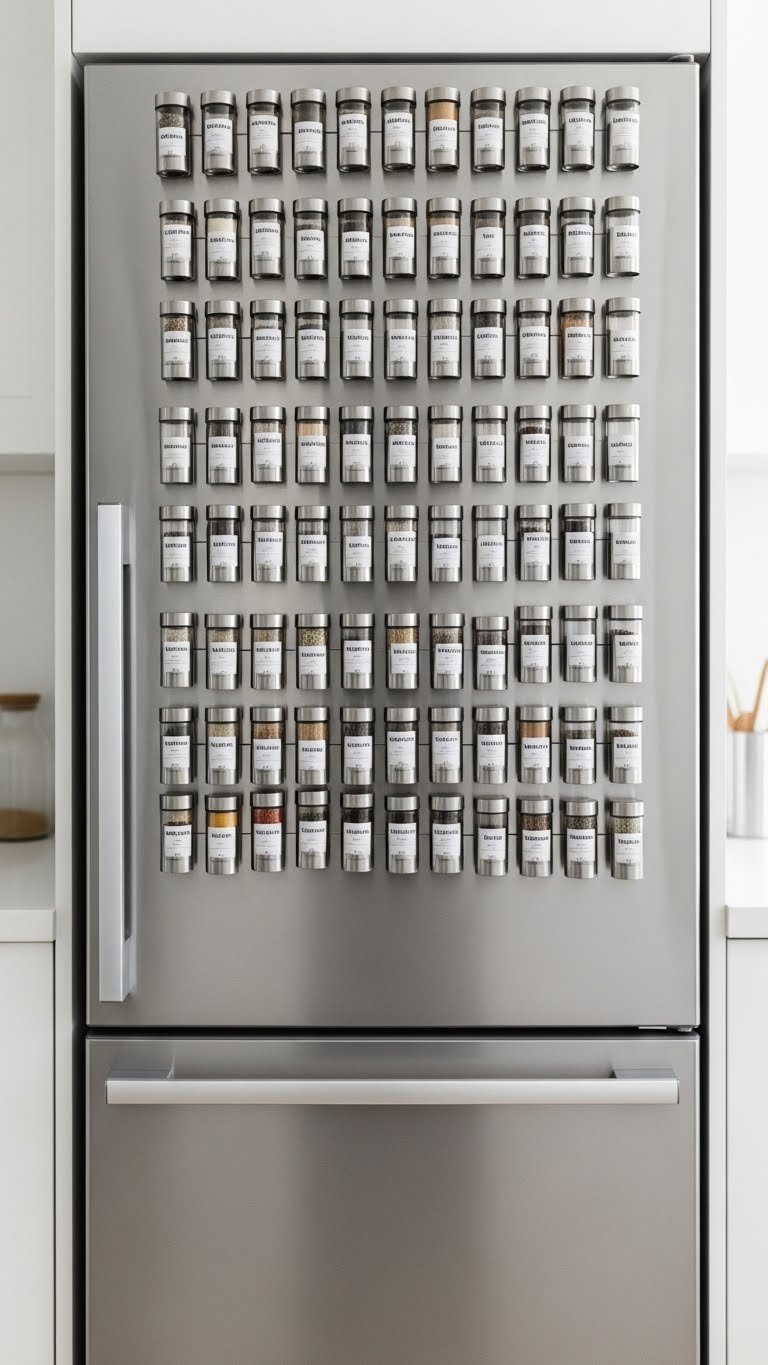
Spices take up significant drawer and cabinet space. Magnetic containers on the fridge put them inches away while cooking.
Buy magnetic spice jars (20–30 count sets, $30–$60) from Amazon or specialty kitchen stores. Fill with your most-used spices and label clearly. Installation takes 10 minutes—just stick them on the fridge side. Works only if your fridge has a metal surface (most do). Budget-friendly and renter-perfect.
Your most-grabbed spices become instantly accessible at eye level, freeing up tons of cabinet or drawer space.
22. Install a Dish Rack Drawer Organizer

Plates, baking sheets, and cutting boards slide around in cabinets and waste space. Vertical dividers keep them organized and maximize storage.
Buy a vertical divider shelf organizer ($20–$50) from IKEA, Target, or The Container Store. Install inside a cabinet or large drawer—takes 10 minutes with no tools. Fits plates, cutting boards, baking sheets, and serving platters upright so you see what you have and grab what you need easily.
This single purchase makes one cabinet feel twice as organized, and you stop digging through stacks.
23. Add a Under-Sink Sliding Drawer Organizer
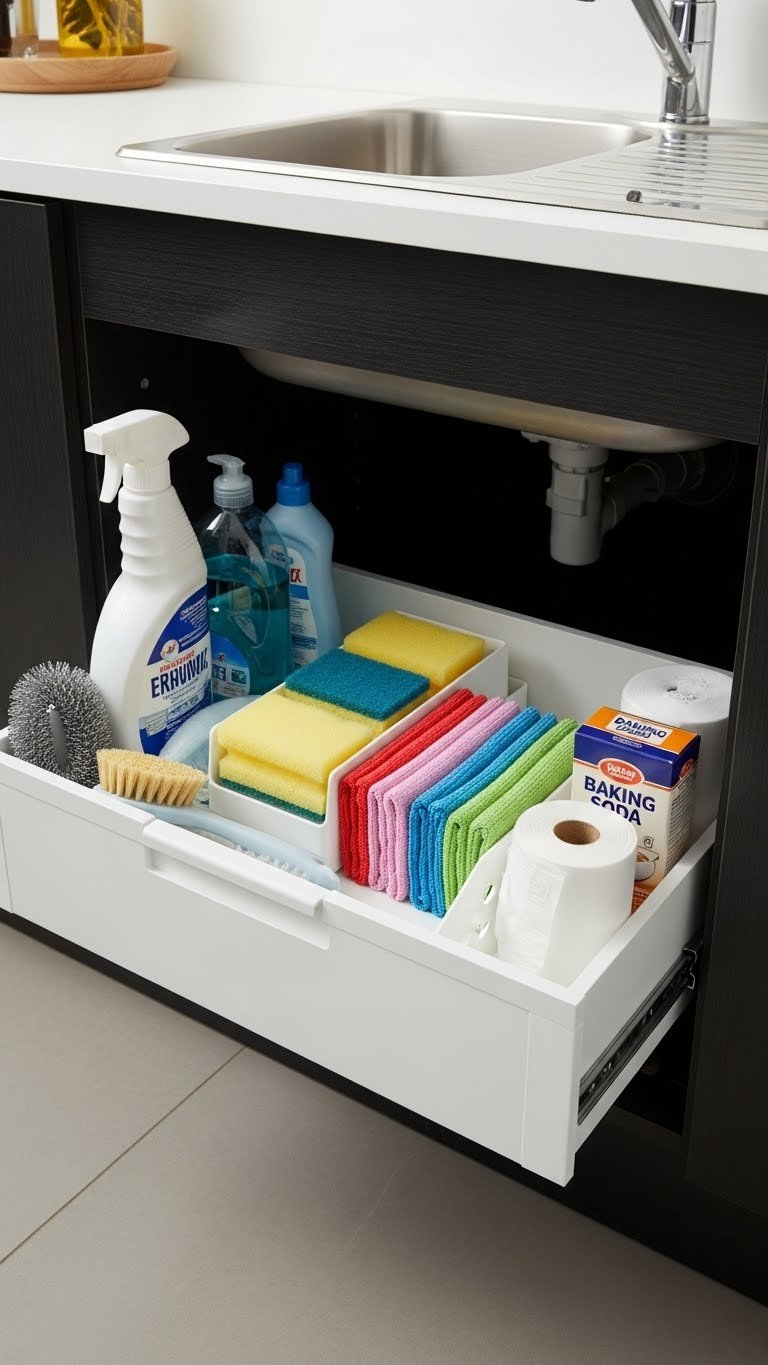
The under-sink cabinet is usually a chaotic jumble of supplies. A sliding drawer organizer brings everything forward and out of the way.
Install a under-sink sliding drawer organizer ($30–$60) designed to work around plumbing. Brands like Rev-A-Shelf make versions specifically for this space. Installation takes 20–30 minutes. Store cleaning supplies, sponges, trash liners, and extra soap here. Renter-friendly if you choose adhesive-mount options.
You’ll actually know what you have under there instead of a mystery zone where bottles disappear.
24. Float Your Microwave on a Shelf Above Counter
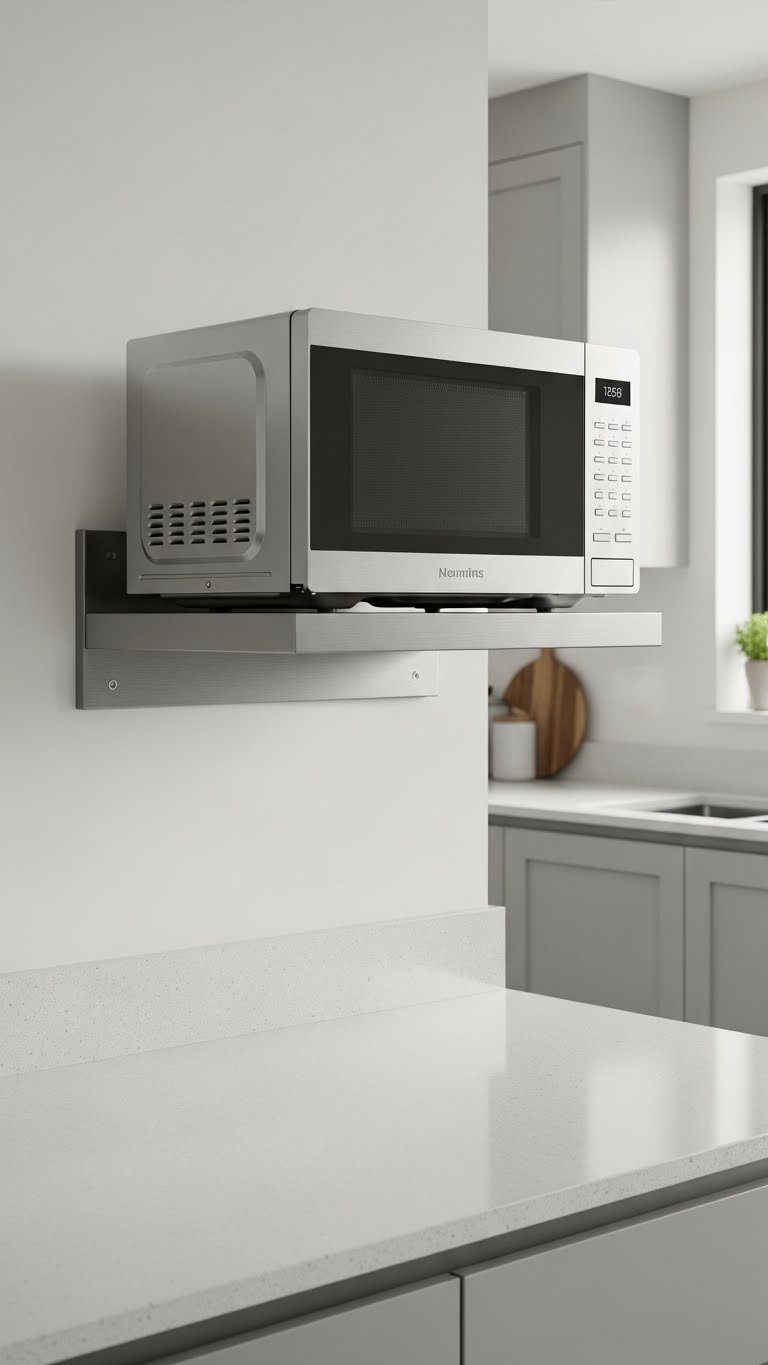
Microwaves dominate counters in small kitchens. A floating shelf mounts it at a comfortable height and reclaims real estate.
Install a floating shelf ($20–$40) at elbow to shoulder height and place a compact microwave on top. Budget 1–2 hours installation time. Only works if you have wall space and the shelf can support the microwave weight (most can, but verify). This frees up significant counter space below for prep work or appliances. Make sure it’s accessible but not dangerously high—you don’t want to reach past your head.
You reclaim several linear feet of counter space while keeping the microwave at a comfortable working height.
Save this for your next kitchen refresh. Pick one idea this weekend—even the smallest change makes a surprising difference in how your space works and feels.
Leave a Reply