Your living room walls deserve better than blank space or a lonely piece of art collecting dust. Art-led styling transforms your entire room—it sets the mood, anchors your furniture choices, and gives your space personality that feels intentional without feeling overdone. Whether you’re working with bold statement pieces or building a gallery wall from scratch, these 25 ideas show you exactly how to make your walls the hero of your room. We’ll cover gallery walls, color-matched art strategies, budget hacks, and styling tricks that work for renters and homeowners alike. Pick one idea this week, and you’ll see how quickly your living room shifts from “nice” to “people notice.”
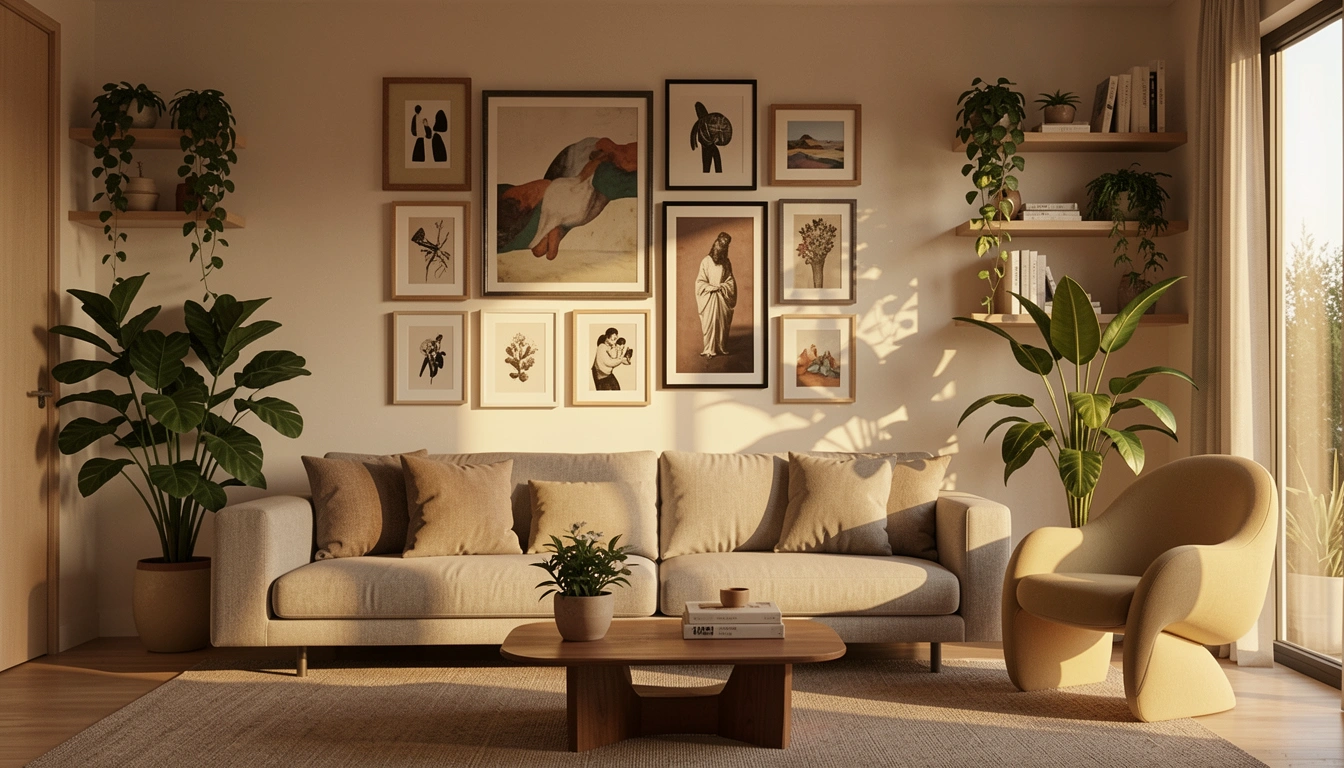
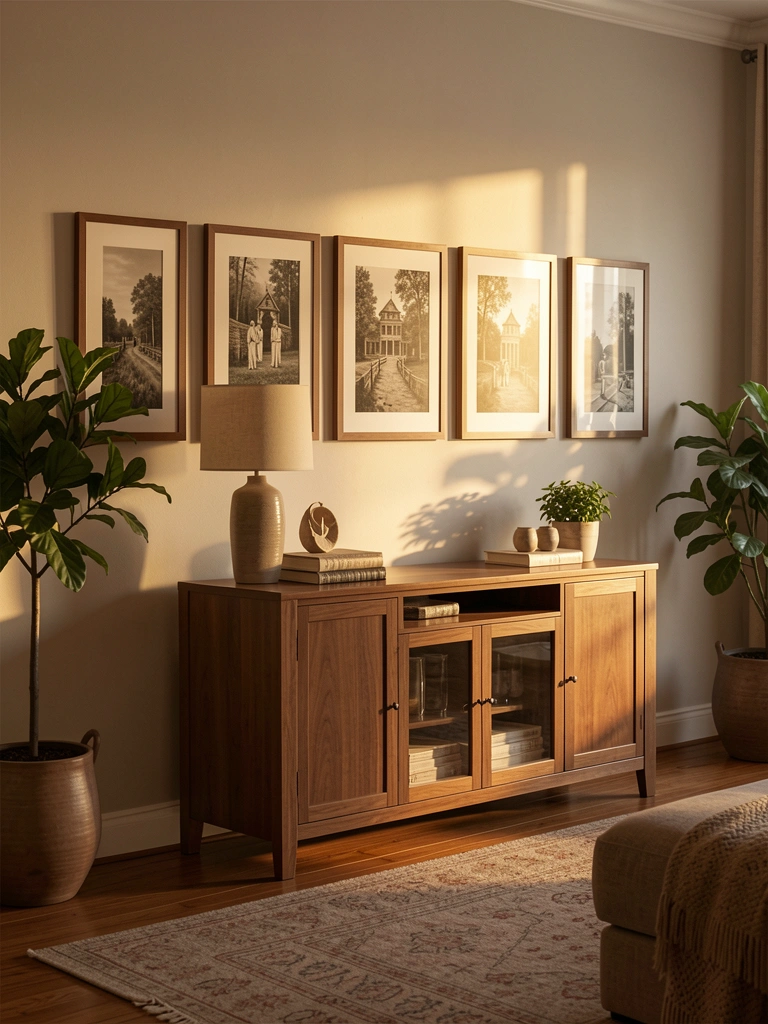
1. Create a Gallery Wall with Mismatched Frames
A gallery wall is the quickest way to add visual interest and personality to your living room. Instead of matching frames perfectly, mixing frame styles—black metal, natural wood, thin gold—looks collected and intentional. This approach costs between $40-$150 depending on whether you buy frames new or thrift them, and it takes about 2-3 hours to plan and hang. Start by laying out your frames on the floor in your desired arrangement, then photograph it before hanging. Pro tip: Use a level, painter’s tape, and small nail holes to keep things straight. The beauty of a mixed-frame wall is that you can swap out art seasonally or as your taste evolves—your wall grows with you.
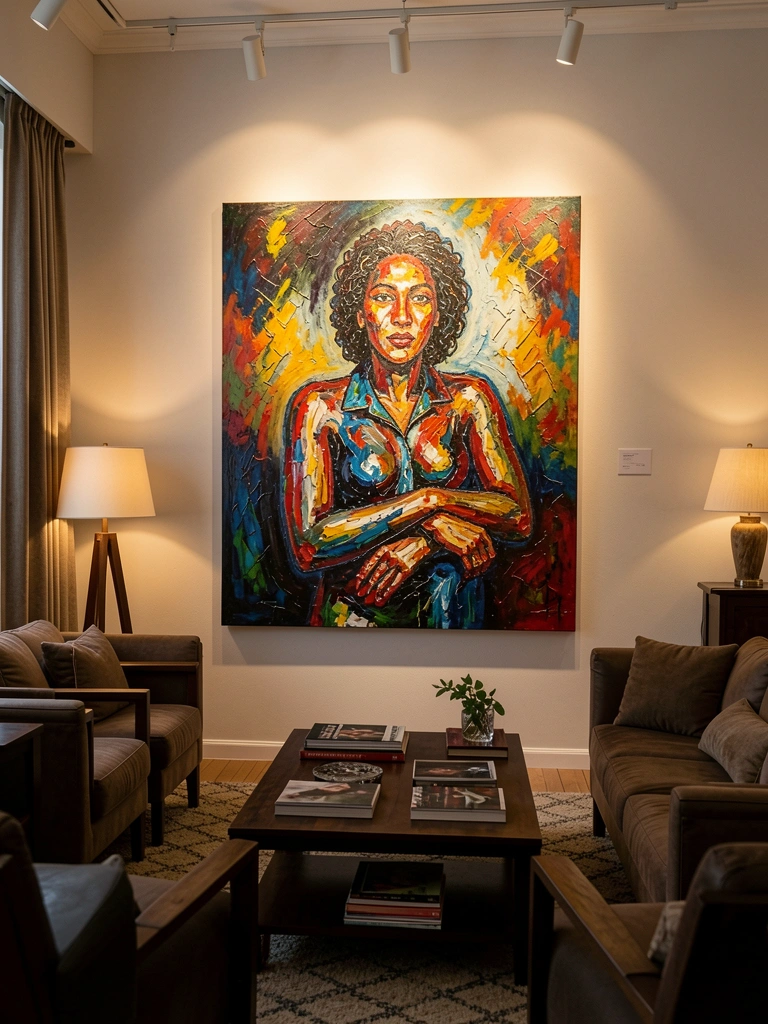
2. Go Bold with a Single Large Statement Painting
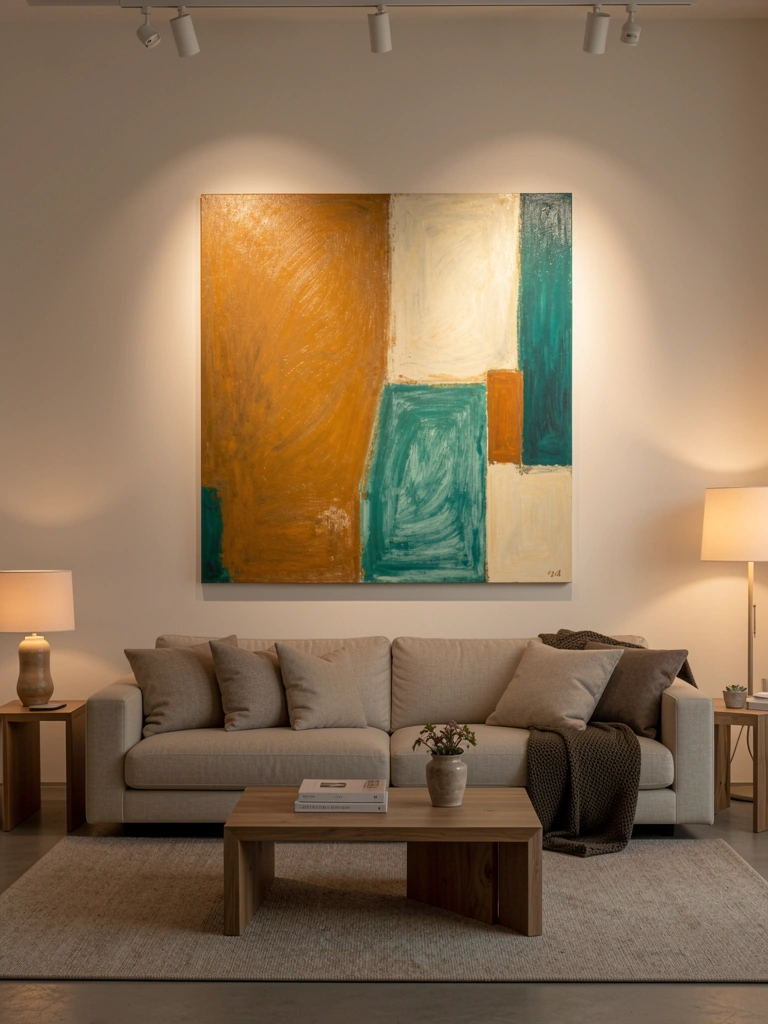
Sometimes less is more. A single large artwork (36 inches or bigger) can anchor an entire room and do the work of ten smaller pieces. Look for abstract paintings, landscapes, or textured pieces that speak to you—this is your chance to be bold. Budget $80-$600 depending on whether you buy original art, high-quality prints, or canvas reproductions from sites like Etsy, Minted, or local artists. One Saturday afternoon is all you need to hang it and rearrange your furniture to face it. The power of this approach is that one stunning piece makes you feel like you’ve hired a designer, even though you’re doing it yourself. Your guests will immediately notice it, and you’ll never tire of looking at something you genuinely love.
3. Layer Art Over a Bold Wall Color
Painting one wall a richer tone—think teal, ochre, oxblood, or deep navy—gives your art more visual weight and makes colors pop differently than white drywall. Choose a color that complements your art, then hang framed prints or paintings directly on top. This project costs $30-$80 for premium paint plus $50-$200 for frames and art, and takes one weekend (paint Friday, hang Saturday). Use painter’s tape for crisp edges, and don’t rush the paint drying time. The trick is choosing art that has some contrast to the wall color—white frames on deep walls, darker art on lighter accent walls. This combo makes a small living room feel intentional and design-forward without feeling cramped or dark if you balance it with light furniture and plenty of natural light.
4. Hang Art at Eye Level—The Right Height Matters
Most people hang art too high. The rule: hang the center of your art at approximately 57 inches from the floor to the middle of the frame. This simple fix makes your entire room feel more polished and intentional. It costs nothing except 30 minutes of your time with a measuring tape and level. If you’re hanging art above furniture, leave 8-12 inches of space between the top of the piece and the art. This spacing creates a visual anchor that ties your wall and furniture together. Check your work as you hang—step back every few frames to assess the overall balance. Getting the height right is the fastest way to look like you know what you’re doing, even if you’re a total beginner.
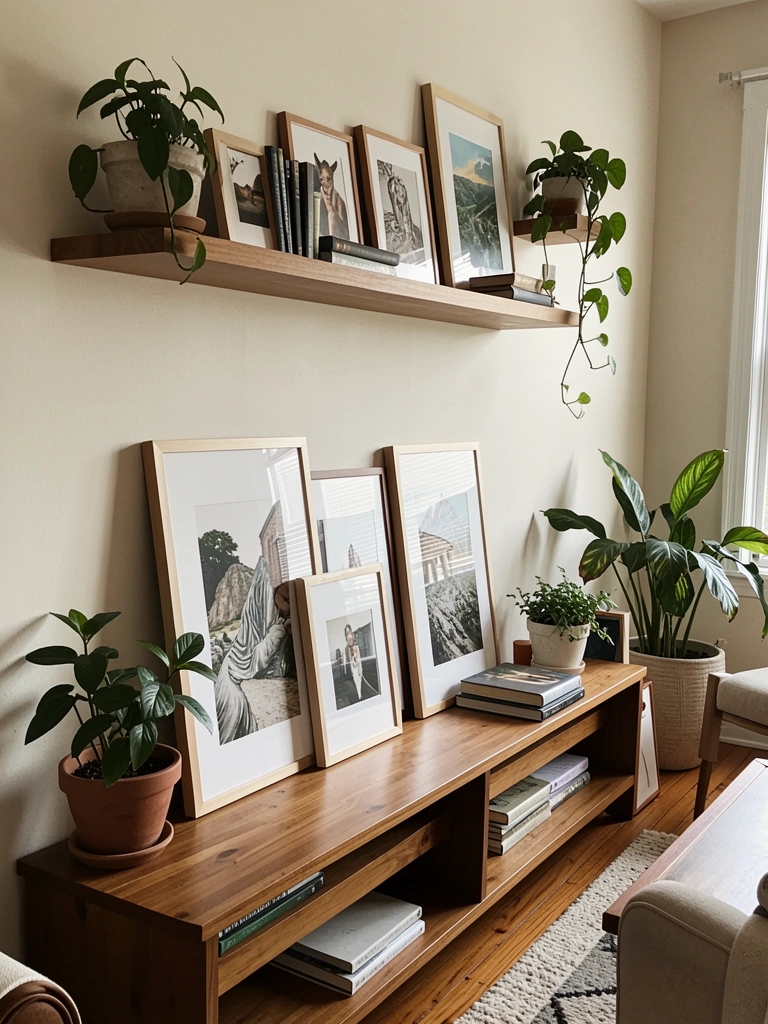
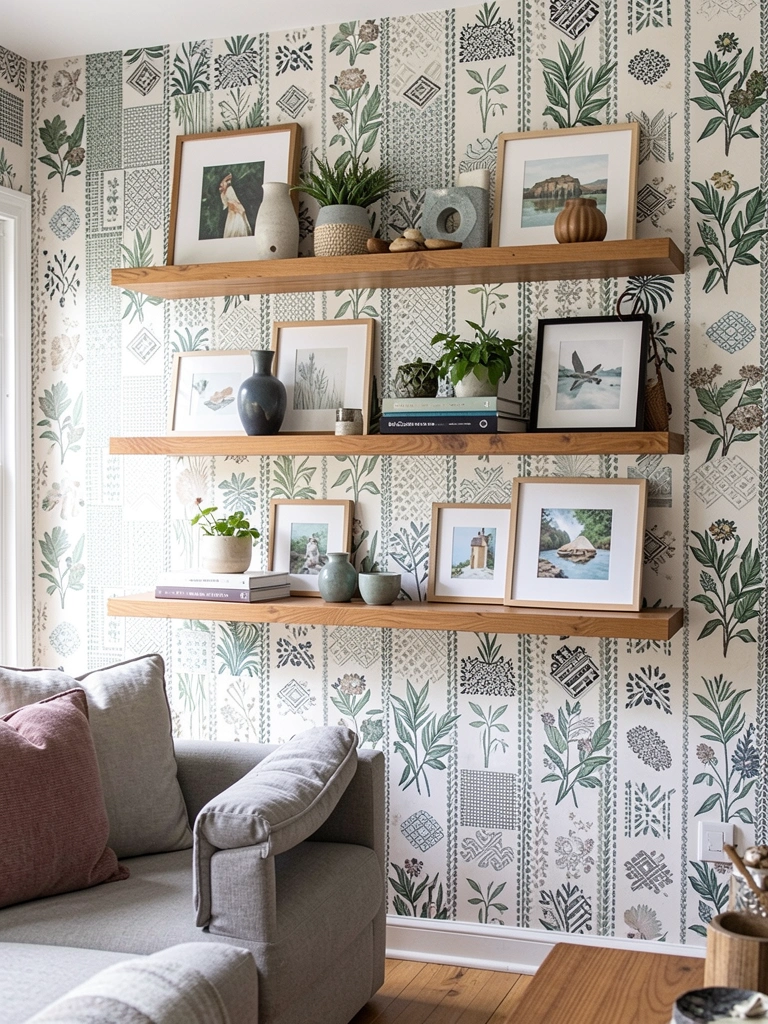
5. Use Floating Shelves to Display Art + Objects
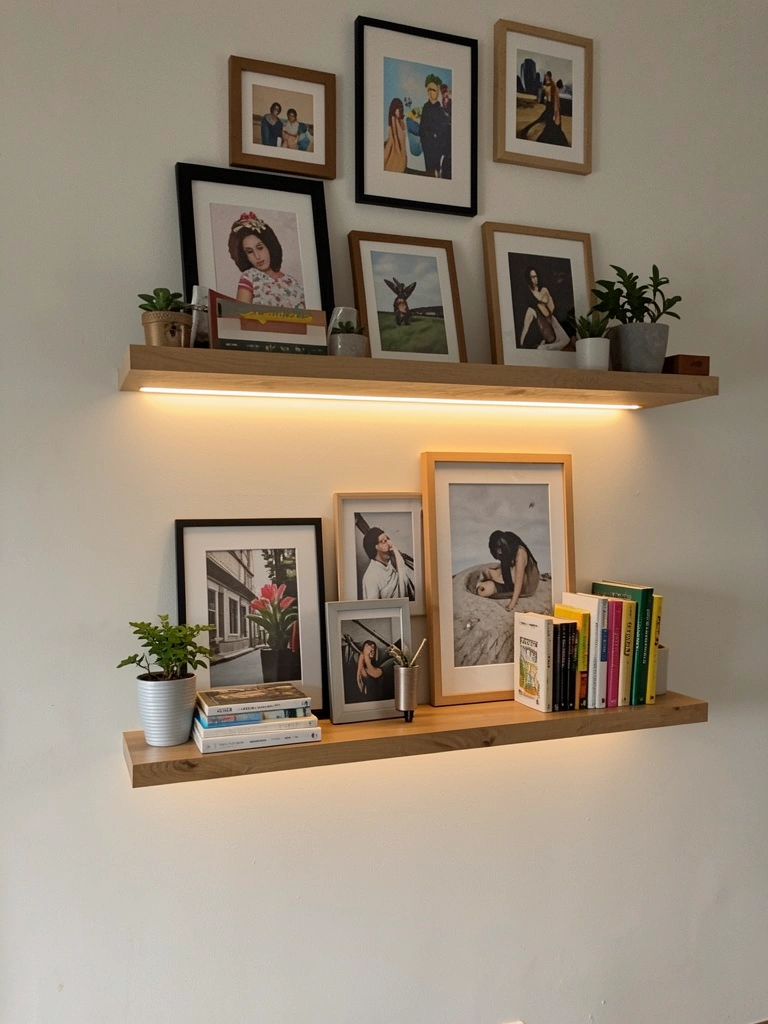
Floating shelves give you flexibility to display art without committing to permanent nails, and they add another layer of visual interest. Mount two or three shelves at varying heights, then prop framed art against the wall, lean it casually, or hang it from small wire. Budget $60-$150 for shelves and hardware, plus $0 if you already have frames. Installation takes about 1-2 hours with a stud finder and drill. The real advantage here: you can rearrange, swap out art, or add plants without rehanging. Lean your larger pieces and stand smaller ones upright for rhythm. This approach is great for renters too if you use damage-free mounting strips and lean pieces instead of hanging them.
6. Paint a Mural or Geometric Wall Design
You don’t need to be an artist to create a painted wall mural—geometric shapes, color blocks, or simple line work read as intentional and modern. Sketch your design lightly in pencil first, then paint with quality acrylic or wall paint. Cost: $20-$50 for paint supplies. Time: 4-8 hours depending on complexity, spread over a weekend. Start with something simple like horizontal color blocks or a diamond grid pattern if you’re nervous. Use painter’s tape for crisp lines and a level to keep angles straight. The payoff is huge—a painted mural becomes a conversation piece and makes your living room feel custom-designed. Plus, you can update it whenever your taste shifts.
7. Build a Color-Blocked Frame Collection
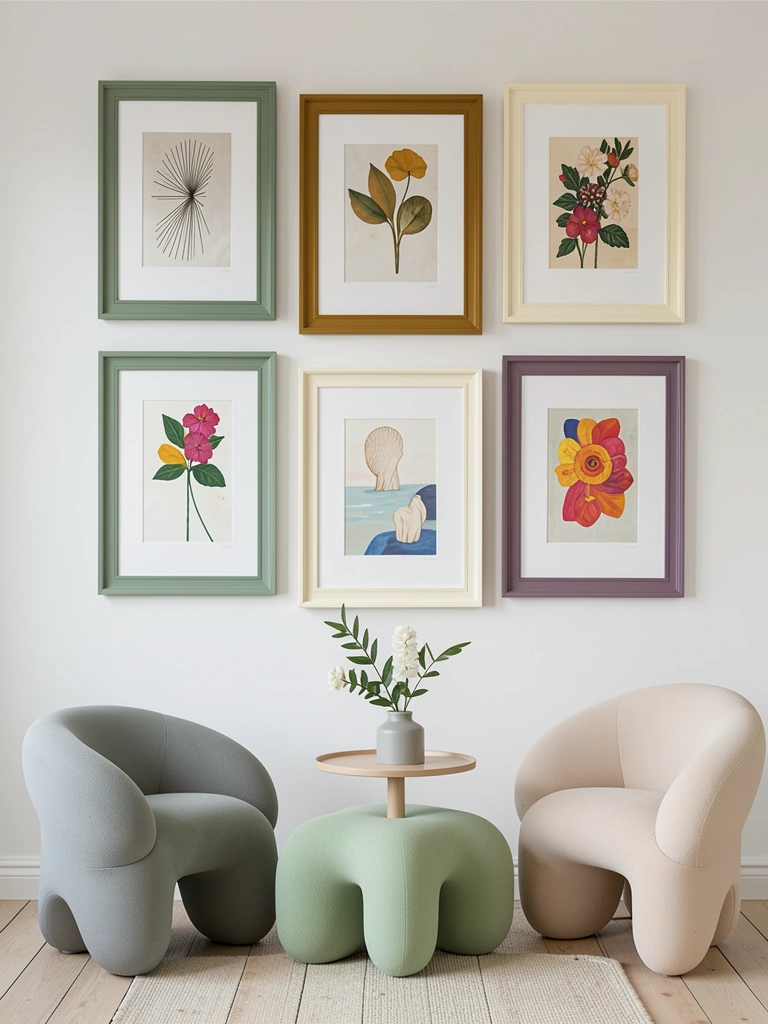
Frame a collection by painting wooden frames in complementary colors—ochre, sage, cream, mauve—then hang them in a grid or scattered pattern. This unifies a collection even if the art inside varies widely. Cost: $40-$100 for plain wood frames and paint. Time: 2-3 hours to paint frames, then 1 hour to arrange and hang. Paint frames with acrylic paint or spray paint for a smooth finish, let them dry fully, then add your art. This approach works great if you’re collecting prints gradually—you can add frames over time as your collection grows. The colored frames become part of the design, almost as important as the art itself. It’s a creative way to tie together mismatched pieces into one cohesive look.
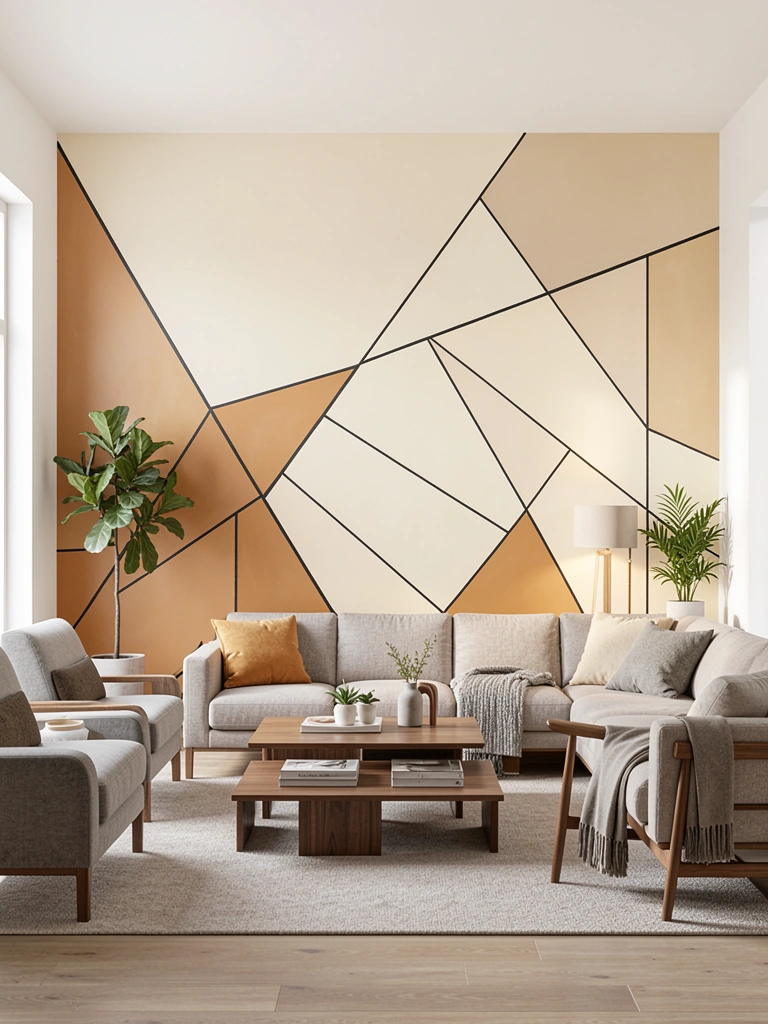
8. Pair Art with Sculptural Furniture for Flow
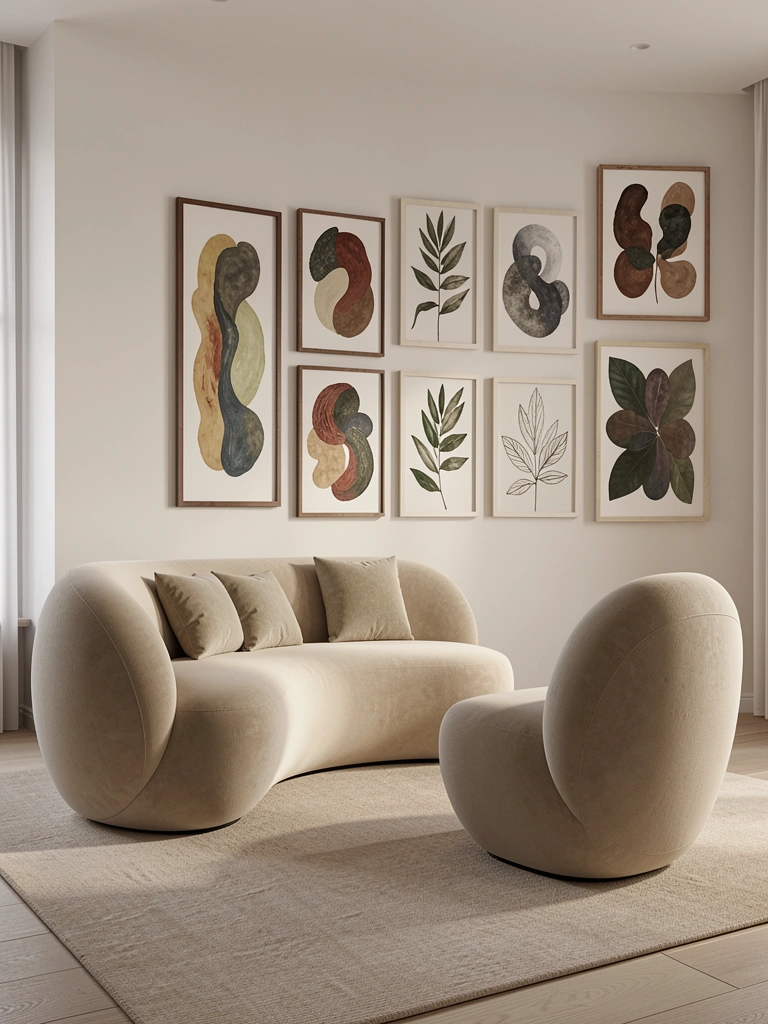
Art and furniture work together. If your wall art has flowing curves or organic shapes, choose furniture with soft edges and curved lines to echo that feel. A sculptural sofa or rounded chair paired with abstract or botanical art creates visual rhythm throughout the room. This isn’t about buying matching sets—it’s about intentional pairing. Budget depends on furniture ($300-$2,000+) and art ($50-$400), but you can start by styling with what you have. Arrange your furniture to face your art rather than the TV, and suddenly your art becomes the focal point. The room feels more designed and curated. This is where your living room stops feeling like a collection of separate objects and starts feeling like a cohesive space.
9. DIY Canvas Art from Thrifted Paintings
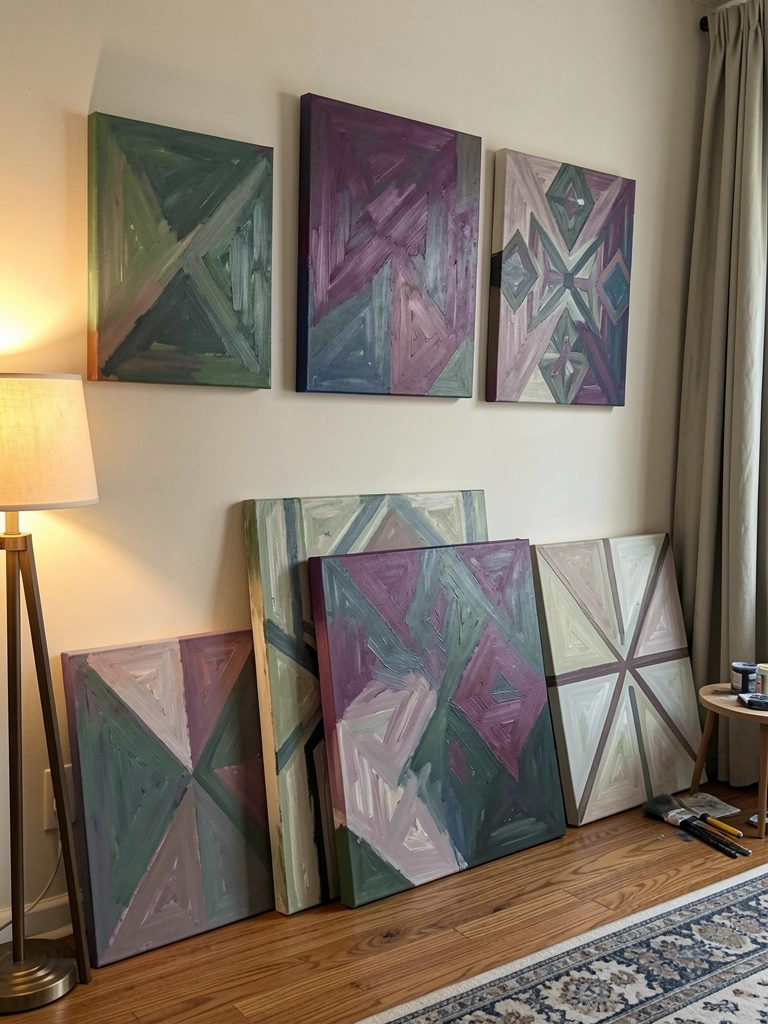
Hit your local thrift store for old paintings you can paint over or modify. Thrifted canvases cost $2-$10 each, and you already have paint at home. Add geometric designs, color washes, or patterns on top—the “imperfect” result looks intentional and artistic. Time: 2-3 hours total for 3-4 pieces. The magic here is that your art becomes 100% unique and costs almost nothing. Hang them salon-style on a feature wall, and people will ask if you commissioned them. This project is also a great weekend activity—put on music, grab your paints, and create without pressure. Your DIY imperfections become part of the charm.
10. Use Negative Space as Part of Your Design
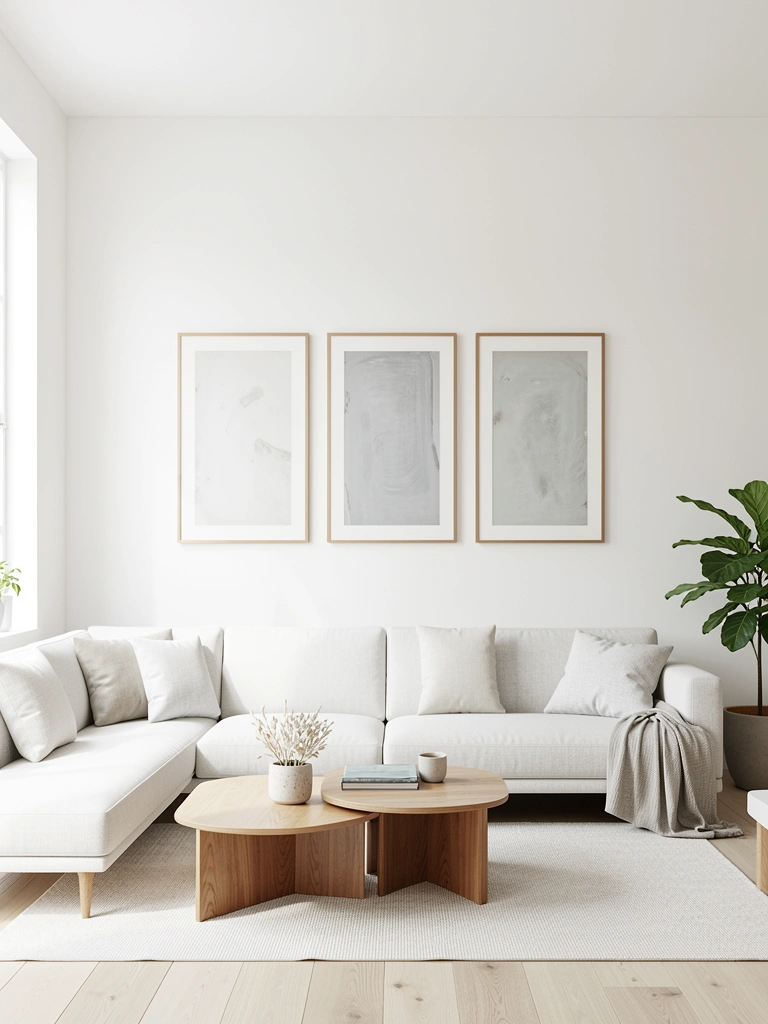
You don’t need to fill every inch of wall. Negative space—the empty area around your art—makes your pieces feel more important and prevents the room from feeling crowded. Choose 2-3 meaningful pieces and give them room to breathe. Cost: $0 (just rearranging). The skill here is resisting the urge to fill space. A single large artwork centered on a wall with nothing else around it feels more sophisticated than a cramped wall. This approach works especially well in small living rooms where breathing room makes the space feel bigger. Let your art stand alone. The emptiness around it actually amplifies its impact.
11. Create a Black-and-White Art Moment
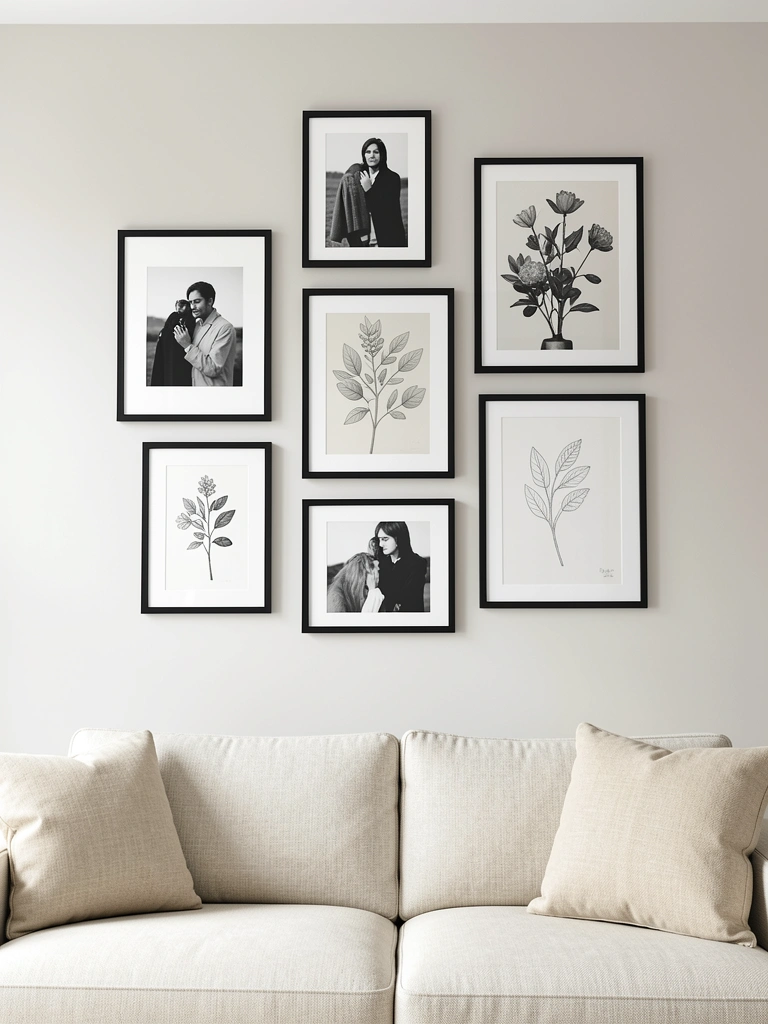
Black-and-white art feels gallery-like and works with any room color. Mix black-and-white photography, line drawings, botanical prints, and sketches in matching or complementary black frames for a cohesive collection. Budget: $50-$150 for frames and prints from Etsy, Minted, or printable art sites. Time: 2-3 hours to hang. The advantage of this approach is that you can build it gradually—add one or two frames every few months without worrying about color coordination. Black-and-white is timeless, so your wall won’t feel dated in a year. This works beautifully in minimalist or maximalist rooms because it doesn’t compete with other colors.
12. Lean Art Against the Wall for a Casual Vibe
Leaning art instead of hanging it feels collected and intentional—plus it’s renter-friendly. Prop framed pieces against your wall on a shelf, console, or directly on the floor in front of furniture. Cost: $0 if you already have frames. Time: 15 minutes. This casual approach works especially well if you rotate your art seasonally or like to change things up. There’s no commitment, no nail holes, and you can rearrange anytime. Pair leaning art with wall-hung pieces for a layered look that feels like you’ve been collecting thoughtfully. This styling trick alone makes a room feel less “decorated” and more “lived in.”
13. Match Your Art to Your Color Palette Intentionally

Don’t choose art in isolation—pick pieces that echo colors already in your room. If your sofa is cream and teal, choose art with those tones. If your accent wall is ochre, find art that pulls that color forward. This creates visual flow and makes your room feel designed rather than random. Cost: $50-$300 for art, depending on size and source. Time: 1-2 hours of browsing and choosing. When your art coordinates with your furniture and walls, the room reads as intentional. You get bonus points if your art also echoes your throw pillow colors or rug. This layered approach to color makes small rooms feel bigger because the eye follows a cohesive color story rather than jumping between conflicting hues.
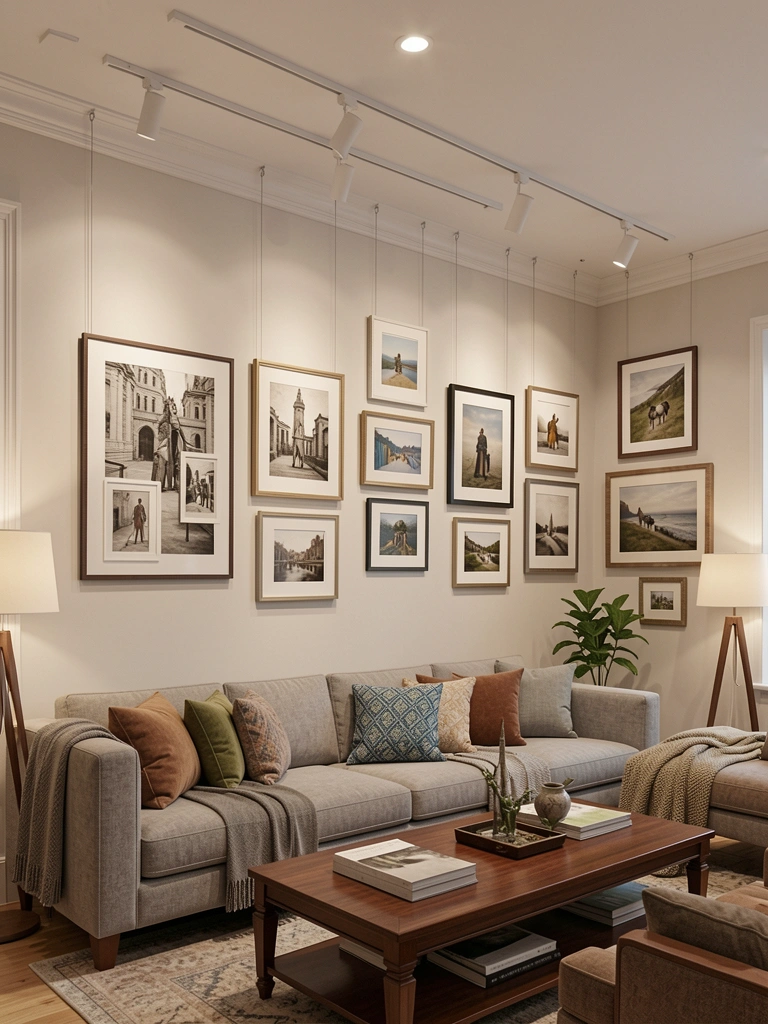
14. Hang Art from Ceiling to Create Height
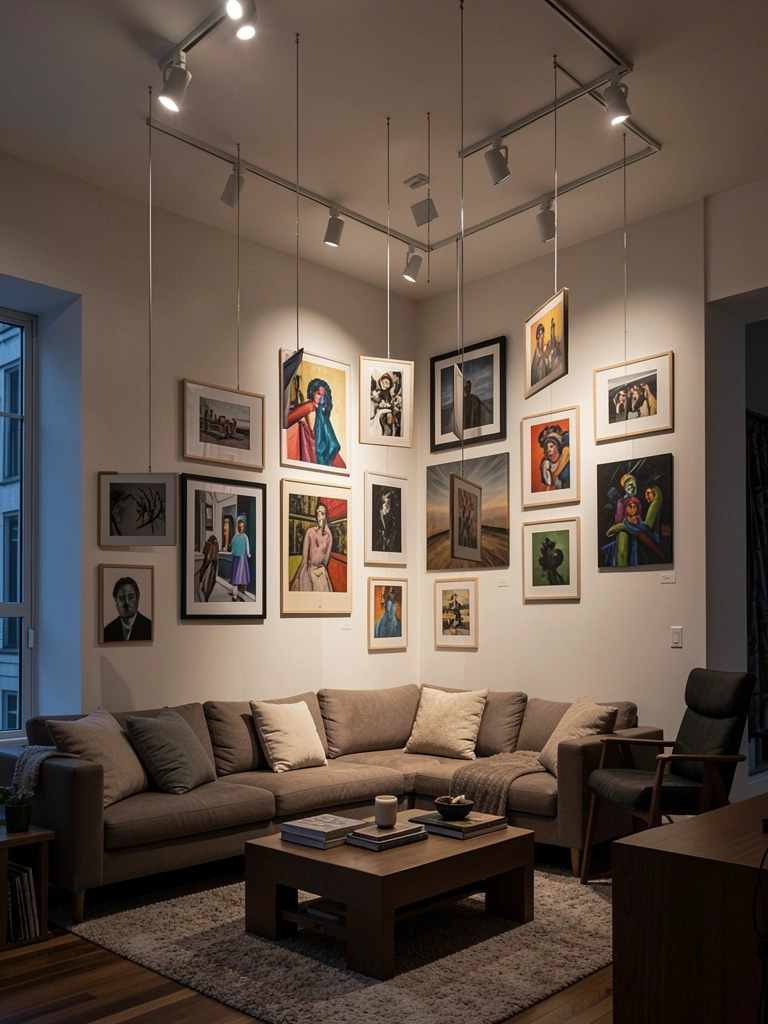
Hanging art from ceiling cables or wire creates drama and draws the eye upward, making ceilings feel higher. Use thin cable, fishing line, or picture-hanging wire attached to ceiling hooks or track lighting. Cost: $30-$80 for hardware and cables. Time: 2-3 hours for installation and adjustment. This approach works especially well in rooms with low or standard ceilings—the upward draw creates perceived height. Change the height, spacing, and rotation of pieces for a living, evolving display. This styling trick feels expensive and design-forward, but it’s actually affordable and attainable. It’s a showstopper move that takes your room from basic to gallery-quality.
15. Invest in One Really Good Piece of Original Art
Save up for one piece of original art from a local artist, emerging painter, or art fair. One beautiful, authentic piece tells a story and becomes an investment that appreciates over time. Budget: $200-$1,500 depending on the artist and size. Time: Research and purchasing over a few weeks. The difference between a print and an original is immediate—original art has texture, presence, and provenance that prints can’t match. Even if it’s your only wall art, one stunning original makes your living room feel curated and intentional. You’ll love it more over time because it carries meaning and story. This is where your living room stops feeling temporary and starts feeling like home.
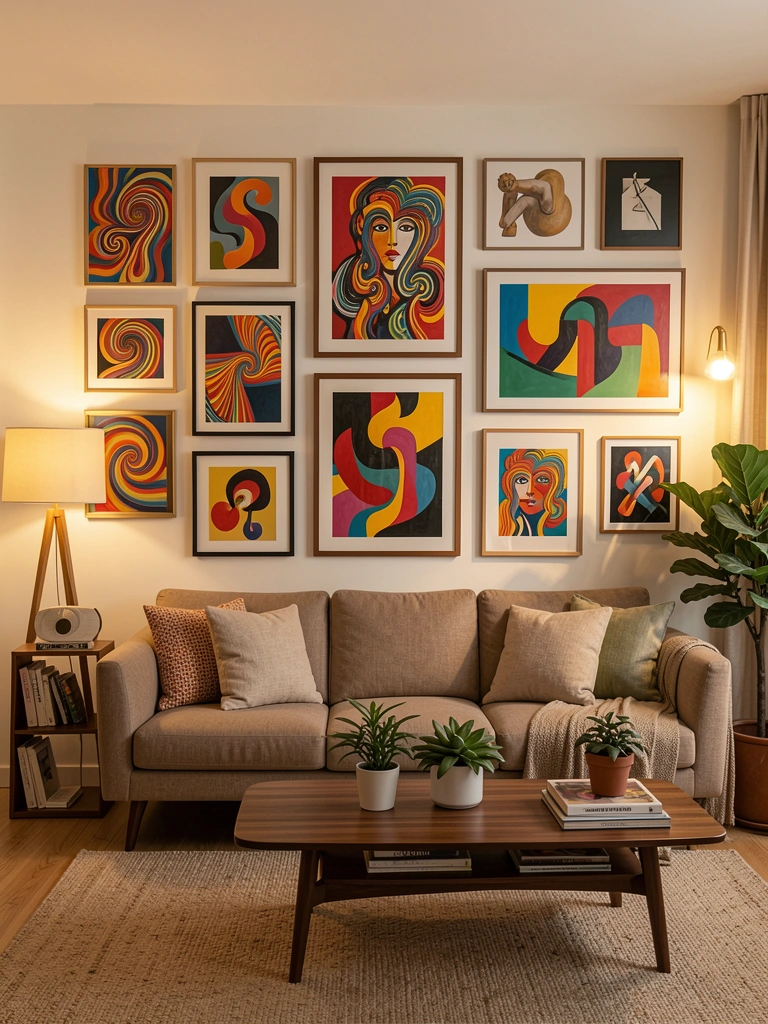
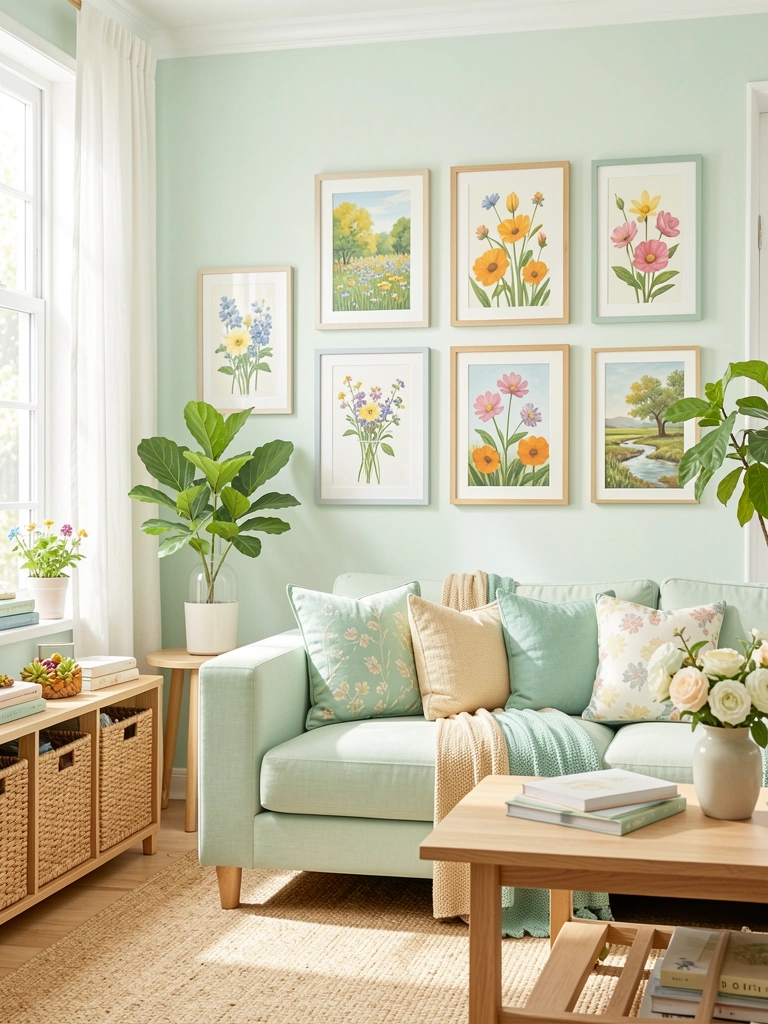
16. Build a Maximalist Gallery Wall with Pattern Mixing
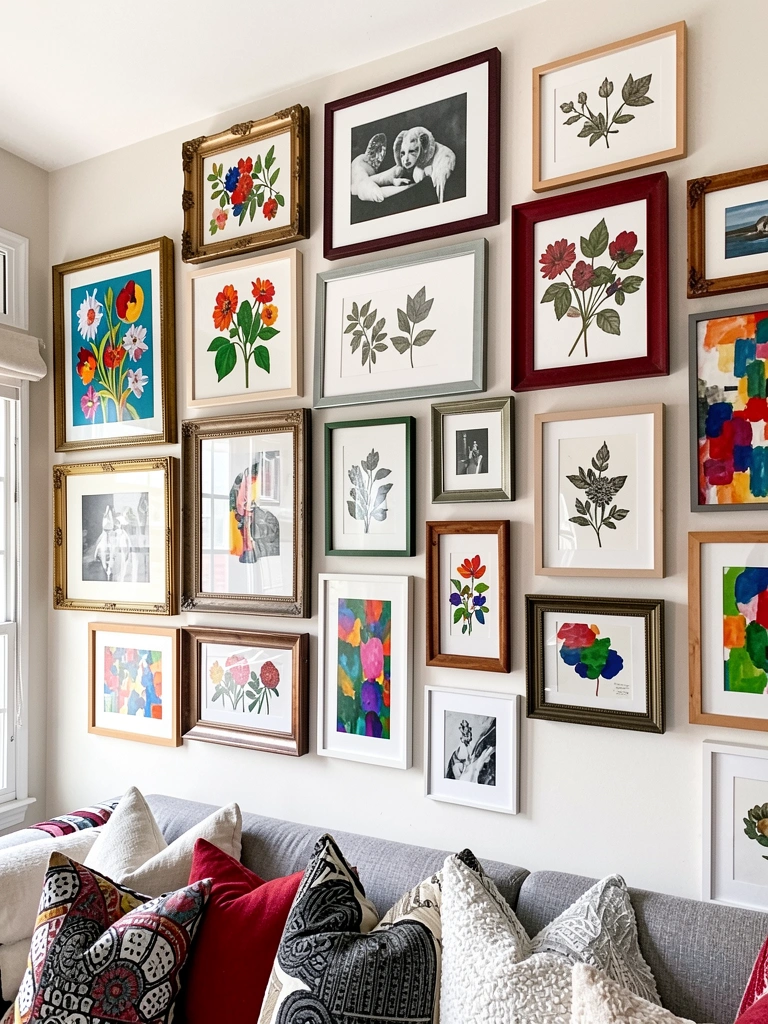
Maximalist gallery walls layer patterns, colors, and frame styles boldly for an eclectic, collected feel. Mix botanical prints with abstract art, ornate frames with simple ones, and lean into color without worrying about perfect coordination. Budget: $80-$200 for a collection of frames and prints from thrift stores, Etsy, and art prints sites. Time: 4-6 hours of collecting and hanging over 2-3 weeks. The secret to maximalist walls: arrange on the floor first, snap a photo, then transfer that layout to your wall using painter’s tape as guides. The “more is more” approach works if you commit to it—half-hearted maximalism reads as cluttered, but a fully committed, thoughtfully layered wall reads as bold and artistic. Your room becomes a conversation starter.
17. Use Removable Wallpaper Behind Floating Shelves
Removable wallpaper behind floating shelves creates a designed backdrop for your displayed art and objects. Choose a pattern that complements your art—geometric, botanical, or abstract. Cost: $30-$60 for peel-and-stick wallpaper. Time: 2-3 hours to apply, spread over a weekend. The wallpaper becomes part of your art display, framing the shelves and everything on them. This is great for renters because it peels off without damage. When you’re ready to change things up, new wallpaper gives your wall completely new energy. Combine this with framed art and small sculptures on the shelves for a layered, curated look that feels professionally styled.
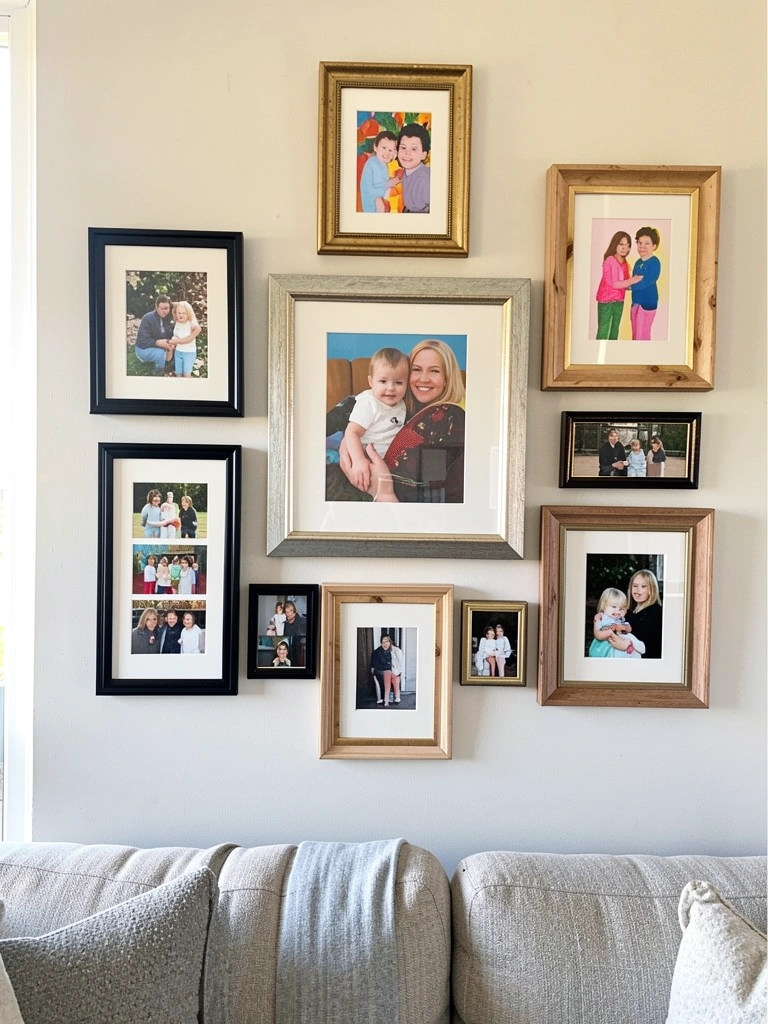
18. Create a Vertical Timeline Wall with Personal Art
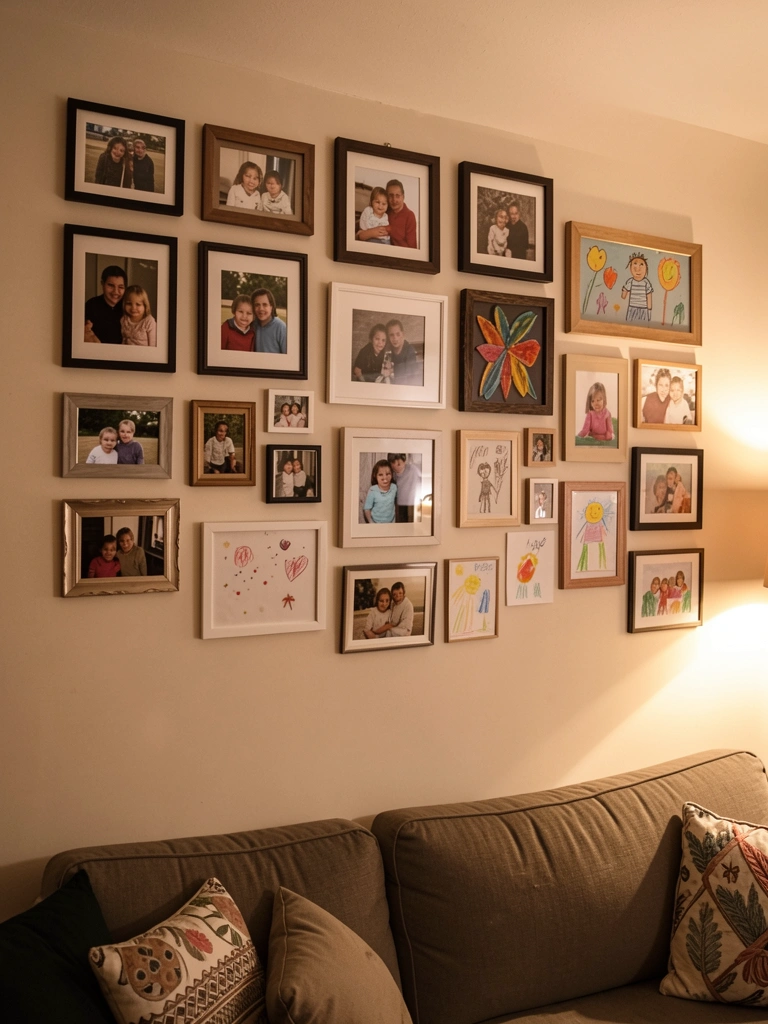
Arrange personal art—family photos, framed children’s artwork, your own sketches, meaningful posters from travels—in a vertical timeline from oldest to newest (or vice versa). Mix frame styles to keep it from feeling too formal. Cost: $0 if you use frames you have, or $40-$100 for new frames. Time: 1-2 hours to gather, frame, and arrange. This wall is deeply personal and tells your story in a way that mass-produced art can’t. When guests see it, they immediately understand what matters to you. Your living room stops being about trends and starts being about your life. This approach is especially powerful in family rooms where kids can see their own contributions displayed proudly.
19. Pair Botanical Art with Real Plants for Biophilic Design
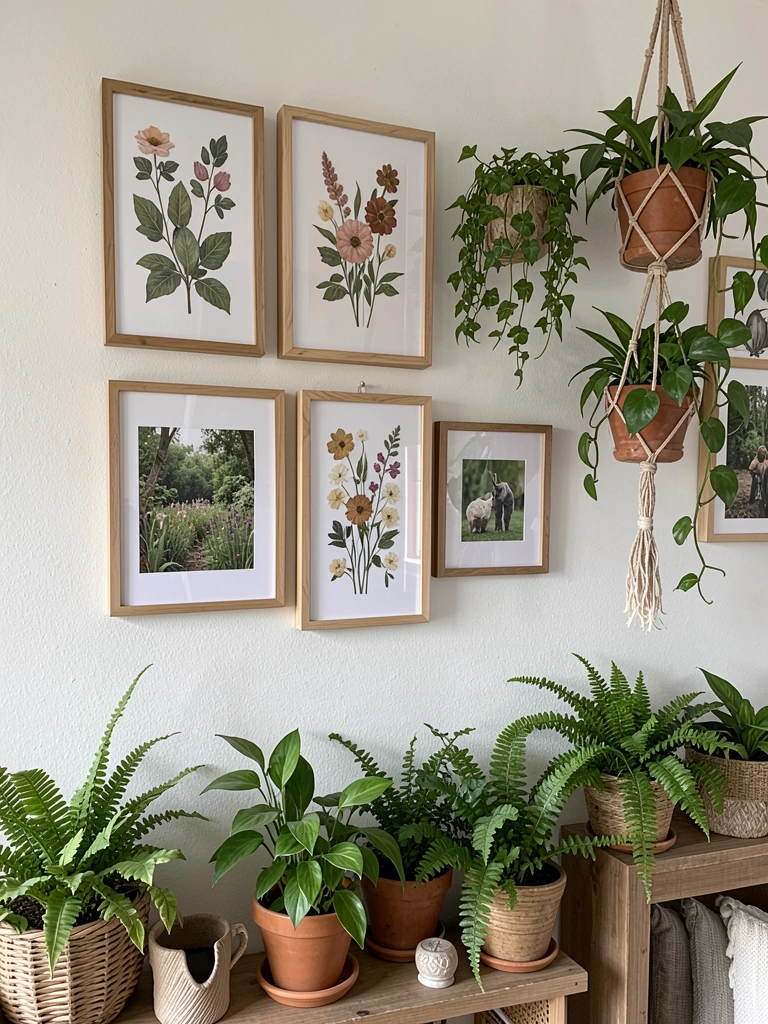
Layer botanical prints and nature photography with real plants for a cohesive, biophilic feel. Group your framed art with hanging or potted plants to create a nature-inspired feature wall. Cost: $50-$150 for art plus $20-$100 for plants. Time: 2-3 hours to arrange and style. The combination of real plants and botanical art makes your room feel alive and grounded—it’s like bringing nature indoors twice over. This approach works especially well with sculptural plants like fiddle leaf figs, monstera, or snake plants that have interesting shapes. Your living room becomes a peaceful retreat rather than just a space. The visual rhythm of plants plus art keeps the eye moving and makes the room feel curated and intentional.
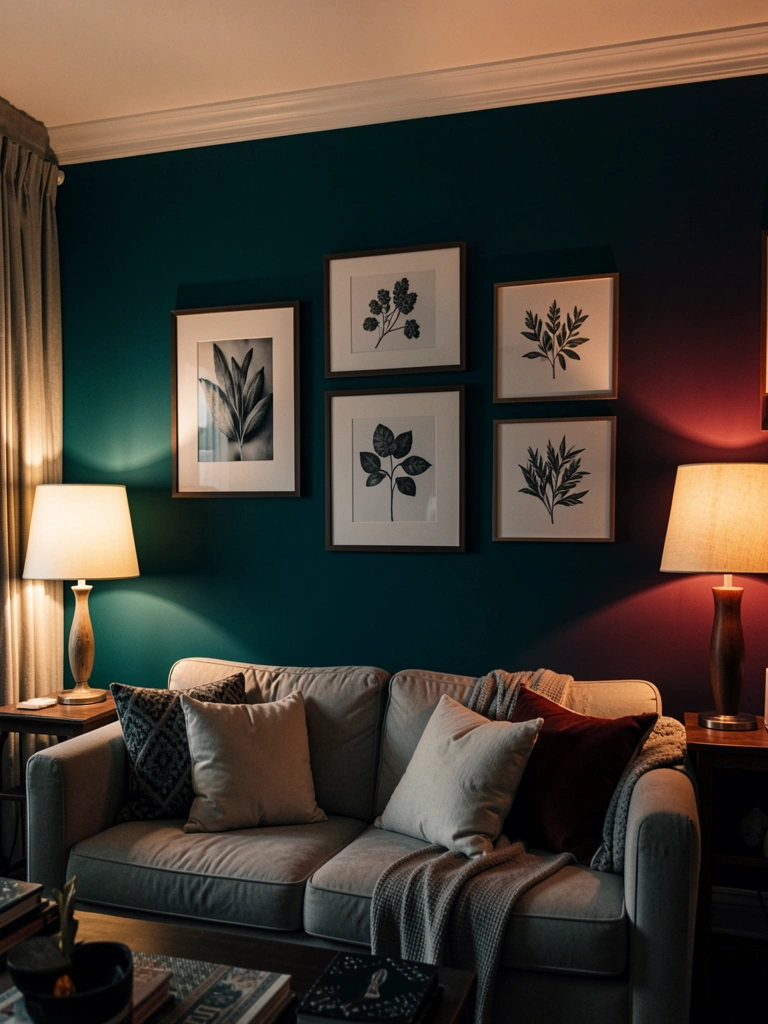
20. Combine Moody Colors with Intellectual Art
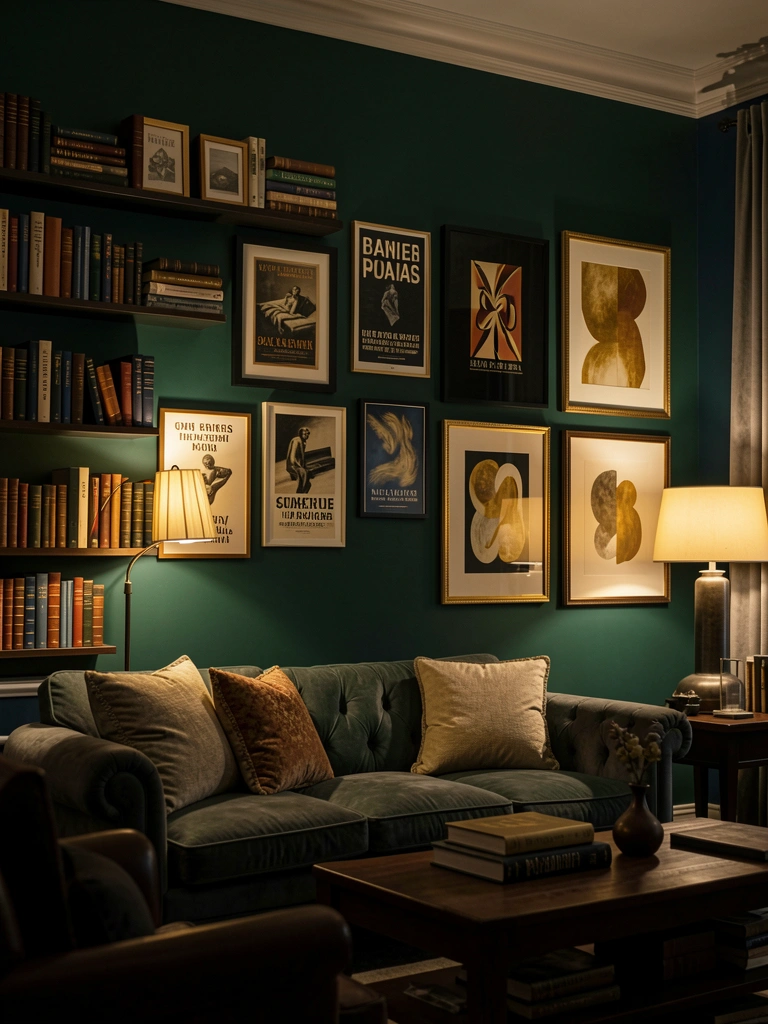
Moody academia styling pairs rich wall colors with intellectual or artistic art—vintage book covers, literary posters, abstract prints. Choose deep forest green, charcoal, or navy walls, then hang art in frames with warm finishes (gold, brass, natural wood). Cost: $30-$80 for paint plus $60-$150 for art. Time: One weekend for painting and hanging. This look feels sophisticated and intentional without being pretentious. It works especially well if you’re a reader, artist, or intellectual at heart. The moody color and thoughtful art selection create a room that feels like a retreat—somewhere you actually want to spend time. Pair it with comfortable furniture, good lighting, and books nearby, and you’ve created a living room that’s both beautiful and genuinely lived-in.
21. Use String Lights or Wire to Display Rotating Art
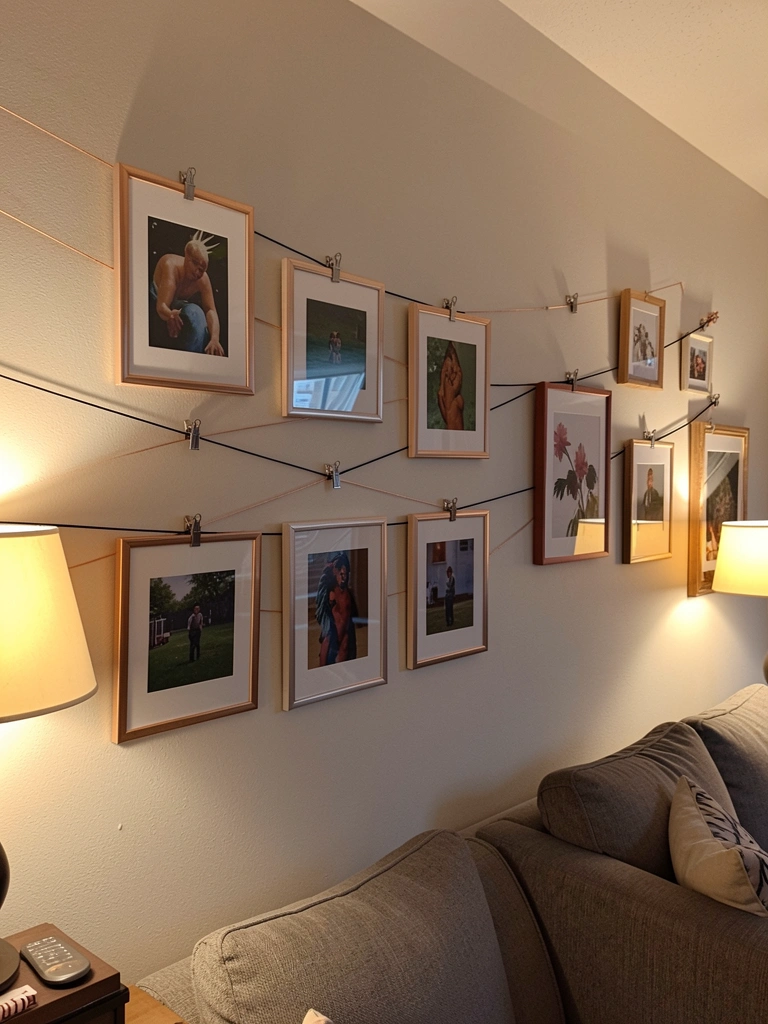
String thin wire or cable horizontally across a wall, then use small metal clips to hang framed art that rotates or changes. This system lets you swap art without adding new nail holes. Cost: $20-$40 for wire, hooks, and clips. Time: 1-2 hours to install, then 15 minutes to swap art anytime. This works great if you’re an artist or collector who likes to rotate pieces seasonally or rotate from storage. The wire system itself becomes part of the aesthetic—it looks intentional and design-forward. You get the flexibility to refresh your wall constantly without commitment, which is perfect for people who get bored easily or like to follow trends.
22. Layer Art Styles Across Different Eras
Mix art styles from different eras—70s retro, mid-century modern, contemporary abstract—in one arrangement tied together by consistent frame colors or a unified palette. This “nostalgia meets modern” approach feels intentional and collected. Cost: $60-$200 for a mix of art from thrift stores, Etsy, and contemporary artists. Time: 3-4 hours of hunting and arranging. The trick is choosing a frame color (black, natural wood, gold) that links all the pieces together visually. When everything has the same frame color or material, disparate styles read as a curated collection rather than random. This approach lets you lean into your actual taste rather than trying to match some imaginary “perfect” palette.
23. Create a Statement Wall with Oversized Typography
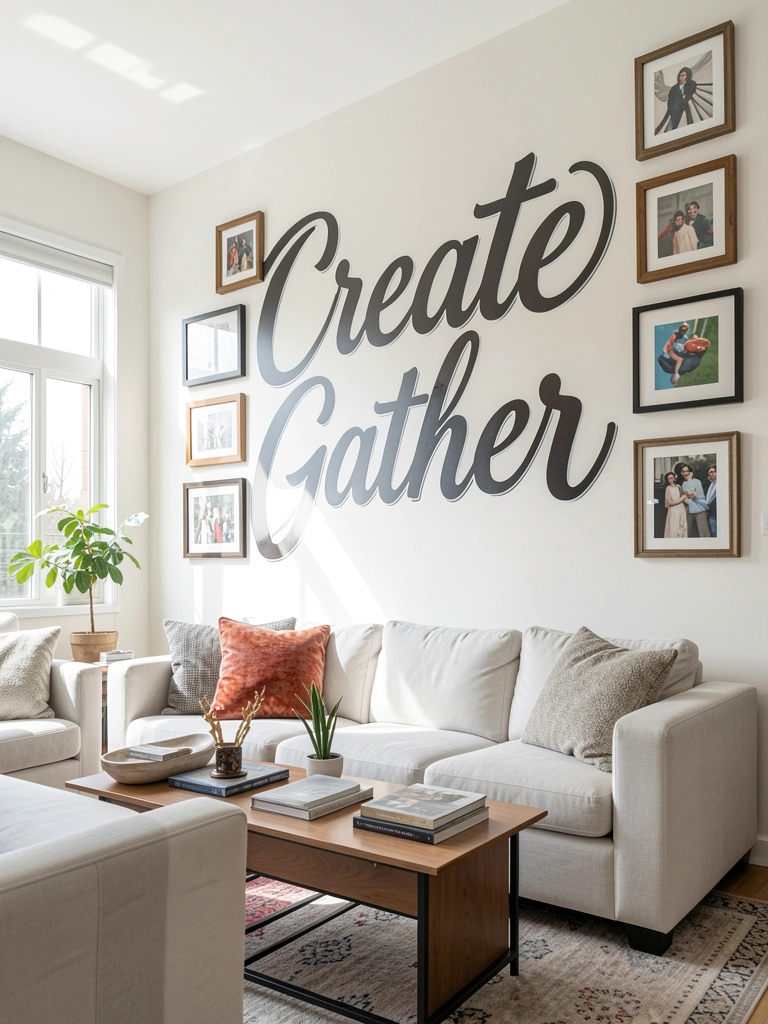
Oversized typography with an inspiring word or phrase becomes instant art. Choose a word that resonates with you, print it in a beautiful font, frame it large, and make it your focal point. Cost: $20-$80 to print and frame large-scale typography. Time: 1 hour to source, print, and hang. This approach makes a bold statement without requiring art skills—you’re just curating existing designs. Pair your typography with smaller framed pieces for visual balance. The words you choose reflect your personality and values, making your room feel deeply personal. This styling move is especially effective in rooms where you want to inspire action—a home office, entryway, or creative space where the words actually impact your daily mindset.
24. Install Picture Rails for Flexible, Damage-Free Hanging
Picture rails are mounted near the ceiling and let you hang art from adjustable wire or cords—perfect for renters and people who like to change things often. Cost: $50-$150 for rails and hardware, depending on wall length. Time: 2-3 hours for installation (or hire help). Once installed, you can hang, rehang, and rearrange art infinitely without new nail holes. This system is also damage-free if you remove it carefully. It’s a slightly higher upfront investment, but it pays off if you’re someone who refreshes your space frequently. The look is elegant and gallery-quality—picture rails read as intentional and designed. You get flexibility plus sophistication.
25. DIY Macramé or Fiber Art Pieces
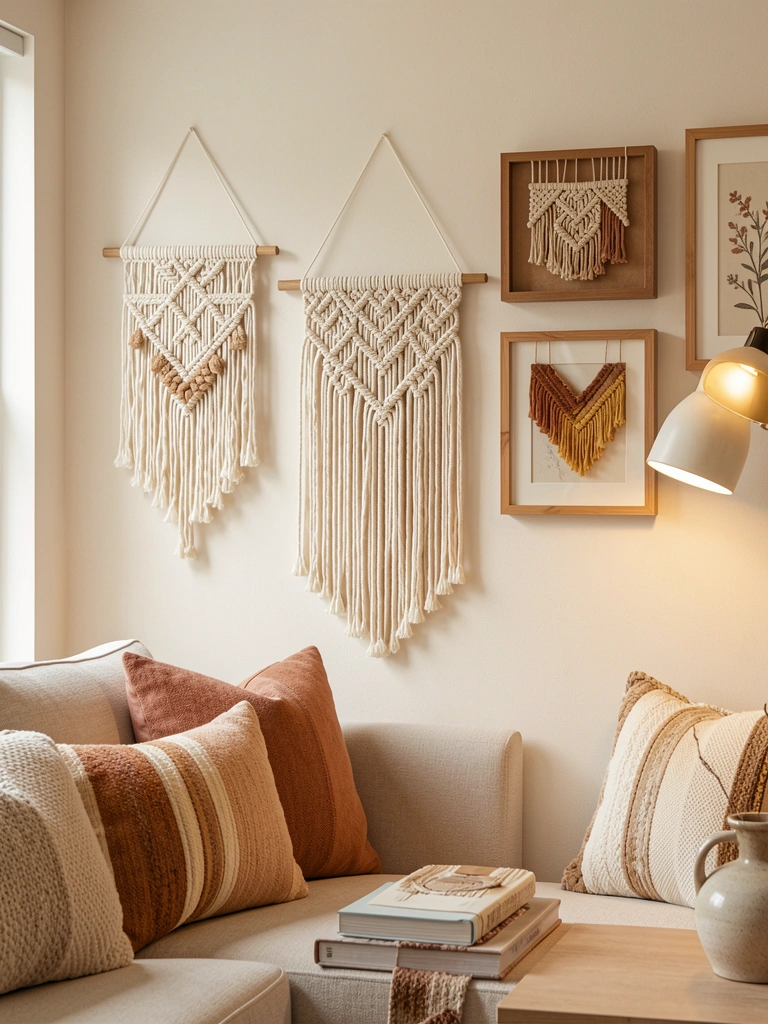
Create your own macramé or fiber art to pair with framed pieces for a handmade, textural look. Macramé kits cost $15-$40, and tutorials are free online. Time: 4-6 hours per piece spread over a few weekends. Your handmade art carries meaning that store-bought pieces can’t match—your guests will ask about it, and you get to share the story of making it. Even if you’ve never tried macramé, the DIY imperfection is part of the charm. Pair your fiber art with photography, prints, or paintings for a layered, curated gallery wall that feels truly unique. This approach transforms your living room into a space that reflects your hands, time, and intention.
26. Rotate Your Art Seasonally for Constant Refresh
Collect art gradually and rotate pieces seasonally—spring pastels, summer brights, fall warm tones, winter moody colors. Store off-season pieces safely and swap them out 4 times a year. Cost: $0 if you already have frames and prints. Time: 30 minutes each season to swap. This constant refresh keeps your room feeling new without actually buying new things. You get to enjoy every piece you own, and your space evolves with the seasons. Your guests notice when you’ve updated, even if they can’t pinpoint what changed. This approach is also budget-smart because you’re building a collection over time rather than buying everything at once. Your living room becomes a living, breathing space that changes with you.
Ready to make your walls work harder for your room? Pick one idea and start this week—whether it’s rearranging existing art at the right height, hanging one new piece, or sketching out a gallery wall layout. Your living room is waiting to show some personality, and these art ideas are the quickest way to get there. Share this post with anyone who needs a living room refresh, and save it for when you’re ready to tackle your next project.
Leave a Reply