Your kitchen should tell your story—not whisper a forgettable one. Whether you’re renting or own, working with a tiny galley or an open floor plan, updating your cooking space doesn’t require a massive renovation or a six-figure budget. The 2025 kitchen trends are all about you: bold colors, mixed textures, smart storage, and designs that balance style with real-life function. We’ve rounded up 25 actionable ideas that range from 15-minute styling tweaks to weekend projects, so you can refresh your space at your own pace. Ready to fall in love with cooking again? Let’s dive in.
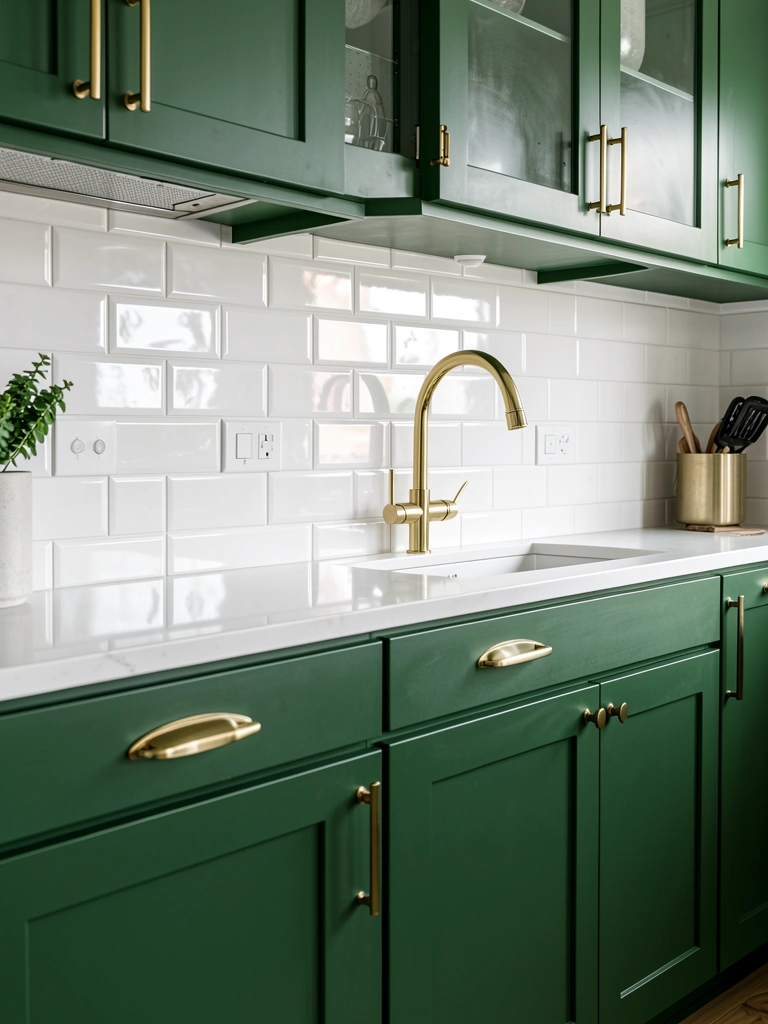
1. Paint Your Cabinets a Deep, Moody Green
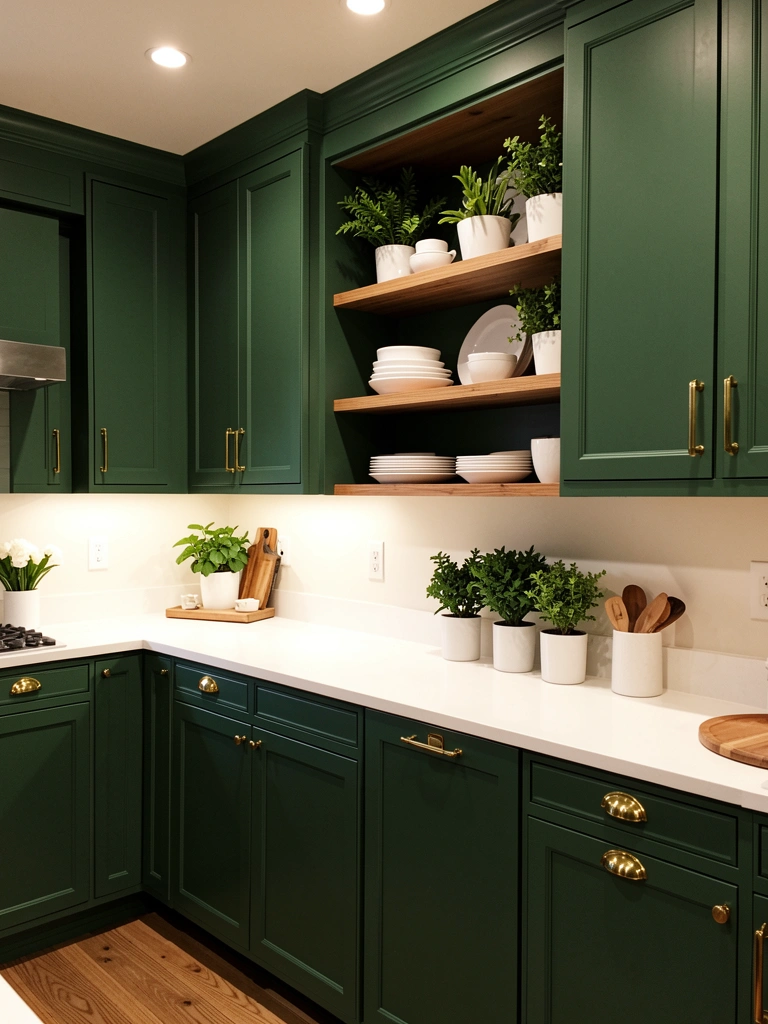
Deep green cabinets bring personality and sophistication without feeling trendy or temporary. This color works beautifully whether your style leans modern, cottage, or eclectic—and 76% of design pros are choosing green as their top kitchen color right now.
You can tackle this yourself with cabinet-grade paint (like Sherwin-Williams or Benjamin Moore) and a quality brush or foam roller. Most kits run $80–$150 for materials, and the project takes about one weekend. If your cabinets have a glossy finish, light sanding or a primer designed for slick surfaces is key. Alternatively, peel-and-stick cabinet wraps ($150–$300) give you the look without the commitment—perfect for renters.
The payoff? Your kitchen instantly becomes a space you actually want to spend time in. That small color shift changes everything.
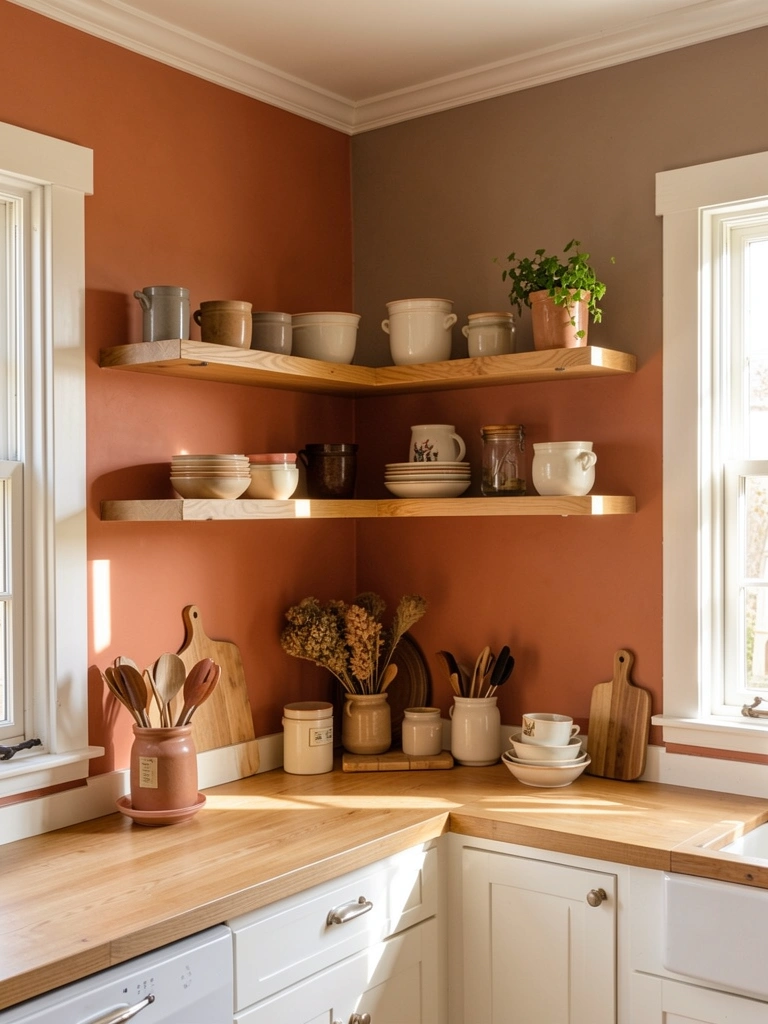
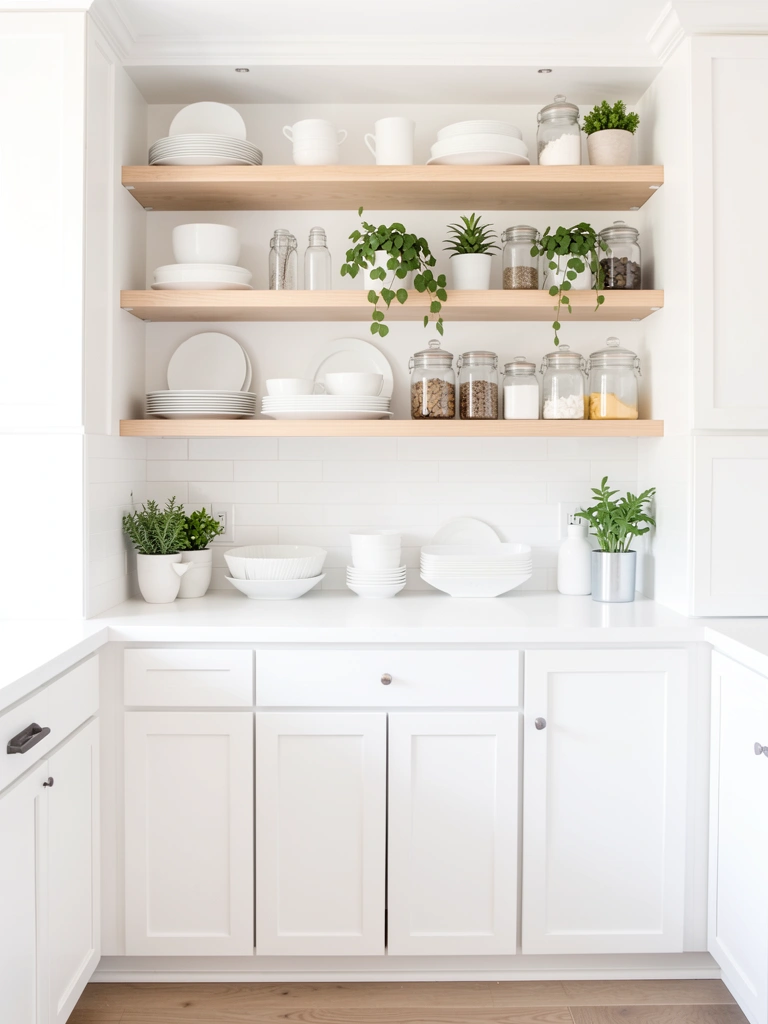
2. Layer Open Shelving with Curated Styling
Open shelving only works when the items on display are intentionally chosen and beautifully arranged. Group similar items (white bowls together, vintage glassware in one zone), add texture with woven baskets, and sprinkle in greenery for warmth.
Mix dishware heights and styles—stack some plates flat, lean others vertically, nestle a small plant between groups. Baskets below shelves hide kitchen clutter while keeping your space airy. Start with one shelf if you’re unsure; swapping three shelves at a time takes about 20 minutes. Cost depends on what you already own, but if shopping, budget $50–$150 for styling pieces from Target, IKEA, or HomeGoods.
Your kitchen looks magazine-worthy while staying functional. Plus, you’ll use your pretty dishes instead of hiding them away.
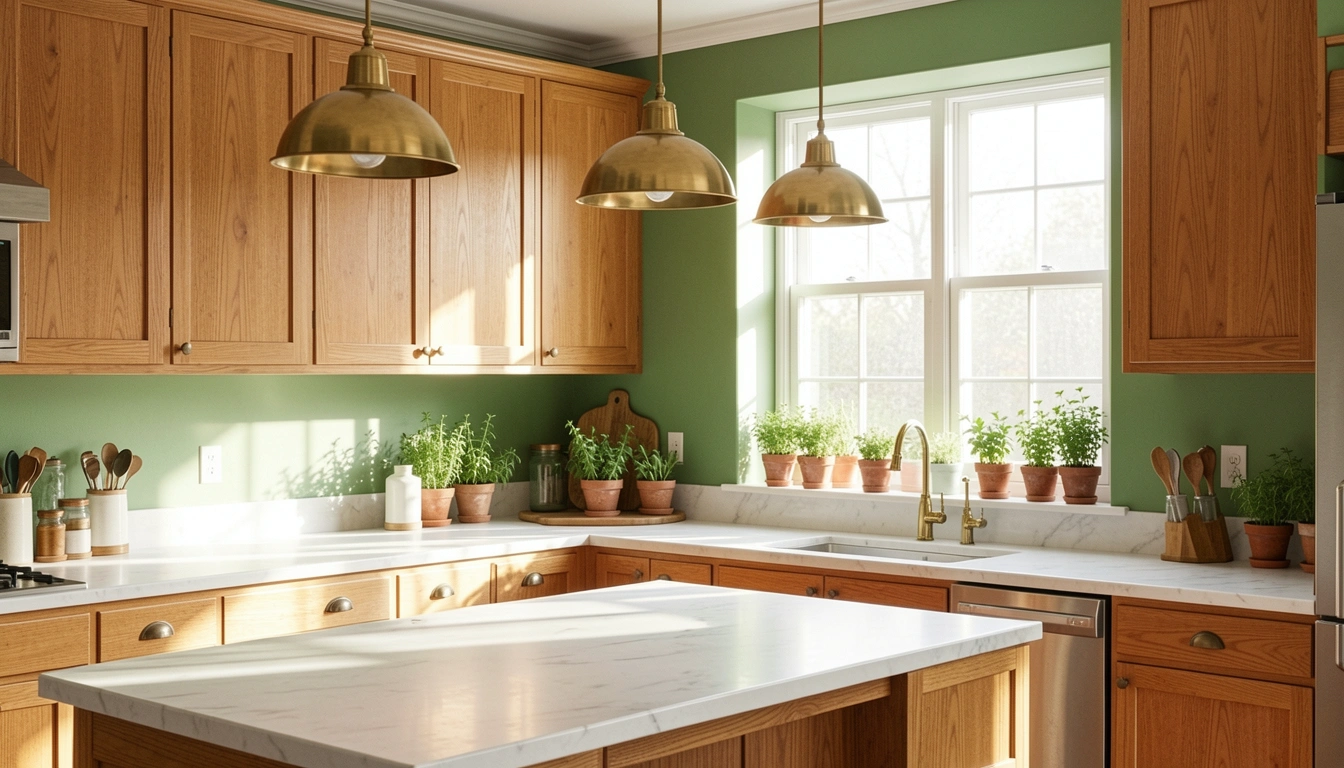
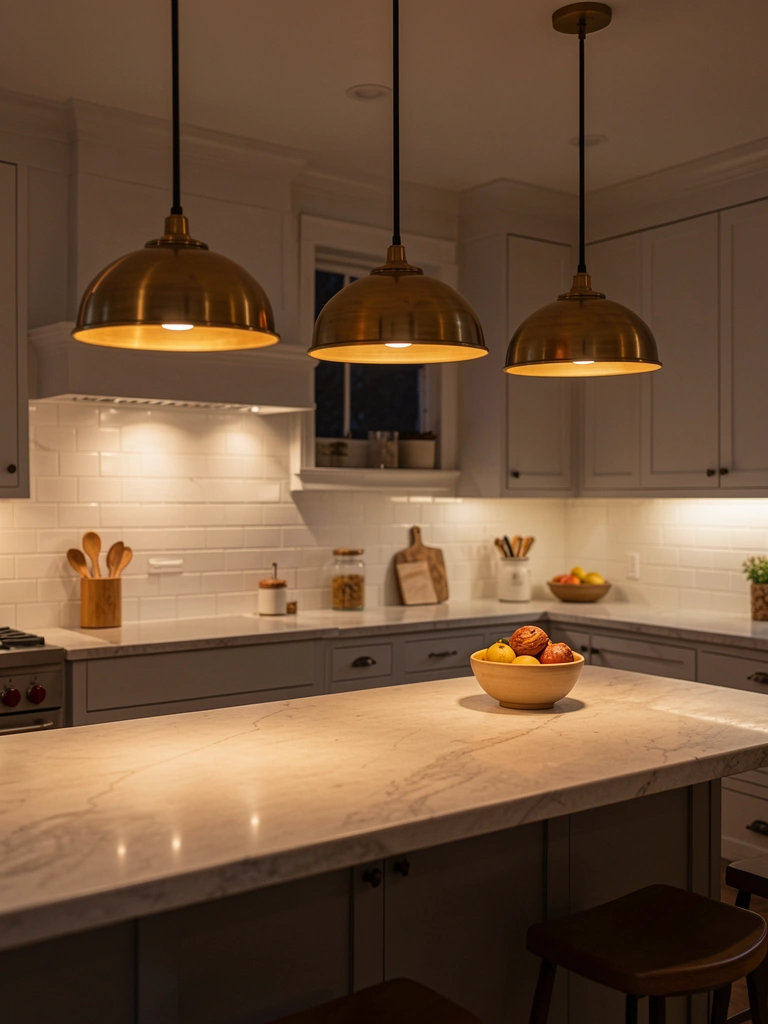
3. Install Brass or Mixed-Metal Pendant Lights

Lighting is the secret weapon that changes the entire mood of a kitchen. Mixing metal finishes (brass, copper, black, wood) creates depth and visual interest in a way that matchy sets can’t.
Look for pendants at IKEA ($30–$80 each), Wayfair ($60–$150 each), or West Elm ($150–$300 each). If you’re handy with a screwdriver and your kitchen already has a junction box, installation is a 15-minute DIY job. Otherwise, budget $100–$200 for an electrician to hang them. The dramatic difference is worth it—84% of design pros cite lighting as the standout feature that elevates a kitchen.
Your space transforms from functional to intentional. Cooking and morning coffee become experiences, not just tasks.
4. Add a Butler’s Pantry or Scullery for Hidden Storage
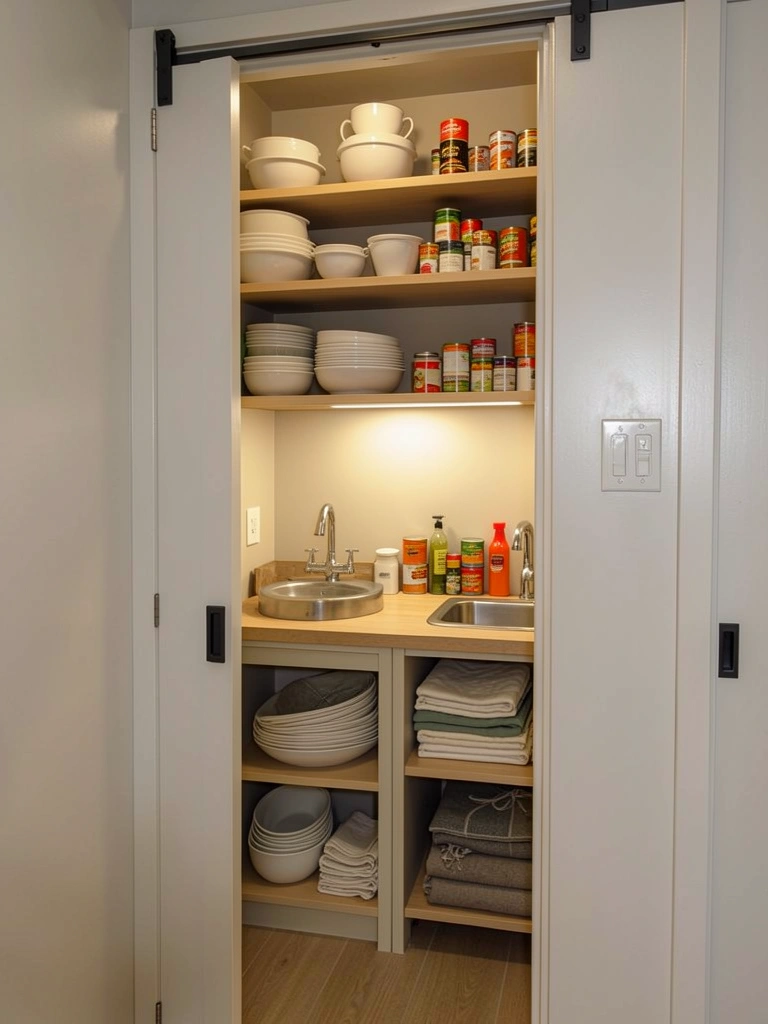
If you have an open-plan kitchen, a hidden prep zone is a game-changer for containing mess while entertaining. A butler’s pantry—even a tiny closet-sized one—hides dishes, snacks, and clutter, so your main kitchen stays show-ready.
If you’re renting, this is trickier, but consider a rolling cart with a curtain rod and fabric panel that slides in front ($60–$120). For homeowners, consult a contractor about converting a closet or adding a pocket-door wall ($1,500–$5,000 depending on complexity). DIY enthusiasts can install open shelving in an existing space for $150–$300.
You get the relaxed, open-kitchen feel without the stress of showing crumbs and dirty dishes. Guests see a polished space; you know exactly where everything is.
5. Swap Neutral Walls for Warm Earth Tones
All-white and all-gray kitchens are officially dated. Warm earth tones—terracotta, warm taupe, soft ochre, sage—make your kitchen feel grounded and personal while still staying timeless.
Pick a test paint swatch and live with it for a few days in your actual kitchen lighting (paint changes dramatically depending on morning vs. evening light). One gallon of quality paint costs $35–$50 and covers most kitchens. Painting two walls takes about 4–6 hours; the whole room takes a weekend. Renters: try peel-and-stick wallpaper ($25–$60 per roll) for a no-commitment vibe.
Your space feels like a cozy retreat instead of a sterile box. Food photography suddenly looks better too—the warm backdrop is chef’s kiss for Instagram.
6. Introduce Mixed-Material Backsplashes with Texture
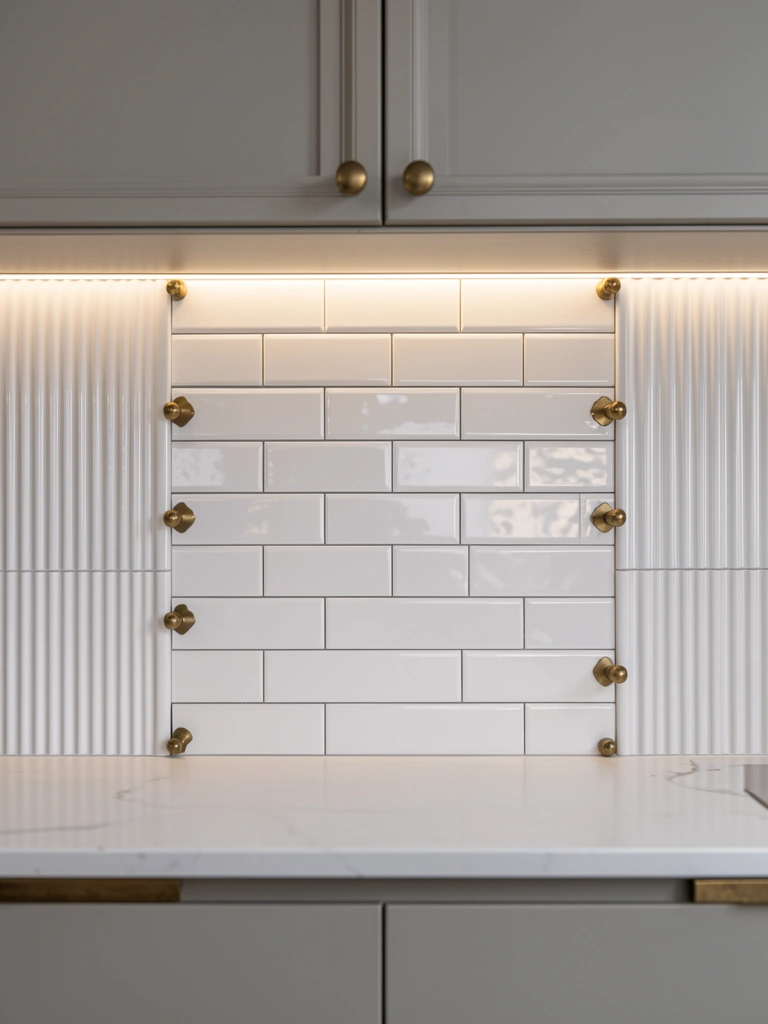
Textured backsplashes—fluted tiles, plaster finishes, dimensional patterns—add visual depth without overwhelming the space. Pairing one texture with a classic subway tile creates balance.
Browse Wayfair, Home Depot, or specialty tile shops for combinations. A simple mixed backsplash for a 30-square-foot area runs $300–$800 in materials. If you’re comfortable with basic tile work, DIY installation saves $200–$500 in labor. For first-timers, hiring a pro costs $800–$1,200 total, but takes stress off your plate and ensures a polished finish.
The backsplash becomes a design feature instead of an afterthought. Suddenly your whole kitchen feels intentionally designed, not just functional.
7. Create a Cozy Kitchen Dining Nook
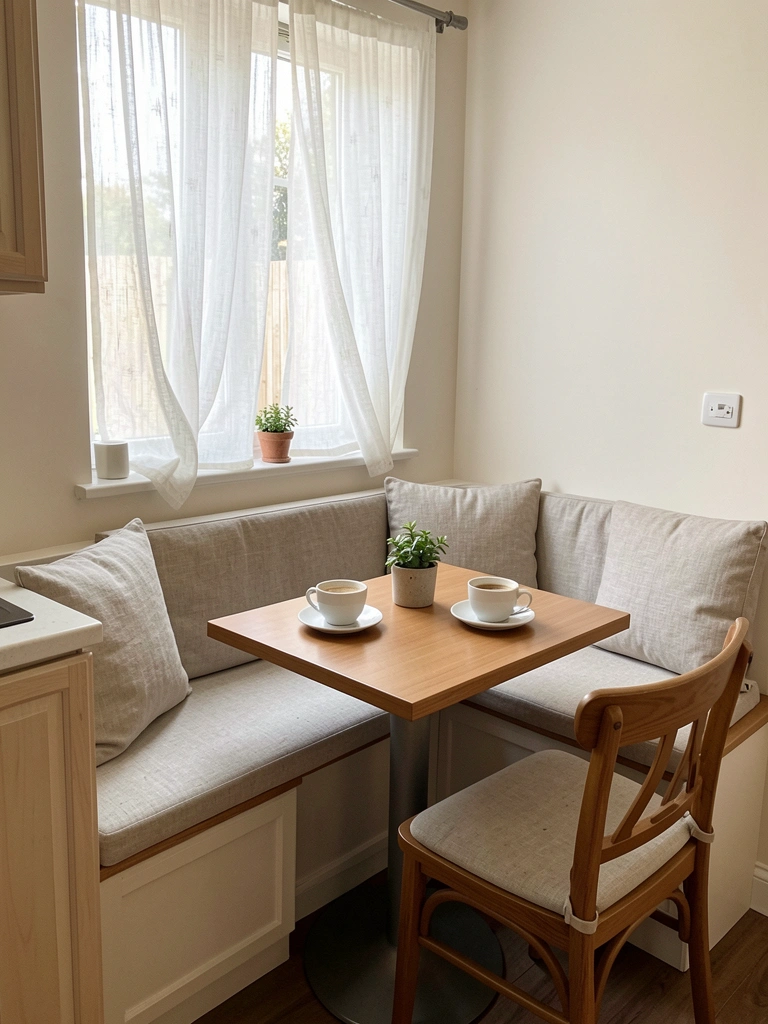
A dining nook transforms a corner into a gathering spot. Whether you build a full bench or use a modest bistro table and chairs, this creates coziness without eating into your main kitchen workspace.
For renters and budget-conscious folks: a small bistro table ($80–$150) and two chairs ($40–$80 each) tucked into a corner does wonders. Homeowners can splurge on a built-in bench ($1,200–$3,000 installed) or DIY one for $300–$600. Add a simple cushion ($50–$120) and you’re done. Total project time: a weekend for DIY builds, or one week if contracting out.
You gain a quiet spot for coffee, a casual dining space, and a reason to actually use your kitchen beyond cooking. Small spaces suddenly feel intentional, not cramped.
8. Go Handle-Free with Push-to-Open Cabinetry
Handle-free cabinets create a seamless, minimalist look that photographs beautifully and stays clutter-free. The mechanism catches your eye way less than hardware does.
If you’re replacing cabinets, specify push-to-open when ordering (adds $100–$300 to your cabinet cost). For existing cabinets, adhesive-catch mechanisms retrofit onto your current doors for $50–$150 total. No tools needed; installation takes 30 minutes. This option is perfect for renters—it’s literally a sticker-on solution.
Your kitchen looks more sophisticated instantly. The bonus? No fingerprints on hardware, and cleaning is faster.
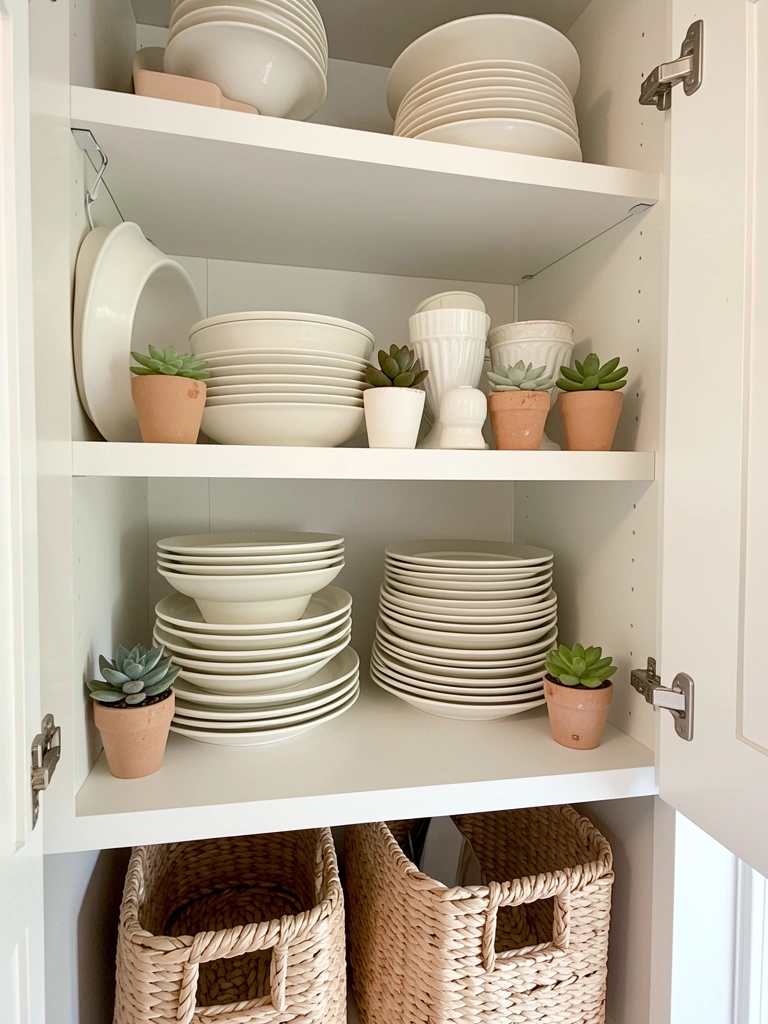
9. Style Your Open Shelves with a Color Palette

Instead of random display, choose a 3-to-4 color palette (white, cream, sage, and natural wood, for example) and stick to it on your open shelves. This creates visual harmony and makes your kitchen feel designed, not chaotic.
Go through your current dishes and dishware—you likely have enough already. If you need to add pieces, target HomeGoods, Wayfair, or TJ Maxx for affordable stoneware in your palette ($10–$30 per piece). Swap out items over one afternoon. Cost for new additions: $50–$150 depending on how much you add.
Your kitchen looks calm and curated. Guests notice the intentionality, and you feel more in control of your space.
10. Paint a Statement Wall in Bold Blue or Brown
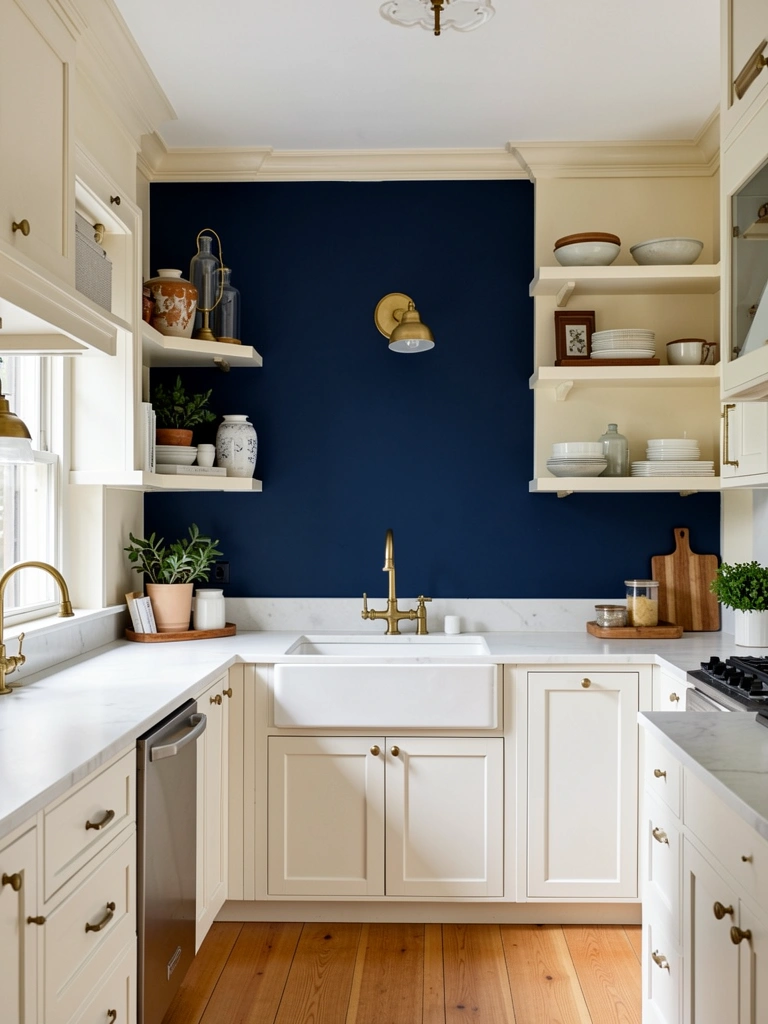
A single bold accent wall (not the whole room) gives you personality without overwhelming a small space. Deep blue and warm brown are the top choices after green; 63% of pros are using blue right now.
Choose one wall (usually behind your sink or stove) and commit. A rich, deep shade of Benjamin Moore or Sherwin-Williams ($35–$50 per gallon) takes 3–4 hours to paint if you’re solo. Rent a paint sprayer from Home Depot ($30–$40 per day) for a flawless finish, or hire a painter ($300–$600 depending on wall size). The trick is using primer first, especially on darker shades.
The focal point makes your kitchen feel designed and intentional. Plus, it’s reversible—if you tire of it, it’s just another coat of paint away.
11. Install Undercabinet Lighting for Function and Mood

Undercabinet lighting solves two problems at once: it brightens your counter workspace and creates ambient mood lighting when you’re not cooking. LED strips are affordable, energy-efficient, and come in warm tones.
LED strip kits run $30–$80 from IKEA, Amazon, or Home Depot. Most are plug-and-play; if your cabinets have an outlet nearby, installation takes 15 minutes. No outlet? Budget $150–$300 for an electrician to run one. The difference in your daily kitchen experience is massive—no more shadowy meal prep, plus a cozier vibe come evening.
Cooking becomes easier, and your kitchen transforms from task-only to an inviting hangout spot. This upgrade pays for itself in function alone.
12. Incorporate Fluted or Textured Range Hood
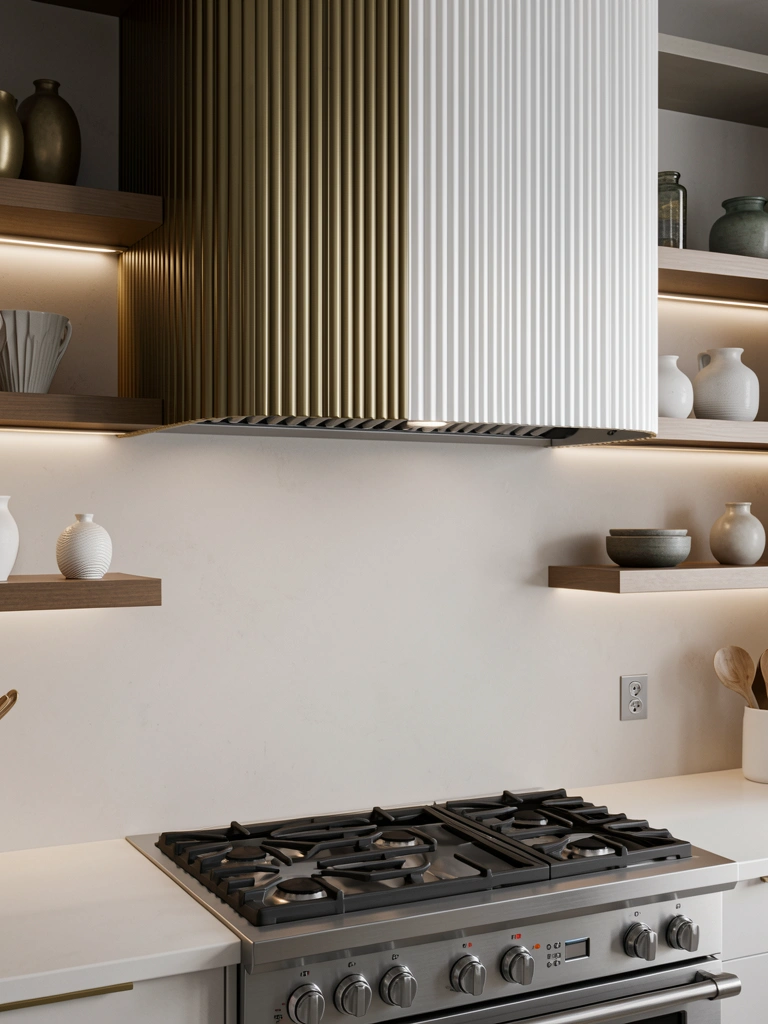
A textured range hood is a sculptural statement piece that grounds your kitchen. Fluting, plaster finishes, and dimensional details are trending hard right now for adding organic interest.
Range hoods vary wildly: $500–$1,500 for mid-range brands like Zephyr or Signature, or $1,500–$4,000+ for designer options. If you’re replacing an existing hood, installation is typically included. If adding new, budget $300–$800 in labor for venting setup. Renters should skip this one—it requires permanent installation.
Your kitchen instantly looks more curated and intentional. The range hood becomes a design feature instead of an appliance you hide.
13. Swap Hardware for Brass or Mixed Metals
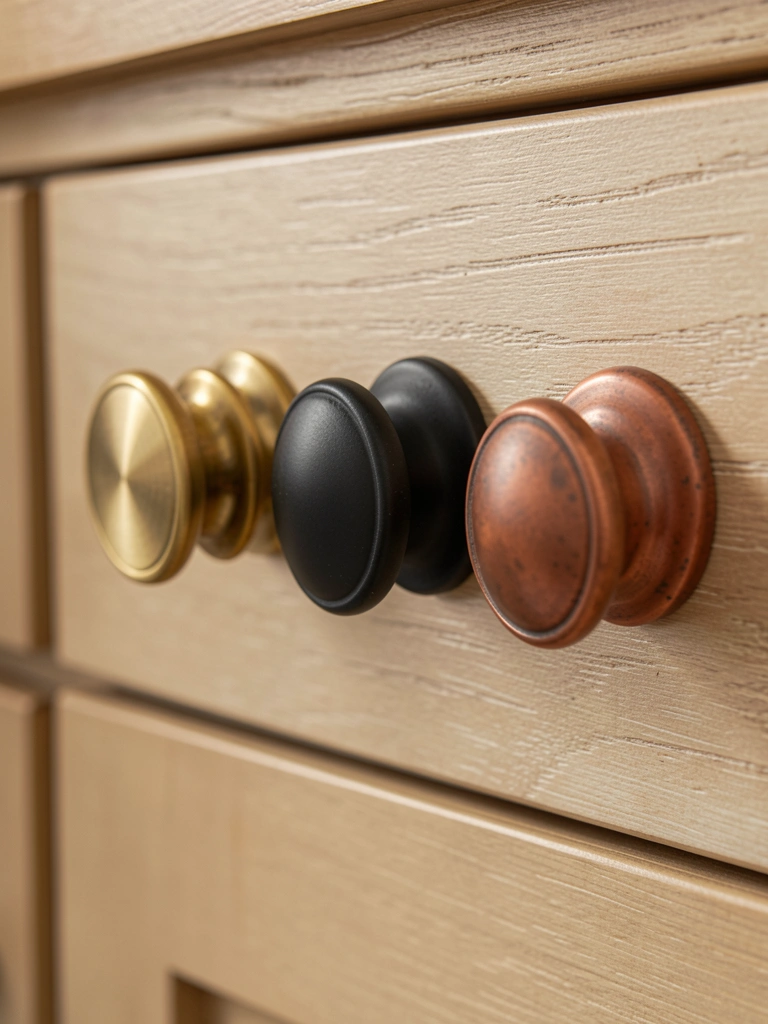
Cabinet hardware is jewelry for your kitchen. Switching from generic silver to brass, copper, or mixed metals updates your entire vibe—and it’s one of the fastest, cheapest wins possible.
Knobs and pulls from Schoolhouse Electric, Rejuvenation, or even Wayfair run $3–$15 each. For a full kitchen with 20 pieces of hardware, budget $60–$300 total. Changing them out takes 30–45 minutes with just a screwdriver. The old hardware might have resale value on Facebook Marketplace, so you could recoup some cost.
Your cabinets look refreshed and intentional without any major work. This single swap elevates your whole kitchen’s design story.
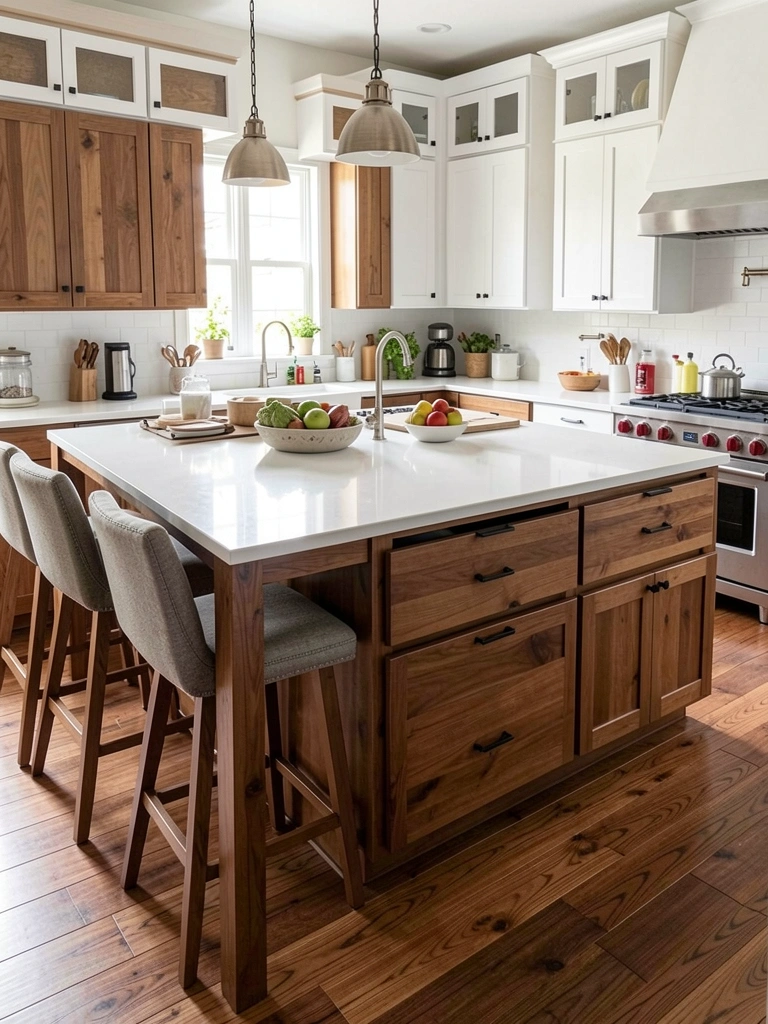
14. Create Hybrid Island with Open Legs and Hidden Storage
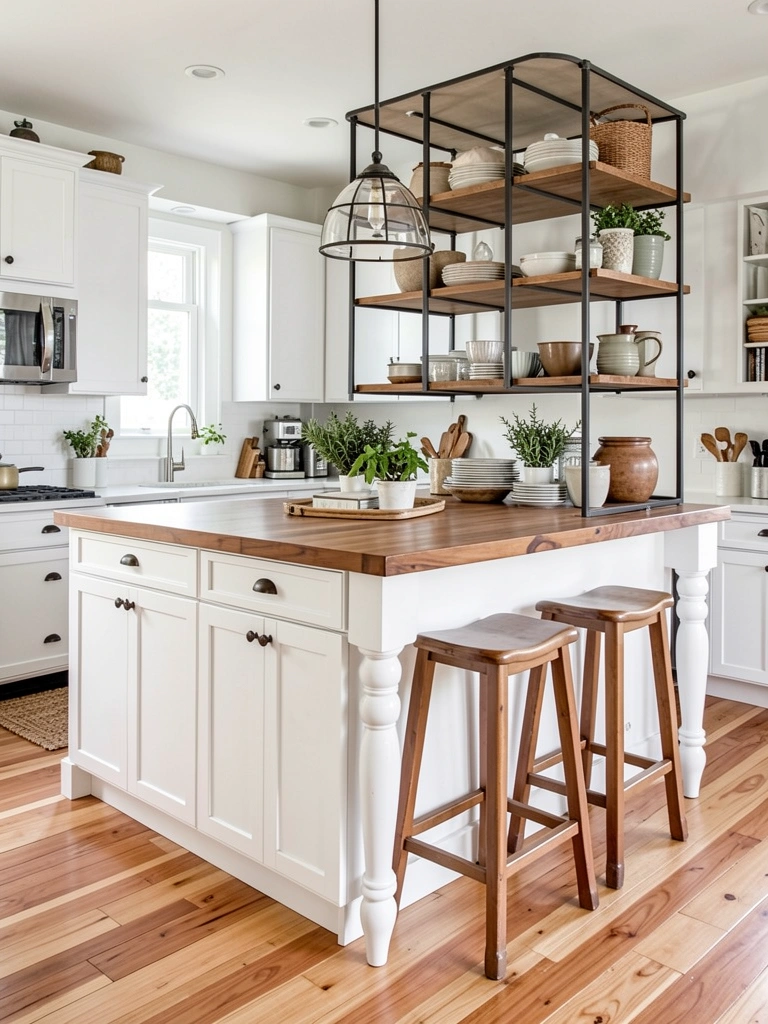
Hybrid islands combine closed storage for mess-hiding with open shelving for display and flexibility. The furniture-style legs (instead of a solid base) make the space feel airier and more collected-over-time.
A ready-made island cart like the IKEA Stenstorp ($150–$250) works for renters and small spaces. Homeowners can commission a custom build for $1,000–$3,000, or DIY using stock cabinetry and metal shelf supports ($300–$600 in materials). The open side gives you display space; the closed side hides cooking prep.
You get flexibility for both hosting and everyday living. The space feels more designed than a basic kitchen island.
15. Add Warm Brass Lighting to Match Your Color Palette
Brass lighting warms up a space psychologically. Unlike cold chrome or industrial black, brass brings sophistication and coziness that pairs beautifully with bold colors and earth tones.
Pendants in brass finishes start at $40–$80 each from IKEA or Amazon, and go up to $150–$300+ for designer pieces. Pair three over an island for $120–$900 depending on your budget. Installation is straightforward if you have an existing junction box (15–30 minutes DIY) or costs $100–$200 if hiring an electrician.
Your kitchen feels warmer and more intentional. The lighting itself becomes part of your design story, not just utilitarian.
16. Organize One Drawer with Drawer Dividers

A single organized drawer is the gateway drug to a more organized kitchen. Start with one high-traffic drawer (utensils, gadgets) and add dividers to create zones. This teaches your brain the system and motivates you to maintain it.
Drawer dividers range from $15–$50 per set at Target, IKEA, or Amazon. Bamboo or wood dividers look nicer than plastic and last longer. Customizing one drawer takes 15–20 minutes. There’s no installation required—just lay them in and arrange your items.
You spend less time hunting for that one spatula and more time actually cooking. A small organized space makes your whole kitchen feel more controlled.
17. Paint Kitchen Island a Different Color from Cabinets

Your island can be a different color from your perimeter cabinets—it’s a design choice, not a mistake. This adds personality and makes the island pop as a focal point.
Follow the same painting process as cabinet painting ($80–$150 in materials, one weekend of work). Choose a complementary or bold-contrast color: if your cabinets are cream, try forest green or deep blue. If you want less commitment, peel-and-stick cabinet film does the job for $80–$150 and peels off cleanly.
Your kitchen looks intentionally designed instead of one-note. The island becomes a real design anchor.
18. Add a Small Beverage Station or Coffee Bar
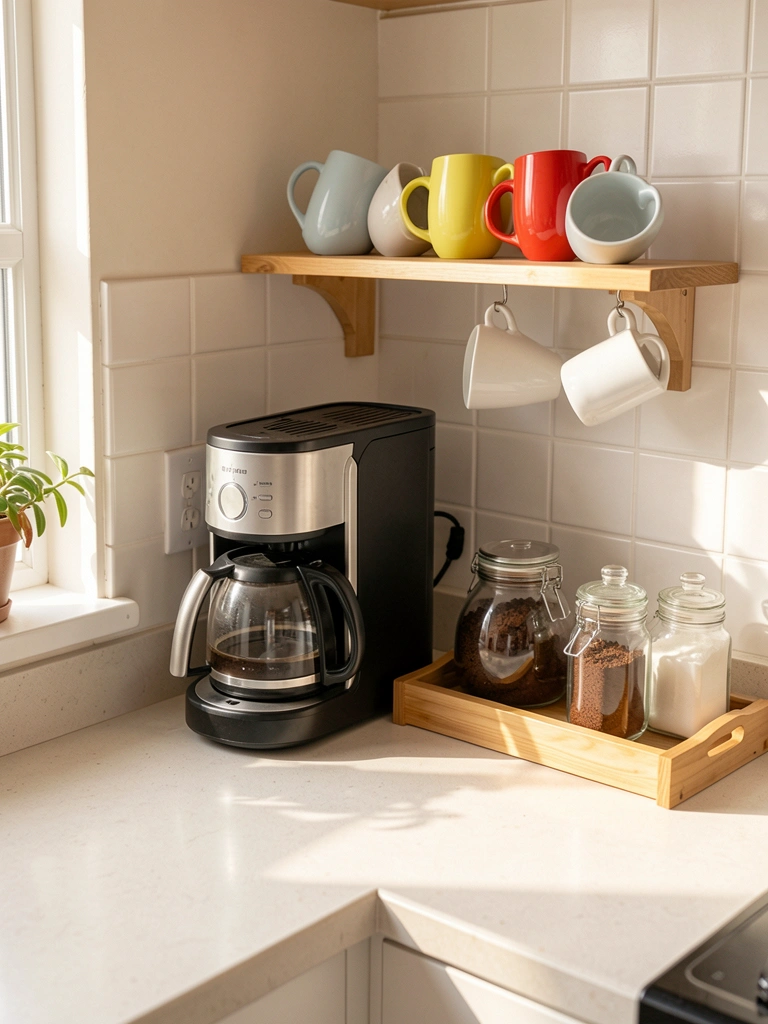
A dedicated beverage zone keeps your morning routine streamlined and adds a stylish corner that guests love. It doesn’t need to be big—just intentional.
Grab a small floating shelf ($20–$40 at IKEA or Wayfair), mount it in 15 minutes, and arrange your coffee gear on it and the counter below. Add a small wooden tray ($15–$30) to corral sugar, stirrers, and pods. If you already have most items, you’re looking at $50–$100 total investment. If you need a new coffee maker, budget an additional $30–$150 depending on the model.
Your morning feels more intentional and luxurious. Plus, guests love having a self-serve option, and you look like you have your life together.
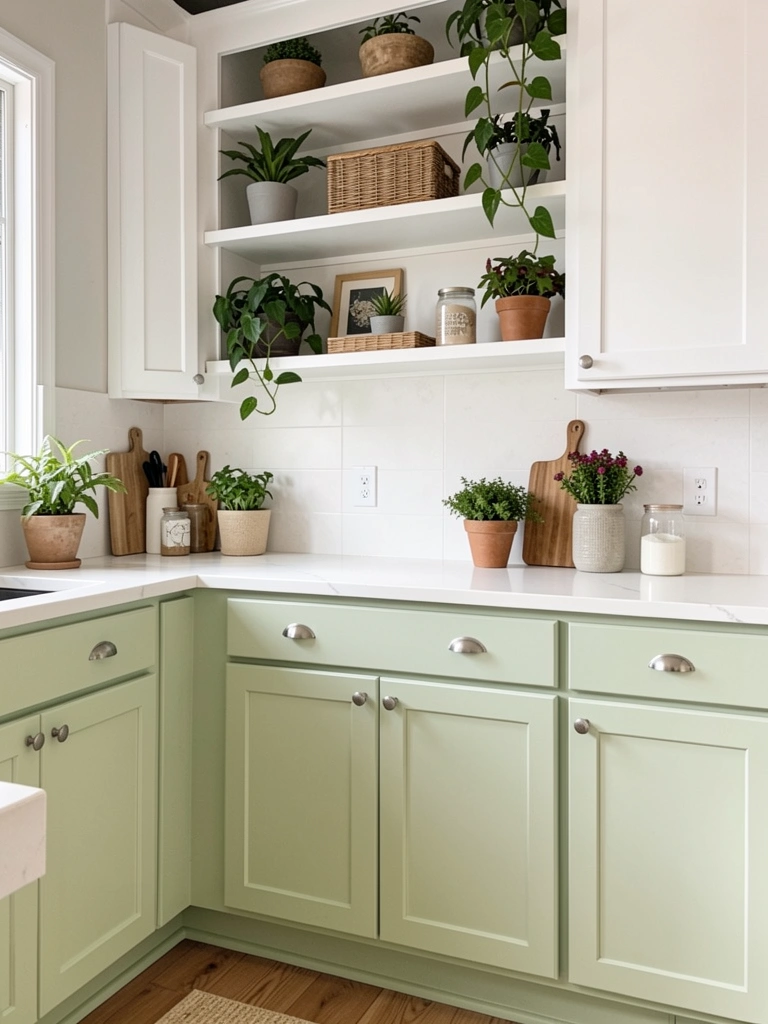
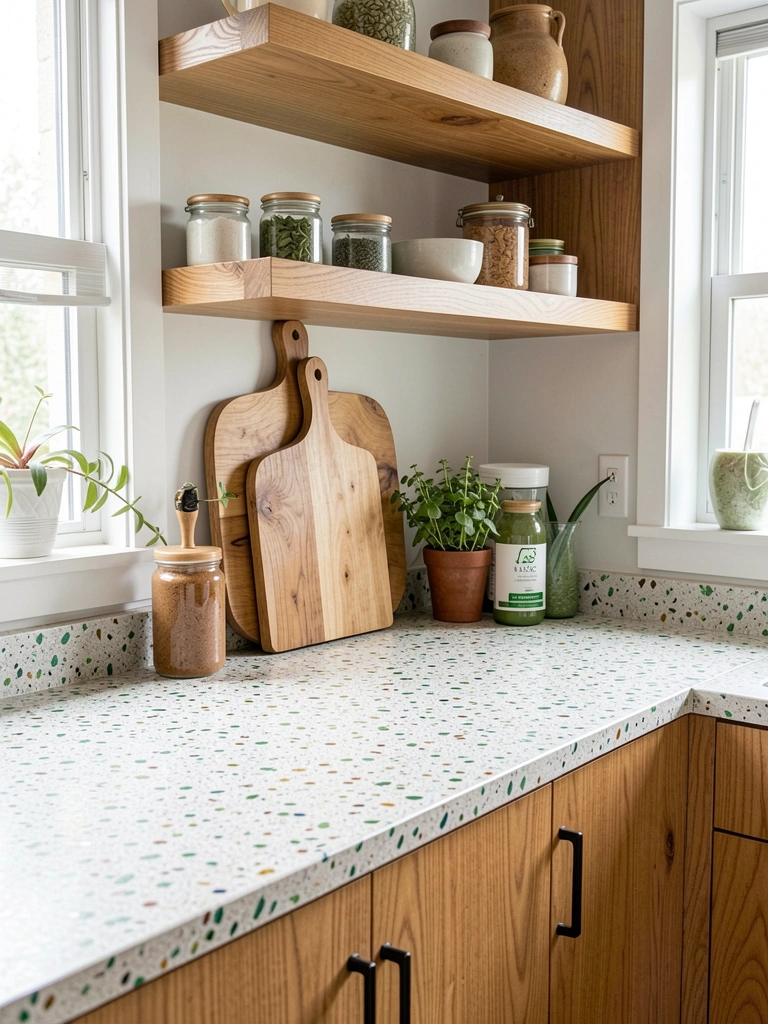
19. Layer Textures with Woven Baskets and Natural Materials

Texture creates visual and tactile interest that makes a space feel lived-in, not sterile. Mixing woven baskets, wood, ceramics, and metal gives your kitchen depth and personality.
Woven baskets from HomeGoods, IKEA, or Etsy run $10–$40 each depending on size. Start with 2–3 in different weaves. Add a wooden cutting board or two ($15–$40 each), and sprinkle in small ceramics or wooden bowls you already own. No installation required—just arrange and play until it feels right. A complete styling session takes 30–45 minutes.
Your kitchen looks intentionally designed and touchable. The mixed textures make your space feel warmer and more personal than perfectly matching everything.
20. Install a Low-VOC Paint Refresh on Lower Cabinets
Low-VOC (volatile organic compound) paint is better for you and the planet—and it smells way less harsh. This matters more when you’re painting in a kitchen you use daily.
Low-VOC paint from Benjamin Moore, Sherwin-Williams, or Behr costs $40–$60 per gallon (slightly more than standard paint, but worth it). The process is identical to regular cabinet painting: prep, prime, two coats. For just lower cabinets, expect 4–6 hours of work. You’ll appreciate not choking on fumes while cooking over the next two weeks.
You get a fresher kitchen without the guilt. Plus, low-VOC paint off-gases much faster, so your space smells normal within days instead of weeks.
21. Swap Upper Cabinets for Open Shelving
Removing upper cabinets (or replacing them with open shelving) creates the illusion of more space and forces intentional curation of what you display. This works especially well in small kitchens where visual clutter reads as physical clutter.
If you’re renting, this isn’t an option. Homeowners should consult a contractor about load-bearing walls before making changes ($200–$500 consultation fee, then $1,000–$3,000 in labor). DIY open shelving installation on existing walls costs $200–$500 in materials. The payoff is huge—your kitchen feels twice as big.
You gain lightness and breathing room. Plus, you’re forced to own only dishes you actually love and display, so nothing hides in the back collecting dust.
22. Create a Multifunctional Island with Seating and Storage
A multifunctional island serves as prep surface, casual dining spot, extra storage, and gathering hub. This is the ultimate kitchen workhorse if you have the space.
A custom island build runs $2,000–$5,000 depending on size and finishes. IKEA’s hack-able options ($300–$800) work for renters with smaller spaces. Budget an additional $200–$600 for stools (aim for upholstered ones that tuck under the counter). The payoff? Your kitchen becomes the heart of your home.
You gain casual dining, prep space, and storage all in one. This single addition transforms how you and your family interact with your kitchen.
23. Display Cookbooks Vertically on Open Shelves
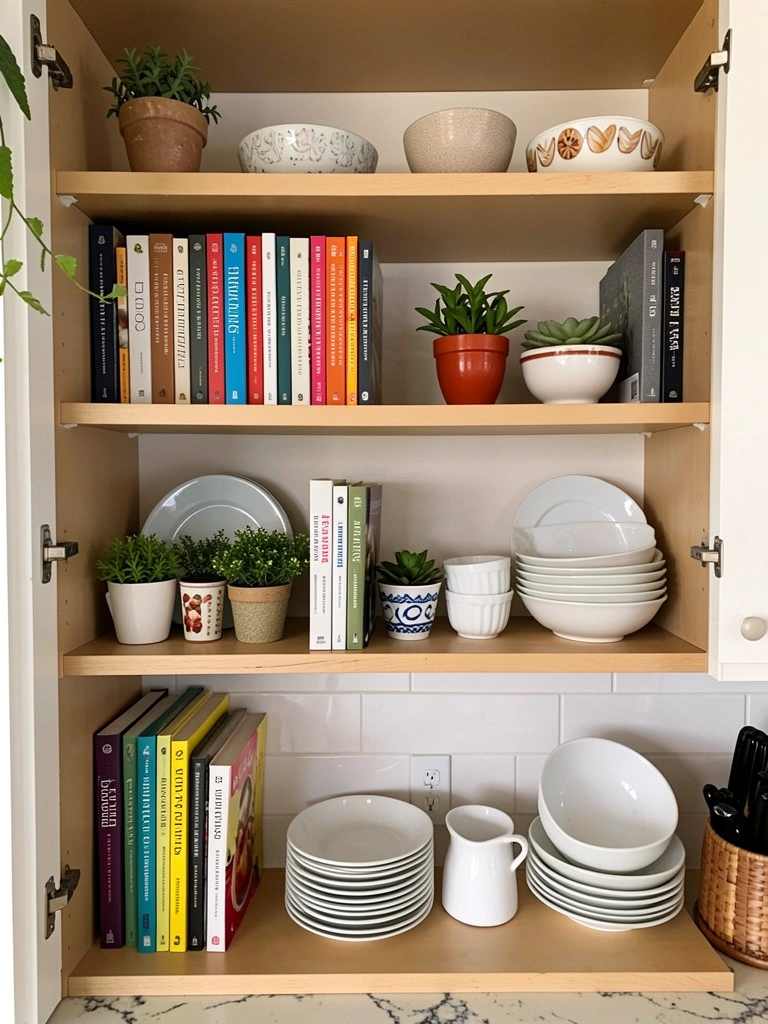
Cookbooks are functional and beautiful. Standing them upright on open shelves turns them into part of your design while keeping them accessible for actual cooking.
Gather your cookbooks (you probably have more than you realize hiding on closet shelves). If you need more, thrift them from Goodwill or estate sales for $2–$5 each. Arrange them upright alongside other curated items—small plants, serving bowls, a wooden trivet. Styling one shelf takes 10–15 minutes. This costs nothing if you use what you already own.
Your kitchen looks intentional and cultured. Plus, you’ll actually use those recipes instead of forgetting they exist.
24. Introduce Sustainable and Recycled Materials
Recycled glass countertops, FSC-certified wood cabinetry, and low-VOC finishes are better for the planet and your home. They’re also increasingly affordable as sustainable options become mainstream.
Recycled glass countertops cost $80–$150 per square foot installed (comparable to mid-range granite). FSC-certified plywood cabinetry runs 10–15% more than standard, but lasts longer and feels better ethically. If you’re painting, choose low-VOC paint ($40–$60 per gallon, $10–$15 more than standard). Small swaps—even just going low-VOC and sustainable on a refresh—add up.
You make choices that align with your values. Your kitchen becomes a space where sustainability isn’t a compromise—it’s just how you live.
25. Curate a Wellness-Focused Kitchen Zone
A wellness zone in your kitchen—filtered water, herbal teas, a designated smoothie-making spot, fresh herbs—makes healthy choices feel natural, not forced. This small design choice supports your actual lifestyle.
This might mean installing a water filter pitcher ($30–$80), dedicating one shelf or small table ($0–$100), and gathering glass tea jars ($5–$15 each). Stock it with herbal teas, dried herbs, and supplements you actually use. Total setup takes 30 minutes and costs $50–$150 if shopping for a few pieces.
You’re more likely to reach for water instead of soda when it’s pretty and accessible. Small environmental design choices support bigger wellness goals without feeling preachy.
26. Mix Matte and Glossy Finishes for Visual Depth
Pairing matte and glossy finishes creates visual dimension that photographs beautifully and feels intentional. The contrast keeps your kitchen from looking flat or one-note.
This works with paint (matte cabinet paint with glossy tile), hardware (brushed brass with polished accents), or countertops (matte wood with glossy ceramic). No extra cost—just choose finishes intentionally when selecting materials. You might spend 5–10 extra minutes making finish selections, but zero additional dollars if you’re already buying these items.
Your kitchen looks professionally designed instead of accidentally assembled. The subtle contrast makes people notice your good taste without being able to pinpoint exactly why.
Save this post and try just one idea this weekend—start small and build from there. Your kitchen is about to feel so much more like you. Which idea are you tackling first?
Leave a Reply