If you’re drawn to handmade bookshelves that tell a story, you’re not alone. Rustic and artistic homes are moving away from mass-produced shelving toward personalized, character-filled designs that reflect who you actually are. Whether you’re renting, own your home, or fall somewhere in between, these 25 handmade bookshelf ideas range from zero-cost styling tricks to investment pieces that last decades. You’ll discover DIY projects you can finish in an afternoon, creative upcycling hacks using materials you might already have, and sourcing tips for finding authentic rustic pieces. By the end, you’ll have everything you need to build a shelf that works as hard as it looks good.
1. Stack and Style with Ladder Shelving
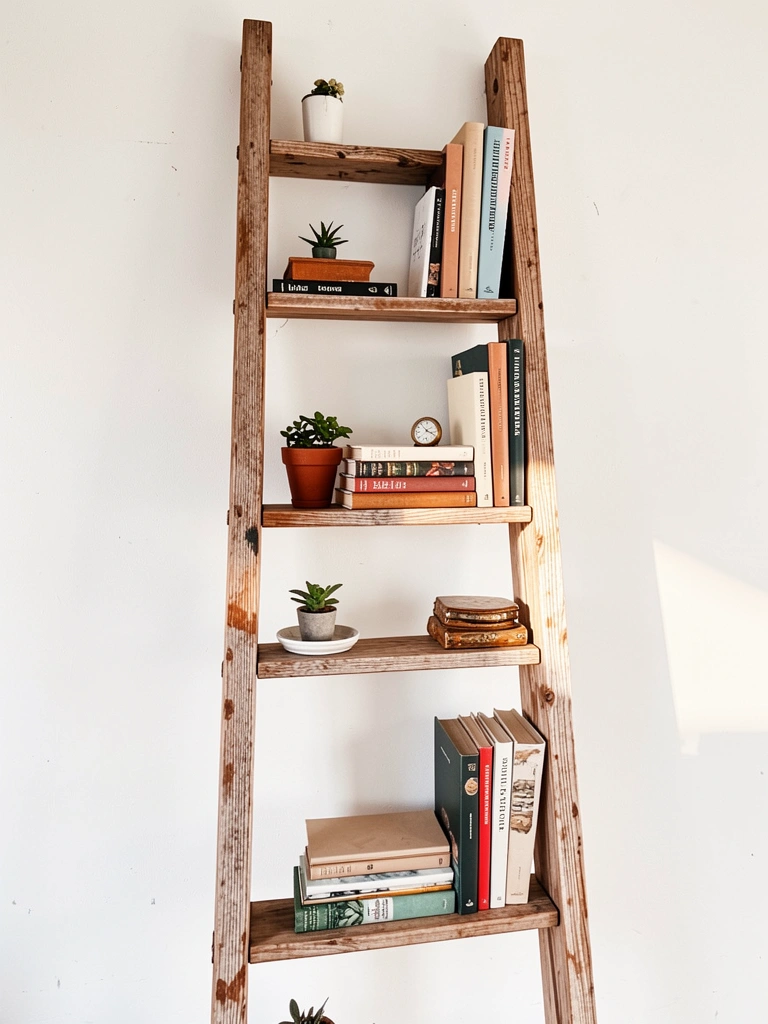
A ladder shelf is basically a bookshelf that doubles as wall art. The open design keeps any room from feeling cramped, and it’s totally renter-friendly since you’re not drilling into walls.
Find old wooden ladders at estate sales, Facebook Marketplace, or thrift stores ($15–$60). Lean it against your wall at a slight angle and load up each rung with books, plants, and decorative objects. No wall hardware needed—just stabilize it with a nail or adhesive hook if you want extra security. The key is mixing heights: stack a few books, set a small plant on the next rung, add a candle or ceramic piece higher up. This creates visual rhythm that photographs beautifully.
Pro tip: Paint or stain the ladder to match your space if it needs freshening, or keep the weathered look for authentic rustic charm.
You get instant storage plus a statement piece that costs way less than a traditional bookshelf and works in any room.
2. Reclaimed Wood Wall-Mounted Shelves
Reclaimed wood shelves are the real deal when you want rustic authenticity. They come with built-in character—visible knots, weathering, and grain patterns that new wood just can’t replicate.
Search Etsy, local salvage yards, or architectural reclamation companies ($80–$300 per shelf depending on size). Many sellers custom-cut shelves to your exact specifications. Installation requires basic tools: a stud finder, level, and mounting brackets. Most shelves ship ready to hang, so you’re looking at a one-hour installation. If DIY drilling feels intimidating, hire a handyman ($50–$100). Reclaimed wood is dense and durable, so these shelves handle heavy books without sagging for decades.
Pro tip: Mix shelf depths (12–18 inches) to create visual interest and leave room for larger objects like sculptures or stacks of art books.
These shelves age beautifully and become even more handsome over time, making them an investment that genuinely pays dividends in both function and style.
3. Crate Shelving with Industrial Vibes
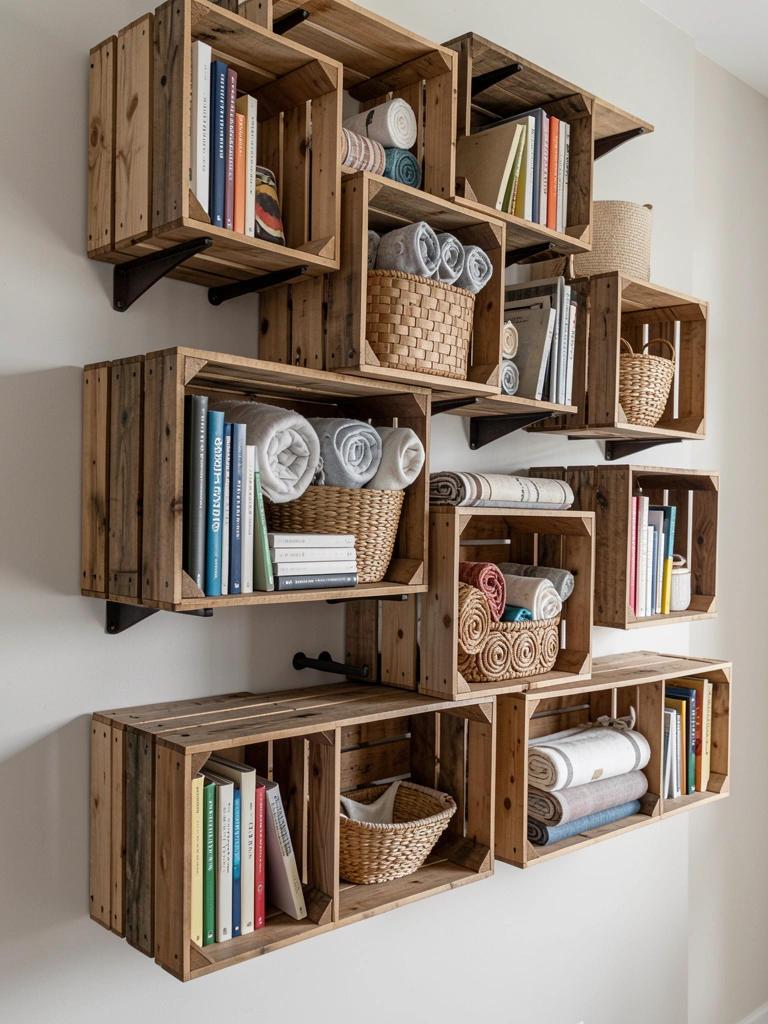
Wooden crates are cheap, modular, and adaptable to any wall configuration you dream up. Stack them in grids, staircase patterns, or random arrangements—whatever matches your style.
Find crates at IKEA, Home Depot, Etsy, or local farmers markets ($8–$30 each). You’ll need 3–8 crates depending on how much wall space you’re working with. Mount them using heavy-duty L-brackets ($5–$10 per bracket) secured into studs. Budget 2–3 hours for installation, including drilling and leveling. Paint or stain them beforehand if you want a cohesive look, or embrace the natural wood variation for authentic rustic appeal. The open backs let you paint the wall behind in a contrasting color for extra visual pop.
Pro tip: Renter? Use a tension rod inside each crate opening to create a subtle backing that hides wall damage without permanent installation.
The modular nature means you can add, remove, or rearrange crates whenever your needs or décor inspiration shifts.
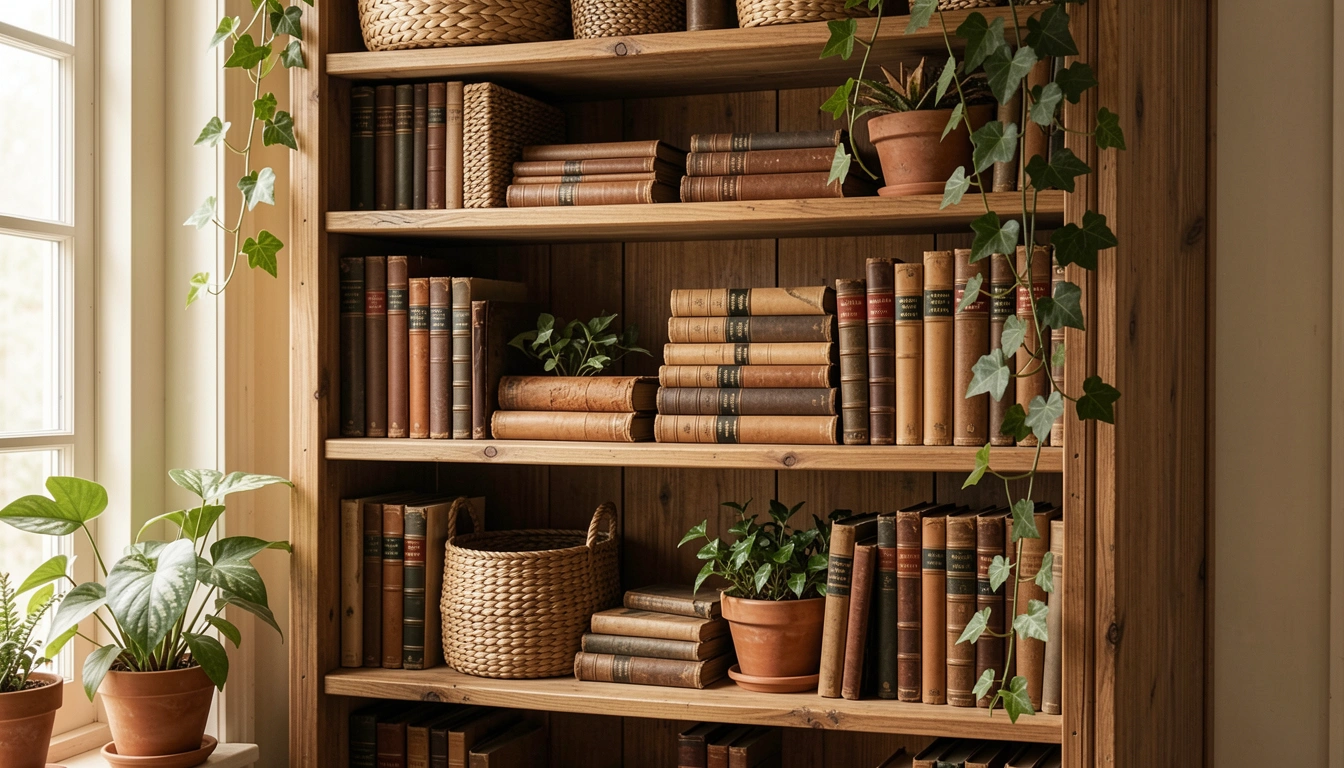
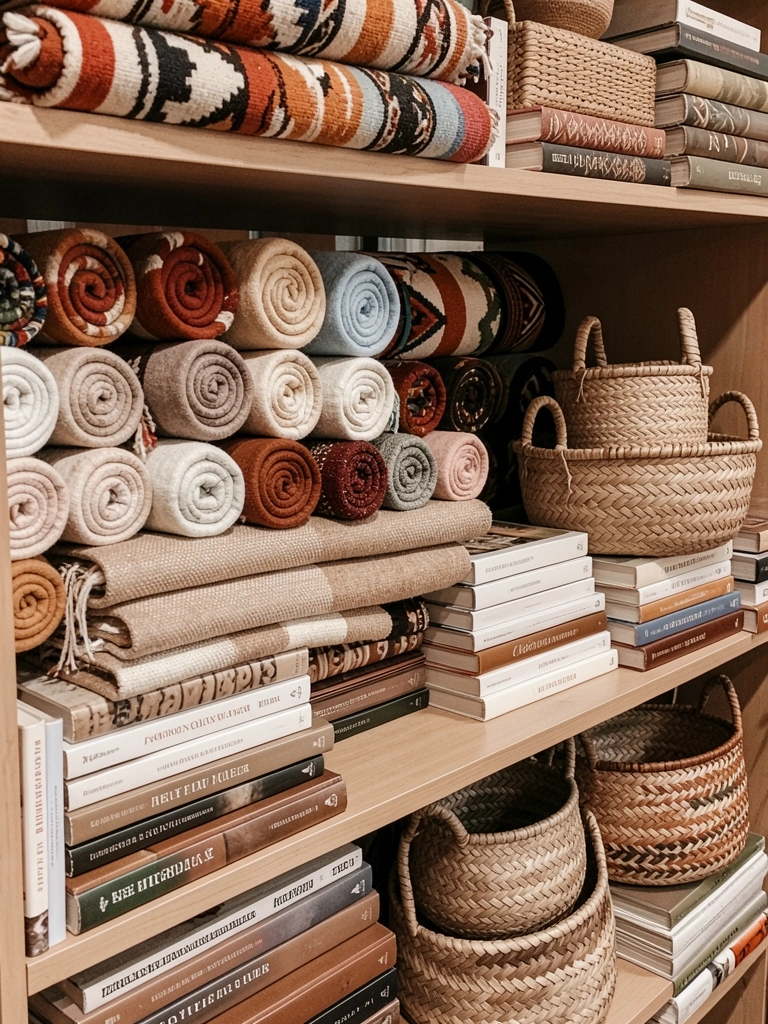
4. Incorporate Woven Baskets for Texture

Baskets break up the visual monotony of all books and create hidden storage for clutter that doesn’t deserve to be on display. Plus, they add wonderful texture that photographs incredibly well.
Source baskets from Target, Wayfair, TJ Maxx, or thrift stores ($10–$40 per basket). Choose sizes that fit your shelf openings—measure before buying. Fill baskets with art supplies, extra books, seasonal décor, or blankets. Layer baskets of different weave styles (rattan, woven seagrass, macramé) to add depth. Alternate baskets with standing books to create rhythm. This styling trick works whether you’re using existing shelves or building custom ones.
Pro tip: Label baskets with small chalkboard tags so you remember what’s stored inside without opening them.
Baskets add warmth and softness to a bookshelf while concealing the less-photogenic items you still need to keep close.
5. Create Corner Shelving from Reclaimed Doors
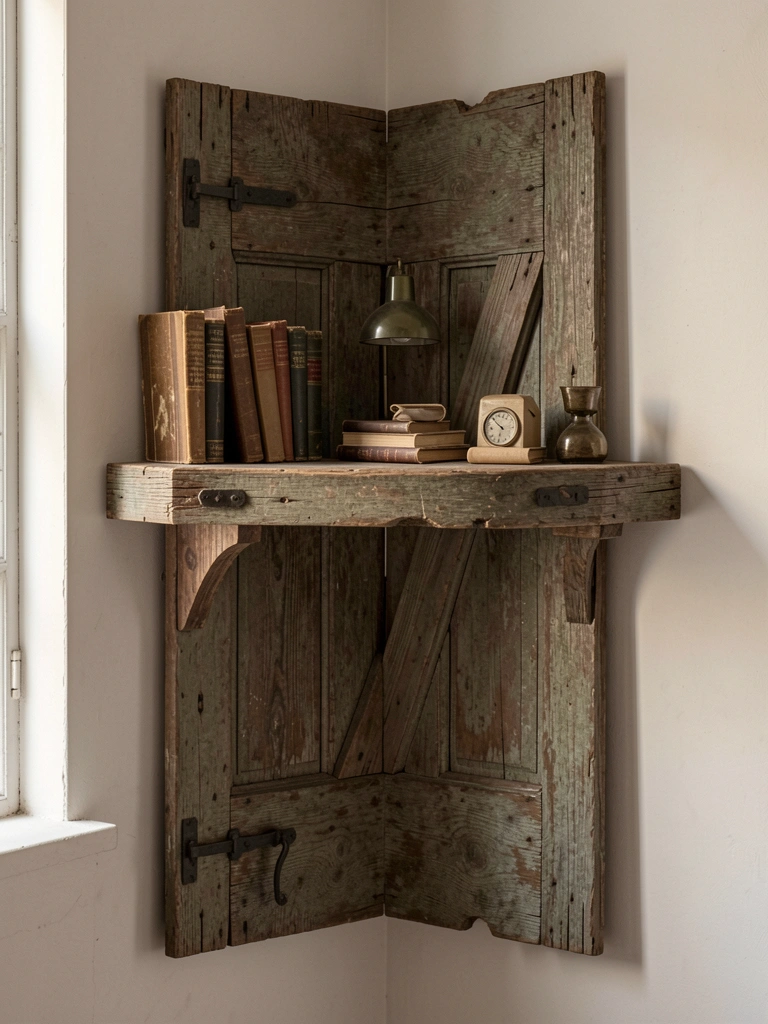
A reclaimed door becomes a conversation-starting shelf with instant rustic character and way more surface area than standard shelving. The weight capacity is solid if properly installed.
Hunt for old wooden doors at salvage yards, estate sales, or ReStore locations ($30–$100). Sand and seal if needed, then have it cut to your exact corner dimensions. Install using heavy-duty floating shelf brackets rated for 50+ pounds ($40–$80). Secure brackets into studs, then mount the door on top. Hire a handyman if you’re unsure about structural installation ($75–$150). The project takes 4–6 hours including prep and finishing.
Pro tip: Leave the door’s original paint or weathering intact for maximum character—you’re paying for that patina.
The oversized shelf becomes a feature wall element, perfect for displaying a large collection or creating a curated vignette that showcases your style.
6. DIY Pipe and Wood Shelving System
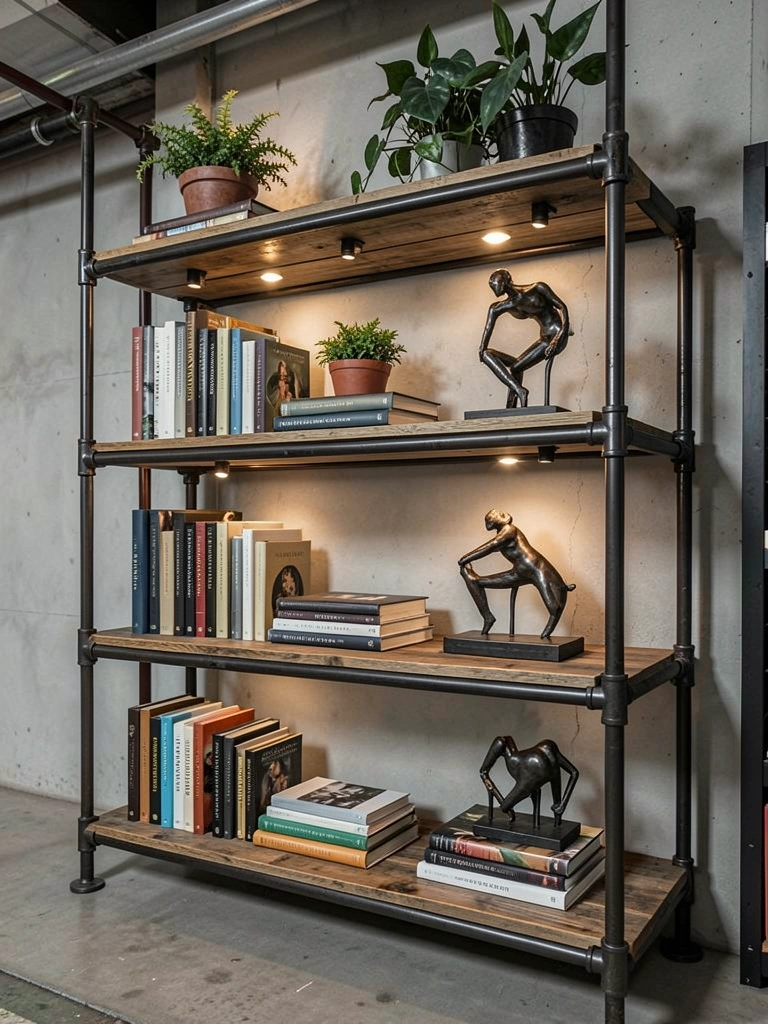
Pipe shelving merges rustic wood with industrial vibes, and you can build it yourself for a fraction of custom pricing. The modular design means you can expand or reconfigure anytime.
Buy steel pipes (½-inch diameter), flanges, and elbows from Home Depot ($50–$120 per shelf system). Pair with weathered wood planks or reclaimed boards. Assembly requires a wrench and basic handyman skills—figure 3–4 hours for a three-shelf unit. Screw flanges into studs, thread pipes through, and rest planks on the pipe structure. Total cost: $120–$250 per full system depending on size and wood sourcing. Rental note: Some landlords okay this if you patch holes when leaving; confirm first.
Pro tip: Choose matte black or raw steel finishes for authentic industrial appeal—shiny chrome looks dated quickly.
The hybrid aesthetic works beautifully in eclectic homes and gives you the satisfaction of building something functional with your own hands.
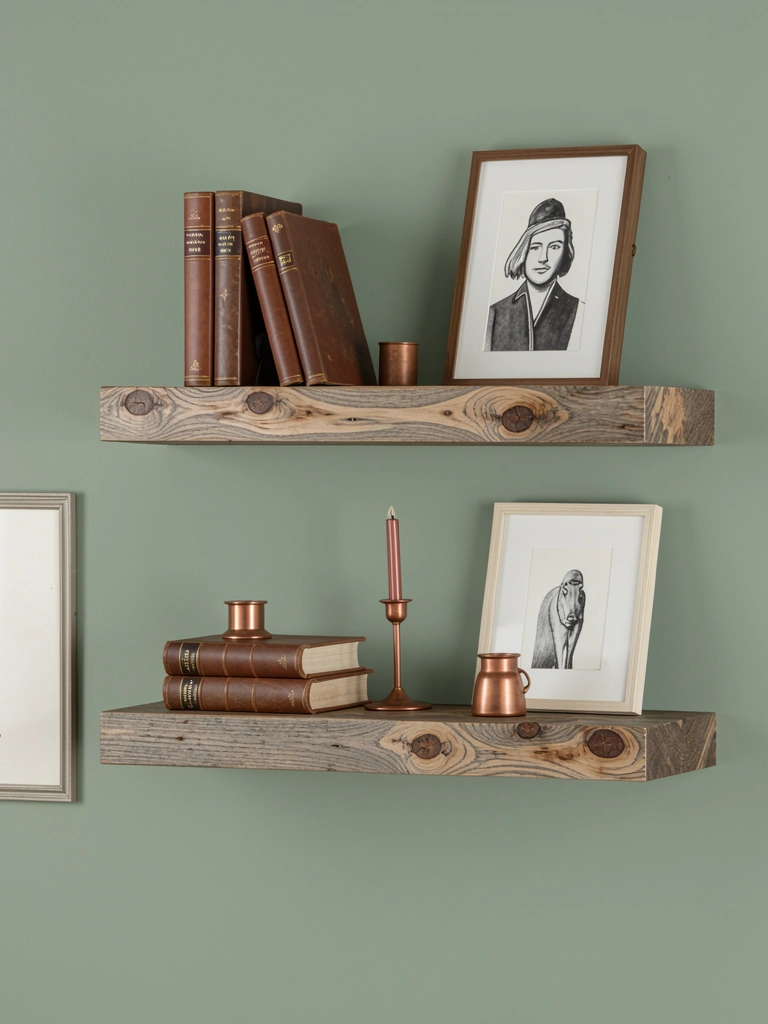
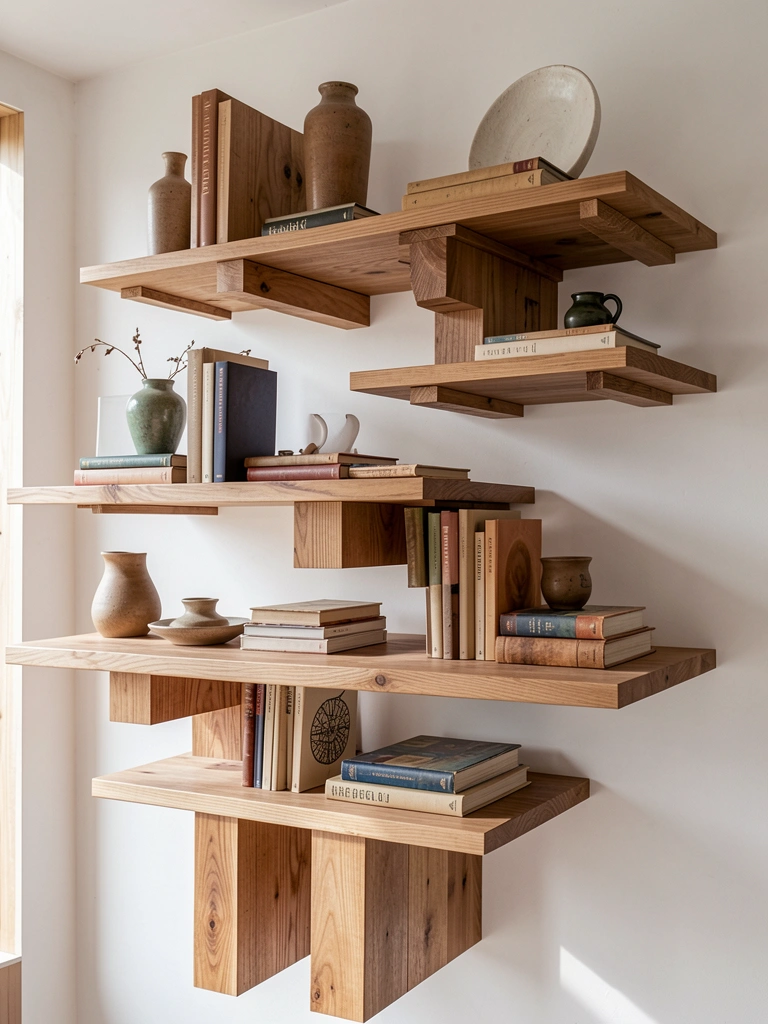
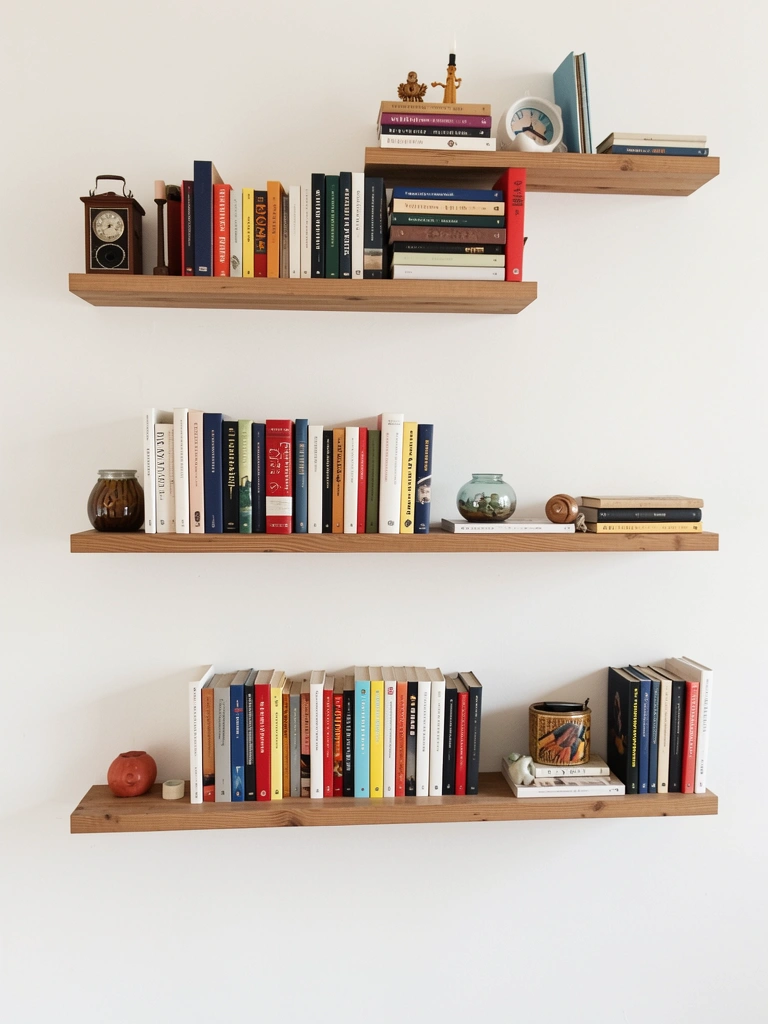
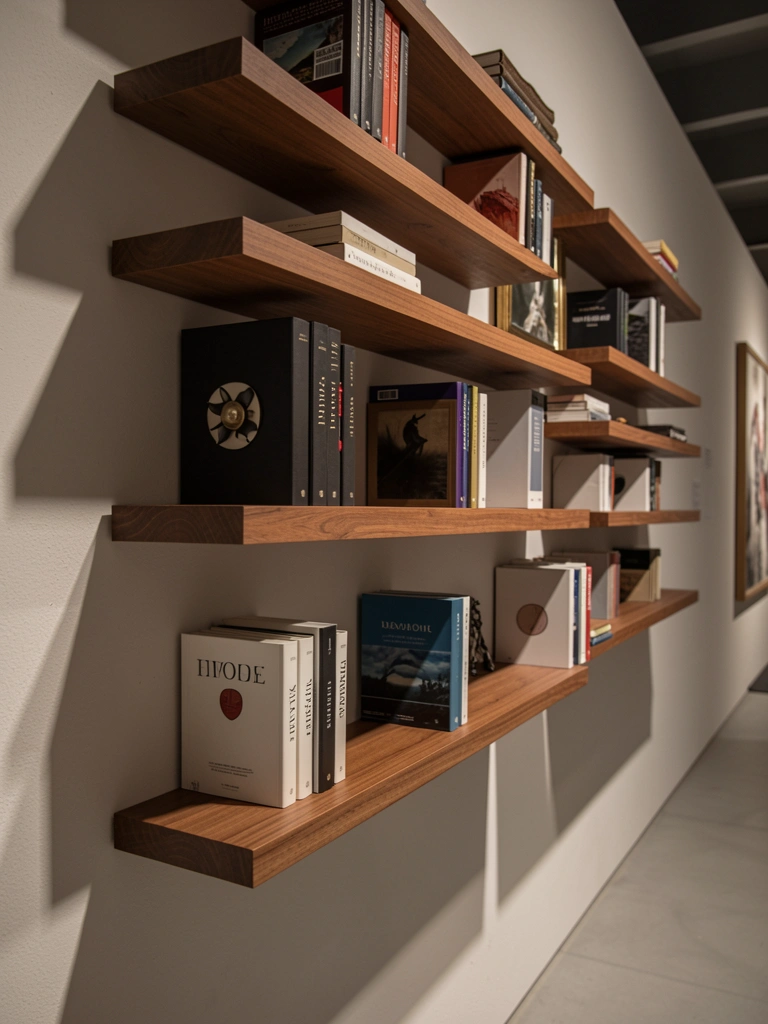
7. Floating Shelves with Book Ends and Objects
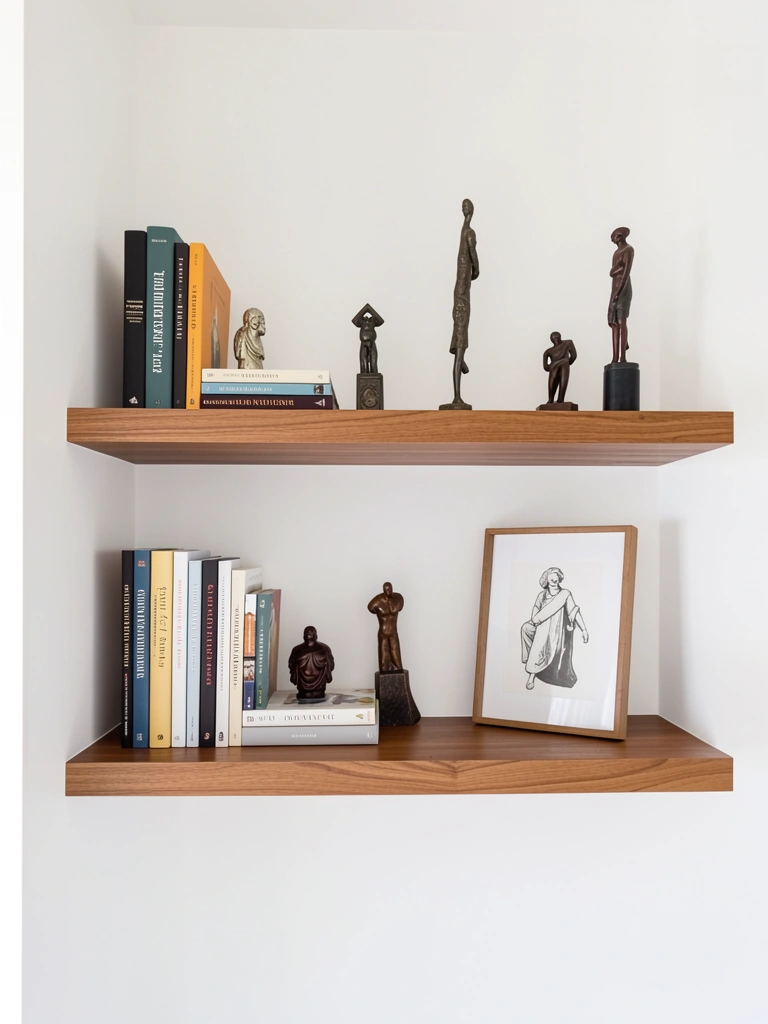
The art of floating shelves isn’t just about installation—it’s about styling them so they don’t look cluttered or sparse. The right spacing and object placement makes all the difference.
Install floating shelves from IKEA ($15–$40 each) or splurge on custom hardwood ($80–$200 each). Arrange books in mixed orientations: some standing, some stacked, some laid on top of others. Add bookends to anchor sections—brass, wood, or ceramic options run $15–$50 per pair. Leave about 30% negative space between items so your eye can rest. Include small decorative objects (plants, candles, framed photos) to break up book masses. This styling principle applies whether shelves are DIY or store-bought.
Pro tip: Create small “vignettes” within each shelf—group related objects in 2–3 item clusters rather than spreading everything evenly.
Thoughtfully styled floating shelves become the focal point of any room, proving that less really does feel like more when arranged intentionally.
8. Repurpose Vintage Mantelpieces as Shelving
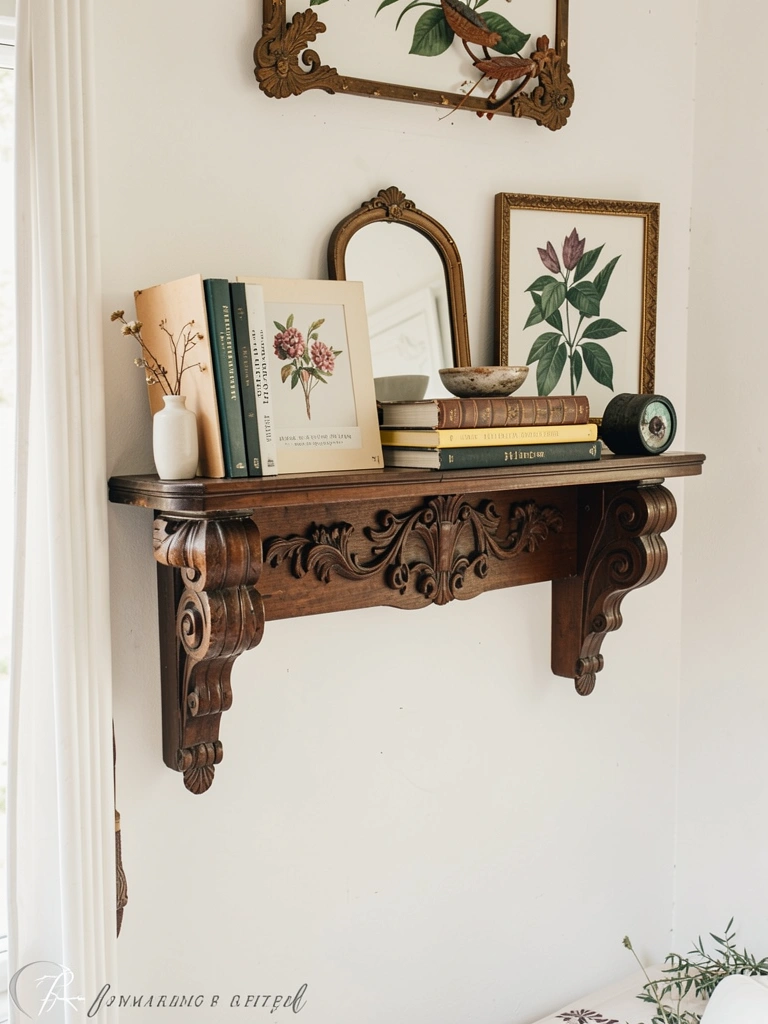
A mantelpiece has built-in character and decorative edge detailing that adds instant sophistication. When mounted horizontally, it becomes a statement shelf that looks curated, not just functional.
Find vintage mantelpieces at antique markets, architectural salvage yards, or Craigslist ($40–$150). Remove any fireplace-specific hardware, sand if needed, and seal with wood stain or paint. Mount using heavy-duty brackets into studs. Installation takes 2–3 hours including positioning and securing. The ornamental edges mean fewer items fit compared to flat shelves, which forces you to curate thoughtfully—exactly what you want for a rustic aesthetic.
Pro tip: Style it like a real mantel: center a mirror or larger piece, anchor with smaller objects, and don’t overcrowd it.
This approach transforms a vintage find into functional art that feels collected and intentional rather than hastily assembled.
9. Build Shelves from Reclaimed Barn Beams
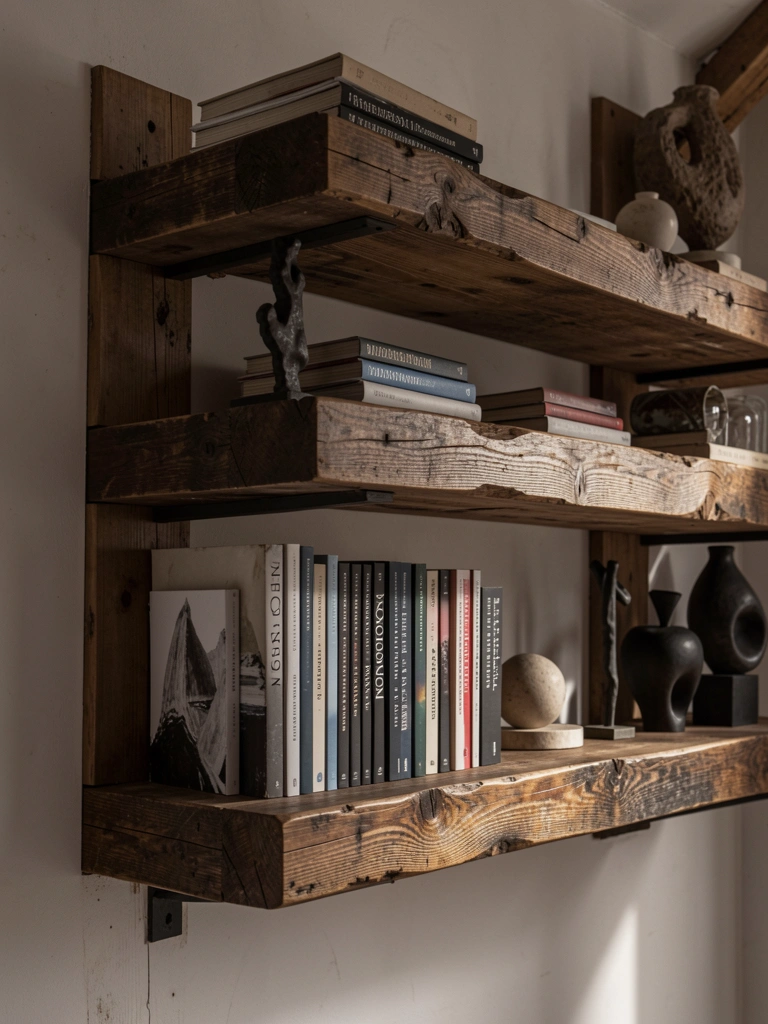
Barn beams are thick, heavy-duty, and absolutely gorgeous—if you want shelves that feel architecturally significant, this is the way. They’re a real investment but last generations.
Source beams from reclaimed timber yards or architectural salvage companies ($150–$400 per beam depending on length and thickness). You’ll need professional-grade mounting hardware and likely professional installation ($200–$400) since beams are heavy and require structural knowledge. This is an investment piece, but you’re essentially getting heirloom shelving that gains character over time. Expect to budget $400–$800 per shelf installation all-in.
Pro tip: Use fewer, larger shelves rather than cramming multiple small ones—let the beam’s architecture shine.
These shelves become permanent design features that anchor a room and signal that you’ve committed to quality and longevity.
10. Open Shelving with Vintage Brackets
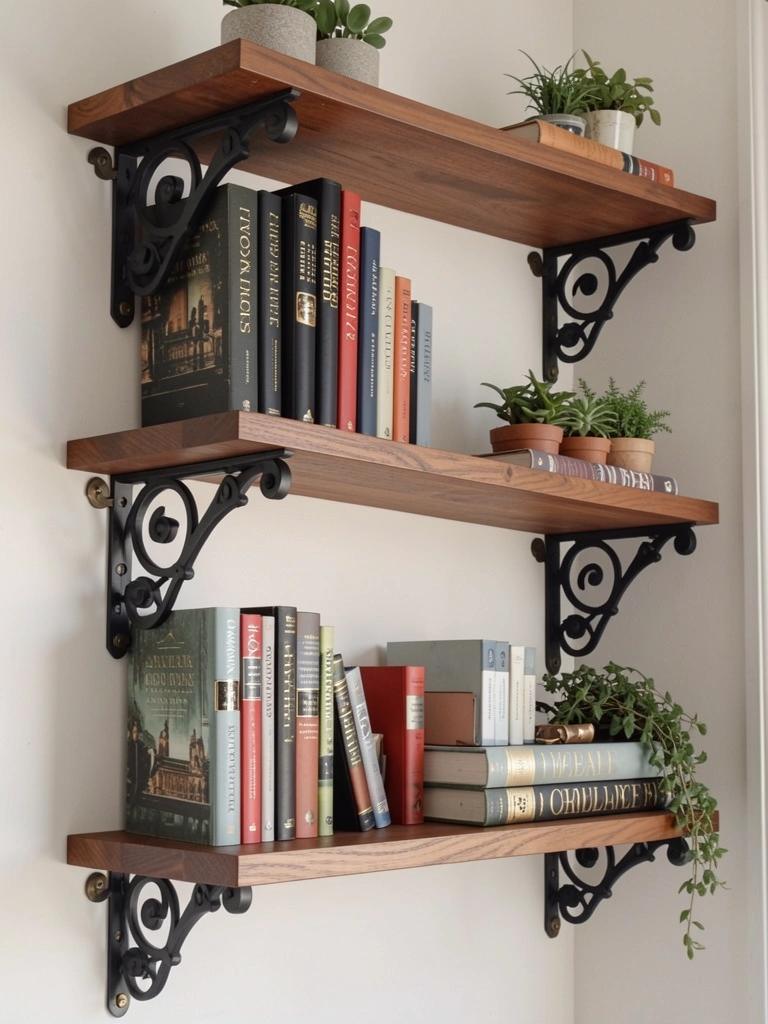
Decorative brackets do heavy lifting both functionally and aesthetically—they’re hardware that becomes visible art. Pairing them with reclaimed wood is a classic rustic move.
Choose brackets from Etsy, vintage hardware shops, or Amazon ($20–$60 per pair). Options range from ornate Victorian cast iron to minimalist industrial steel. Pair with reclaimed wood boards ($30–$80 each) or fresh wood you’ve distressed yourself. Installation requires a drill, level, and stud finder. Plan 1–2 hours per shelf. Paint brackets to match your aesthetic or let them show their natural patina. Mix bracket styles on the same wall for eclectic charm, or keep them consistent for a more refined look.
Pro tip: Install one floating shelf without brackets for a modern interruption in an otherwise vintage wall—this creates visual balance.
The bracket details become part of your décor story, especially when you choose unique vintage pieces that hint at their past lives.
11. Paint Books to Match Your Color Palette
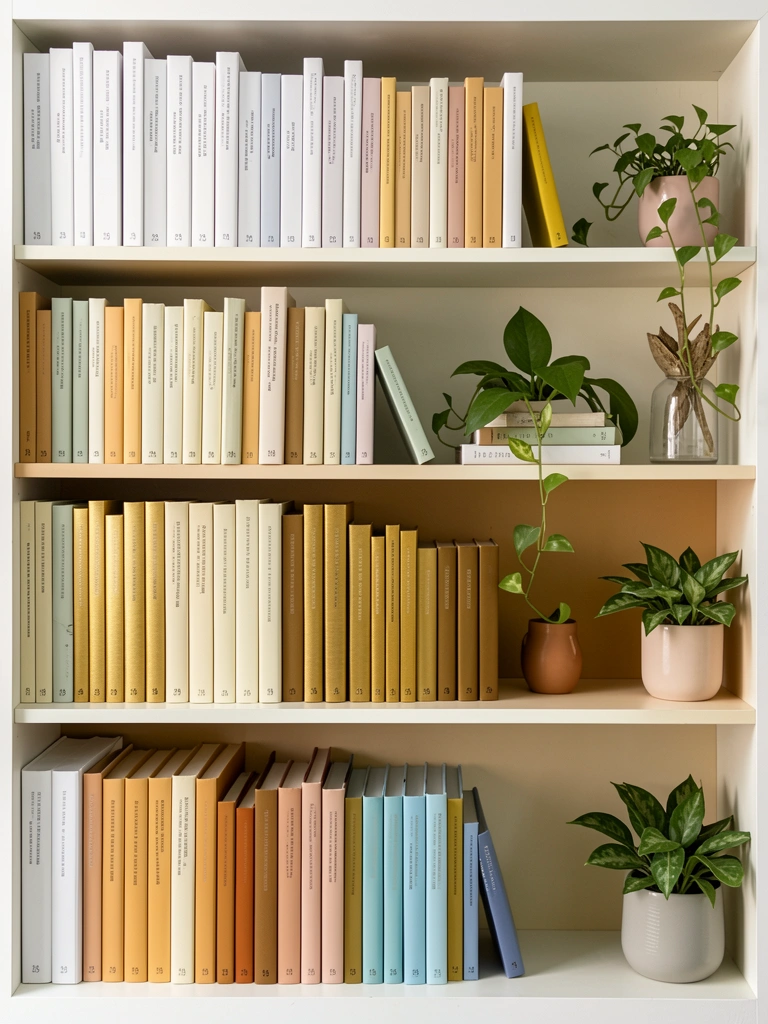
This sounds unconventional, but painting book spines transforms a chaotic collection into a curated visual statement. It’s especially helpful if your books don’t already coordinate with your room’s color scheme.
Use acrylic paint ($5–$10 per bottle) and paintbrushes to paint spines in shades that match your palette. Work in thin coats so text remains slightly visible underneath—this keeps the artistic, handmade quality. Paint only spines you see regularly; you don’t need to paint entire shelves. This takes 20–30 minutes per 5–10 books depending on your pace. Focus on coordinating colors: soft sage greens, dusty blues, warm taupes, ivory tones. Arrange books by color gradient for maximum impact.
Pro tip: Keep a few original colorful covers visible to add visual interest amid the painted cohesion.
A color-coordinated shelf looks intentional and gallery-like, making even a modest book collection feel curated and high-design.
12. Mix Books with Framed Art and Textiles
Books alone can feel one-note. Mixing in art, textiles, and sculptural pieces creates a dynamic display that feels like a personal collection, not a library.
Use small frames ($10–$25 each) with artwork, botanical prints, or photographs you’ve taken. Drape lightweight textiles (scarves, small tapestries, fabric samples) across shelves or hang them from thin brass rods ($5–$15). Roll a few fabrics and stand them upright like books. Lean art at angles rather than hanging it flush—this casual approach feels more artistic. Vary object sizes and materials so your eye has texture to land on. Include small sculptures, ceramics, or found objects that matter to you.
Pro tip: Group related items in odd numbers (three books, two frames, one sculpture) for visual balance.
This styling approach transforms shelves from functional storage into a three-dimensional gallery that tells your story through collected objects and artistic choices.
13. Create Height Variation with Stacked Bases
Rather than expecting all shelves to sit at the same height, use risers underneath to create elevation variation. This architectural trick is totally DIY and costs almost nothing if you use books as risers.
Grab wooden blocks, stacked books, or small crates ($0–$20) as risers under your existing shelf supports. This lifts sections of each shelf, creating a wave-like or tiered effect. Arrange your items so taller pieces sit on elevated sections while shorter objects ground the lower areas. The visual result feels intentional and sculptural. This works especially well on floating shelves where you can experiment without permanent installation. You can adjust riser heights as your collection evolves.
Pro tip: Use risers that match your shelving material (wood blocks under wood shelves) so they look intentional rather than accidental.
Height variation prevents the “everything on the same plane” flatness and creates a display that’s genuinely interesting to look at from any angle.
14. Incorporate Live Plants for Organic Texture
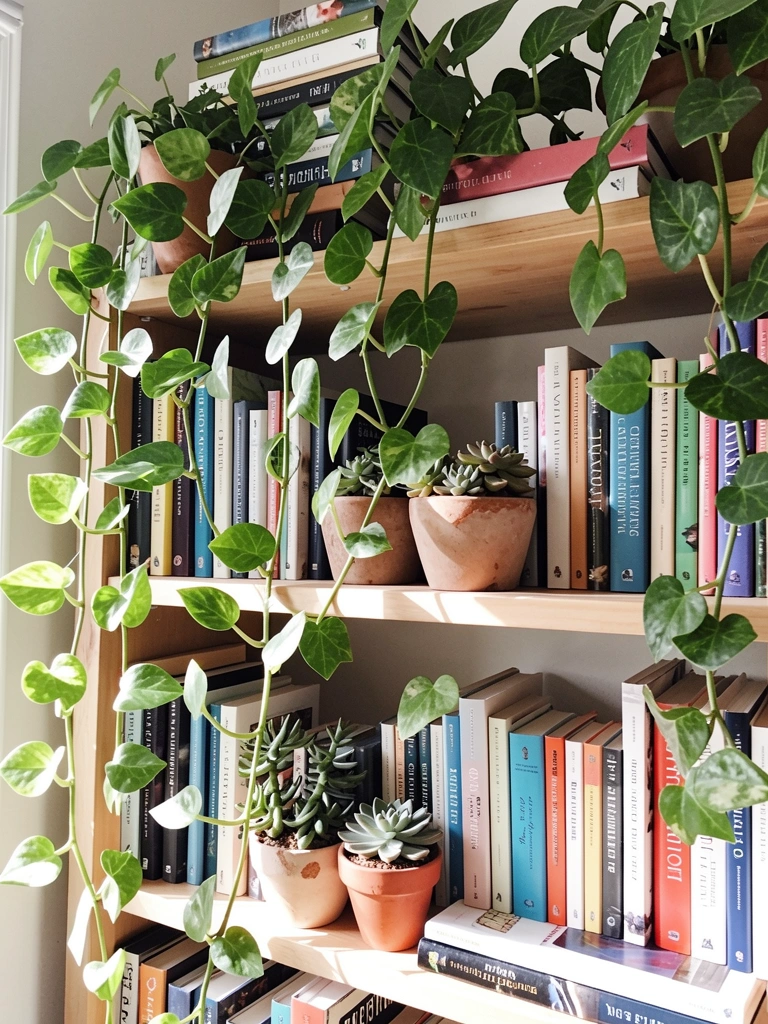
Living plants soften a bookshelf’s hard architecture and add organic movement that static objects can’t provide. They’re also basically free if you propagate from cuttings.
Prop up small potted plants from garden centers ($5–$15 each) in stable spots between book sections. Choose trailing plants like pothos, string of pearls, or philodendron—they’ll cascade beautifully. Propagate cuttings in water on shelves for an almost-free addition (just snip from an existing plant). Include a mix of trailing, upright, and low-growing varieties for texture contrast. Ensure shelves receive enough indirect light for plants to thrive, and water occasionally so soil doesn’t dry out completely.
Pro tip: Use small clear bottles or bud vases to root cuttings—the water and emerging roots become part of the visual display.
The greenery brings life and movement to your shelves, plus it purifies air slightly and gives you a reason to nurture something beautiful every day.
15. Style Books Spine-In and Cover-Out
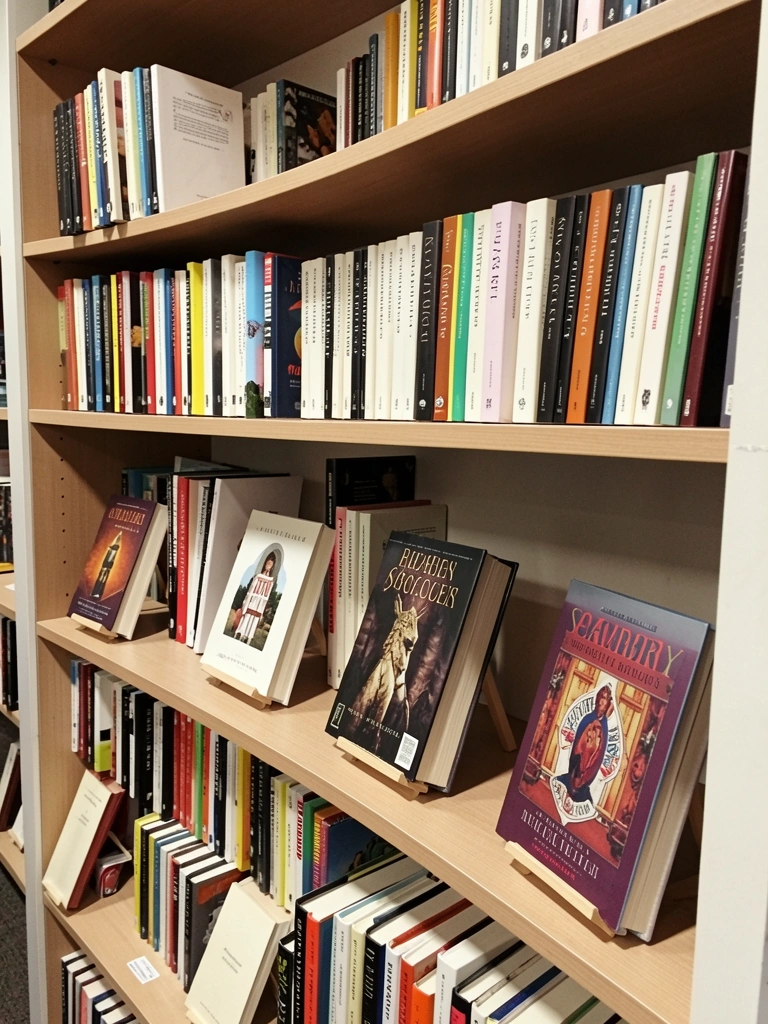
The mix of spine-out and cover-out arrangements creates rhythm and draws attention to specific books that deserve highlighting. It’s a curation strategy that looks deliberate and artistic.
Keep most books spine-out for practical browsing, but select 3–5 per shelf with visually striking covers to display face-out using small book easels ($3–$8 each) or just leaning them naturally. These should be books you genuinely love or that add color/visual interest to your arrangement. Rotate these highlight books seasonally or whenever you finish one and want another cover to feature. This approach celebrates your actual favorites rather than just alphabetizing everything. Mix orientations—some standing, some stacked—to maintain visual variety.
Pro tip: Feature books with cohesive color or subject matter so the face-out display feels curated rather than random.
This styling method transforms book display from practical storage into a rotating gallery that celebrates your reading interests and favorite designs.
16. Use Vintage Crates as Architectural Shelving
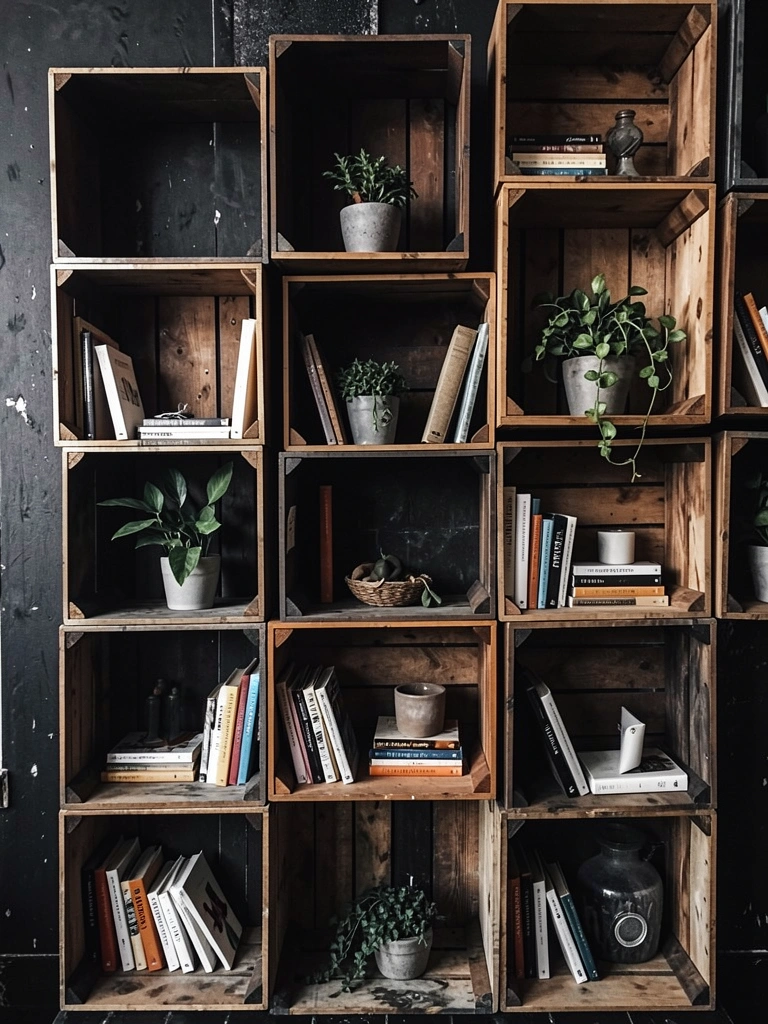
Crates aren’t just storage—when arranged thoughtfully, they become architectural elements that define your wall. Stagger them at different heights for maximum impact.
Stack and mount wooden crates ($8–$30 each) in staggered patterns using heavy-duty brackets ($5–$10 per bracket). You might create a pyramid shape, staircase, or completely asymmetrical arrangement—whatever matches your artistic vision. Paint or stain them beforehand, or embrace natural wood variation. Installation takes 3–4 hours including drilling, leveling, and mounting. The irregular arrangement means you can customize shelf dimensions: long crates below for larger items, smaller cubes above for decorative objects. This approach works beautifully for renters if you use adhesive strips instead of permanent mounting (reduced weight capacity but still functional).
Pro tip: Leave some crates open with no backing so books are visible from multiple angles, creating a more sculptural effect.
The modular nature means your shelving evolves with your collection, and the irregular arrangement automatically looks curated and intentional.
17. Mount Shelves at Staggered Heights
Symmetry is classic, but asymmetry is interesting. Staggering shelf heights creates visual movement and allows flexibility in displaying objects of different sizes.
Install floating shelves from any source using a stud finder and level, but don’t space them evenly. Mount the first shelf at shoulder height, the next one lower (maybe 20 inches below), and the third even lower or in a completely different section of the wall. This scattered approach works beautifully in corners, along hallways, or creating a gallery wall. Mix shelf lengths: 24-inch shelves next to 36-inch ones. The irregular arrangement means each shelf can showcase different collection items without feeling crowded. Total installation time: 2–3 hours for 3 shelves.
Pro tip: Sketch your desired layout on the wall with painter’s tape before mounting—this lets you visualize spacing before committing to drill holes.
Staggered heights create visual interest and rhythm while allowing you to maximize wall space for displaying collections of various dimensions.
18. Create a Floating Shelf from a Wooden Board and Hidden Brackets
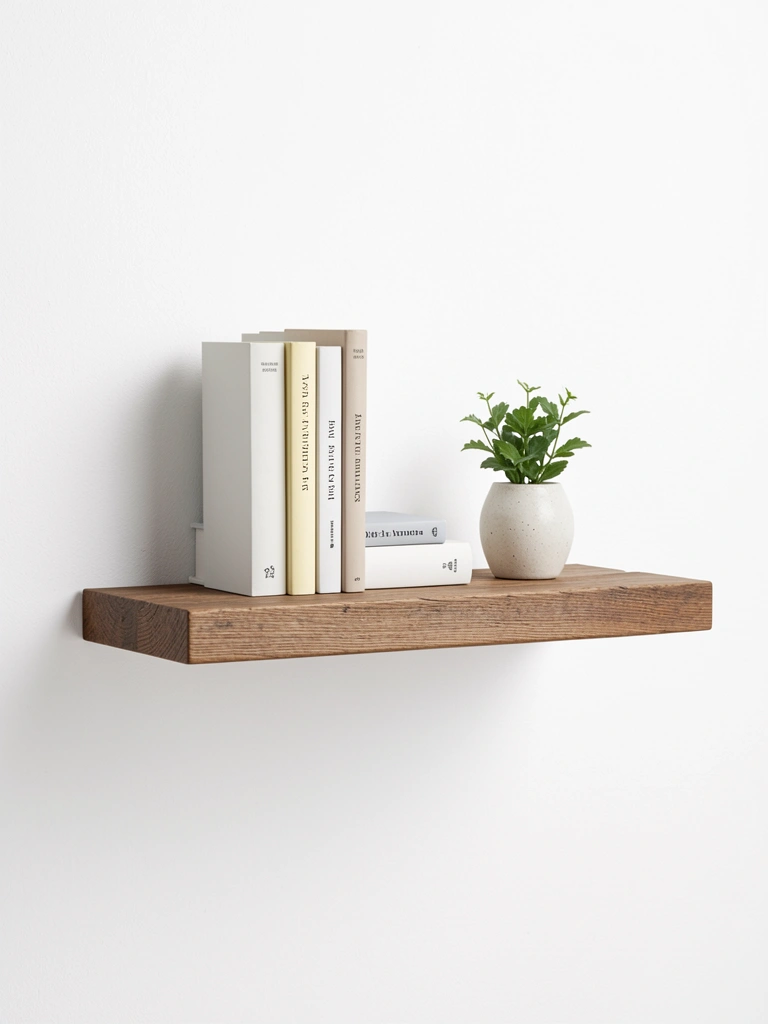
The cleanest floating shelf look comes from proper hidden brackets. When done right, the shelf appears to levitate, creating maximum visual drama with minimal visual clutter.
Buy a solid wood board (at least 1.5 inches thick, $30–$80 depending on wood type and length) and heavy-duty concealed brackets designed to slide into pre-drilled holes ($30–$50 per bracket set). Locate studs with a stud finder, mount brackets securely, then slide the board onto the brackets. The brackets hide completely inside the board, creating the illusion of floating. This requires moderate DIY skills; takes 2–3 hours for a single shelf. Choose wood that coordinates with your room: reclaimed oak, walnut, or weathered pine.
Pro tip: Use a thicker board (1.5–2 inches) to emphasize the floating effect—thinner boards can look flimsy even if structurally sound.
The seamless floating effect creates a sophisticated, almost sculptural quality that elevates your entire shelf aesthetic.
19. Style Books with Decorative Bookends and Objects
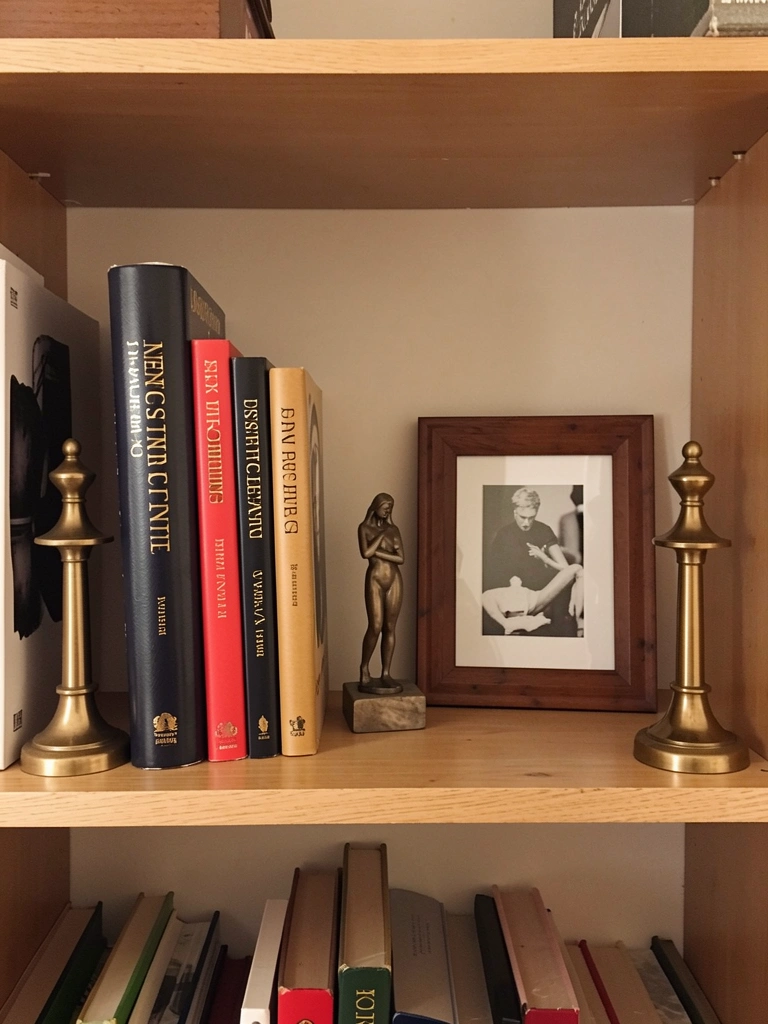
Strategic placement of bookends and small objects breaks up long rows of books and creates mini-vignettes that feel intentional and gallery-like.
Invest in quality bookends ($20–$60 per pair) in materials that match your aesthetic: brass, ceramic, marble, or carved wood. Position them at the outer edges of book clusters. Fill the space between bookends with a mix of books and decorative objects: small sculptures, framed photos, or plants. Space them so your eye has visual resting points. Use odd-numbered groupings (3 or 5 items per section) for visual balance. The bookends serve dual purpose: functional anchors that prevent books from toppling plus design elements that define sections.
Pro tip: Source bookends as pairs that coordinate but don’t match perfectly—slight variation feels more artisanal than identical pieces.
Thoughtfully placed bookends transform a simple book row into a curated display section that signals intentionality and aesthetic attention.
20. DIY Stained Glass or Painted Glass Shelf Backing
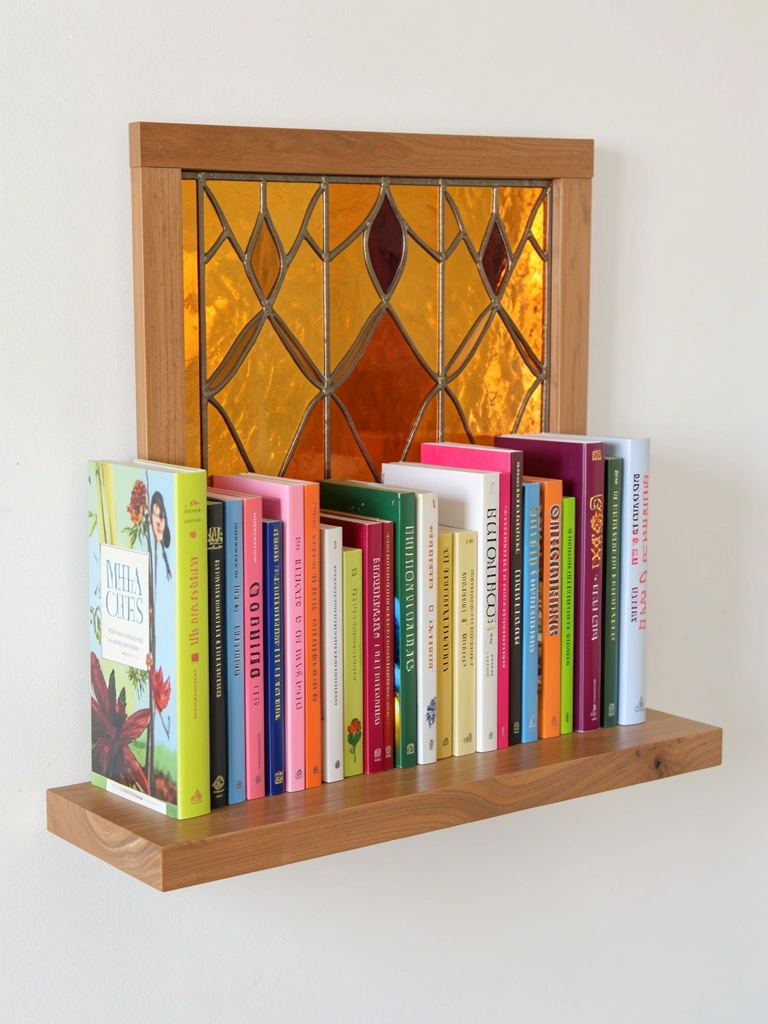
A decorative backing transforms a simple shelf into a statement piece. Paint or commission stained glass to create a custom backdrop that ties your entire display together.
Find wooden shelves with backing from retailers like West Elm or Wayfair ($100–$250), or create your own by sourcing a shelf and commissioning an artist to create a stained glass or painted glass backing ($150–$400). Paint the glass yourself with glass paint ($5–$10 per bottle) if you want a budget option—simple geometric patterns or watercolor effects work beautifully. Let paint cure fully before styling the shelf. The backed shelf immediately becomes focal wall art, especially if placed where natural light hits the glass, casting colored shadows.
Pro tip: Choose glass colors that complement your book spine colors or your room’s overall palette for cohesive design.
A backed shelf becomes an immediate focal point and transforms basic shelving into a custom art installation that feels gallery-curated.
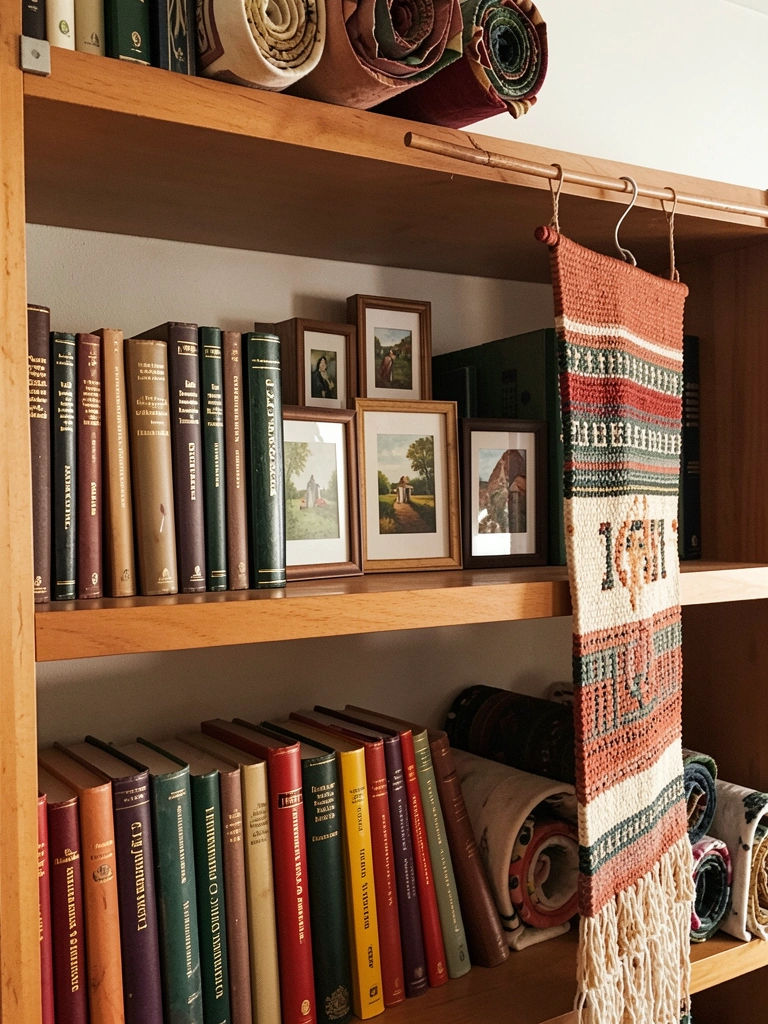
21. Incorporate Rolled Textiles and Woven Elements
Textiles add warmth, pattern, and tactile quality that books and hard objects can’t provide. Rolled scarves, fabric scraps, and small rugs create artistic visual interest.
Roll scarves, fabric remnants, or small textiles ($0–$50 if you’re sourcing vintage pieces) and arrange them upright like books or stack them horizontally for variation. Include small woven placemats, tapestry samples, or textile art. These soften the visual weight of hard book spines and introduce pattern and color. This works especially well if your book collection includes mostly neutral tones—textiles provide visual energy. Rotate textiles seasonally to refresh the look without replacing anything.
Pro tip: Source textiles from thrift stores, estate sales, or your own closet—vintage items always look more artisanal than new store-bought ones.
Textiles add unexpected warmth and tactile appeal to shelves, making them feel collected and personally meaningful rather than generic or sterile.
22. Create a Shadow Box Effect with Deep Shelving
Deep shelves (18–24 inches) allow you to layer objects at different depths, creating a shadow box effect with incredible visual dimension and interest.
Install deep floating shelves ($80–$200 each depending on material) or build them yourself from solid wood and concealed brackets. Arrange items in layers: place a few books near the front, position taller objects in the middle, and tuck a framed piece or mirror at the back. This creates visual depth as your eye travels through the layers. The shadows cast between items add drama and sophistication. This approach means you can display more items than a shallow shelf without it looking crowded—the depth absorbs visual complexity.
Pro tip: Place a narrow mirror at the back to reflect light and create the illusion of even more depth.
Layered shelving turns simple display into three-dimensional art that rewards close inspection and changes appearance based on viewing angle.
23. Mix Vintage Books with New Publications
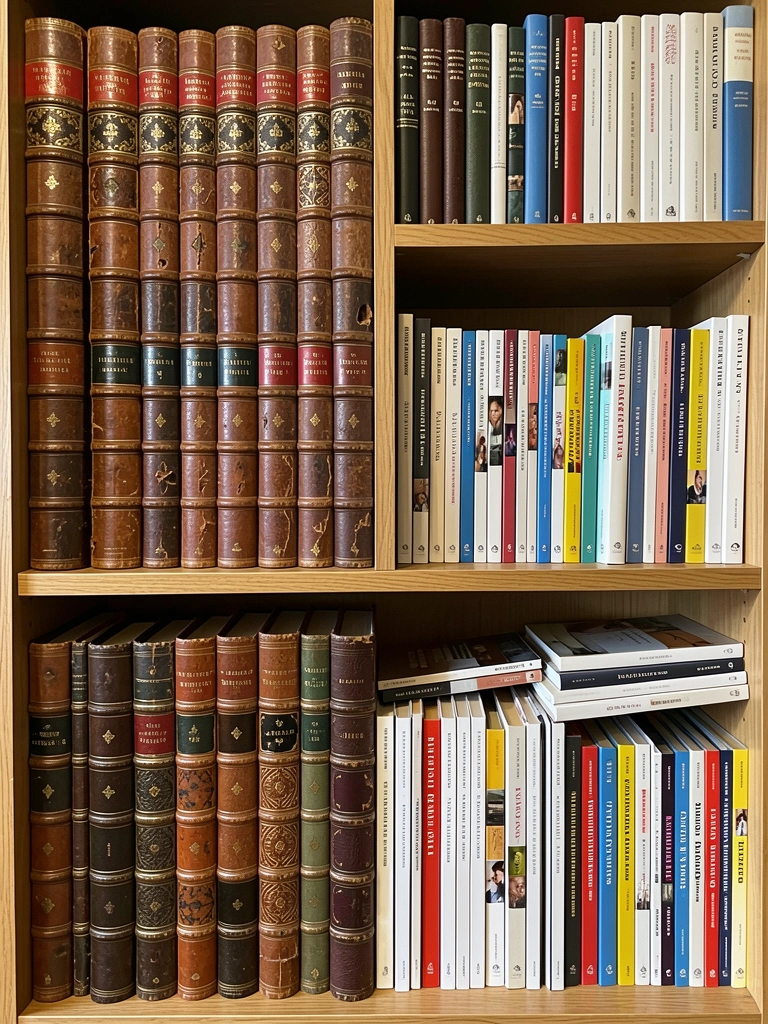
The contrast between aged vintage volumes and contemporary releases is visually dynamic and tells a story about your reading range and aesthetic appreciation.
Source vintage books ($2–$15 each) from thrift stores, estate sales, or online—look for beautiful bindings, interesting typography, or subjects that genuinely interest you. Intersperse them with your current reading. The varying thicknesses, colors, and binding styles automatically create visual interest. Stand some vintage books face-out to show off their stunning covers or embossed spines. Group new and old together rather than segregating them. This mixed approach feels collected and suggests genuine engagement with reading across time periods and genres.
Pro tip: Prioritize older books with gorgeous bindings even if you haven’t read them—they’re decorative objects that warrant display.
A mix of old and new suggests an intellectual curiosity that spans generations, making your shelf feel genuinely cultured rather than trend-focused.
24. Style Shelves Around a Central Focal Point
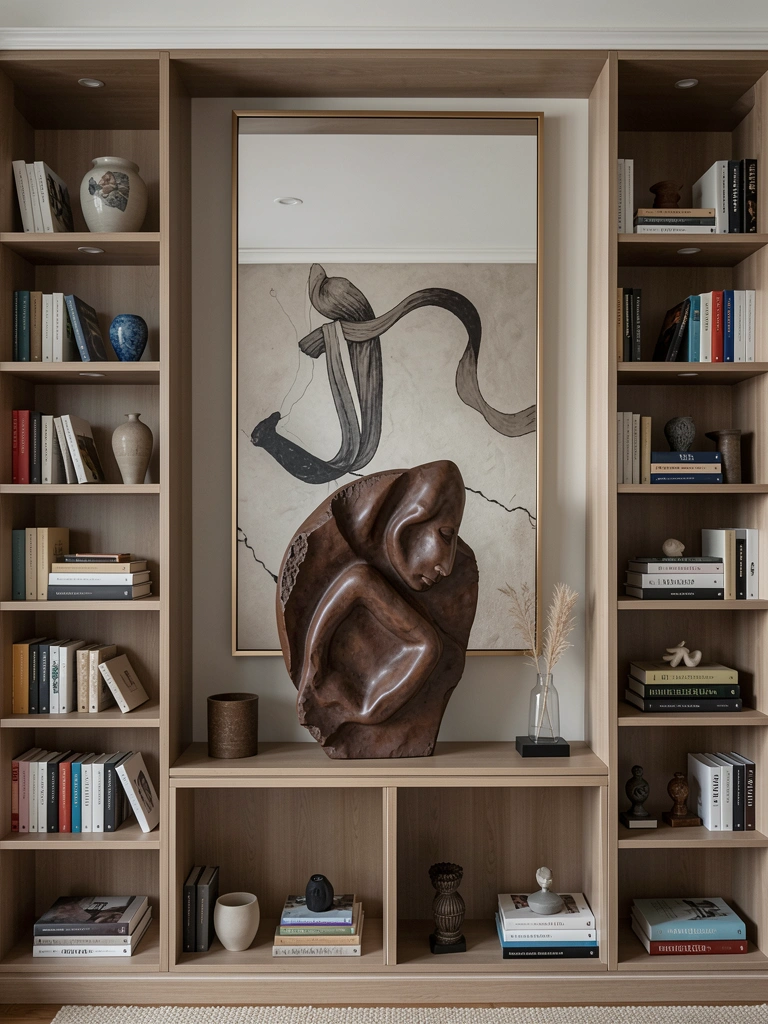
Anchoring your shelf around a central focal point creates visual organization and makes the entire arrangement feel intentional and curated. This principle works on a single shelf or entire wall.
Choose a focal object ($50–$200) that matters to you: a large framed piece of art, an ornate mirror, or a significant sculpture. Mount or position this at the center of your shelf space. Arrange books and objects symmetrically on both sides, though not in rigid mirror-image fashion—think asymmetrical balance rather than perfect symmetry. This approach naturally draws the eye inward and creates visual harmony. Works beautifully whether you’re styling a single shelf or an entire wall of shelving.
Pro tip: Your focal point should be something you genuinely love, not just something that “looks good”—personal connection shows in how people perceive spaces.
A thoughtfully anchored shelf feels museum-quality and proves that organization and aesthetic appeal can absolutely coexist.
25. Combine Open Shelving with Closed Cabinet Storage
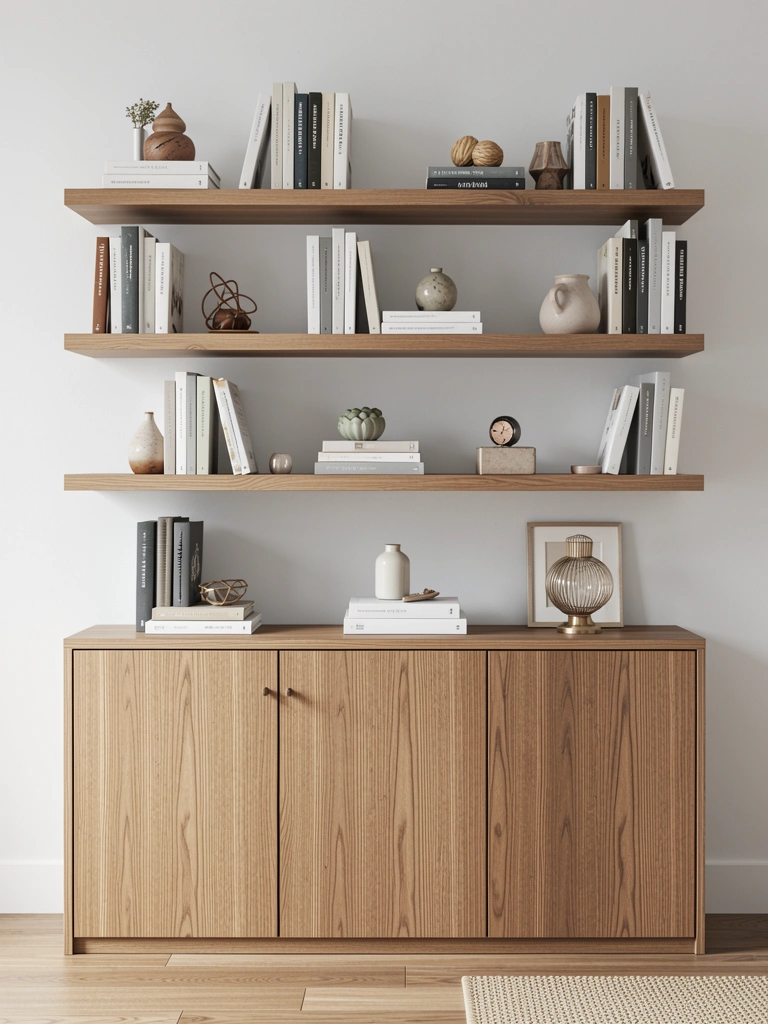
Not everything needs to be displayed. Combining open shelving with enclosed storage lets you maintain a curated look while keeping less-beautiful necessities accessible and out of sight.
Install open floating shelves ($50–$200 each) above closed wooden cabinets or shelving with doors ($150–$400). Use the open shelves for your most beautiful books, curated collections, and display-worthy objects. Tuck less-attractive items, extras, and seasonal storage behind cabinet doors. This hybrid approach gives you maximum functionality without visual clutter. You get the open, airy feel of floating shelves combined with the clean lines and storage capacity of enclosed cabinetry. Options range from DIY construction to purchasing matching wall systems from retailers.
Pro tip: Keep cabinet doors consistent in color and finish with your open shelves for a unified, designed look.
This combination delivers both aesthetic pleasure and genuine storage functionality—you get the best of both worlds without compromising on either.
26. Add Ambient Lighting Behind or Under Shelves
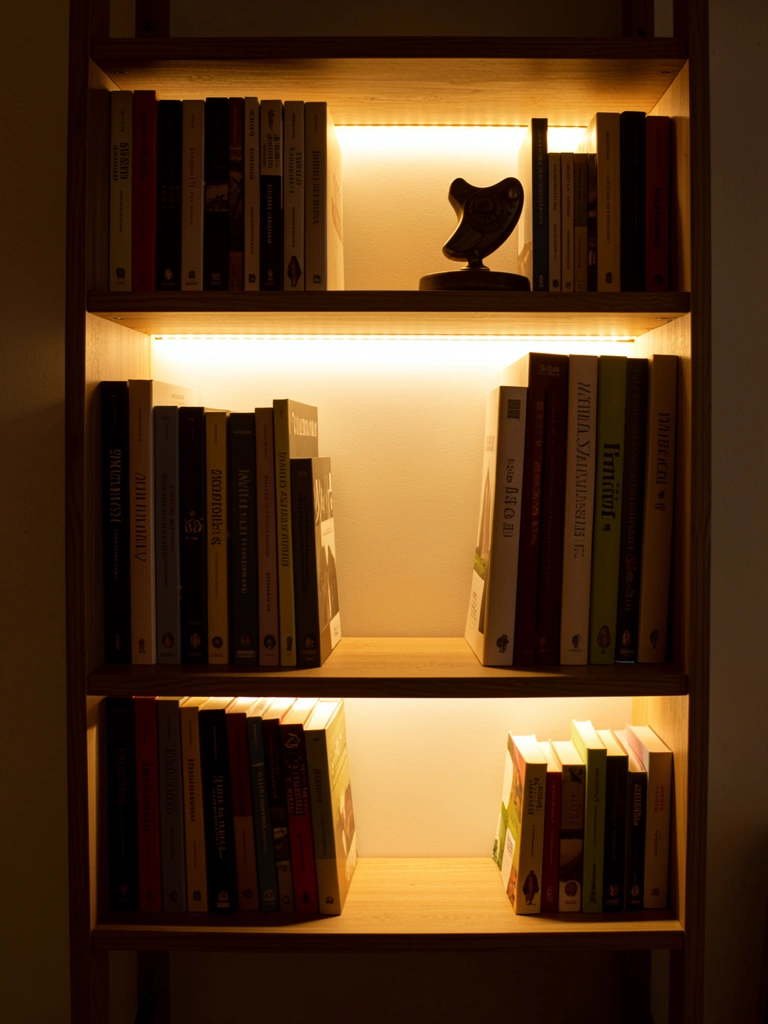
Strategic lighting transforms how your shelves look, especially in evening hours. Hidden ambient lighting adds warmth and draws attention to your carefully curated display.
Install LED strip lights ($15–$50 per set) under each shelf using the adhesive backing—no wiring required for simple plug-in options. Choose warm white light (2700K) for a cozy, rustic feel rather than cool white. Position lights so they illuminate the shelf below without creating glare. This works especially well on floating shelves where the light can create beautiful shadows on the wall. The investment is minimal, the effect is significant, and you can easily remove or upgrade lights later.
Pro tip: Use a dimmer switch on your lights so you can adjust ambiance based on time of day or mood.
Evening-lit shelves become a completely different focal point that invites close inspection and creates an intimate atmosphere that static daylight simply can’t match.
Save this post for your next bookshelf project—whether you’re building from scratch or refreshing what’s already on your walls. Pick just one idea this weekend and watch how it shifts the whole vibe of your space. Which handmade approach speaks to you most?
Leave a Reply