There’s something magical about claiming your balcony as your own private retreat. Whether you’re dealing with nosy neighbors, street noise, or just craving a secluded corner to breathe, privacy screens transform your outdoor space into an actual sanctuary. The good news? You don’t need to spend a fortune or live with industrial eyesores. In this guide, you’ll discover 25 creative privacy screen ideas—from budget hacks you can DIY this weekend to investment pieces that double as stunning decor. We’re talking natural materials, modern designs, renter-friendly options, and solutions that actually look beautiful. Let’s turn that exposed balcony into the peaceful oasis you deserve.
1. Install Bamboo Screening for Instant Natural Vibes

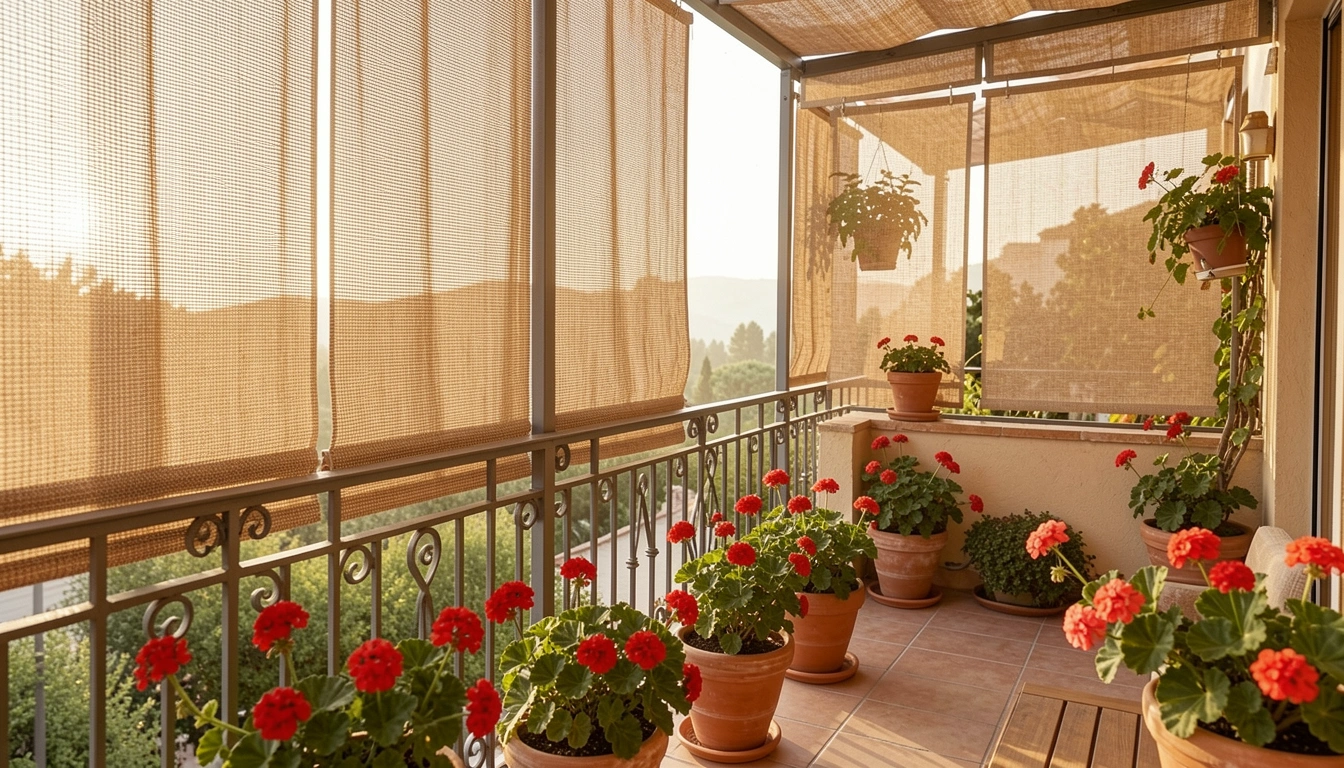
Bamboo screening creates an instant natural barrier that feels organic, not industrial. It filters light beautifully while keeping prying eyes out, and it works with almost any decor style—from Scandi to Riviera to modern minimal.
Setup is straightforward: Unroll bamboo panels (typically 4–6 feet tall, $30–$60 per panel on Amazon or Home Depot) and attach them to your railing using waterproof zip ties or stainless steel brackets. Most installations take 20–30 minutes. For renters, zip ties mean zero permanent damage. Bamboo naturally weathers to a gorgeous silver-gray over time, though you can seal it to maintain the golden tone.
Pro tip: Layer bamboo screens with climbing ivy or potted plants in front for added depth and texture.
Your balcony immediately gains a resort-like quality. Sunlight still filters through, so you get privacy without feeling trapped in a box.
2. Create a Living Green Wall with Vertical Planters
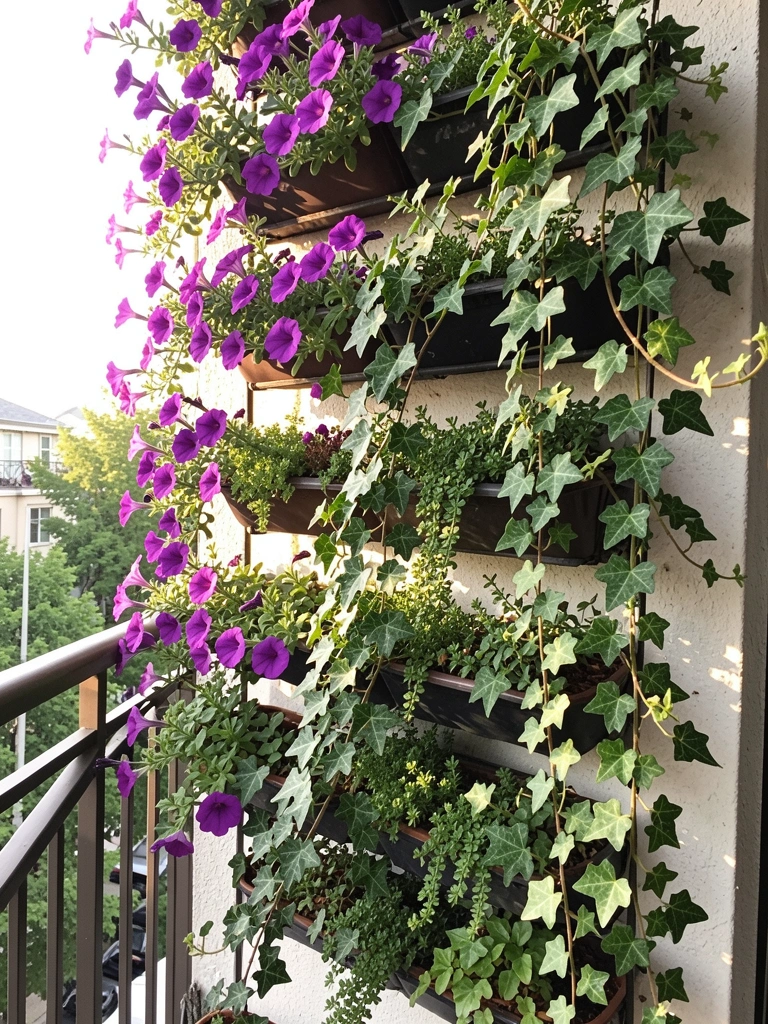
A living wall isn’t just beautiful—it actually provides privacy while purifying air and creating that coveted garden aesthetic. Trailing plants like petunias, pothos, and ivy cascade naturally, blocking views while looking effortlessly elegant.
Choose modular vertical planter systems (IKEA’s FÖRENLIG or Etsy handmade options, $40–$150 for a full wall setup) or go DIY with repurposed wooden pallets and fabric pockets ($15–$30 in materials). Mount these directly to your balcony wall or railing. Allow 1–2 hours for installation, then give plants 2–3 weeks to fill in. Water regularly—trailing plants dry out faster in high positions.
Budget alternative: Use hanging macramé planters ($5–$15 each) staggered across a wire grid ($10–$20).
Within weeks, you’ll have a stunning green barrier that adapts to your space and improves as it grows. Plus, you get fresh herbs or flowers right outside your door.
3. Use Outdoor Fabric Panels on a Rod System
Outdoor fabric panels offer style flexibility—they look contemporary, they’re removable for renters, and they cost way less than permanent installations. Think of them like curtains for your balcony.
Hang panels using a tension rod system or track rails (adjustable rods, $20–$50; panels in outdoor-grade fabric, $30–$80 each from Wayfair or Target). Most fabric comes in 54–60-inch widths, so you’ll need 2–3 panels for standard balconies. Installation takes 30–45 minutes with basic tools. Choose weather-resistant materials (solution-dyed acrylic or polyester) that won’t fade or mildew.
Styling bonus: Select earth tones, stripes, or subtle patterns that complement your 2025 color palette—terracotta, soft greens, or warm neutrals work beautifully.
You get a polished, intentional look that you can swap seasonally. Open them on nice days, close them for privacy or wind protection.
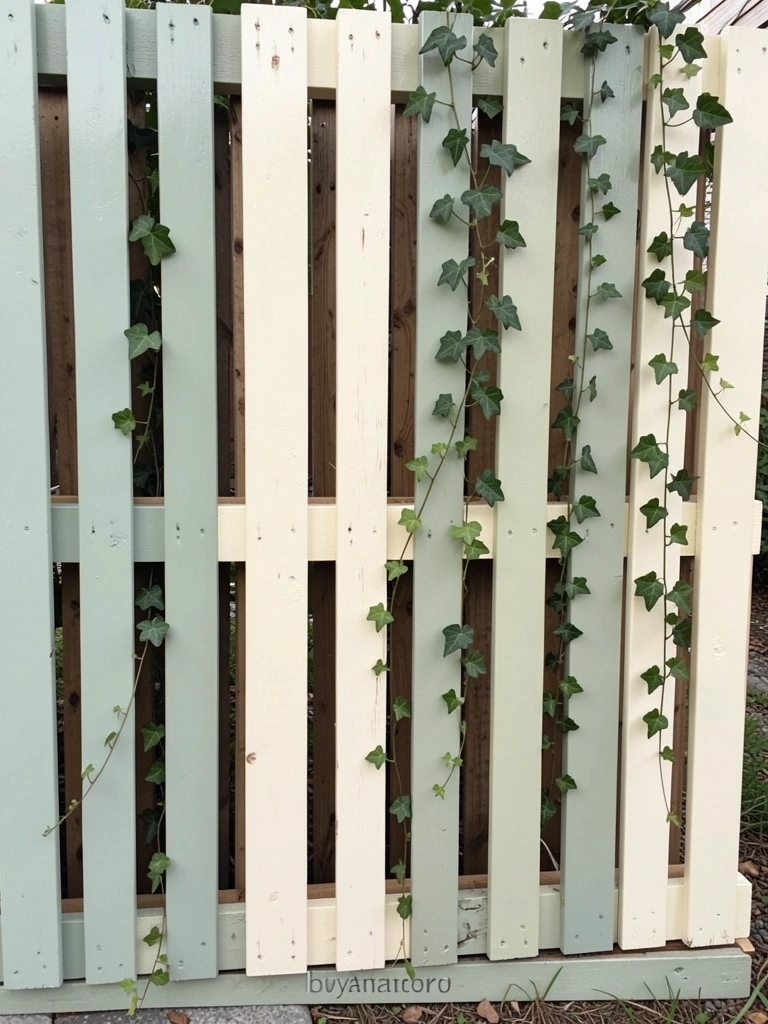
4. Build a Slatted Wood Privacy Wall
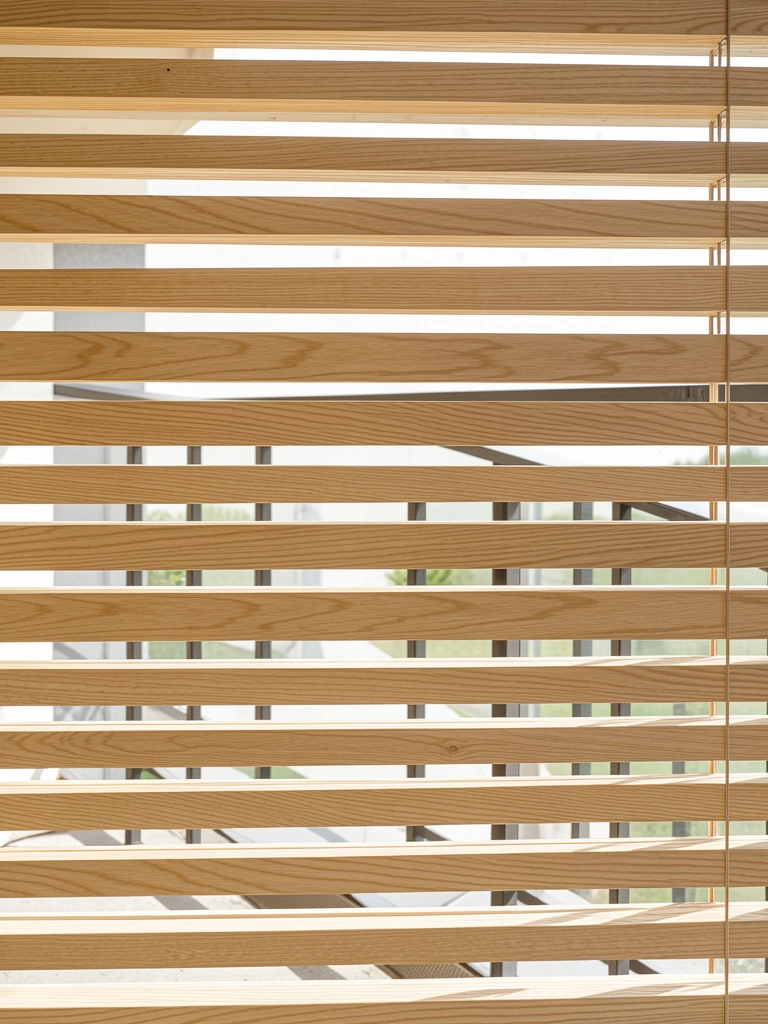
Horizontal or vertical slats create modern visual interest while maintaining partial sightlines. They’re less “closed-off” than solid walls, so your balcony still feels open and airy.
DIY this with pressure-treated 2x4s or cedar boards ($50–$150 in materials, depending on balcony size). Cut to length, attach to existing railings or a frame using stainless steel hardware. Plan 2–3 hours for installation, possibly longer if you’re building a supporting frame. For renters, this isn’t ideal—but it’s worth asking your landlord since it adds real property value.
Renter alternative: Use pre-made slatted privacy screens ($80–$200) that lean against or hang from railings without permanent attachment.
The finished screen provides real privacy while maintaining an open, Scandinavian aesthetic. Light creates beautiful geometric shadows as the sun moves.
5. Hang Macramé Plant Dividers for Boho Charm
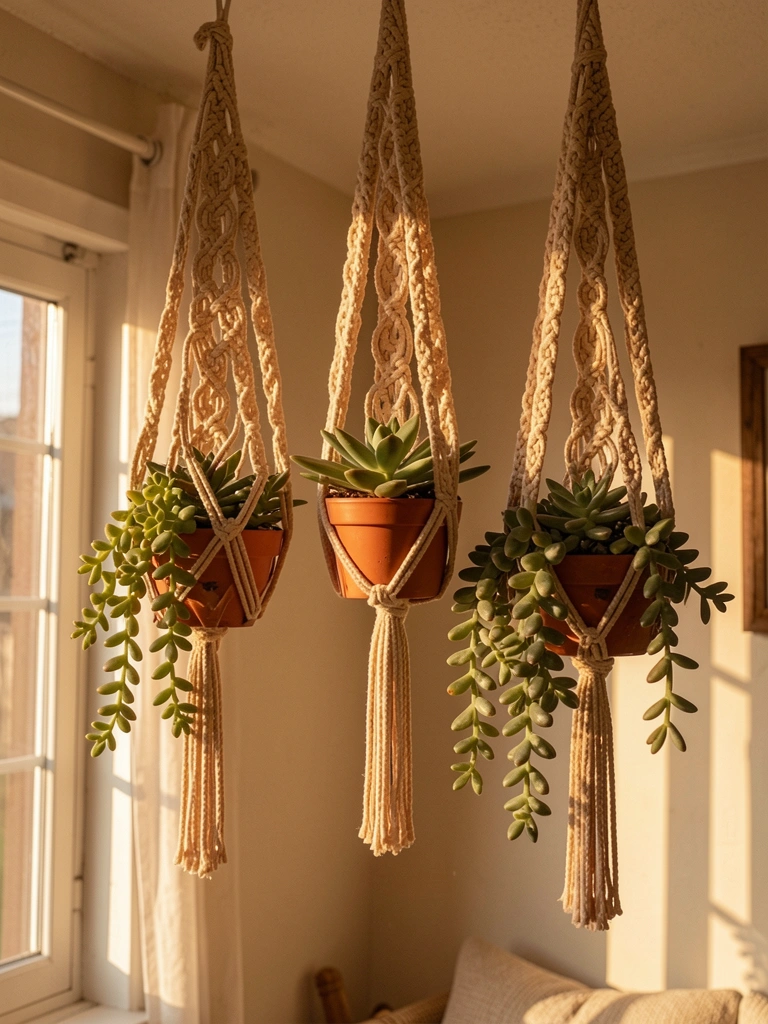
Macramé isn’t just trendy—it’s functional decor that lets you create privacy and grow plants simultaneously. Each hanging becomes a privacy layer while showcasing greenery.
Purchase macramé hangers in bulk (10–15 pieces, $40–$80 from Etsy or Amazon) and suspend them from ceiling hooks using stainless steel eye bolts ($1–$3 each). Space them 12–18 inches apart across your balcony front. Installation takes 45 minutes to 1 hour. Fill hangers with low-maintenance plants: pothos, philodendron, string of pearls, or succulents. This works great for renters if you use adhesive ceiling hooks instead of drilling.
Cost-saver: DIY macramé using jute rope ($15–$30 for a full kit) and YouTube tutorials.
Your balcony becomes a boho jungle that feels collected and intentional. Privacy increases as plants fill in and mature.
6. Install Polycarbonate Panels for Weatherproof Durability
Polycarbonate combines privacy with visibility and durability. Frosted or tinted options block sight lines while remaining weatherproof and long-lasting—ideal for balconies facing harsh sun or wind.
Source panels from hardware stores ($20–$50 each; you’ll need 3–6 depending on balcony width). Attach using aluminum frames and stainless steel brackets ($40–$100 for hardware). Installation takes 1–2 hours. Polycarbonate resists UV damage, won’t yellow or become brittle, and cleans easily with a soft cloth and mild soap.
Design flexibility: Choose clear (minimal privacy, maximum light), frosted (diffused light, moderate privacy), or tinted (maximum privacy and heat reduction).
You get a semi-transparent barrier that protects from wind and weather while maintaining sightlines. Your space stays bright and open-feeling.
7. Layer Reed or Willow Fencing Behind Your Railing
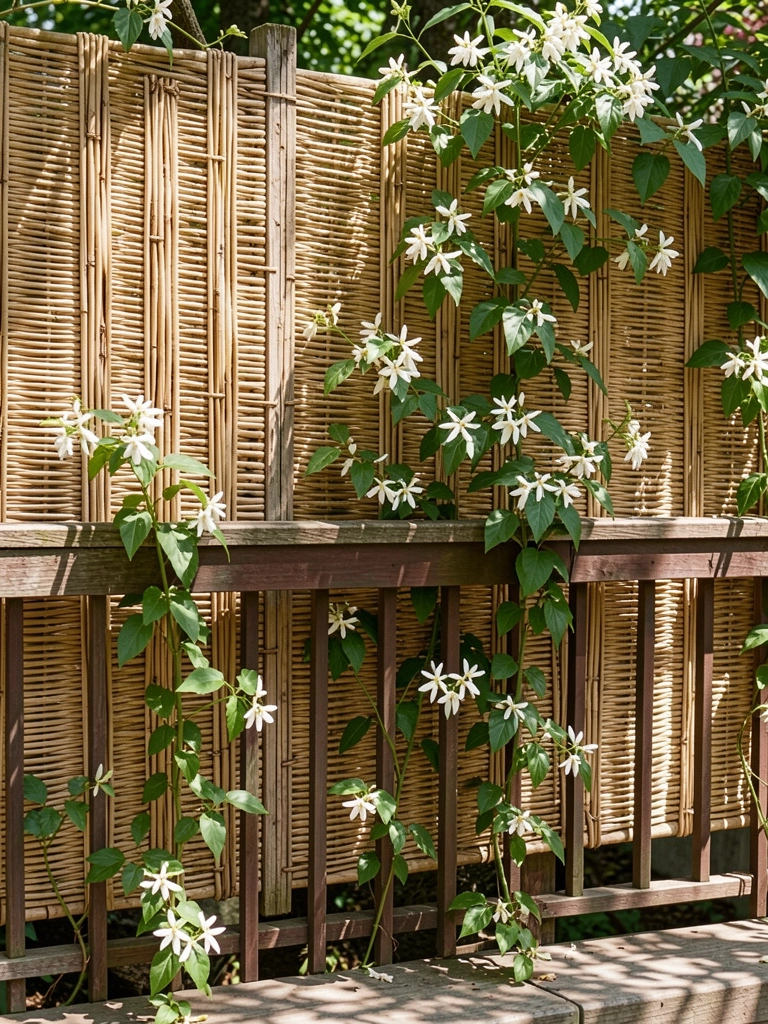
Reed and willow fencing brings instant cottage charm while being budget-friendly and biodegradable. It weathers beautifully and pairs perfectly with climbing plants.
Purchase pre-made panels (4–6 feet tall, $25–$40 each from garden centers or Amazon). Attach to your existing railing using galvanized wire, zip ties, or U-bolts ($15–$25 total). Takes about 30 minutes per panel. Expect the material to last 3–5 years outdoors before weathering significantly; you can extend lifespan with clear wood sealant ($20–$30).
Planting suggestion: Grow clematis, jasmine, or honeysuckle in front for added privacy and fragrance.
The rustic aesthetic immediately softens your space. As climbing plants grow through the gaps, you get layered privacy that looks natural, not forced.
8. Use Artificial Ivy Panels for Maintenance-Free Greenery
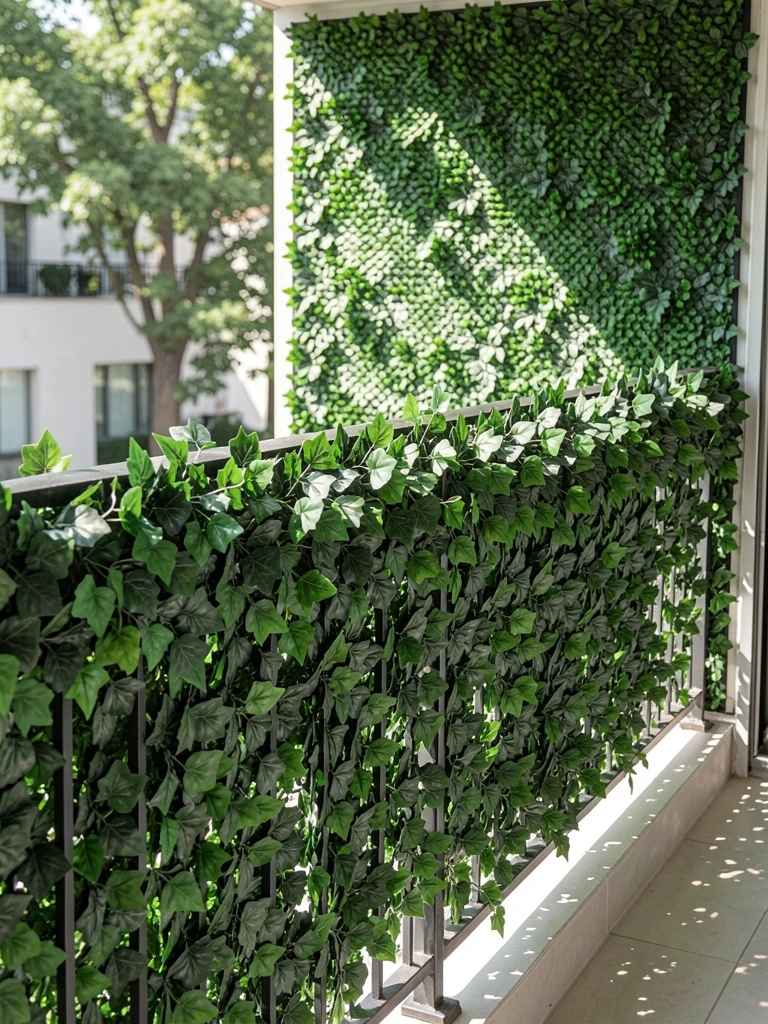
If you love the look of living walls but don’t have time for watering and plant care, high-quality artificial ivy panels deliver the aesthetic instantly—and permanently.
Invest in UV-resistant artificial panels ($50–$150 per set of 3–4 panels, depending on quality; premium brands from Wayfair or Amazon look remarkably real). Attach directly to railings or wall panels using weather-resistant zip ties or clips. Installation is 20–30 minutes, and maintenance is literally zero. These panels hold up for 5+ years without fading if you choose UV-protected varieties.
Styling note: Pair with real potted plants at base level for a hybrid approach that looks intentional.
Your privacy barrier looks permanently lush and full, requiring zero green-thumb skills. Perfect if travel or work keeps you from plant care.
9. Install a Retractable Shade Screen for Flexible Privacy

Retractable screens give you privacy on demand without permanent installation. Roll them down when you need seclusion, roll them up to enjoy open views and sunshine.
Purchase motorized or manual retractable screens ($150–$400 depending on balcony width and automation; brands like Lutron or basic manual versions from Wayfair). Professional installation runs $200–$500, or DIY with patience ($1–2 hours). These work beautifully for both renters (with landlord approval) and owners. Manual versions cost less but require hand-rolling; motorized options integrate with smart home systems.
Material choice: Select outdoor-grade mesh or solid fabric depending on privacy preference.
You get privacy without commitment. Open your space on beautiful days, secure it during wind or when strangers are around. It’s flexibility built in.
10. Create a Slatted Metal Screen for Industrial Edge
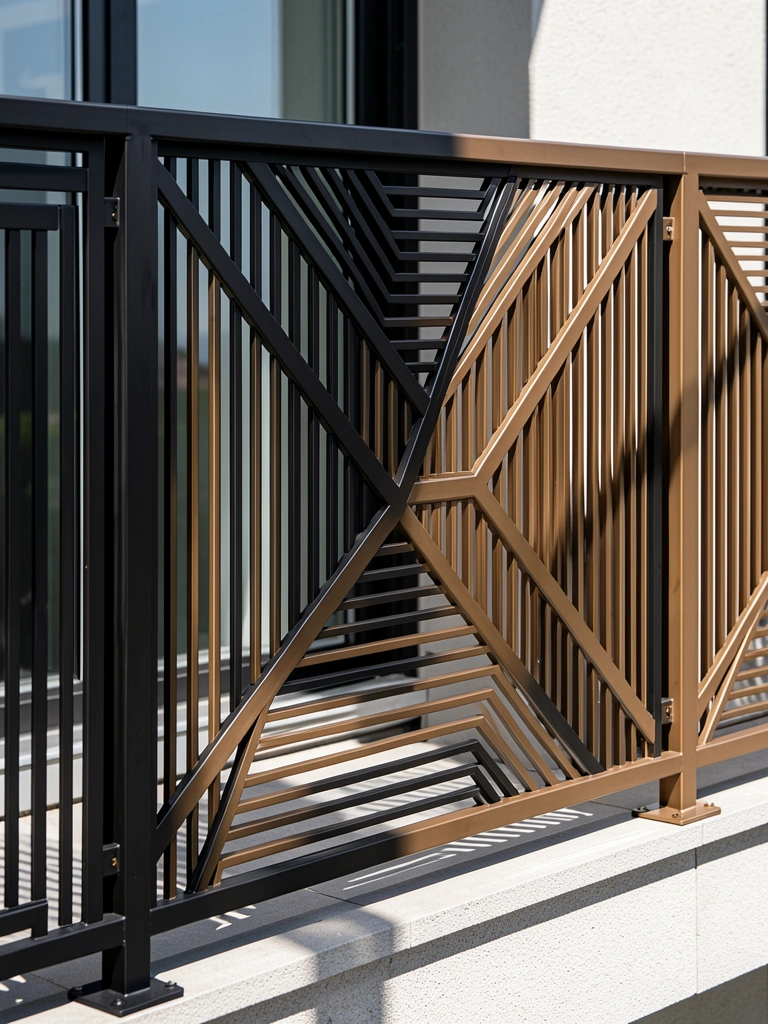
Metal slat screens bring urban sophistication and require zero plant maintenance. They’re durable, modern, and available in various geometric patterns.
Source pre-made metal screens (powder-coated aluminum or steel, $100–$250 per panel) from architectural suppliers or specialized outdoor retailers (Decorpot or similar). Alternatively, DIY with metal strips and a welded frame ($80–$150 in materials if you have welding access). Attach using stainless steel bolts and brackets. Installation takes 1–2 hours. Metal screens require occasional dusting but no other care.
Color options: Black, bronze, copper, or weathered steel all photograph beautifully.
The result is sleek, industrial-modern privacy that feels intentional and design-forward. Your balcony looks curated, not cluttered.
11. Layer Rattan Panels with Terracotta Pots
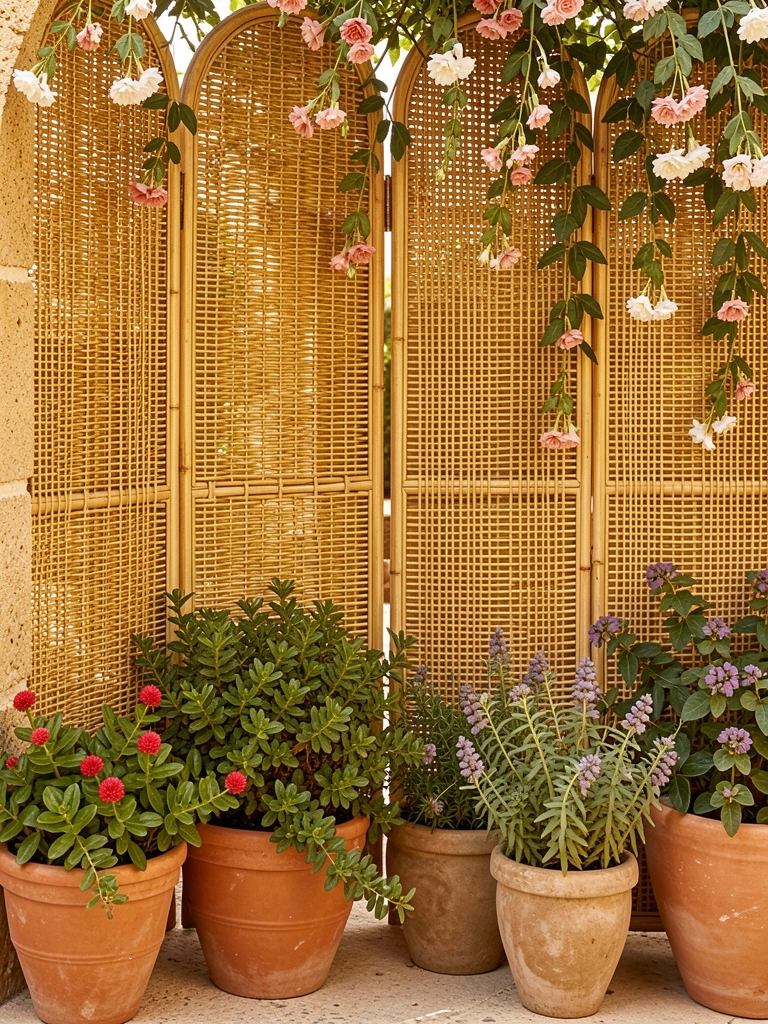
Rattan brings warmth and natural texture to privacy screening. When paired with terracotta pots and geraniums, it channels that on-trend Riviera style while being budget-friendly.
Purchase woven rattan panels ($30–$60 each, widely available on Amazon or Etsy). Lean them against your railing or attach using zip ties for a permanent setup. Arrange potted geraniums, marigolds, or petunias in front—layering creates depth and makes the rattan feel intentional rather than obvious. Setup takes 20–30 minutes. Budget $50–$100 for a mix of plants.
Maintenance note: Rattan is natural, so it will weather. Seal it every 1–2 years to extend life.
You get Mediterranean ease with real privacy and living color. The combination feels curated and photo-worthy—exactly what pins get saved.
12. Build a DIY Pallet Privacy Screen
If you have access to free or cheap pallets, this project is nearly cost-free and gives you major design control. Paint, stain, or leave natural—it’s entirely customizable.
Collect 4–6 pallets (often free from stores, shipping companies, or Craigslist). Sand them, paint or stain with outdoor-grade finishes ($20–$40), and attach horizontally or vertically to a simple frame using bolts. Plan 4–6 hours for a weekend DIY project. Seal with polyurethane to extend life. For renters, this is tricky—it’s fairly permanent, so get landlord approval first.
Design idea: Paint pallets in soft pastels (sage, blush, cream) for a farmhouse aesthetic.
You get a completely custom privacy screen for minimal cost. The rustic, handmade quality feels intentional and Instagram-worthy.
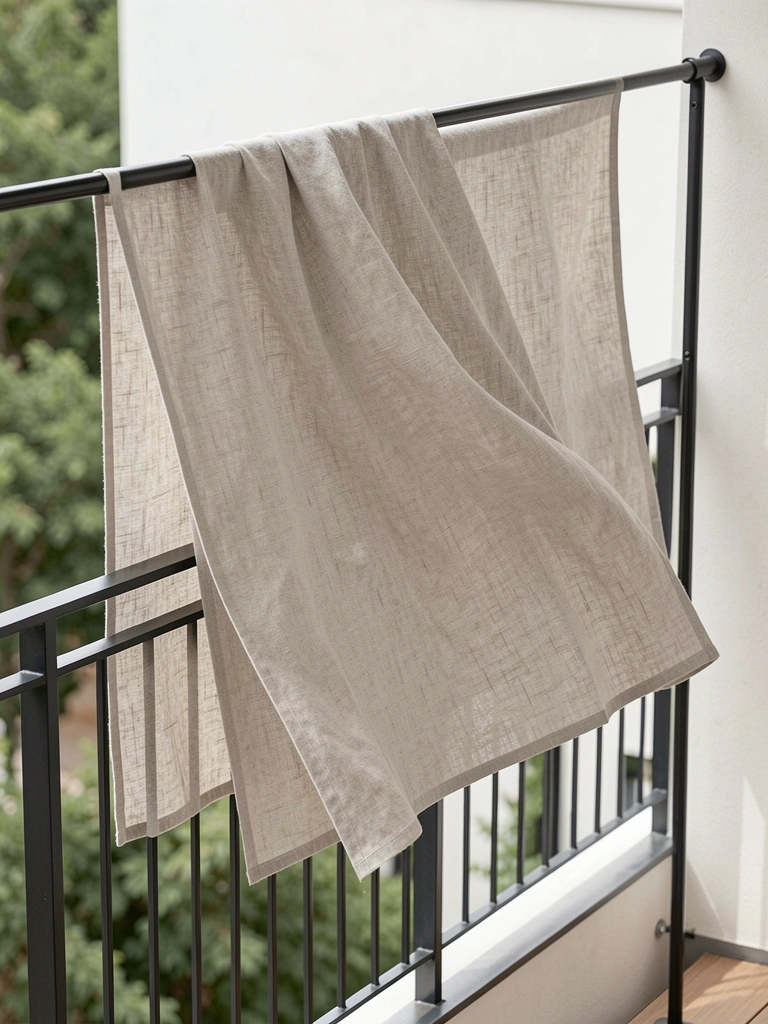
13. Hang Outdoor Curtains in Neutral Linen
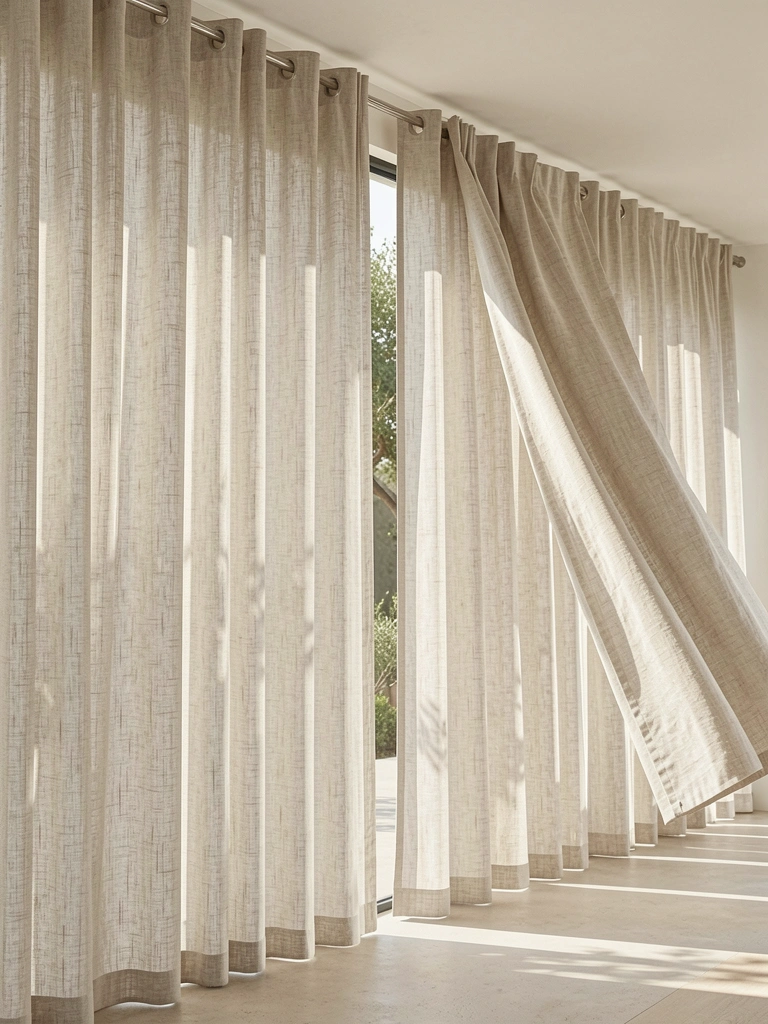
Outdoor curtains blur the line between indoor comfort and exterior living. Linen and canvas fabrics weather beautifully and add softness that screens can’t.
Purchase outdoor-grade linen or solution-dyed acrylic panels ($40–$80 each; Wayfair, Target, or Crate and Barrel carry good options). Install a tension rod or track rail system ($20–$60) along your balcony opening or railing. Takes 30–45 minutes to hang. Linen naturally develops a patina, so light color variations over time add character rather than looking like wear.
Bonus feature: Open during the day for light and air; draw closed for evening privacy or when the sun’s too intense.
The space instantly becomes more intimate and intentional. Soft fabric creates a gentler aesthetic than hard screening—think relaxation rather than fortress.
14. Plant Bamboo in Tall Planters for Living Privacy
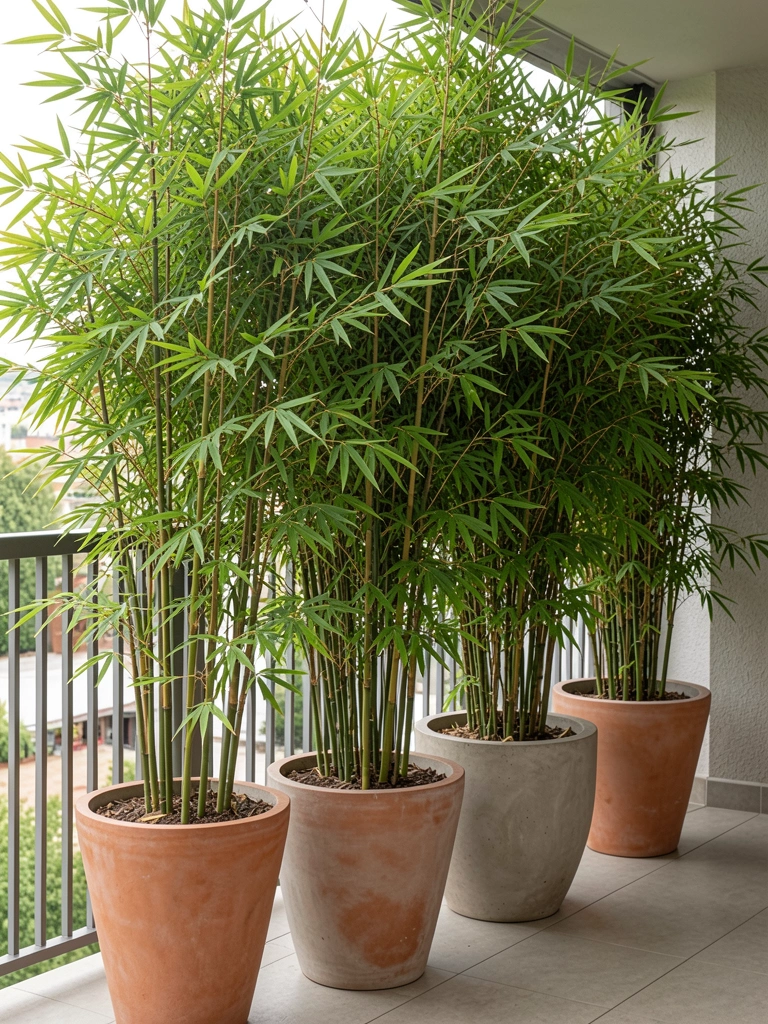
Living bamboo screens yourself means total control over height, density, and maintenance—plus they’re visually stunning and bring actual greenery to your space.
Source bamboo plants from garden centers ($15–$40 each depending on size) or online nurseries. Use large terracotta or concrete planters ($30–$80 each) to contain root systems. Space planters 2–3 feet apart along your balcony edge. Setup takes 1–2 hours. Bamboo grows fast (6–12 inches per month in growing season) and reaches 6–8 feet tall naturally. Control height with annual pruning.
Maintenance tip: Regular watering in summer; reduce in winter. Keep soil consistently moist but not waterlogged.
You get a stunning, dynamic privacy screen that creates oxygen and brings nature inches from your daily life. Bamboo’s architectural look adds sophistication automatically.
15. Install Horizontal Cable Railings for Minimalist Lines
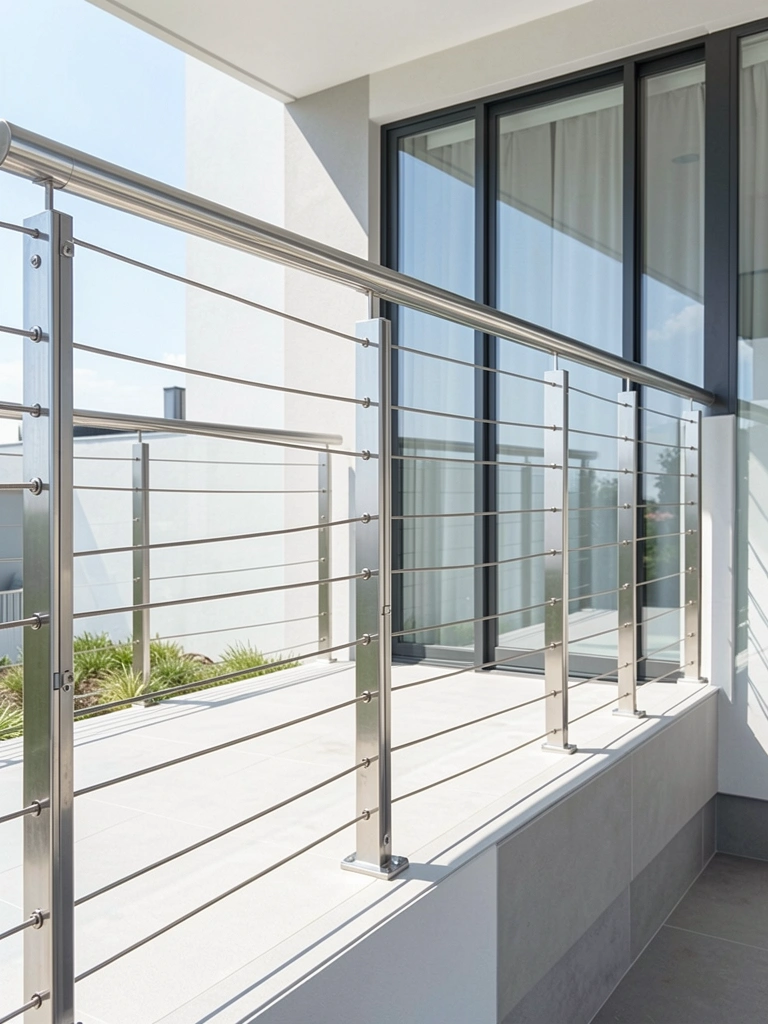
Cable railings maintain visual openness while creating psychological privacy. They’re code-compliant, ultra-modern, and photograph beautifully.
Install stainless steel cable systems ($200–$400 in materials; hardware from Decor Pot or similar specialists). Professional installation costs $300–$600, or DIY if comfortable with basic carpentry and drilling. These systems typically include tensioners, end fittings, and cables ($150–$250 total). Cable railings add value to property, making them worth the investment if you’re staying long-term.
Renter note: This requires permanent installation, so it’s only viable with landlord approval or if you own.
The minimalist lines create sophistication without bulk. You maintain sightlines to trees or skyline views while defining your private space clearly.
16. Layer Climbing Vines on a Trellis Framework

Trellises work best as a scaffold for climbing plants. Give vines a season to establish, and you’ll have stunning natural privacy that improves each year.
Build or purchase a wooden trellis ($40–$100 from garden centers or made yourself with 1×2 lumber, $20–$30). Attach to your railing or wall using lag bolts and brackets ($20–$30 in hardware). Plant fast-growing, climate-appropriate vines at the base: clematis, jasmine, or passion flower work beautifully and attract pollinators. Planting and setup takes 1–2 hours. Budget $15–$25 for 2–3 starter plants.
Growing timeline: Expect significant coverage within 8–12 months as vines establish.
The privacy develops organically over time, creating a living boundary that’s far more beautiful than any manufactured screen. Flowers add fragrance and wildlife.
17. Use Decorative Metal Screens with Geometric Patterns

Ornamental metal screens blur the line between art and function. They’re conversation starters that create stunning light patterns throughout the day.
Source vintage or contemporary metal screens ($80–$250 each, depending on complexity; check Etsy, local antique shops, or specialty garden retailers). Mount using heavy-duty brackets ($30–$50) or lean against railings for easy repositioning. Installation takes 30–60 minutes. These screens often become focal points, so position them where they’ll catch light and showcase the patterns.
Styling bonus: Paint screens in unexpected colors (emerald, mustard, navy) to personalize.
Your space gains artistic flair alongside privacy. Geometric shadows create Instagram-worthy moments throughout the day.
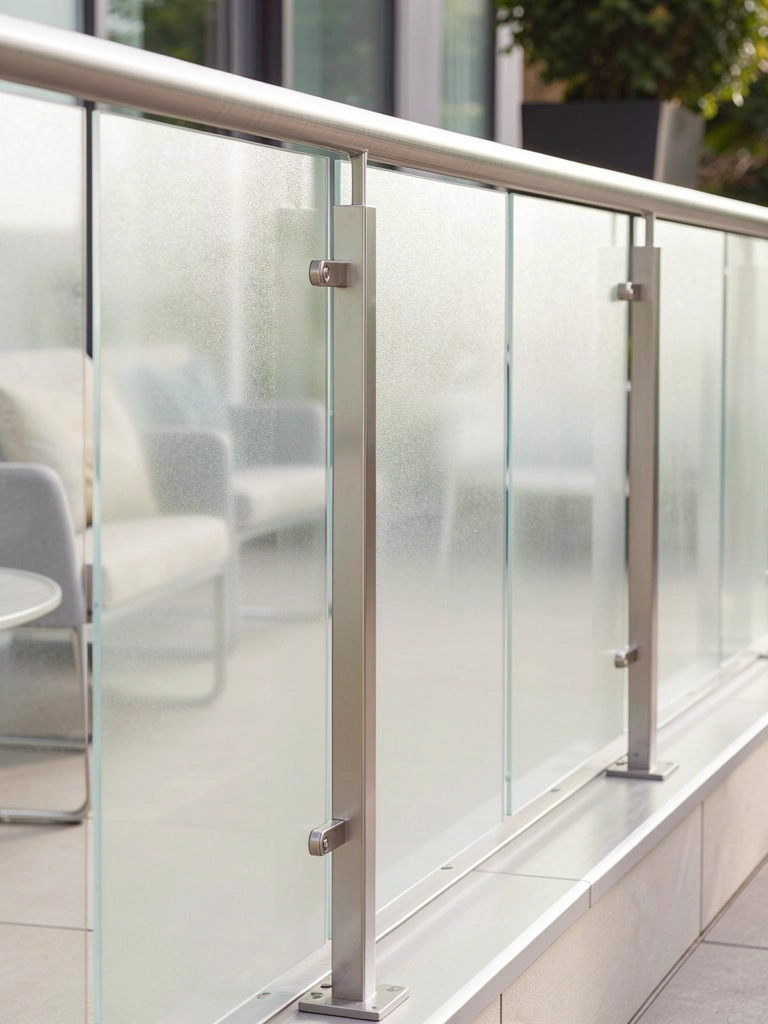
18. Install Frosted Glass Panels for Sleek Privacy
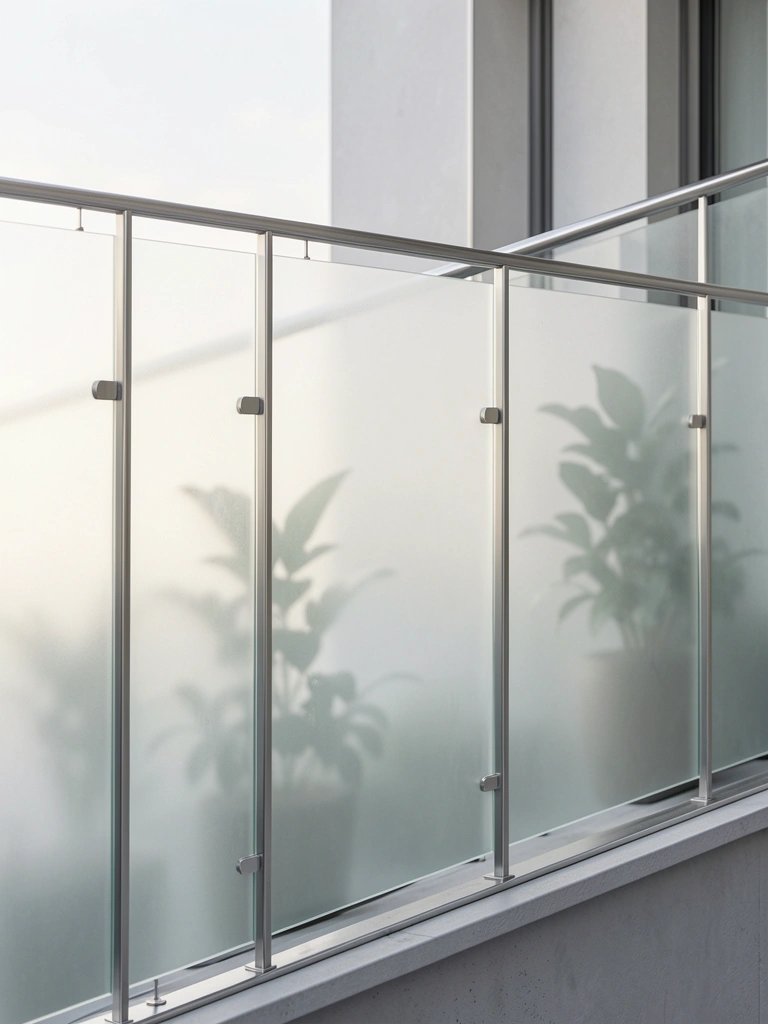
Frosted glass maintains light flow while completely blocking direct sight lines. It’s sleek, contemporary, and works with minimalist aesthetics beautifully.
Purchase frosted or etched glass panels ($40–$80 per panel, depending on size; Home Depot or Wayfair). Mount using aluminum frames and stainless steel hardware ($30–$60 for brackets and fasteners). Professional installation runs $200–$400; DIY takes 2–3 hours if confident with measurements and drilling. These panels last indefinitely and clean easily with glass cleaner.
Design consideration: Pair with minimalist furnishings to maximize the contemporary feel.
Light pours through beautifully while complete privacy is maintained. The space feels open and bright, not fortress-like.
19. Create a Tiered Plant Wall for Green Privacy
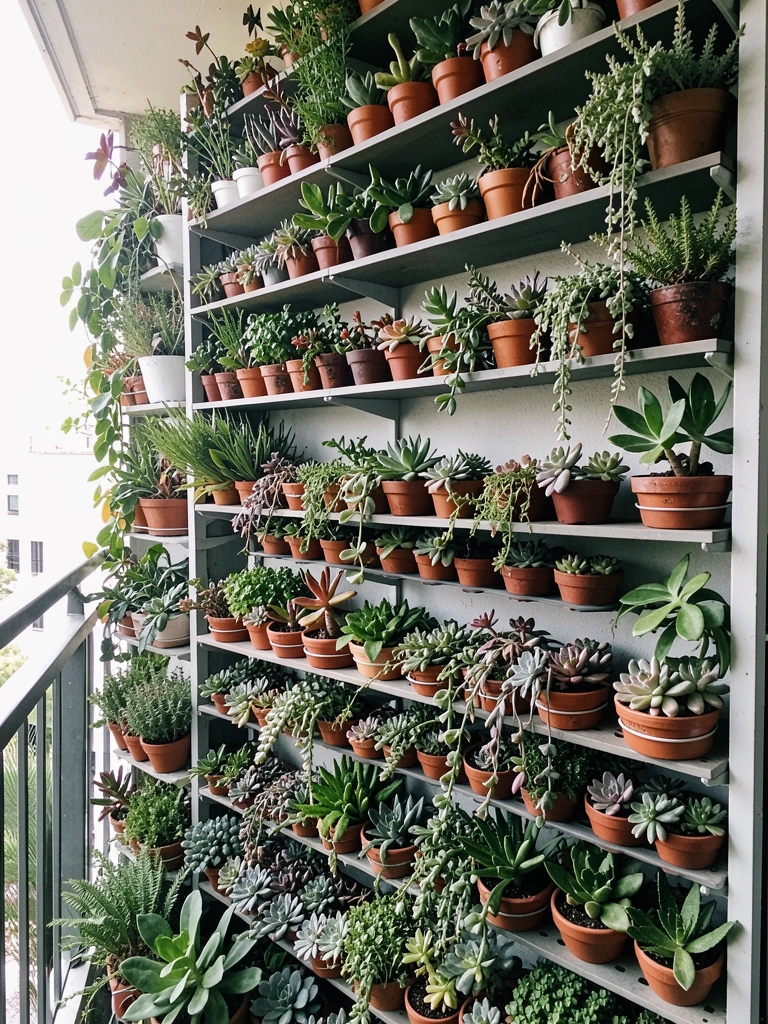
A tiered plant wall combines storage, greenery, and privacy in one multifunctional feature. It’s perfect for plant lovers who want both beauty and utility.
Build or purchase a tall shelving unit (metal or wood, $60–$150 from IKEA, Home Depot, or Wayfair). Arrange dozens of small potted plants: succulents, trailing ivy, compact herbs, and flowering plants ($40–$80 for a mix). Setup takes 2–3 hours. This approach works beautifully for renters if you use a free-standing, bolt-to-wall unit (non-permanent attachment).
Watering hack: Use a timer-based drip system ($30–$50) to automate watering.
Your privacy increases as plants mature and fill in. You get a living, breathing art installation that’s yours to curate and adjust seasonally.
20. Install a Motorized Privacy Roller Blind
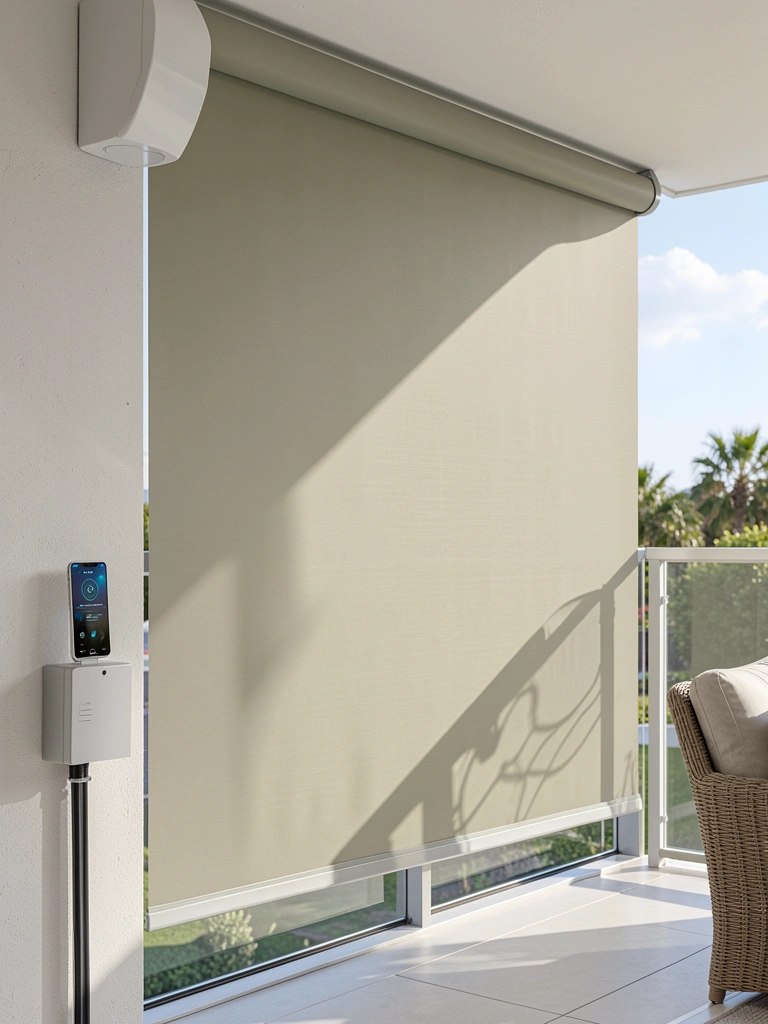
Motorized roller blinds offer maximum convenience—control via remote or smartphone, and they integrate with smart home systems. Perfect for those who value technology and flexibility.
Install motorized outdoor blinds ($300–$600 depending on width; brands like Lutron, Hunter Douglas, or Somfy). Professional installation adds $200–$400. Manual versions cost $100–$200. These systems are durable, weather-resistant, and often include UV protection features. Some models have built-in sensors that adjust automatically based on sun position.
Renter consideration: Usually requires permanent installation, so landlord approval is necessary.
Privacy at your fingertips—literally. The space becomes effortlessly adjustable for any situation, from morning privacy to evening entertainment.
21. Layer Sheer and Opaque Outdoor Fabrics
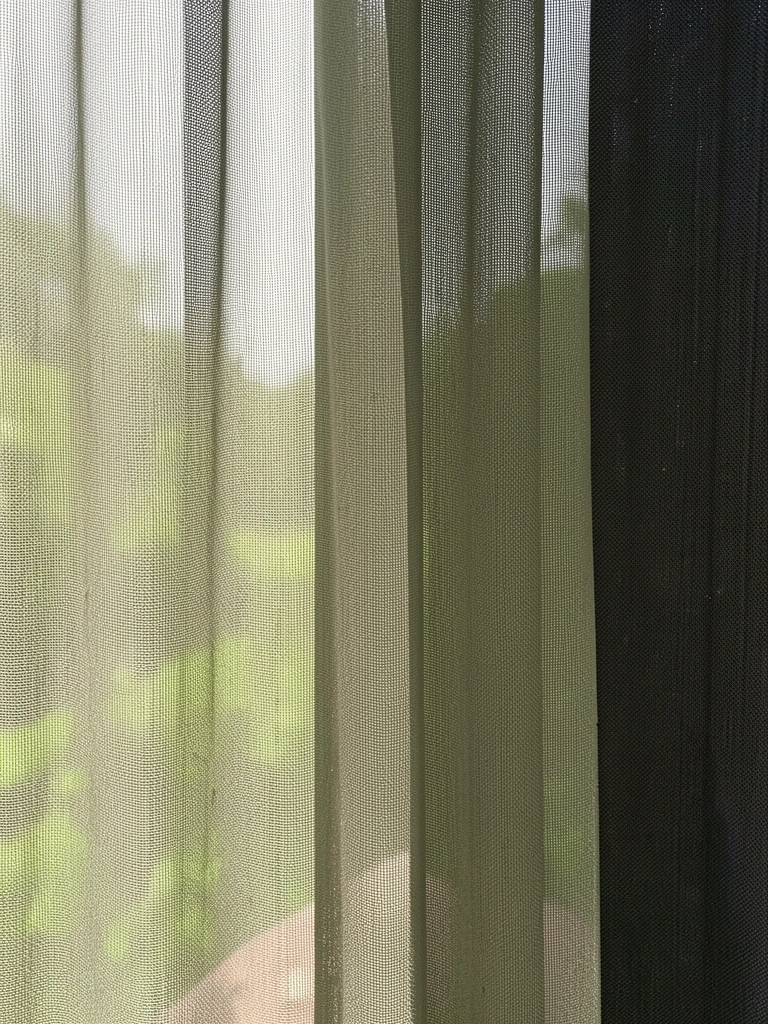
Layering different fabric opacities creates depth and gives you flexibility: use sheer layers during the day for filtered light, or draw the opaque layer for complete privacy.
Hang two separate curtain rods (staggered 6–12 inches apart, $40–$80 total) and use different fabrics on each. Sheer outdoor fabric ($25–$40 per panel) + opaque solid ($35–$60 per panel). Installation takes 1 hour. Open layers independently to adjust privacy and light throughout the day.
Color strategy: Pair neutral sheers with deeper-toned opaques for visual interest.
You get customizable privacy with dimensional appeal. The space feels intentional and designed, not makeshift.
22. Build a Slatted Wooden Box Planter Screen

Combining seating, storage, and greenery, slatted planter boxes serve multiple purposes while creating stunning visual privacy.
Construct or purchase wooden planter boxes with slat fronts ($100–$200 per box from garden centers or build DIY for $40–$70 each in materials). Stack or arrange 2–3 boxes along your balcony edge. Fill with tall ornamental grasses, dwarf bamboo, or flowering shrubs. Setup takes 2–3 hours total. These boxes provide hidden storage for cushions or gardening supplies beneath planting areas.
Bonus: Slatted design allows airflow and water drainage, keeping plants healthy.
Your privacy comes with function and beauty. The space becomes more curated and garden-forward.
23. Hang a Macramé Wall Tapestry as Decorative Screening
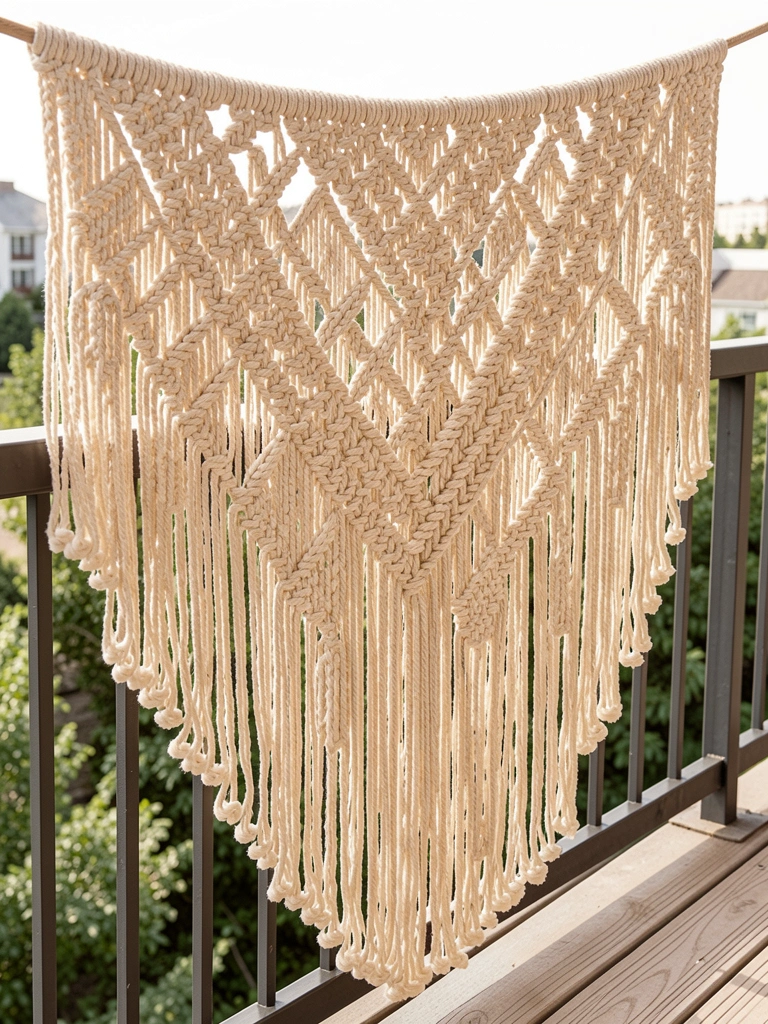
Oversized macramé tapestries serve as both art and privacy screens. They’re lightweight, portable, and radiate boho charm.
Source or handmake a large macramé tapestry ($60–$150 for handmade from Etsy; DIY with jute rope and online patterns for $25–$40 in materials). Hang from a rod using clips or attach directly to railing using soft ties. Installation takes 15–20 minutes. Macramé naturally collects dust, so plan light brushing or gentle vacuuming every month.
Styling note: Pair with rattan seating and potted plants for cohesive boho aesthetic.
The tapestry becomes a focal point while softly screening views. It’s portable, so you can swap seasonally for different aesthetics.
24. Install Clear Acrylic Panels with Printed Designs
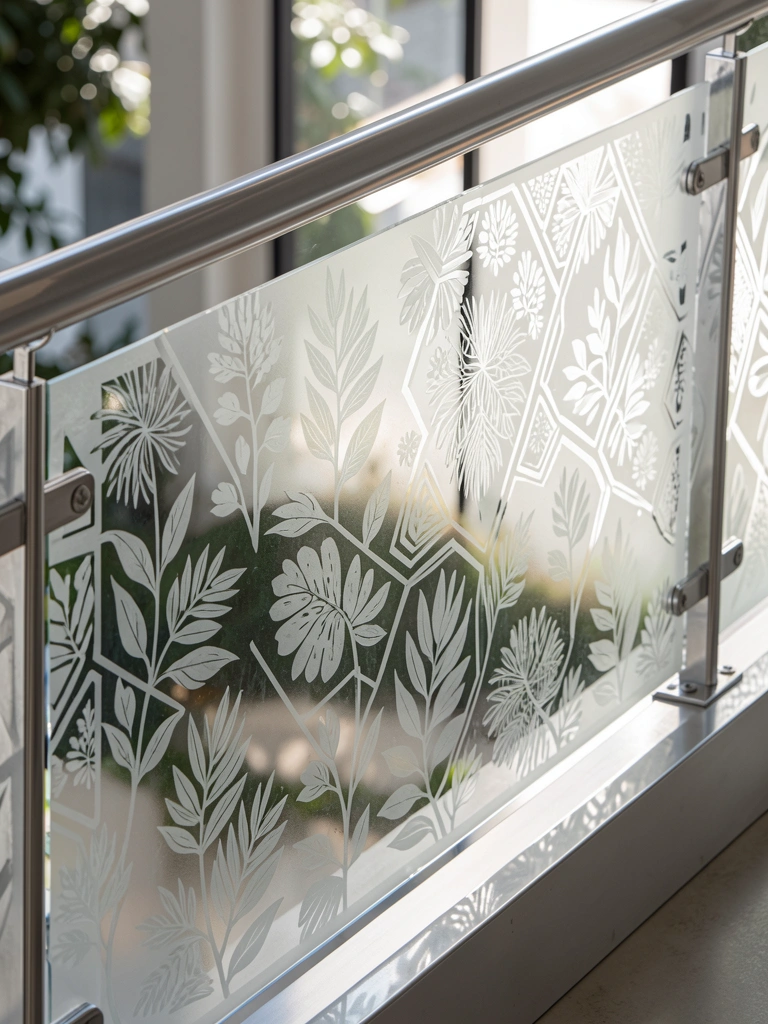
Printed acrylic offers privacy plus personality. You can choose designs that match your aesthetic—botanical, geometric, abstract—or go custom.
Order custom-printed acrylic panels ($80–$200 per panel depending on complexity; suppliers like Plastpro or custom printers). Mount using aluminum frames and brackets ($40–$80 for hardware). Installation takes 1–2 hours. These panels are durable, UV-resistant, and easy to clean.
Design ideas: Botanical prints (monstera, palm leaves), geometric patterns, or artistic silhouettes all translate beautifully to acrylic.
You get artistic privacy that reflects your personality. Sunlight showcases the printed designs throughout the day.
25. Combine Metal Slats with Climbing Ivy for Hybrid Coverage

Hybrid screening—mixing materials and living plants—creates the most visual interest and depth. Metal provides immediate structure; vines add organic growth and softness over time.
Install metal slat screens ($100–$250 per panel) and plant fast-growing vines at the base (clematis, jasmine, ivy: $15–$30 total). Setup takes 2–3 hours. The vines will gradually weave through metal gaps, creating a symbiotic aesthetic that improves each season. This approach works beautifully for both renters and owners.
Timeline: Visible vine coverage develops within 6–12 months of planting.
You get the best of both worlds: immediate structure plus evolving organic beauty. The screen becomes more stunning each year as vines mature and fill in.
Save this post for your next balcony project and try one idea this weekend. Whether you’re starting with something simple (like hanging fabric curtains) or planning a season-long planting project, your outdoor space is about to become so much more private—and so much more yours. Which idea will you tackle first?
Leave a Reply