Mirrors do more than show your reflection—they’re your secret weapon for making any space feel bigger, brighter, and more intentional. Whether you’re working with a tiny apartment, a dark hallway, or a bathroom that needs serious style, the right mirror can completely change how a room feels. The trick isn’t just hanging any mirror on the wall; it’s choosing the shape, size, and placement that works for your specific space. In this guide, you’ll discover 27 specific mirror ideas—from zero-cost styling tricks to investment pieces that become focal points—so you can finally create a room that feels as open and polished as the ones you’ve been pinning. Let’s get started.
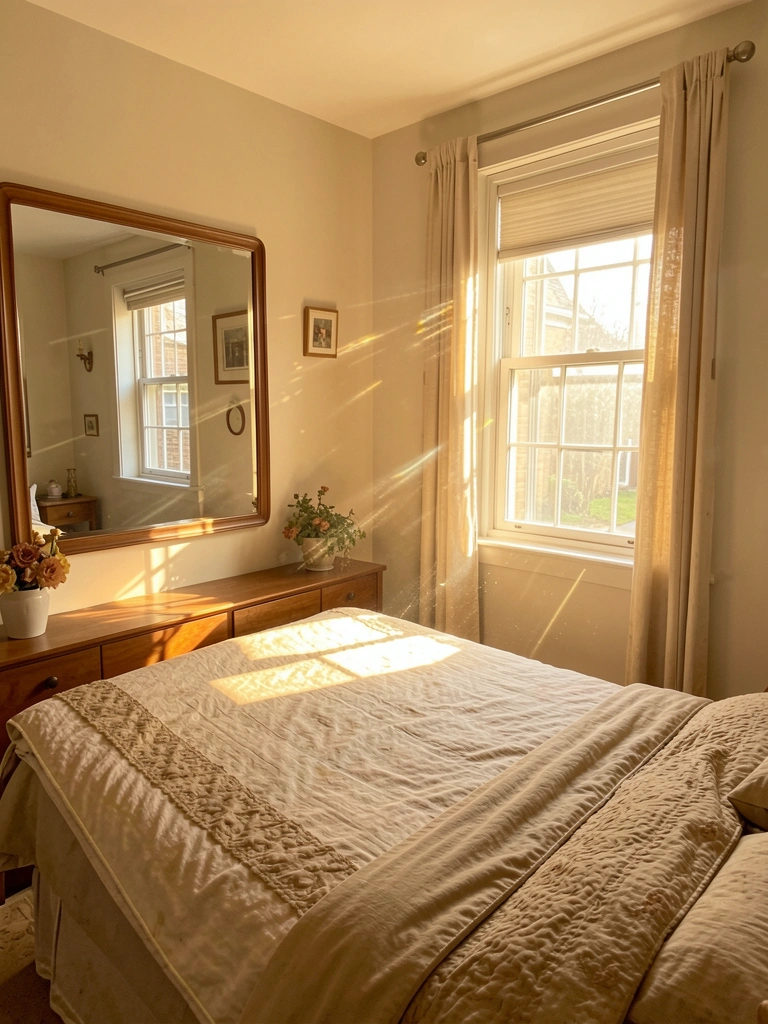
1. Lean an Oversized Round Mirror for Instant Depth

Leaning an oversized mirror against the wall creates the illusion of a much larger room without any commitment or wall damage. This works especially well in living rooms, bedrooms, and entryways where you want impact without permanent installation.
Look for mirrors 24–36 inches in diameter from retailers like Target ($80–$150), IKEA ($40–$100), or Wayfair ($100–$300). Modern round mirrors with minimal frames work best for this approach. Place it in a corner or against a wall where it reflects light from a window or light fixture. The lean-and-style method takes 5 minutes and works beautifully with a console table or bench below. Pro tip: Use a furniture pad underneath the mirror’s base to protect your floors and keep it stable.
You’ll immediately notice how much lighter and more open the space feels. The reflected light bounces around the room, making it appear 20–30% larger without any structural changes.
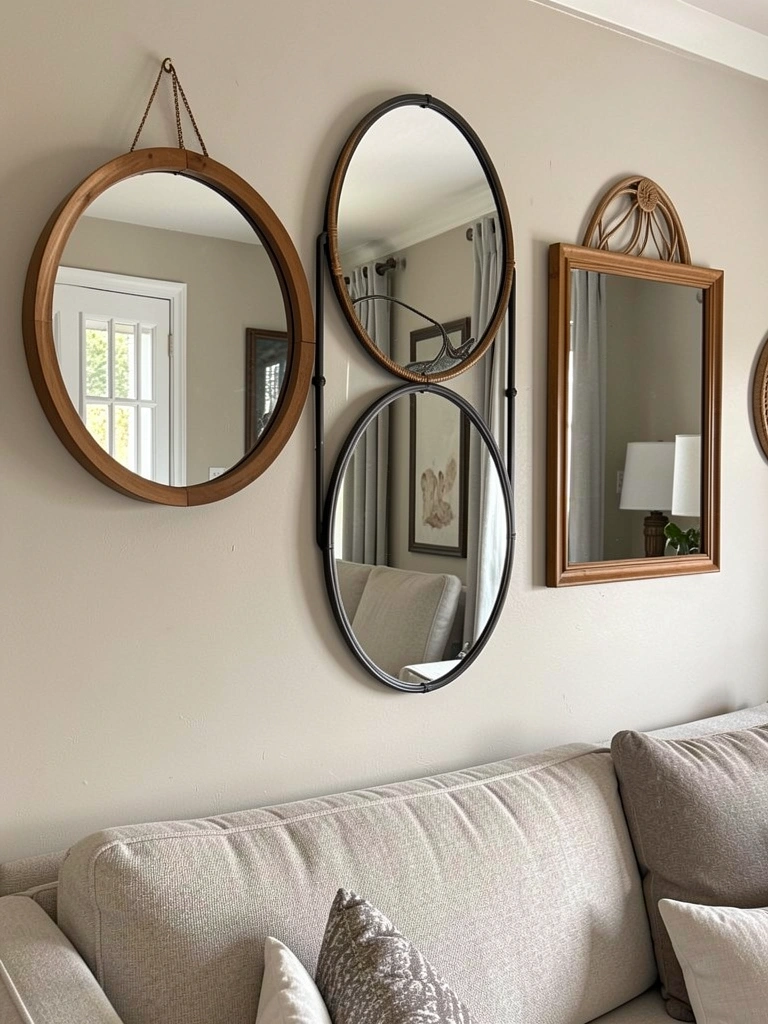
2. Hang Frameless Mirrors Side-by-Side for a Gallery Wall

Frameless mirrors stacked together create a sophisticated gallery wall that multiplies your light and makes compact spaces feel airy without the visual weight of frames. This trick works in narrow hallways, small bedrooms, and entryways where space is tight.
Choose 3–5 frameless mirrors in complementary sizes (mix rectangles and squares). Installation takes 1–2 hours using toggle bolts or studs for secure hanging. Look at Wayfair ($30–$150 per mirror), CB2 ($60–$200), or West Elm ($100–$250) for clean frameless options. Stagger them with small gaps for visual interest. Use a level and painter’s tape to plan your layout before drilling. Pro tip: If you rent, use damage-free adhesive strips rated for mirror weight, though mounting securely to studs is always safer.
This arrangement bounces light throughout your entire entryway or hallway. The gaps between mirrors add modern flair while the reflective surfaces multiply your natural light, making the path feel less cramped.
3. Paint Your Wall Light to Make Mirrors Reflect More
Before buying a bigger mirror, try changing your wall color. Light, neutral walls maximize mirror reflection and brightness—a free or ultra-cheap change that compounds the depth effect.
Paint walls in soft whites, warm creams, pale grays, or gentle blues (the backdrop matters as much as the mirror itself). Benjamin Moore ($35–$50/gallon) and Sherwin-Williams ($40–$60/gallon) offer excellent sample sizes to test. One gallon covers approximately 350 square feet. DIY painting takes 3–4 hours depending on room size; hire a painter for $800–$1,500 if preferred. Light walls reflect existing light (and mirror reflections) better than dark walls. Pro tip: Use semi-gloss or satin finishes in bathrooms for easier cleaning and subtle shine.
Suddenly, your mirrors work harder. The reflected light bounces around the room more effectively, creating a genuinely brighter, more spacious feeling without any mirror upgrades needed.
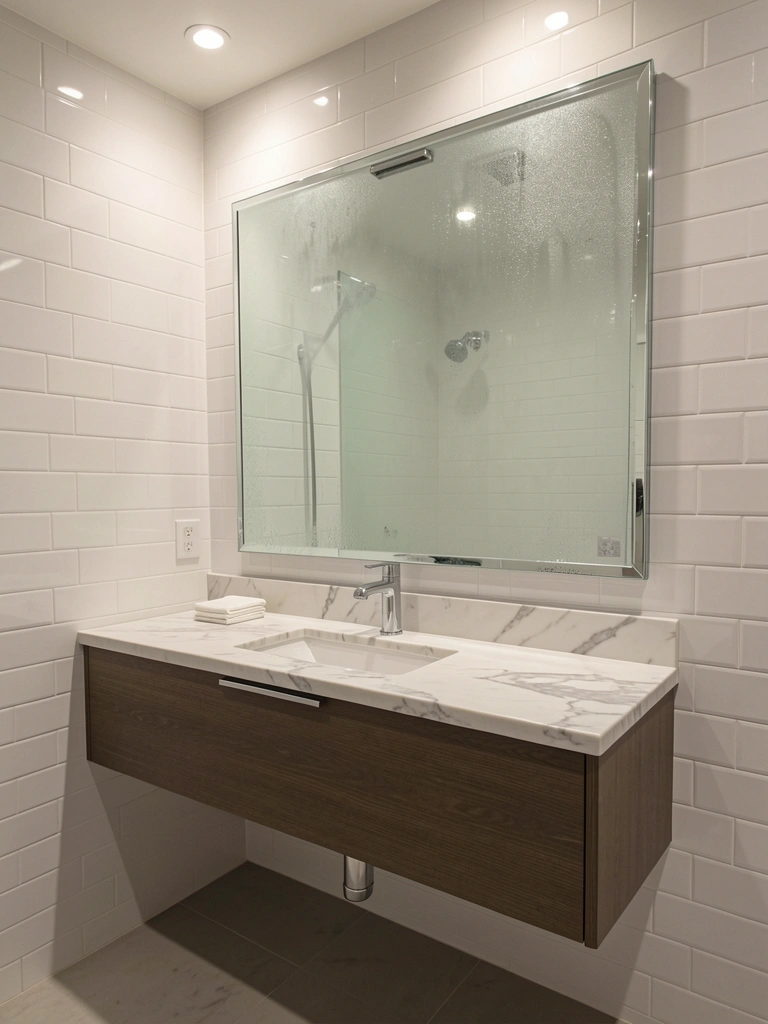
4. Install a Lit Vanity Mirror for Grooming Perfection
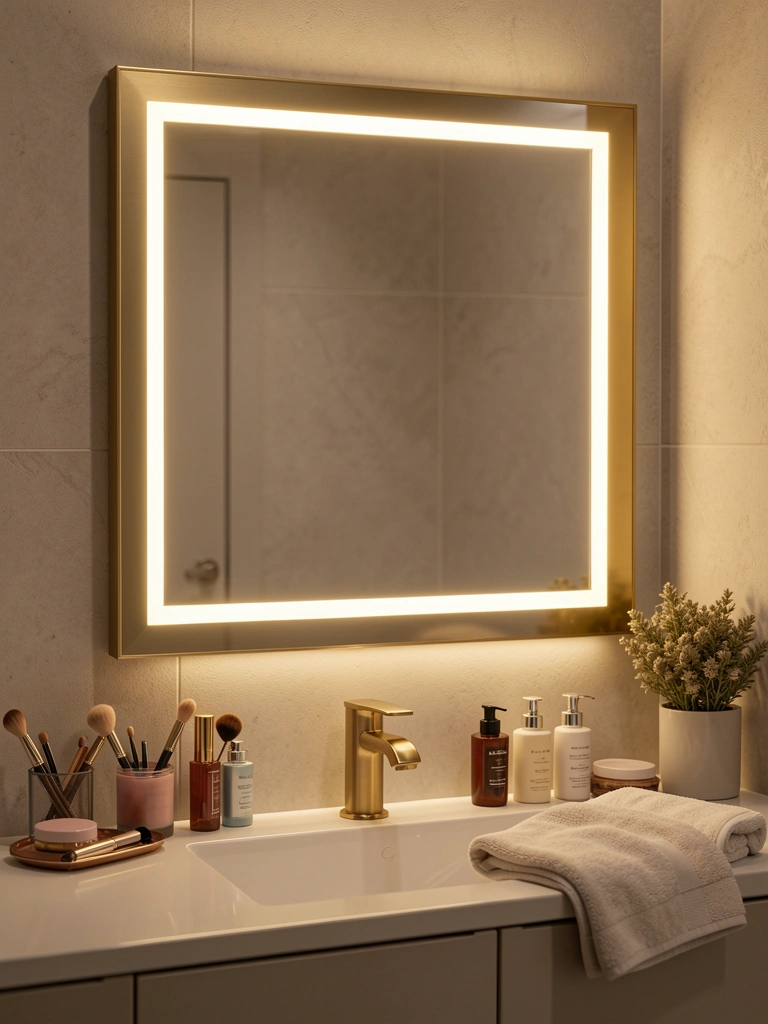
LED and lit mirrors solve two problems at once: they provide task lighting for grooming while reflecting your face evenly without harsh shadows. Perfect for bathrooms where natural light is limited or inconsistent.
Choose from wall-mounted lit mirrors ($150–$400) or tabletop vanity mirrors ($80–$200). Top brands include Kosmonia ($120–$280), Anthropologie ($200–$350), West Elm ($180–$320), and budget-friendly Amazon options ($60–$150). Look for 3000K–4000K color temperature for warm, flattering light. Installation takes 30–60 minutes for wall-mounted; tabletop versions need zero installation. Choose dimmable options if possible for flexibility. Pro tip: LED bulbs last 10–50 years and use 75% less energy than traditional bulbs.
You’ll get flawless makeup application and skincare visibility every single time. The even, shadow-free lighting makes your bathroom feel like a professional spa rather than a rushed morning routine space.
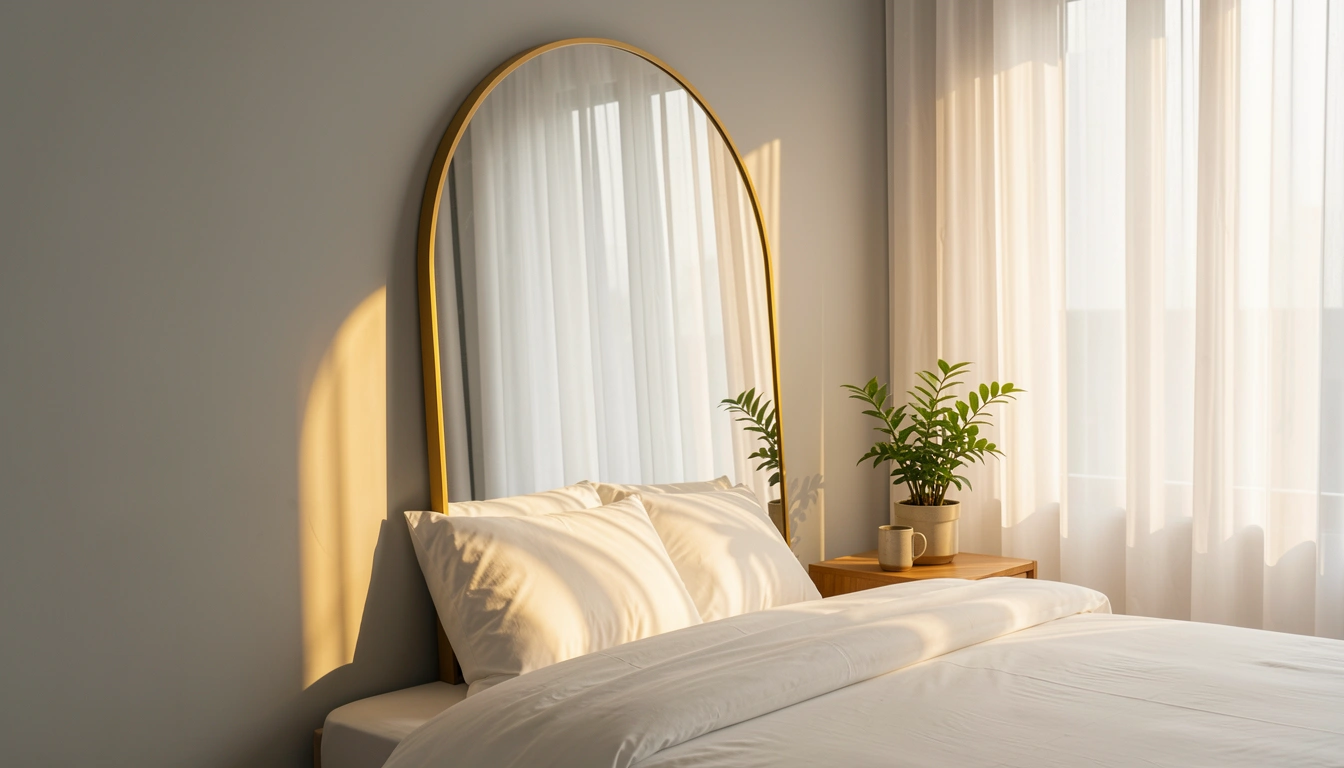
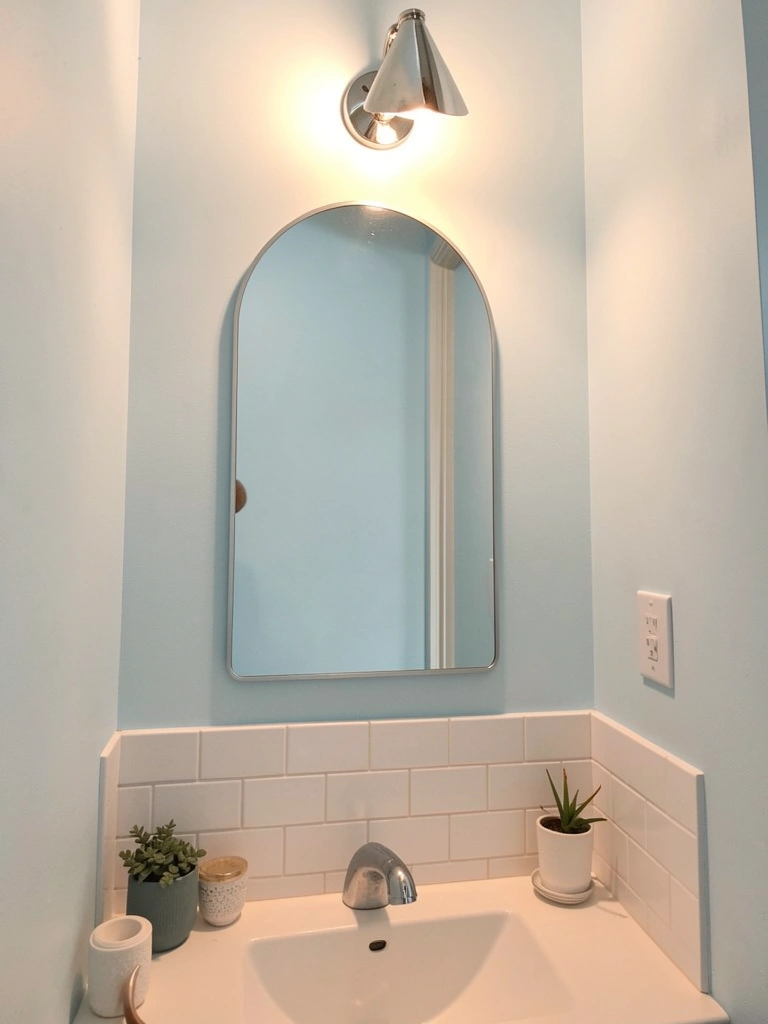
5. Use an Arched Mirror to Soften Hard Edges

Arched mirrors bring elegance and softness to rooms with lots of hard angles and right angles. They work particularly well in bedrooms, bathrooms, and feminine-leaning spaces where you want to reduce visual harshness.
Search for arched or curved-top mirrors (18–36 inches wide, $80–$300) on Wayfair, CB2, Target, or West Elm. Metal frames in gold, brass, or black work beautifully. Installation is straightforward: mark studs, use heavy-duty wall anchors ($10–$20), and hang with picture-hanging wire or D-rings. Takes 20–30 minutes. The arch naturally draws the eye upward, making ceilings feel higher. Pro tip: Pair with an arched window or doorway nearby for a cohesive, intentional look.
The curved silhouette makes your bedroom feel more refined and restful. Instead of boxy mirror-on-wall, you get a piece that looks purposefully chosen and contributes to a calm, well-designed aesthetic.
6. Mount a Hexagon Mirror for Geometric Interest
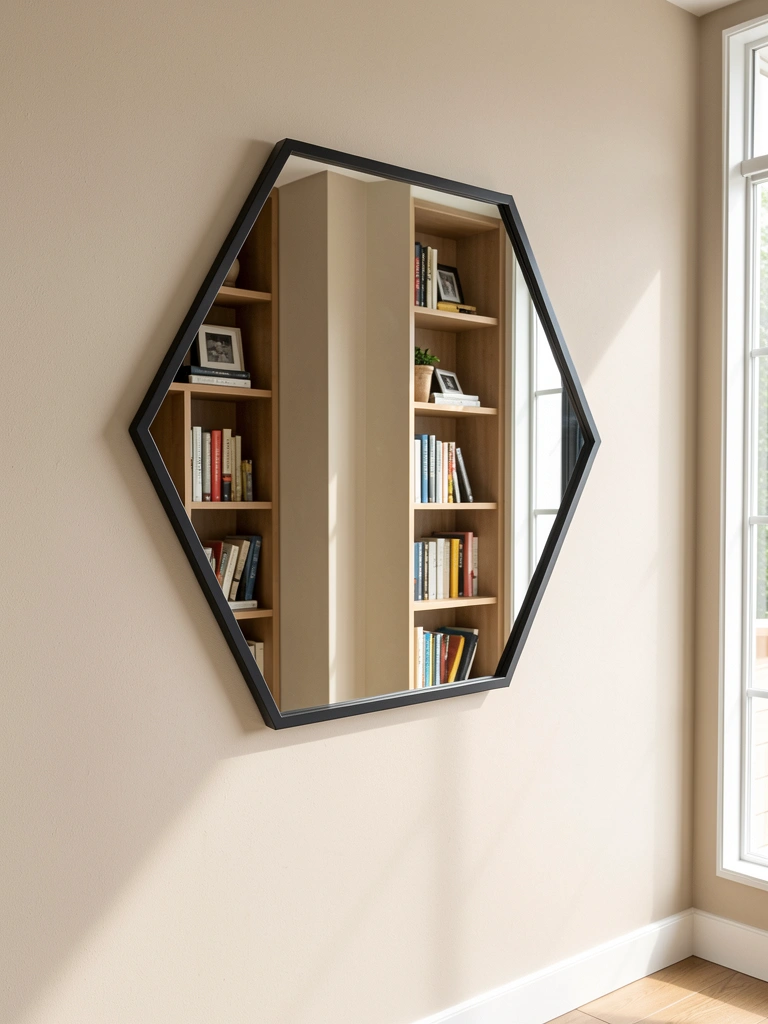
Geometric mirrors—especially hexagons—add modern flair and playful sophistication without being too bold. They work as statement pieces in entryways, hallways, and modern living rooms.
Hunt for hexagon mirrors (16–30 inches, $60–$250) on IKEA ($40–$80), Target ($50–$120), Amazon ($60–$180), or Wayfair ($80–$300). Matte black and natural wood finishes are trending. Installation takes 15–20 minutes with a level and stud finder. Position it as a solo statement piece (don’t clutter around it). The geometric shape creates visual rhythm and draws attention, so choose a spot where you want focus. Pro tip: For renters, lean a hexagon mirror against a console table instead of hanging it.
This one change elevates your space from basic to design-forward. The reflections bounce off the geometric shape, creating visual interest while still multiplying your light and perceived space.
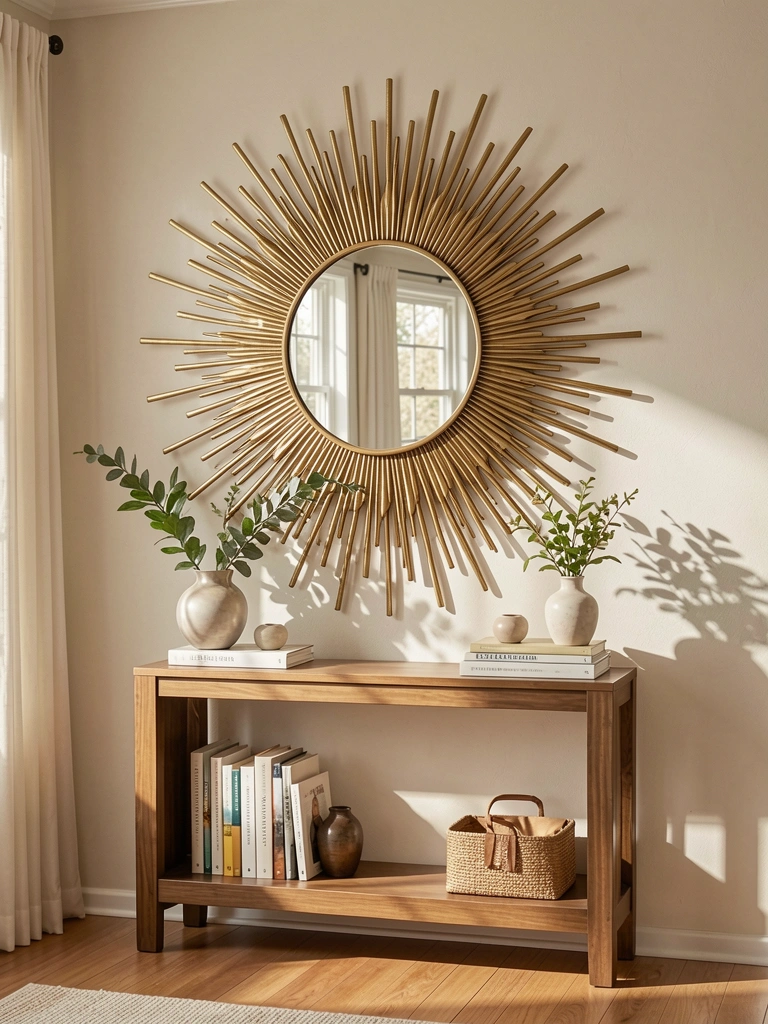
7. Create a Sunburst Mirror Moment for Living Room Drama
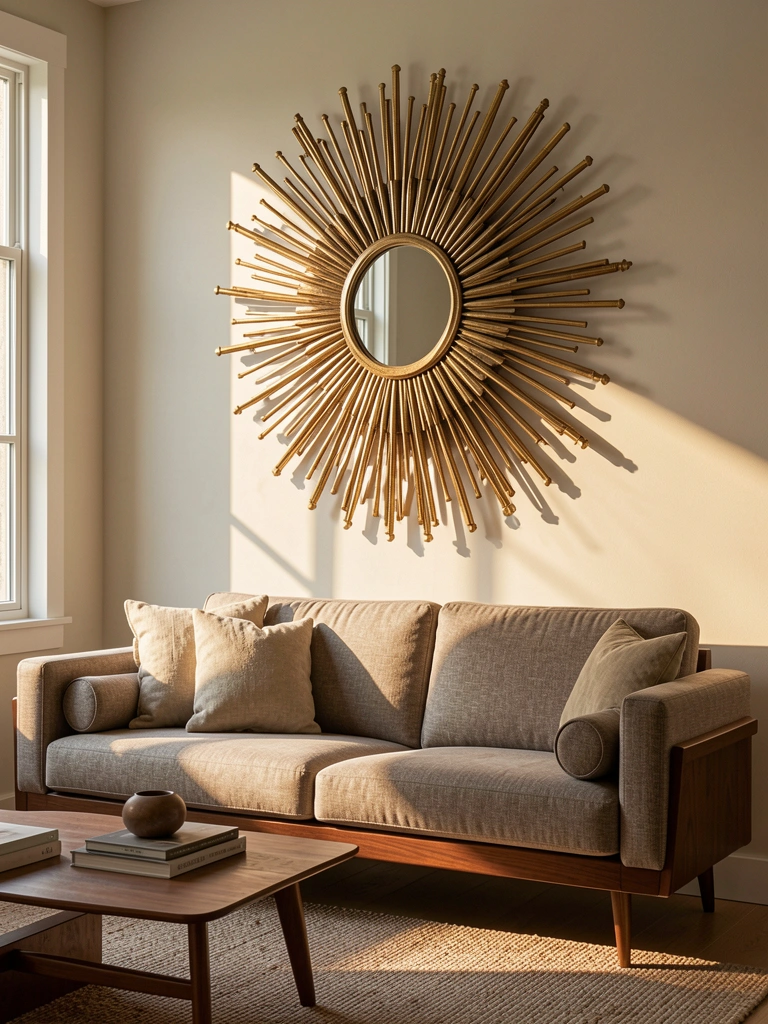
Sunburst mirrors are 2025’s statement piece. They work as the focal point of an entire room, creating architectural drama and instantly elevating your space from dated to gallery-worthy.
Look for sunburst mirrors (28–48 inches, $120–$500+) at West Elm ($250–$400), Wayfair ($150–$350), CB2 ($200–$450), or Anthropologie ($300–$600). Brass, gold, and black finishes dominate. Hang as a solo focal point above a sofa, console, or bed—no competing decor nearby. Installation takes 30–45 minutes; use a stud and heavy-duty anchors. The rays can be adjustable or fixed. Pro tip: Position one to catch morning or afternoon light for dramatic shadow play on surrounding walls.
This mirror becomes the hero of your room. Guests notice it immediately, and the architectural design makes your space look intentionally curated and magazine-worthy.
8. Use Anti-Fog Bathroom Mirrors for Luxury Functionality
Anti-fog mirrors combine practical functionality with subtle luxury—they stay clear during and after hot showers without the squeegee routine. Perfect for families and frequent shower-takers.
Anti-fog mirrors range from $80–$400 depending on size and brand. Kosmonia ($100–$250), Amazon ($60–$150), and Home Depot ($100–$300) have solid options. The fog-free coating lasts 5–10 years. Installation is standard mirror hanging with wall anchors ($15–$30) and takes 20–30 minutes. Some models include heated elements that activate humidity sensors automatically. Pro tip: DIY anti-fog spray ($10–$15) works for existing mirrors if replacing isn’t in the budget.
No more wiping your mirror before skincare or shaving. The consistent clarity transforms your shower routine from rushed to relaxed, and the mirror stays functional even in high-humidity bathrooms.
9. Lean an Arched Mirror in Your Bedroom for Effortless Style
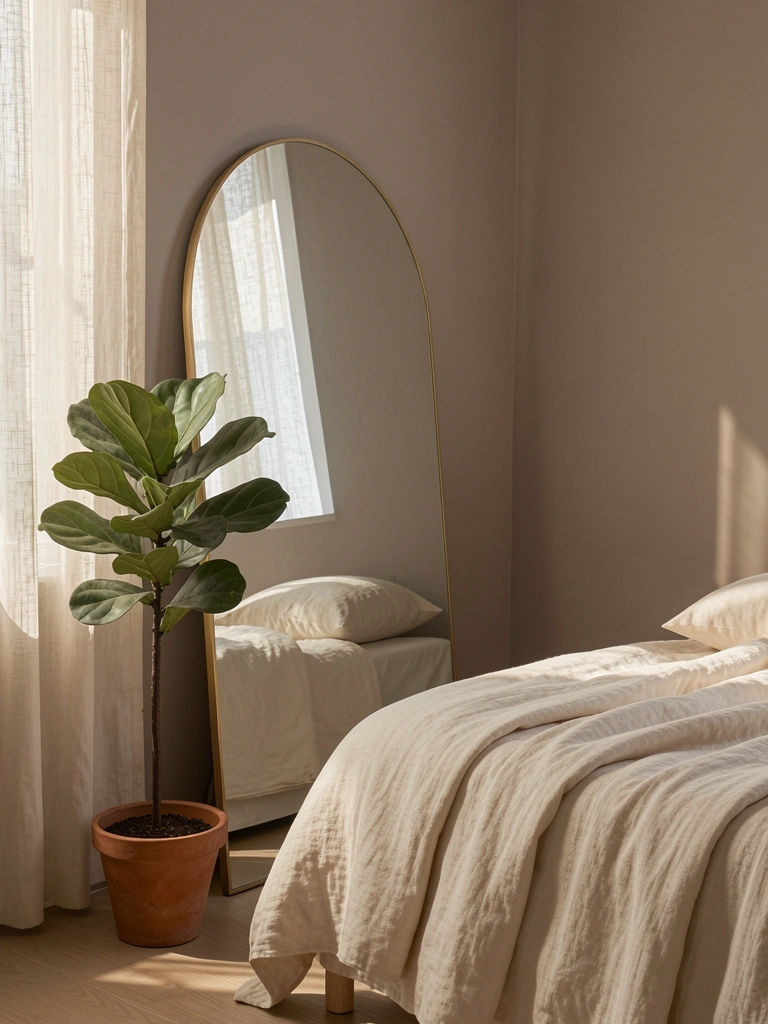
Leaning an arched mirror creates a slower, more intimate feel than hanging it—perfect for bedrooms where you want calm over drama. The arch adds softness without being fussy.
Find arched mirrors (24–36 inches tall, $100–$350) to lean against bedroom walls. Target ($60–$150), West Elm ($150–$300), and IKEA ($50–$120) all have options. Use a felt furniture pad underneath ($5–$10) for floor protection and slight angle adjustment. Position near your bed or against a wall beside a chair. This zero-commitment installation takes literally 2 minutes, making it perfect if you’re renting or like changing your layout seasonally. Pro tip: Lean it at a slight angle (ask a friend to check) to avoid a too-perfect, artificial appearance.
Your bedroom immediately feels more relaxed and lived-in. The curved mirror adds softness while still opening up the space and reflecting light—without the permanent commitment of wall hanging.
10. Hang Multiple Small Mirrors for a Scattered Gallery Effect

Small mirrors clustered together create a collected, curated feel while multiplying reflections and light throughout the room. Perfect for small bathrooms, powder rooms, and bohemian-style spaces.
Source small mirrors (4–12 inches, $10–$80 each) from IKEA, Target, Wayfair, thrift stores, and vintage shops. Mix shapes and finishes for personality (don’t match them). Plan your layout on paper first or use painter’s tape on the wall. Installation takes 1–2 hours depending on quantity. Use picture-hanging hooks rated for mirror weight ($5–$15 per hook). The staggered arrangement is forgiving and charming—perfection is the opposite of the goal here. Pro tip: Include one larger mirror as an anchor point to ground the gallery.
Instead of one boring mirror, you get a dynamic, artistic installation that reflects light from multiple angles. Your space looks collected, intentional, and way more interesting than standard bathroom mirrors.
11. Add a Floor-to-Ceiling Mirror to Transform Tiny Spaces
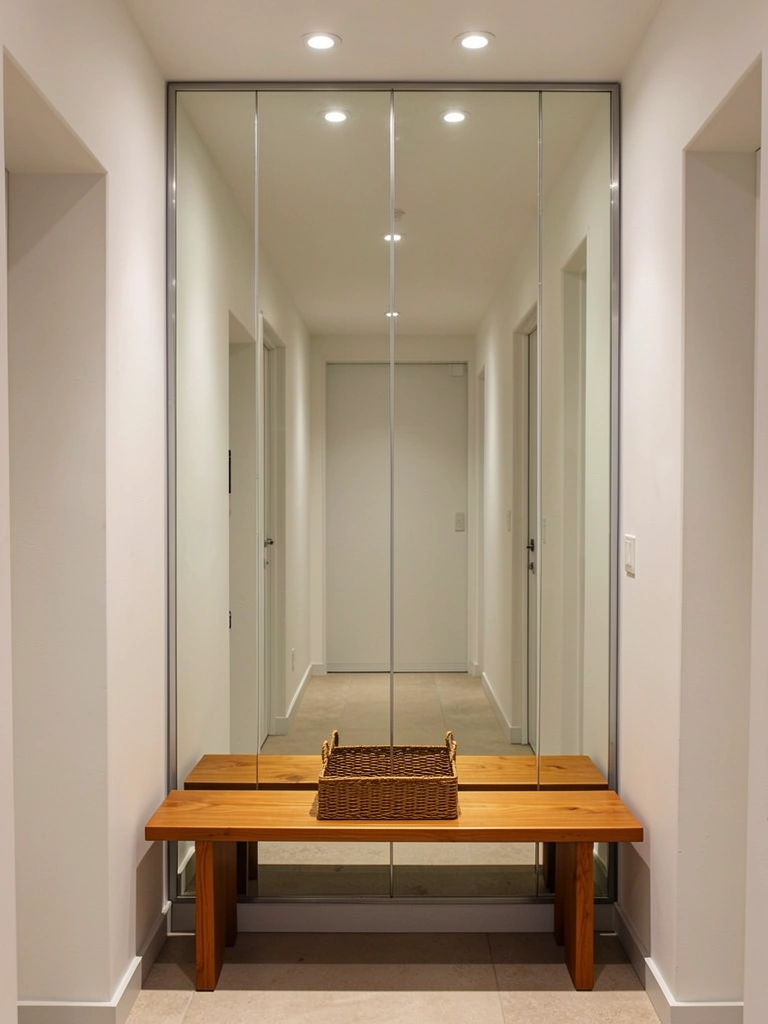
Full-height mirrors create the maximum illusion of space and are worth the investment if you’re dealing with a genuinely cramped room. They completely reshape how small spaces feel.
Floor-to-ceiling mirrors cost $300–$800 for DIY installation or $800–$2,000 with professional hanging. Retailers like Wayfair ($400–$1,200), IKEA ($250–$500 for modular panels), and custom glass suppliers ($600–$2,000) all offer options. Modular panel systems are renter-friendly; permanent installations require professional help and wall studs. Installation takes 2–4 hours for DIY or half a day for professionals. Ensure your walls are level before ordering. Pro tip: Use mirror panels in one accent wall rather than all four to avoid an overwhelming funhouse effect.
This is the nuclear option for small-space transformation. Your tiny apartment, hallway, or bedroom suddenly appears drastically larger and brighter—you’ve essentially doubled your perceived square footage.
12. Style a Mirror with Scalloped Edges for Feminine Elegance
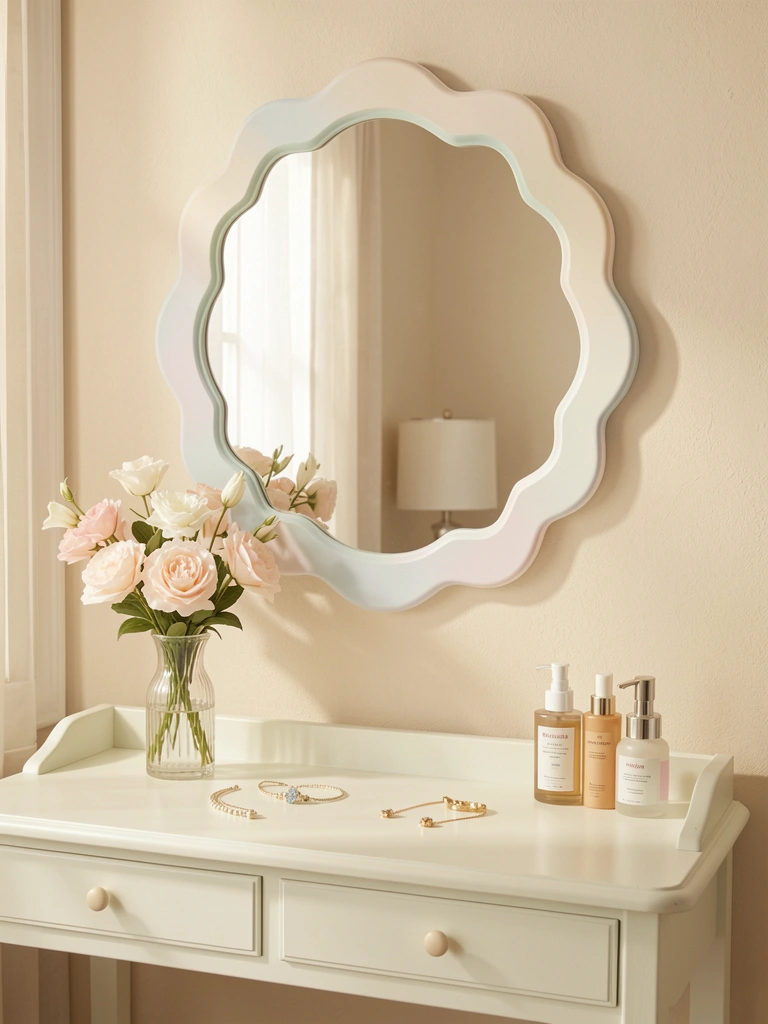
Scalloped mirrors balance elegance with playfulness—they’re sophisticated enough for adults but still feel fun and slightly whimsical. Perfect for bedrooms, bathrooms, and dressing areas.
Search for scalloped mirrors (20–32 inches, $80–$300) at Anthropologie ($150–$300), Urban Outfitters ($100–$200), Wayfair ($80–$250), or Amazon ($60–$180). White, cream, and soft pastels are trending, though brass and gold finishes add glam. Installation takes 20–30 minutes with standard wall anchors and a level. The curved edges catch and reflect light beautifully from different angles. Pro tip: Pair with a vintage vanity table or modern dresser depending on your overall style.
The undulating edge softens your space and adds personality. Instead of feeling like just a functional mirror, it becomes a decorative statement that makes your bedroom or bathroom feel more curated and intentional.
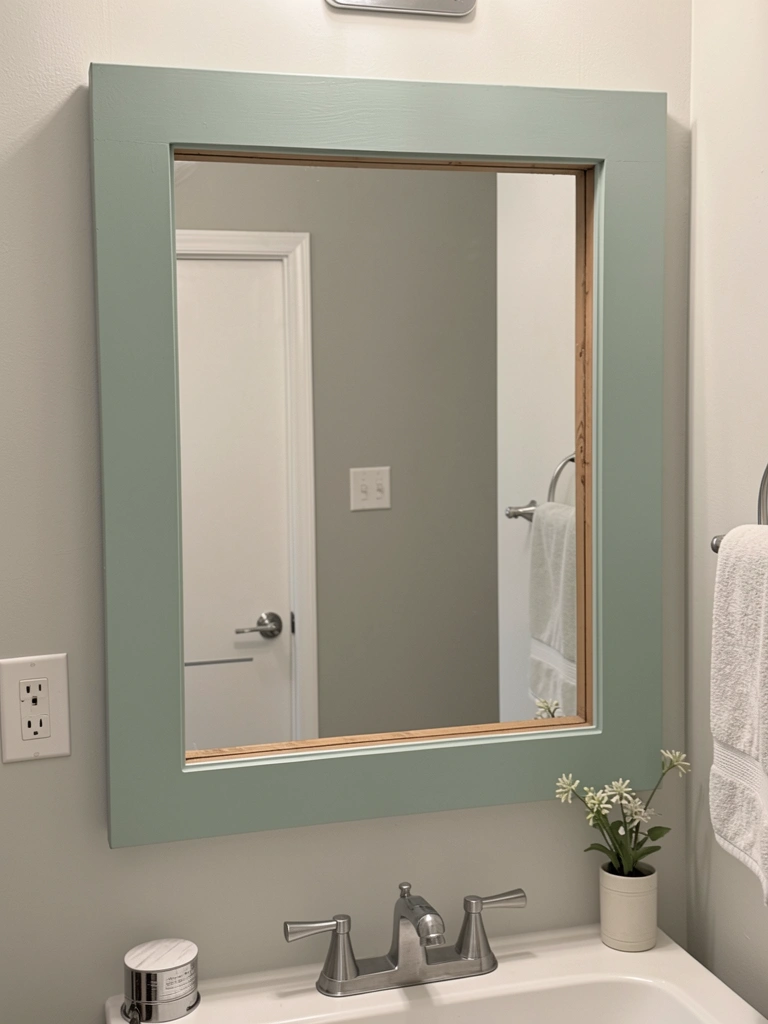
13. Install a Black-Framed Mirror for Modern Edge
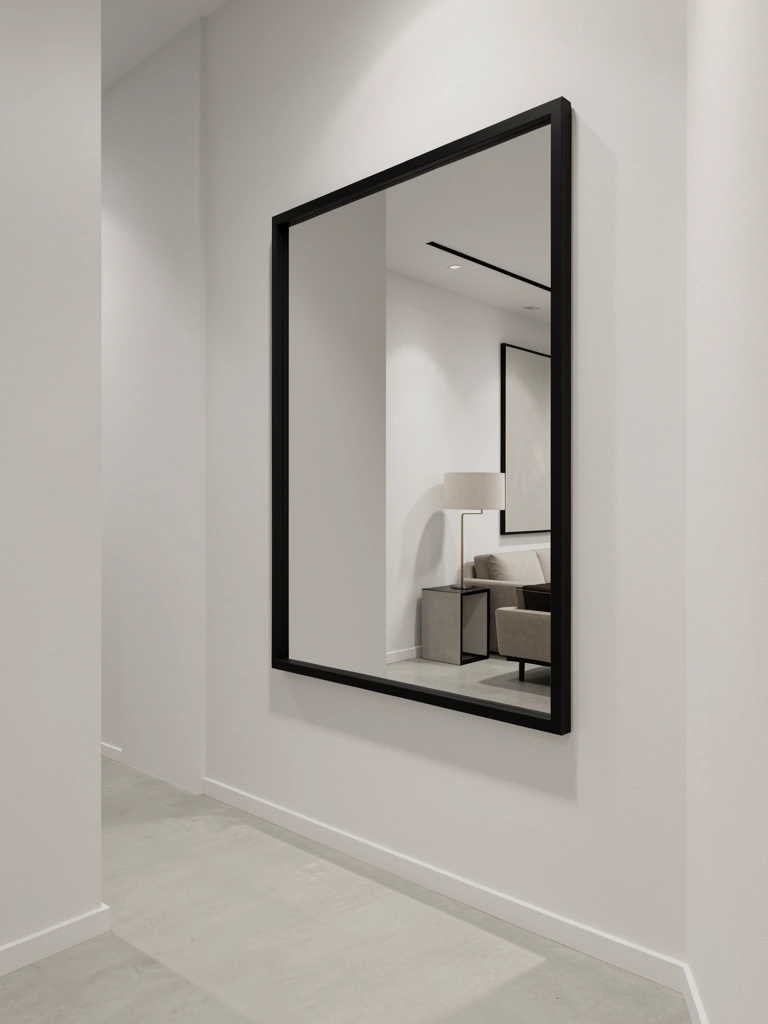
Black-framed mirrors add instant modernity and edge to any space without being trendy or temporary-feeling. They ground a room and work with nearly every style.
Look for black-framed mirrors (16–40 inches, $80–$400) at CB2 ($150–$300), IKEA ($40–$120), Target ($50–$150), West Elm ($120–$280), or Wayfair ($100–$350). Matte black resists fingerprints better than glossy finishes. Rectangular and square frames are most versatile. Installation takes 20–30 minutes with a level and stud-mounted hangers or heavy-duty anchors. Black frames work in minimalist, industrial, and even bohemian spaces—they’re quietly adaptable. Pro tip: Use multiple smaller black-framed mirrors in a grid for visual impact.
The black frame makes a statement without shouting. Your space instantly reads as more design-conscious and modern, and the high contrast helps the mirror become a focal point rather than blending into the wall.
14. Choose a Rattan-Framed Mirror for Coastal Calm

Rattan mirrors bring coastal, relaxed vibes without looking kitschy. The woven texture adds depth and visual interest while keeping spaces feeling airy and organic.
Find rattan-framed mirrors (18–36 inches, $60–$250) at Target ($50–$120), IKEA ($40–$100), West Elm ($100–$220), Wayfair ($70–$300), or Amazon ($50–$150). Natural woven finishes work best; stained or painted rattan often looks cheap. Pair with light, neutral backgrounds. Installation takes 15–20 minutes with standard hangers. Rattan is durable and lightweight, making it easy to hang even on less-than-perfect walls. Pro tip: For renters, lean a rattan mirror against a console table for a curated entryway look.
The organic texture makes your space feel warm and welcoming. Instead of a sterile glass-and-frame mirror, you get a piece that looks intentionally chosen and contributes to a calm, beach-house-inspired aesthetic.
15. Add a Gold or Brass Mirror for Instant Glam

Gold and brass mirrors add warmth and luxury without being overdone if chosen thoughtfully. They work as focal points in entryways, bathrooms, and bedrooms.
Search for gold/brass mirrors (20–36 inches, $100–$500+) at Anthropologie ($200–$450), West Elm ($150–$350), CB2 ($120–$400), Wayfair ($80–$400), or high-end retailers ($300–$1,000+). Look for warm brass or antique gold finishes rather than bright yellow gold, which can feel dated. Installation takes 20–30 minutes. Gold frames reflect warm light beautifully and work with both traditional and modern spaces. Pro tip: Choose matte or antiqued finishes over shiny brass—they age beautifully and hide fingerprints.
The warmth of the metal elevates your entire room. Where a simple mirror might disappear into the wall, a gold-framed mirror becomes a piece guests notice and admire—it signals thoughtful design choices.
16. Hang a Beveled-Edge Mirror for Seamless Minimalism

Beveled-edge mirrors create subtle prismatic reflections and look more refined than standard flat mirrors. They’re the choice for minimalist and modern spaces where you want sophistication without visible frames.
Look for beveled mirrors (16–40 inches, $100–$300) at IKEA ($60–$150), Home Depot ($80–$250), Wayfair ($100–$350), or custom glass suppliers ($150–$500). The beveled edge is subtle—about ¼ inch—so it catches light without being flashy. Installation takes 20–30 minutes with mirror hangers rated for glass weight. Beveled mirrors weigh slightly more than standard mirrors, so use appropriate hardware. Pro tip: This works beautifully in minimalist spaces but might feel too subtle in eclectic rooms where you want personality.
Your mirror looks intentionally chosen and architectural. The subtle beveled reflections add refinement and depth, making your space read as well-designed rather than simply decorated.
17. Create a Focal Point Wall With an Oversized Sunburst Mirror
If you want your mirror to be the conversation piece in your home, go oversized sunburst. This is an investment, but it completely redefines the room.
Sunburst mirrors in this size range cost $300–$800+ depending on materials and finish. Check West Elm ($400–$600), Anthropologie ($350–$550), CB2 ($300–$500), Etsy ($250–$1,000 for artisan pieces), or custom metal workers ($500–$1,500). Brass and gold finishes are most popular, though black offers modern edge. Professional installation recommended ($150–$300) due to weight; DIY takes 45–60 minutes with two people. Position where it catches natural light for shadow play. Pro tip: Hang it alone on a focal wall—competing decor diminishes its impact.
This mirror becomes art. It’s the first thing people notice when they enter your home, and it creates a sophisticated, intentional aesthetic that feels expensive and collected.
18. Use a Mirror With Built-In Shelving for Functional Style
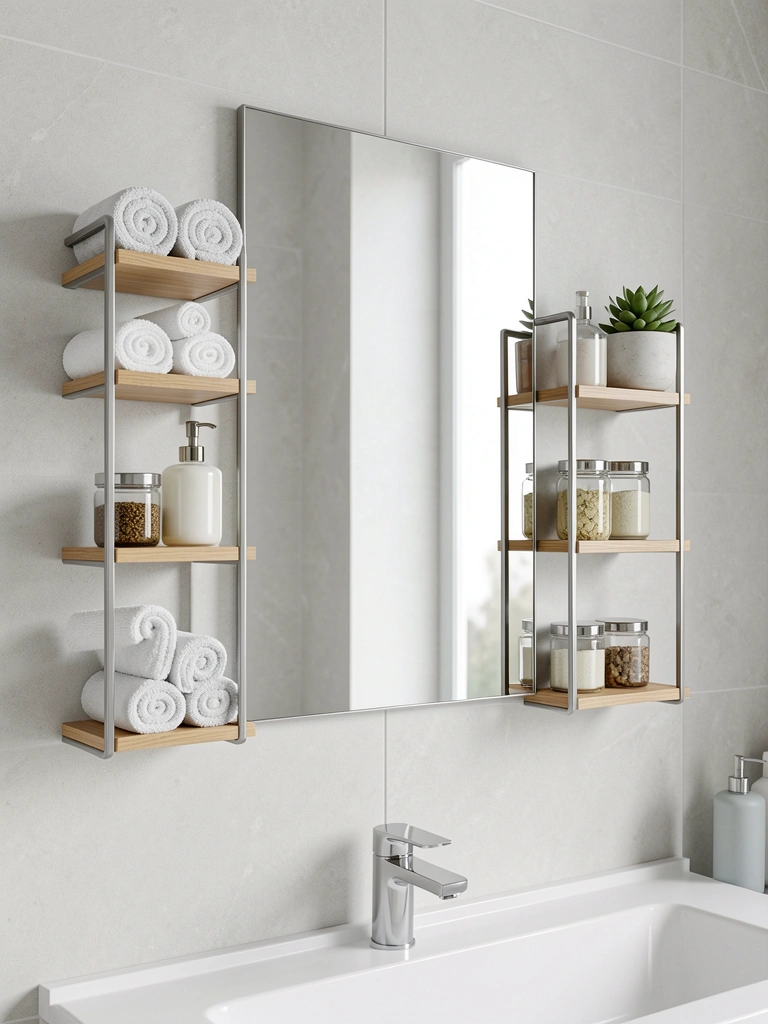
Mirrors with integrated shelving solve the storage problem while keeping your space visually calm. Perfect for small bathrooms and bedrooms with limited wall space.
Find mirror with shelving ($150–$400) at West Elm ($200–$350), CB2 ($180–$300), Wayfair ($100–$350), IKEA ($80–$200), or Amazon ($120–$250). Materials range from wood to metal to floating glass shelves. Installation takes 45 minutes to 1.5 hours and requires stud mounting for stability (don’t use anchors for weight-bearing shelves). This multitasking piece replaces both a mirror and floating shelves, saving money and wall space. Pro tip: Keep shelves organized with matching containers and minimal decor for a clean, intentional look.
You get mirroring, reflection, light-bouncing, and functional storage in one piece. Your bathroom or bedroom stays organized without cramped countertops, and the integrated design looks intentional and designed rather than like you’re just storing things on a shelf.
19. Mount a Mirror Across From a Light Source to Double Brightness
Strategic mirror placement is free and multiplies the effectiveness of your existing light. Mounting a mirror opposite a window or light fixture is the smartest design move you can make in a dark room.
No product needed—just intelligent placement. Measure and mark where direct light hits your window or lamp. Mount a mirror directly opposite (any size, $40–$300+) to catch and reflect that light throughout the room. Use a level and stud finder for secure installation. Takes 20–30 minutes. This works for both natural and artificial light. In dim north-facing bedrooms or dark hallways, this change is transformative. Pro tip: Use a large mirror for maximum light reflection; even a small 18-inch mirror makes a difference.
The room immediately becomes noticeably brighter without installing new light fixtures or increasing your electric bill. Morning light bounces around twice as effectively, and dark corners suddenly feel approachable and warm.
20. Choose a Geometric Petal Mirror for 3D Visual Interest

Geometric petal mirrors (think mandala patterns or layered designs) add artistic depth without being maximalist. They read as sophisticated modern art rather than just a functional mirror.
Hunt for geometric petal mirrors (24–36 inches, $100–$400) at Wayfair ($120–$350), Etsy ($100–$500 for artisan pieces), Amazon ($80–$300), or specialty home decor shops ($150–$600). These often have a slight 3D element, so they’re not flat like standard mirrors. Installation takes 20–30 minutes. Position as a solo focal point to let the pattern shine. The petal design works with both modern and eclectic spaces. Pro tip: These are investment pieces—choose one you’ll love long-term since they’re less trendy than sunbursts.
Your mirror becomes art. The dimensional petal pattern adds sophistication and visual interest, making your space feel curated and intentional rather than just decorated.
21. Install a Corner Mirror to Open Up Tight Spaces
Corner mirrors are a secret weapon for tight spaces. Positioned at an angle in a corner, they reflect the room back on itself, creating the illusion of openness where claustrophobia exists.
Look for tall rectangular mirrors (28–40 inches tall, $80–$250) to position at a 45-degree angle in corners. IKEA, Target, Wayfair, and Amazon all have affordable options ($50–$150). Installation is 25–35 minutes with a level—you’re essentially hanging a mirror at an angle using standard hardware. This works in bedrooms, home offices, entryways, and small bathrooms. Pro tip: Use furniture sliders or felt pads underneath if you’re leaning it rather than hanging it, to keep it stable and protected.
A cramped corner suddenly feels open. The angled mirror multiplies your perceived space and makes tight rooms feel genuinely larger without any renovation needed.
22. Add a Decorative Mirror to Your Entryway Console

Pairing a mirror with an entryway console creates a complete, intentional-looking vignette that says “I have my life together.” It’s styling, not just decoration.
Choose a mirror that echoes your console style (18–28 inches, $60–$200) from retailers matching your aesthetic. Target ($40–$100), IKEA ($30–$80), West Elm ($100–$250), or thrift stores ($10–$50) all have options. The mirror should complement (not match) your console in materials and finish. Lean it casually against the wall rather than hanging for flexibility. Arrange the console with a tray, bowl, decorative object, and mirror cleaning cloth. Pro tip: Keep it minimal—three to four items max—so it looks intentional, not cluttered.
Your entryway transforms into a magazine-worthy vignette. You’ve created a purposeful first impression that makes guests think you’re more organized and design-minded than you might actually be.
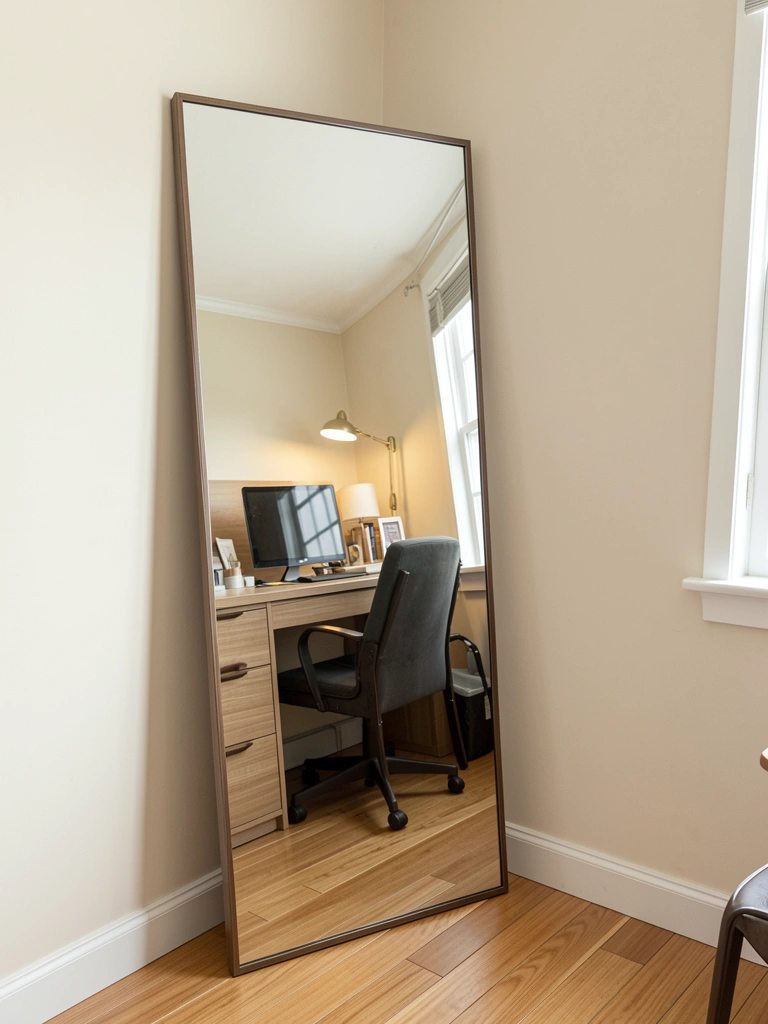
23. Use a Tall Leaning Mirror to Fill Empty Wall Space
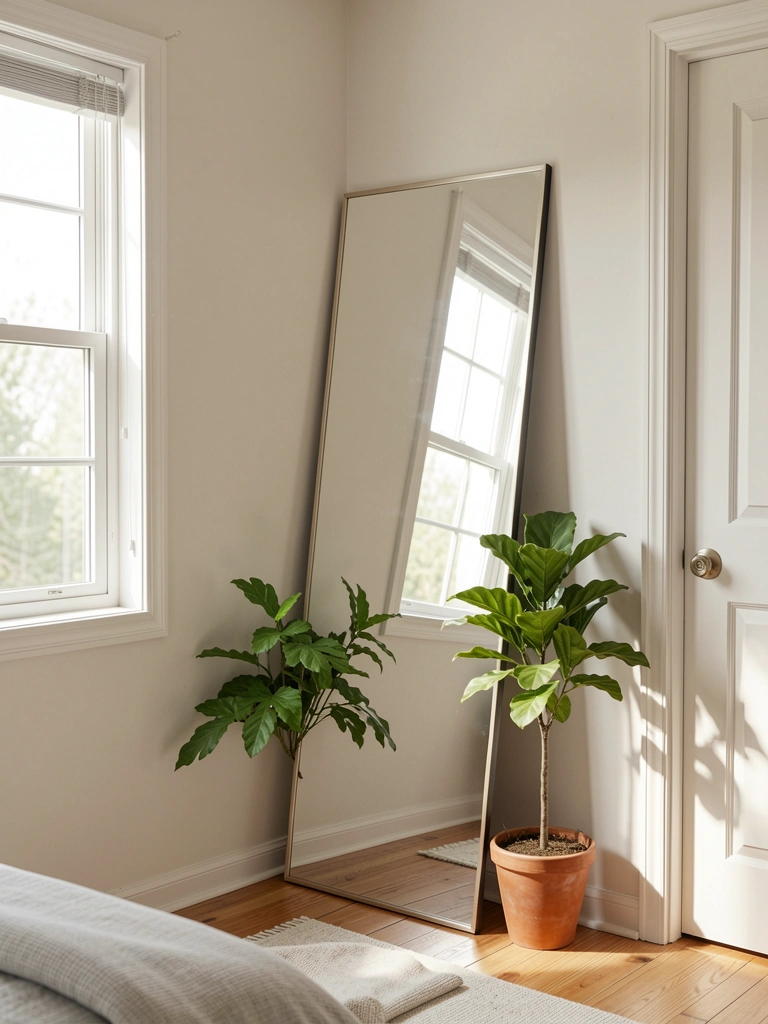
Tall leaning mirrors fill awkward empty wall spaces (corners, between furniture, beside doors) while maintaining a casual, renter-friendly aesthetic. No holes, no damage, completely flexible.
Find tall standing mirrors (48–72 inches, $100–$300) at IKEA ($80–$200), Target ($100–$180), Wayfair ($120–$350), West Elm ($200–$400), or Amazon ($80–$250). Modern, mid-century, or minimal frames all work. Installation: literally 3 minutes—just lean it against the wall on a felt pad for stability and floor protection. The weight keeps it secure (no tipping hazard if positioned against a wall). This is perfect for renters since there’s zero commitment. Pro tip: Use a furniture pad underneath to protect both the mirror and your flooring.
You’ve filled dead wall space with style and function. The leaning mirror looks intentional, bounces light around the room, and works beautifully whether your space is minimal or eclectic.
24. Paint a Wooden Frame for a Custom, Budget-Friendly Look
Painting an existing mirror frame is the cheapest way to customize a mirror to your space. Buy any basic frame and paint it to match your aesthetic.
Start with a basic framed mirror ($30–$80) from IKEA, Target, or Wayfair. Choose high-quality paint ($15–$25) in your desired color—try Benjamin Moore, Sherwin-Williams, or Behr. Lightly sand the frame first, apply 2–3 coats of paint (30 minutes wait time between coats), then seal with matte or satin polyurethane ($10–$15). Total project time: 2–3 hours, mostly drying time. This works beautifully with wood frames; metal frames need primer. Pro tip: This is perfect for renters—you’re customizing an affordable piece rather than buying something expensive.
For under $80, you’ve got a custom mirror that looks like you invested in something designer. The painted frame coordinates perfectly with your room, and you’ll feel proud knowing you made it happen.
25. Layer Mirrors of Different Sizes for Curated Depth
Layering mirrors of different sizes and finishes creates visual interest and depth. This approach looks more collected and curated than matching sets.
Gather 3–5 mirrors in various sizes ($50–$200 total depending on quality) from thrift stores, IKEA, Target, Wayfair, and vintage shops. Mix shapes and frames (don’t overthink matching). Plan your layout with painter’s tape before hanging. Installation takes 1–2 hours. Hang at slightly different heights with 6–8 inches of space between pieces. This forgiving approach allows for “mistakes”—asymmetry is actually the point. Pro tip: Include one larger anchor mirror to ground the arrangement.
Instead of one boring mirror, you’ve created an artistic installation that looks collected over time. The varied reflections add dimension and visual complexity—your space reads as curated and design-forward.
26. Mount a Mirror on Your Bedroom Closet Door for Space Maximization
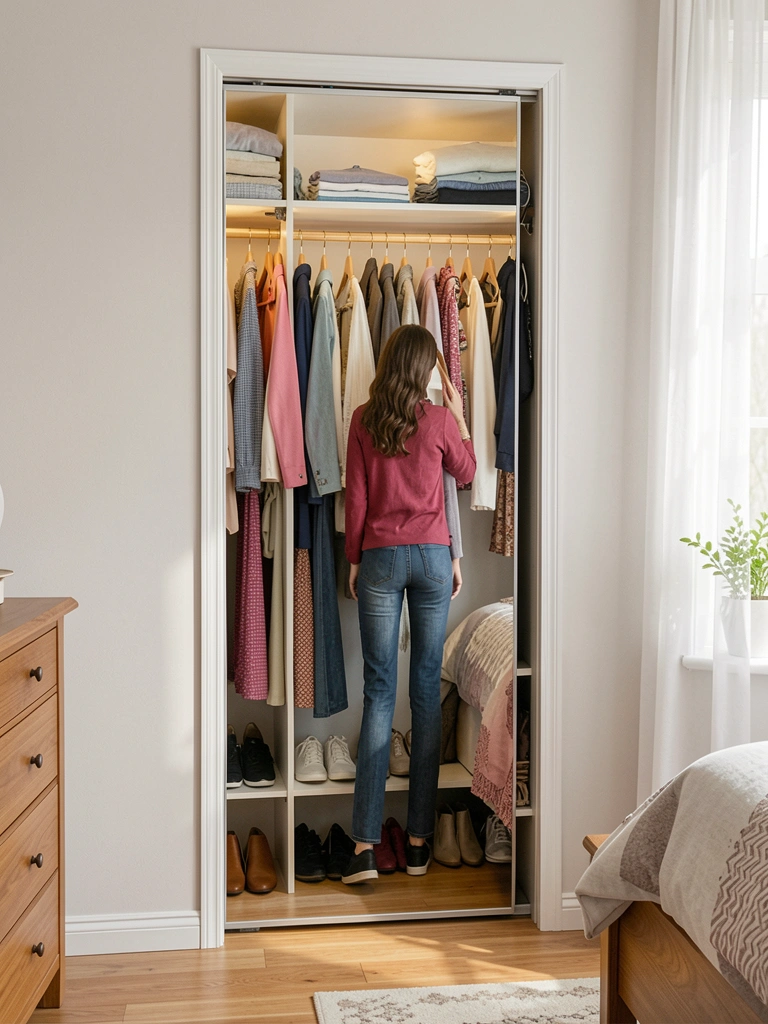
Mounting a mirror on your closet door serves double duty: you get a full-length view for outfit checking, and it reflects light into the closet while opening up your bedroom visually.
Install a full-length mirror (24–30 inches wide, 60–72 inches tall, $60–$200) using adhesive-backed mirror strips or heavy-duty double-sided tape ($15–$30) for damage-free hanging on closet doors, or standard hangers if you own. Installation takes 15–20 minutes. Measure your closet door first to ensure the mirror fits. For apartments, damage-free tape works beautifully; homeowners can use permanent mounting. The reflected light makes your bedroom feel significantly larger. Pro tip: A full-length mirror maximizes outfit visibility without taking up floor space like a leaning mirror would.
Getting dressed becomes easier—you see your entire outfit at once. Bonus: your bedroom feels airier and brighter because the mirror reflects window light and room illumination, essentially expanding your visual square footage for free.
27. Install Mirrors in a Powder Room for Maximum Impact
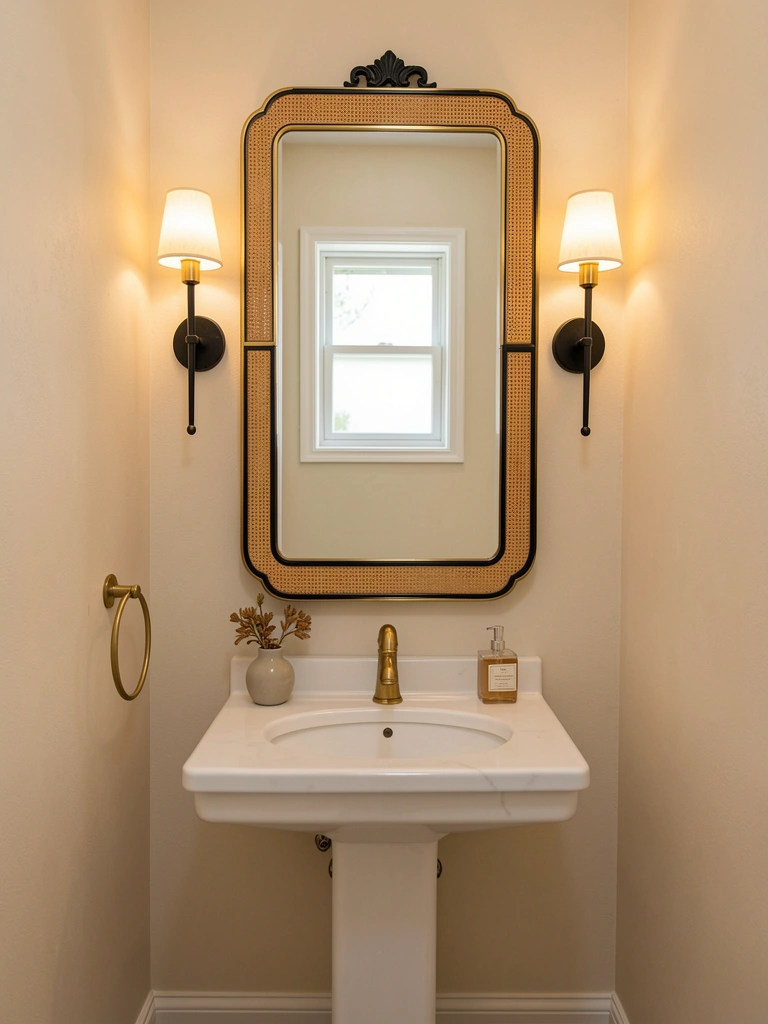
Powder rooms are where you can go bold with mirrors. A single statement mirror in a small, guest-facing space makes an outsized impact and signals thoughtful design.
Choose a statement mirror (24–32 inches, $100–$300) that reflects your personal style—brass, black, rattan, or scalloped edges all work beautifully in powder rooms. Anthropologie ($150–$300), CB2 ($100–$250), West Elm ($120–$280), Wayfair ($80–$300) all have elevated options. Installation takes 20–30 minutes. Position it above your sink or vanity as the focal point. In such a small space, one elevated piece is better than multiple mirrors. Pair with a sconce on either side (optional but powerful). Pro tip: Add fresh flowers or a single decorative object to complete the refined vignette.
Your tiny powder room becomes the most sophisticated room in your home. Guests notice the thoughtfulness and intentionality—it’s the perfect place to make a bold design statement without the commitment of larger rooms.
Save this post for your next room refresh and try at least one idea this weekend. Whether it’s moving a mirror to catch better light or leaning an oversized statement piece in an empty corner, even one small change shifts how your entire space feels. Pick the idea that speaks to you and go from there.
Leave a Reply