Your TV is probably the biggest focal point in your living room—so why not make it look intentional? A thoughtfully designed TV wall does more than hide cables and clutter. It sets the mood for your entire space, makes your room feel pulled-together, and honestly? It’s way easier than you think.
Whether you’re renting, own your home, have a tiny apartment, or an open-plan living space, there’s a TV wall idea here that’ll work for your budget and style. You’ll find quick fixes that cost nothing, weekend projects under $100, and investment pieces that’ll make you feel like you hired a designer. Some ideas work with paint alone. Others need a few materials from Home Depot. Most don’t require any special skills.
Let’s walk through 25 concrete ways to create a TV wall that actually looks good—and makes you want to spend time in your living room.
1. Paint an Accent Wall Behind Your TV in Warm Neutrals
An accent wall is the cheapest way to frame your TV and give your room instant polish. Skip the basic white—warm neutrals like soft taupe, sage, warm gray, or creamy beige make the space feel curated without overwhelming it.
Pick a paint color from Sherwin-Williams (like “Accessible Beige” or “Urbane Bronze”) or Benjamin Moore (“Chelsea Gray” or “HC-172 Healing Aloe”). One gallon usually covers a TV wall, costing $30–$50. Grab a brush, tape off edges, and you’re done in 2–3 hours. The wall draws your eye naturally to the TV while keeping the room balanced. Pair it with simple floating shelving, and suddenly your living room feels intentional.
Pro tip: Use painter’s tape on ceiling and floor edges to avoid mistakes. If you rent, confirm with your landlord first—this is one of the easiest changes to reverse.
Your TV now has a purposeful backdrop instead of looking like an afterthought mounted on drywall.
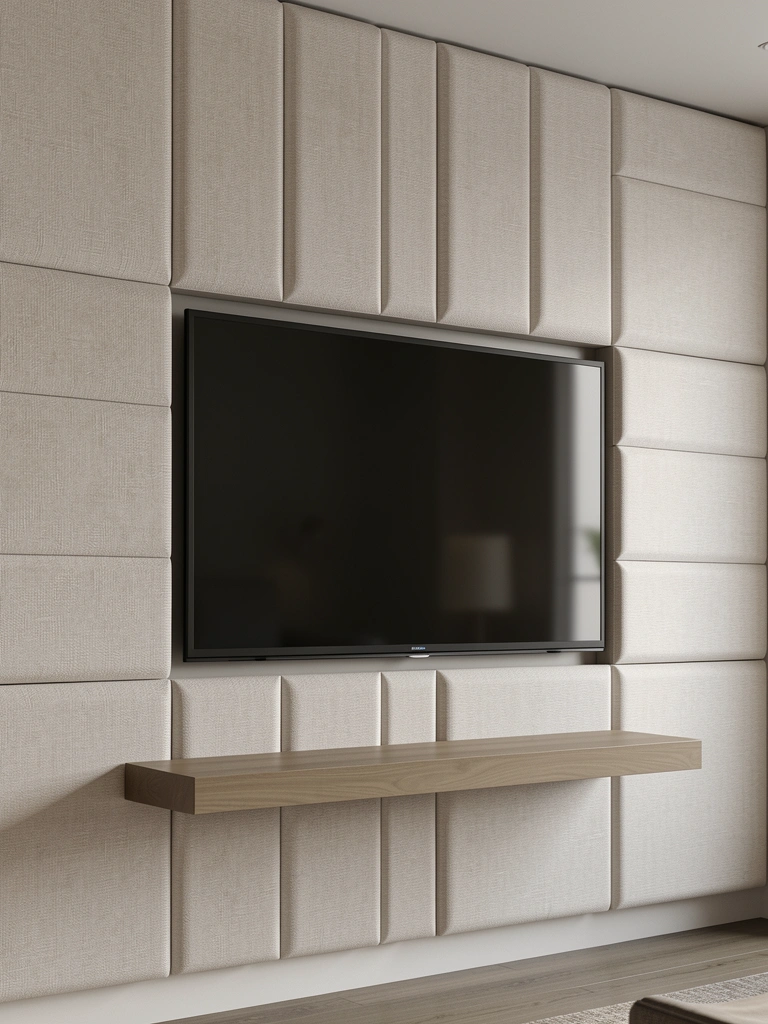
2. Layer Fluted Wood Panels for Texture and Visual Interest
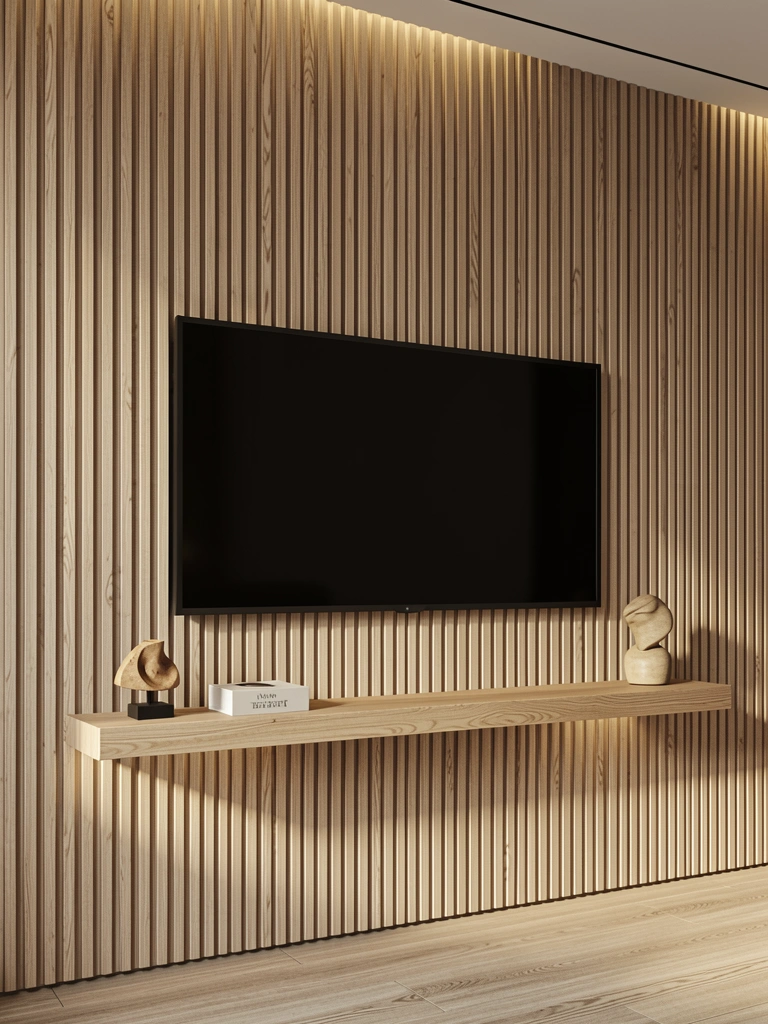
Fluted panels are everywhere in 2025, and for good reason—they add dimension without clutter. These are grooved wooden panels that catch light differently depending on the angle, making your wall feel dynamic.
You can buy pre-made fluted panels from Home Depot or Wayfair ($40–$80 per panel) and install them with adhesive or simple nail work. Measure your TV wall width, calculate how many panels you need, and install over one weekend. If DIY doesn’t appeal, hire a handyman for installation ($100–$300 labor). The result? Your wall becomes a texture showcase that photographs beautifully and doesn’t rely on color or bold patterns to impress.
Alternative: Try slatted panels (thinner, lighter) if your wall is small or you want a more minimalist feel.
The subtle grooves catch light throughout the day, so your wall literally looks different at different times—adding visual interest without busyness.
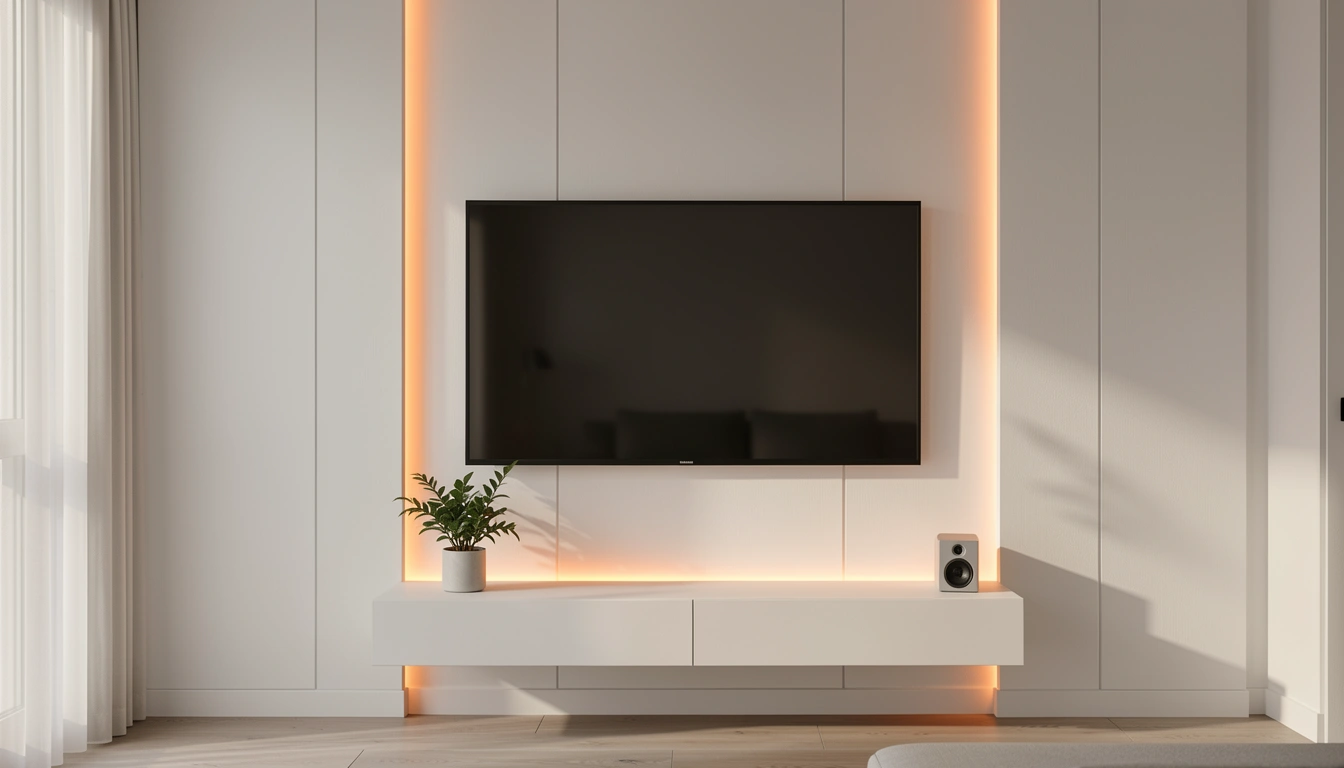
3. Install LED Backlighting Behind the TV
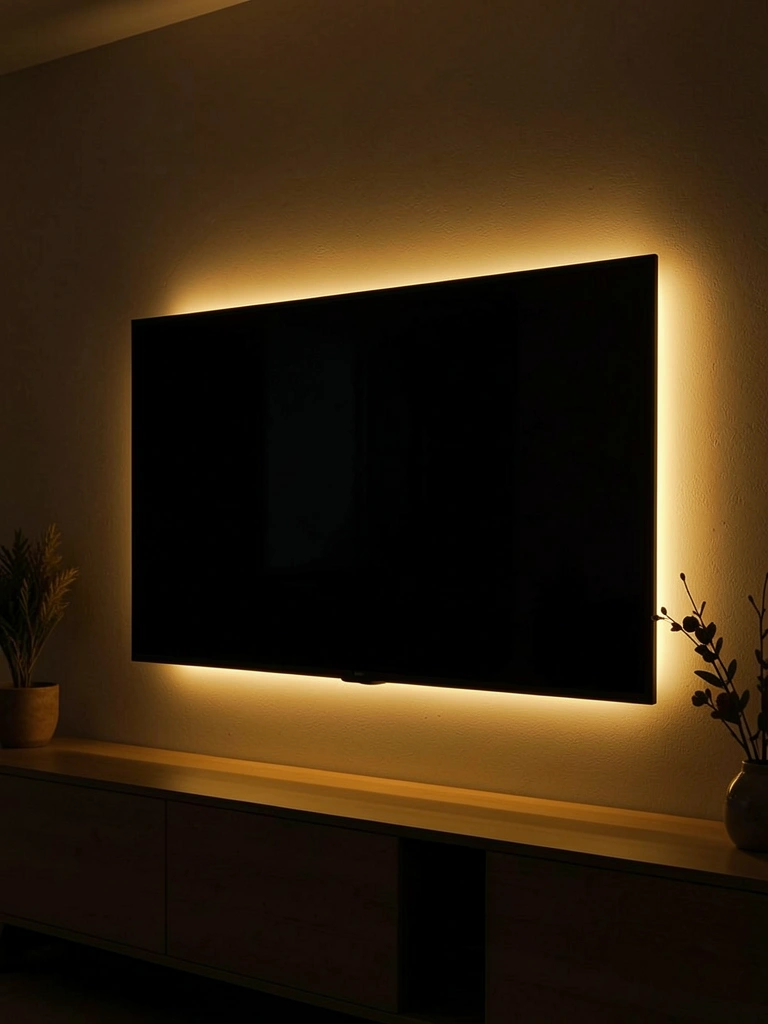
LED backlighting isn’t just pretty—it reduces eye strain and makes watching TV feel like a theater experience. The soft glow behind or around your screen makes the space feel upscale and intentional.
Grab an LED strip kit from Amazon or Best Buy ($25–$60 for smart-compatible options). Mount the strips directly on the wall behind the TV using the included adhesive. Install in 15 minutes. Choose warm white (2700K) for cozy vibes or cool white (4000K) for a modern edge. Many kits let you adjust brightness via remote or phone, so you control the ambiance.
Pro tip: Measure twice before sticking. Test the placement with masking tape first.
The soft glow makes your entire room feel more sophisticated and creates a subtle frame around your screen that draws the eye naturally.
4. Mount Your TV on a Recessed Media Niche

A recessed niche makes your TV feel like it’s part of the wall, not sitting on top of it. This is the “disappearing TV” effect that’s huge right now—it looks custom and high-end, even if you DIY it.
If you’re building or renovating, frame out a recessed box (work with a contractor or handy friend, $200–$500 labor). If you’re renting or don’t want to modify walls, use a temporary frame-style niche made from wood trim ($50–$100 materials, 3–4 hours to build). Inside, add dark wallpaper or textured panels to make the screen visually recede. Mount your TV flush inside, and suddenly it doesn’t dominate the room.
Alternative: If permanent installation isn’t possible, simply paint a large rectangle around your TV in dark paint to create a visual recess effect.
The niche grounds your TV and makes it feel intentional rather than like a screen stuck to the wall.
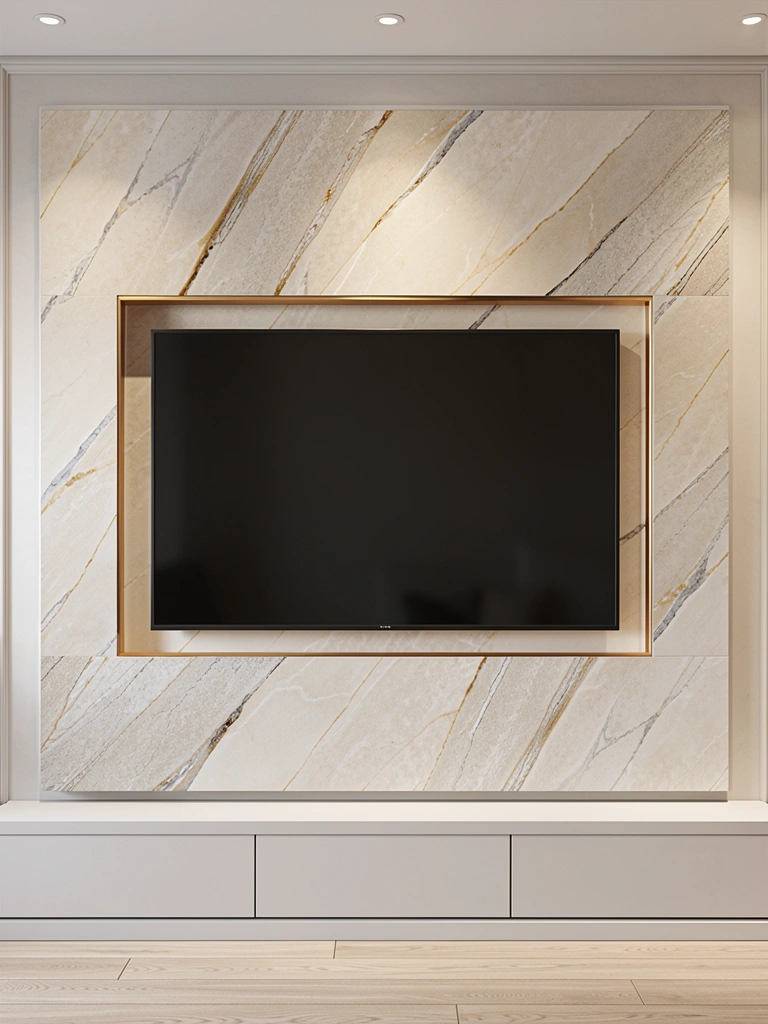
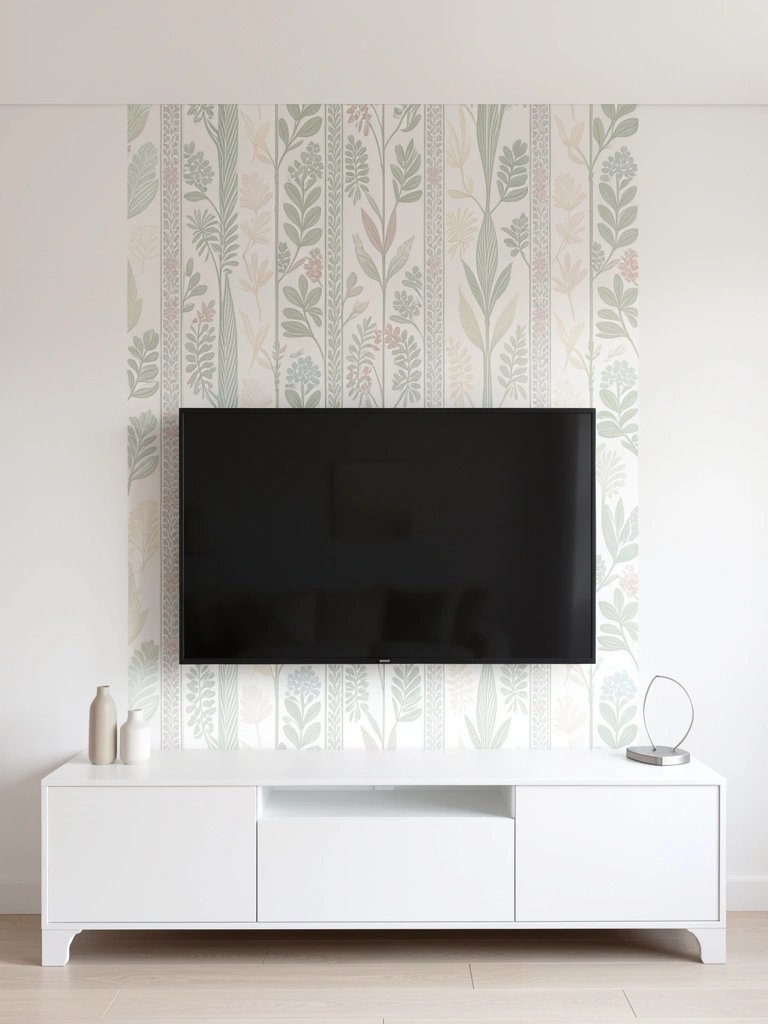
5. Use Dark Textured Wallpaper to Frame the TV
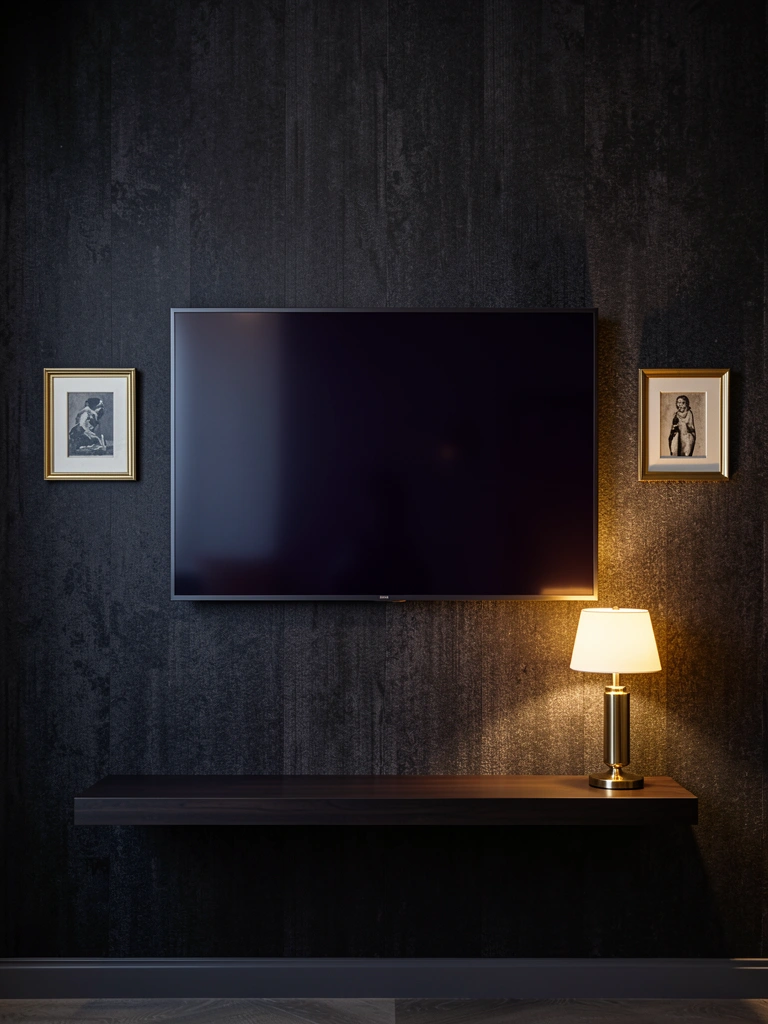
Dark wallpaper—especially textured or patterned—frames your TV beautifully without making the room feel cramped. Charcoal, deep navy, or warm graphite all work wonderfully.
Apply wallpaper to just the wall section behind your TV ($15–$40 per roll). Measure your wall width and height, grab 2–3 rolls (most measure 27″ wide), and either DIY with a wallpaper kit ($20, about 4 hours of work) or hire someone ($200–$400 labor). If you rent, use peel-and-stick wallpaper ($25–$60 per roll, completely removable). The dark backdrop makes your TV visually pop while adding sophistication and creating a focal point that feels intentional.
Pro tip: Textured wallpaper hides imperfect walls better than smooth patterns.
The dark frame makes your TV feel like art rather than just a screen, and the contrast adds depth to your living room.
6. Build or Buy a Modular Media Wall System
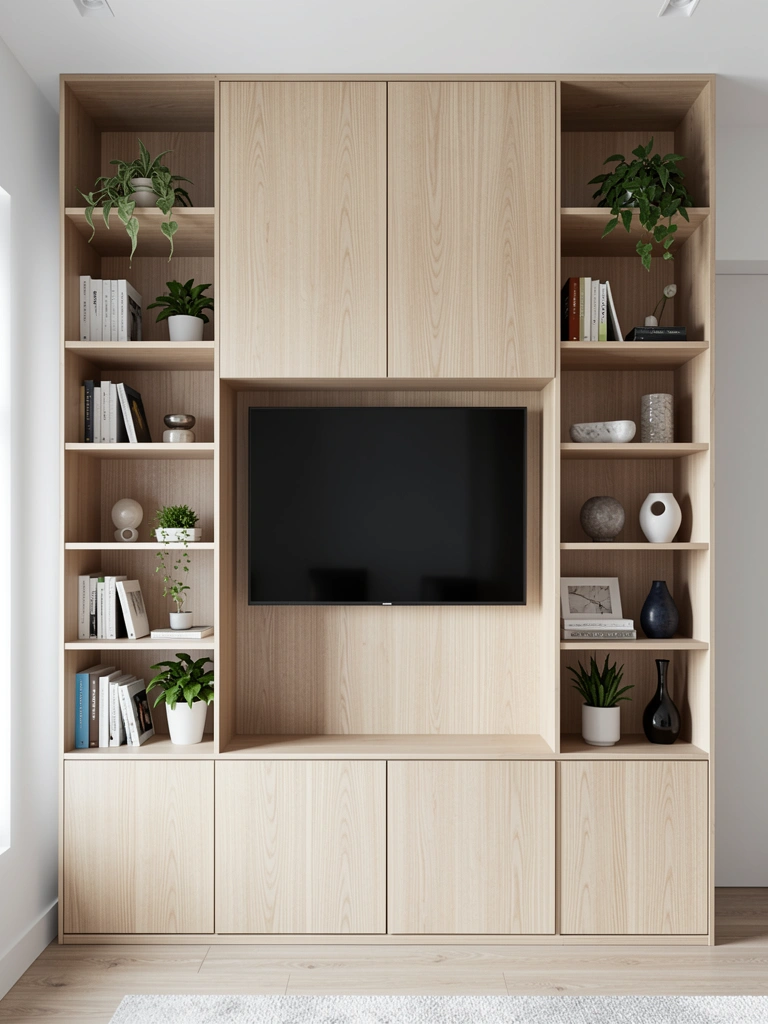
Modular systems solve the “what do I do with the rest of the wall” question. These stackable units give you TV space, storage, display, and organization all in one.
Browse IKEA’s Besta system ($200–$600 for a full setup), Wayfair’s modular options, or invest in a custom system from a local maker ($1,000–$3,000+). Most modular systems arrive flat-packed and install over one weekend with basic tools. The genius? You can reconfigure them if you move or your needs change. Stack shelves, add closed cabinets, mix heights—totally flexible.
Budget option: Use floating shelves and a TV mount to DIY a modular look for $100–$300.
You get storage, display space, and a designed TV wall all at once—no cables visible, everything organized.
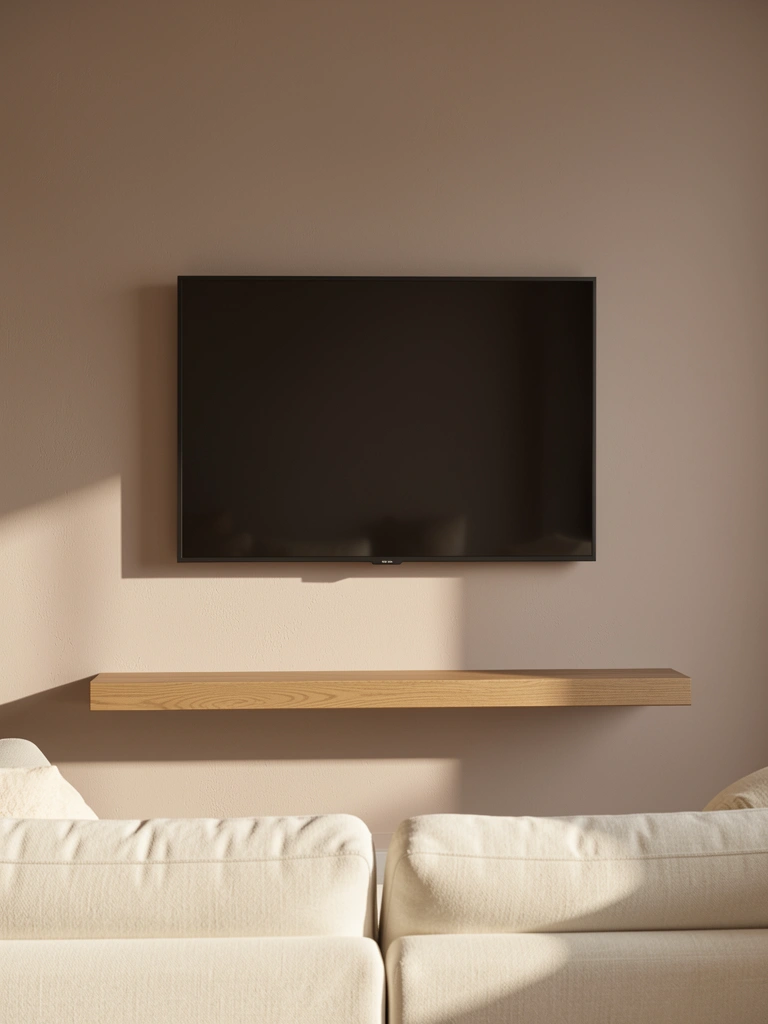
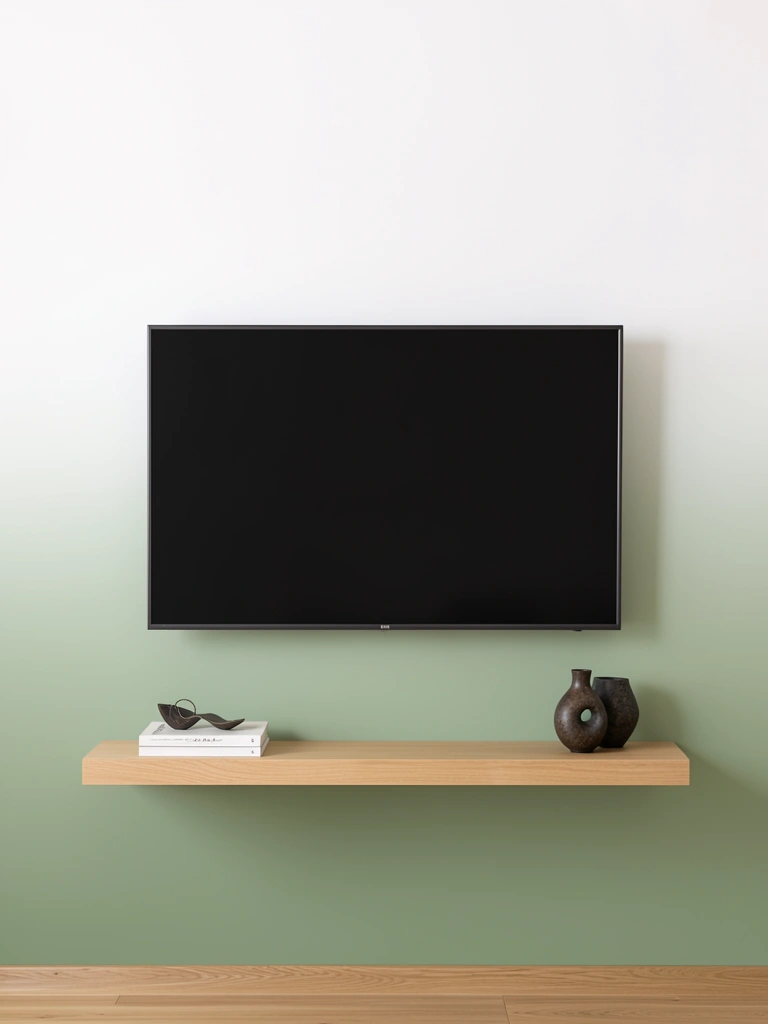
7. Add a Floating Console Shelf Below Your TV

A floating console is the simplest way to hide components and add functional style. This works whether you’re renting (with adhesive mounts) or own (with brackets).
Grab a floating shelf from IKEA ($20–$50), Wayfair ($30–$150), or build one with pipe and wood ($40–$80 materials). Install with heavy-duty brackets that can handle your cable box, speaker, or gaming console. Installation takes 30 minutes. Use this shelf to hide components behind the console—thread cables through pre-drilled holes or use cable management trays underneath. Keep the top display minimal: maybe a plant, speaker, and one candle.
Renter hack: Use adhesive-mount floating shelves that leave no holes when removed.
You’ve got cable management sorted, components hidden, and a clean display surface—no clutter creeping toward your screen.
8. Paint Walls Soft White and Let Your TV Be the Star
Sometimes the simplest approach is best. Clean white walls let your TV, artwork, and accessories shine without competing for attention. This works especially well in small spaces where you want maximum lightness.
Paint your wall in a true white like Sherwin-Williams “Pure White” or Benjamin Moore “Simply White” ($30–$50 per gallon, 2–3 hours painting time). Pair with minimal styling: maybe two framed prints, a small plant, and a floating shelf. Your TV becomes the focal point naturally, and the rest of the wall feels intentional because of what’s not there. Bonus: white walls make rooms feel bigger and brighter.
Pro tip: Use a satin or semi-gloss finish if possible—it’s easier to clean and catches light beautifully.
The simplicity makes your space feel premium and uncluttered, and your TV gets to be the showpiece it deserves to be.
9. Combine Your TV Wall With an Electric Fireplace
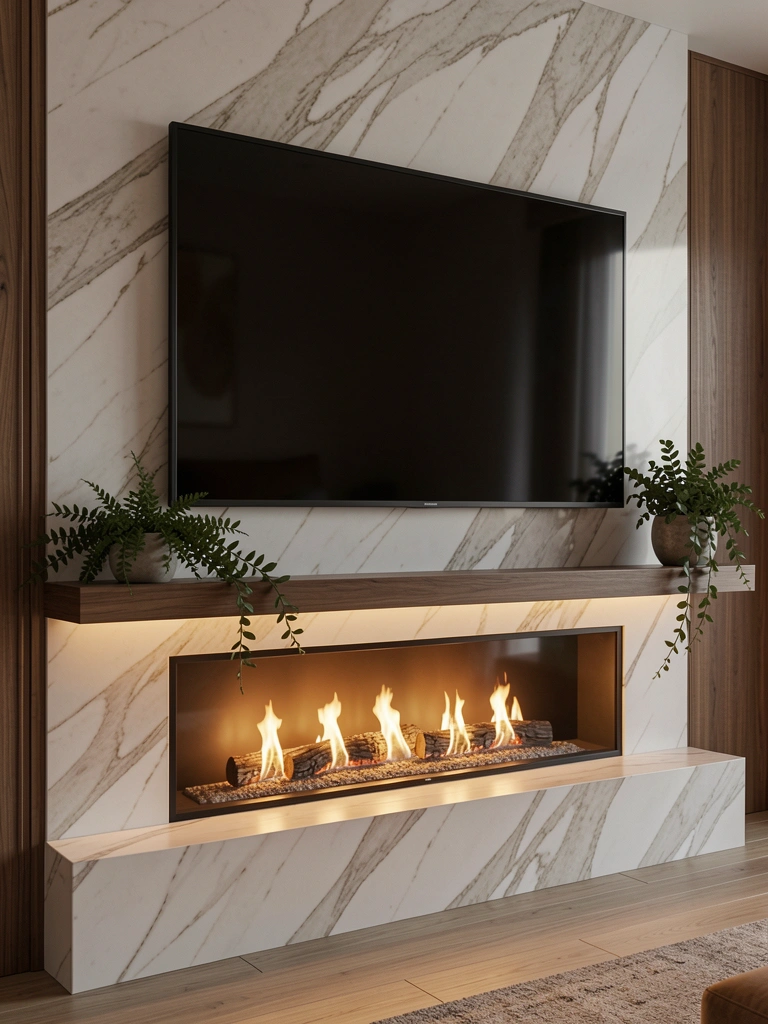
An electric fireplace beneath your TV creates warmth, ambiance, and a natural focal point. It’s not just functional—it makes your TV wall feel like a designed feature rather than random tech.
Install an electric fireplace insert into a recessed space or flush mount one to your wall ($200–$800 for quality units from Wayfair, Best Buy, or Amazon). Keep your TV mounted 3–4 feet above for comfortable viewing. The fireplace adds instant coziness and works year-round. Many are voice-activated and dimmable, so you control heat and flame independently.
Safety note: Follow manufacturer guidelines for clearance above the fireplace. Don’t mount TV too low or heat can damage it.
You’ve created a focal point that actually serves multiple purposes—it’s cozy, warm, and makes your TV wall feel like a design centerpiece.
10. Install Acoustic Panels That Look Like Design
Acoustic panels solve the “my room sounds like a cave” problem while looking intentional if you choose wisely. Skip the foam gym-style look and go for fabric-wrapped or designer panels.
Brands like GIK Acoustics ($80–$150 per panel) or Amazon’s budget options ($20–$40 per panel) come in linen, canvas, or wool finishes that complement any decor. Arrange them in a grid or asymmetrical pattern on either side of your TV. Install with adhesive or hooks in 30 minutes. They absorb sound reflections, reduce echo, and look like you planned them as part of your design (not as an acoustic afterthought).
Alternative: Fabric-wrapped DIY panels cost $15–$30 each to make and work just as well.
Your room sounds clearer and more comfortable for watching, and the panels look like intentional design elements—not sound-absorbing afterthoughts.
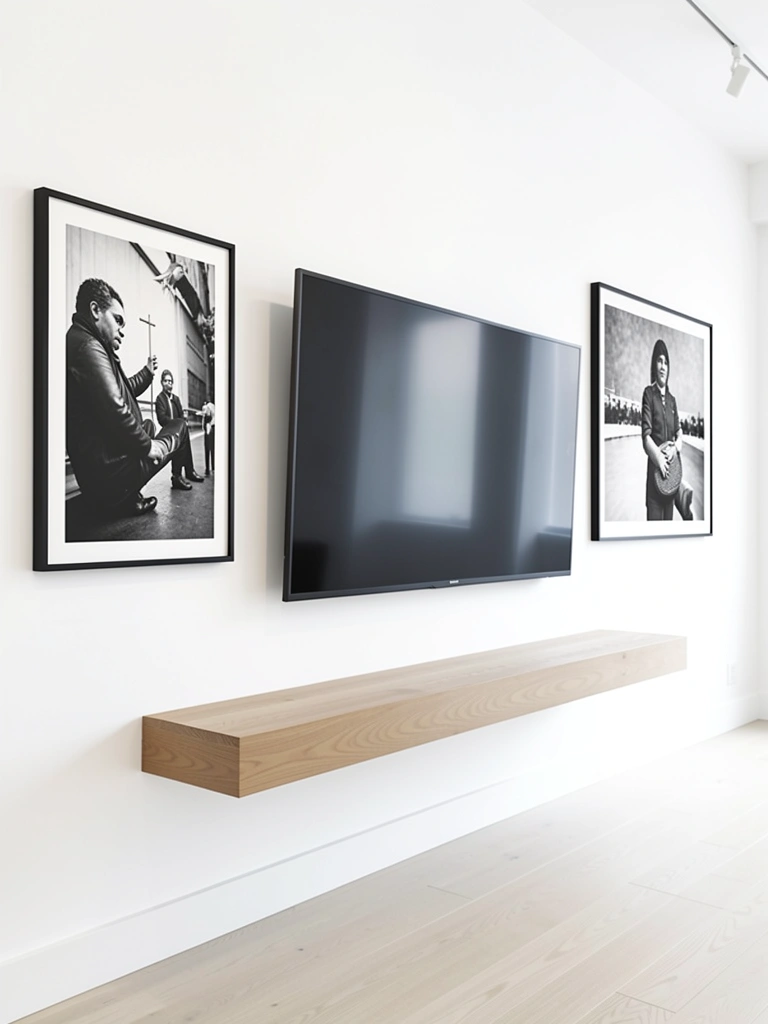
11. Layer Art Around Your TV in a Gallery Wall
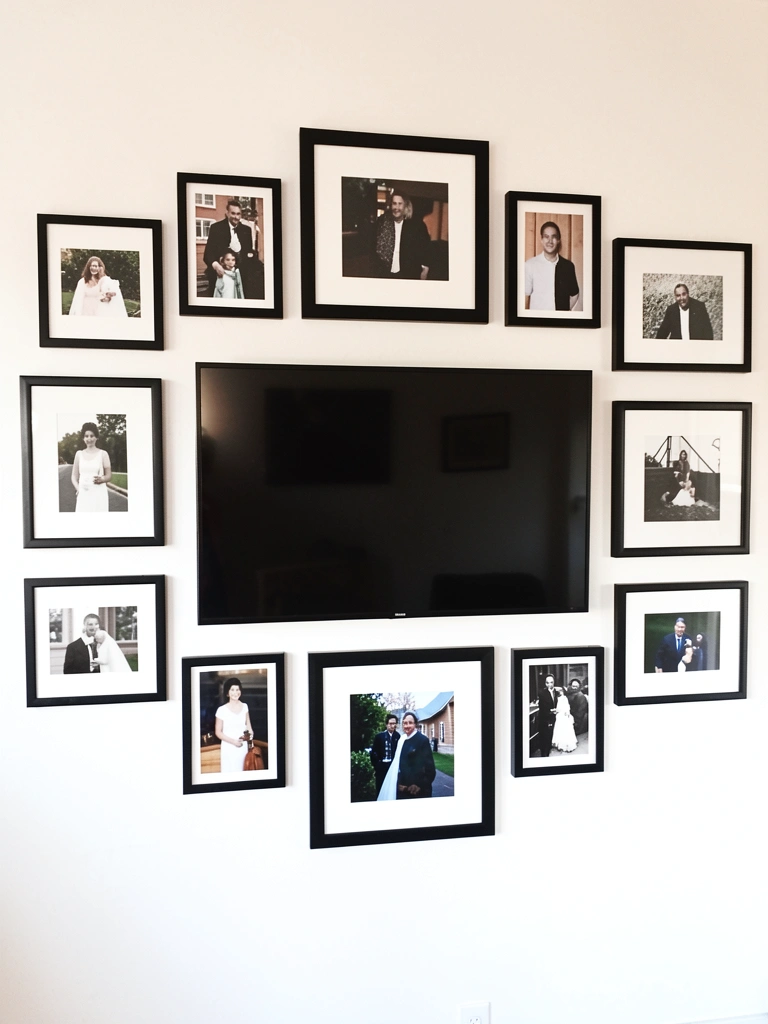
A gallery wall makes your TV feel like part of an art collection rather than just a random screen. This works beautifully with minimalist TV walls or textured backdrops.
Gather frames you already own or buy affordable frames from IKEA or Target ($5–$15 each). Mix frame sizes and orientations around your TV—vary between portrait and landscape layouts. Arrange on the floor first to plan spacing, then install using a level and painter’s tape to mark positions. The arrangement should feel balanced but not perfectly symmetrical. Leave 4–6 inches between frames for breathing room.
Pro tip: Limit your color palette to 2–3 frame colors max so it reads as intentional, not cluttered.
Your TV becomes part of a larger visual story, and the wall feels collected and thoughtful rather than tech-focused.
12. Use Micro Cement for a Luxury Textured Finish

Micro cement is a trendy, durable finish that looks high-end and photographs beautifully. It’s smoother than concrete but with subtle texture and depth.
Hire a professional to apply micro cement ($400–$1,000 depending on wall size). The application takes 2–3 days including drying time. Alternatively, DIY kits exist but are tricky—if you’re new to home projects, hiring makes sense here. The finish comes in various colors (dove gray, warm terracotta, soft white) and creates a gallery-like backdrop. Micro cement is durable, easy to clean, and won’t fade or show dust the way textured paint can.
Budget alternative: Try limewash ($100–$300 professional, similar aesthetic).
Your wall becomes a design statement—the kind of finish people notice and comment on—and it’s genuinely easy to maintain.
13. Mount Your TV at Eye Level on a Swivel Arm
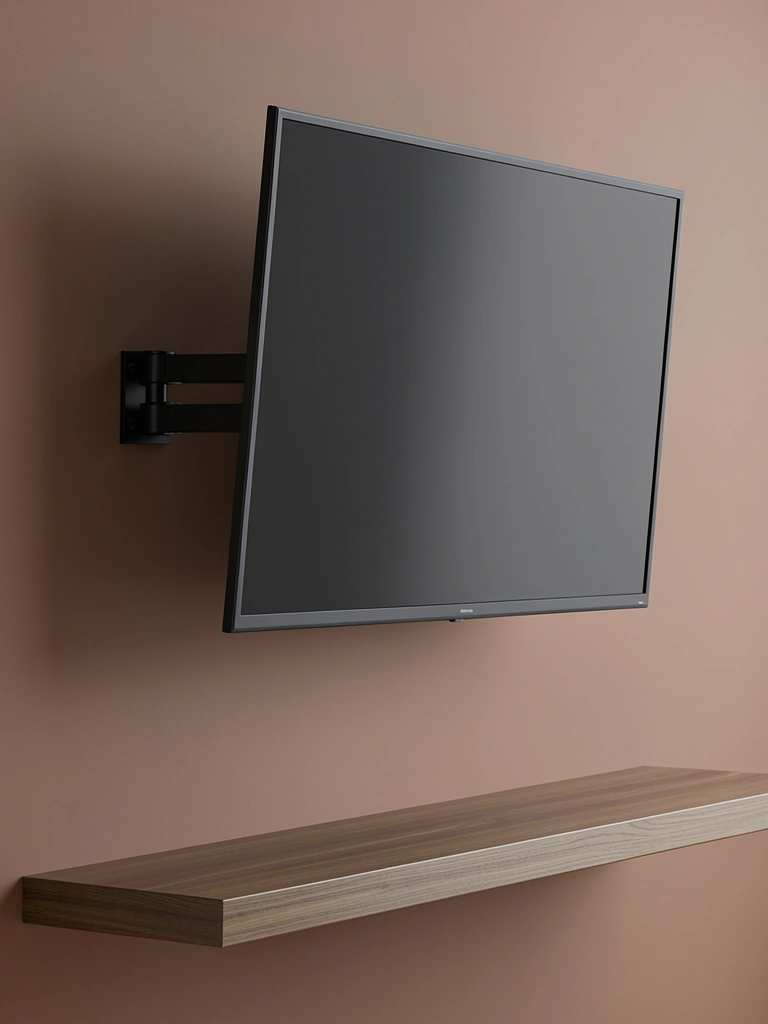
A swivel arm mount hides cables, adjusts viewing height, and looks way sleeker than a fixed mount. This is pure function that looks like design.
Grab a heavy-duty swivel mount from Best Buy, Amazon, or Home Depot ($50–$150). Install following manufacturer instructions (usually 30–45 minutes with a drill and level). Mount your TV so the center of the screen hits eye level when you’re seated. The swivel lets you angle for optimal viewing and tuck the TV nearly flush against the wall when not in use.
Pro tip: Thread cables through the arm’s internal cable management system so nothing shows.
Your TV disappears into the wall, cables vanish, and viewing angles become adjustable—it’s both functional and looks intentionally designed.
14. Create a Two-Tone Wall (Paint + Paneling Combo)

Combine paint and paneling to add visual interest without overwhelming a small space. A two-tone approach breaks up a large wall and adds sophistication.
Paint the lower half of your TV wall ($30–$50 for paint, 2–3 hours work). Install fluted or shiplap panels on the upper half ($80–$150 materials, 4–6 hours installation). The split creates visual balance and lets you enjoy texture and color. This works especially well if your TV is mounted in the center—the painted section grounds it below, panels add visual lift above.
Renter option: Use peel-and-stick panels on the upper half instead of permanent installation.
The two-tone approach makes your wall feel intentional and custom without requiring a massive overhaul or budget.
15. Install Shiplap for a Cottage-Modern Look

Shiplap adds warmth, texture, and a slightly rustic-modern vibe that works in almost any space. It’s easier to install than you’d think and absolutely photographs well.
Buy shiplap boards from Home Depot ($1–$3 per linear foot). Measure your wall to calculate how much you need—a typical TV wall costs $100–$250 in materials. Install over one weekend with a nail gun and basic carpentry knowledge (or hire someone for $300–$500 labor). Paint it white, cream, or natural wood for flexibility. Shiplap is forgiving because the horizontal lines create rhythm, so small installation imperfections disappear into the pattern.
Budget hack: Use peel-and-stick shiplap wallpaper ($60–$120) for a renter-friendly option.
You get genuine texture that feels organic and warm, and it’s surprisingly doable as a DIY project if you’re willing to try something new.
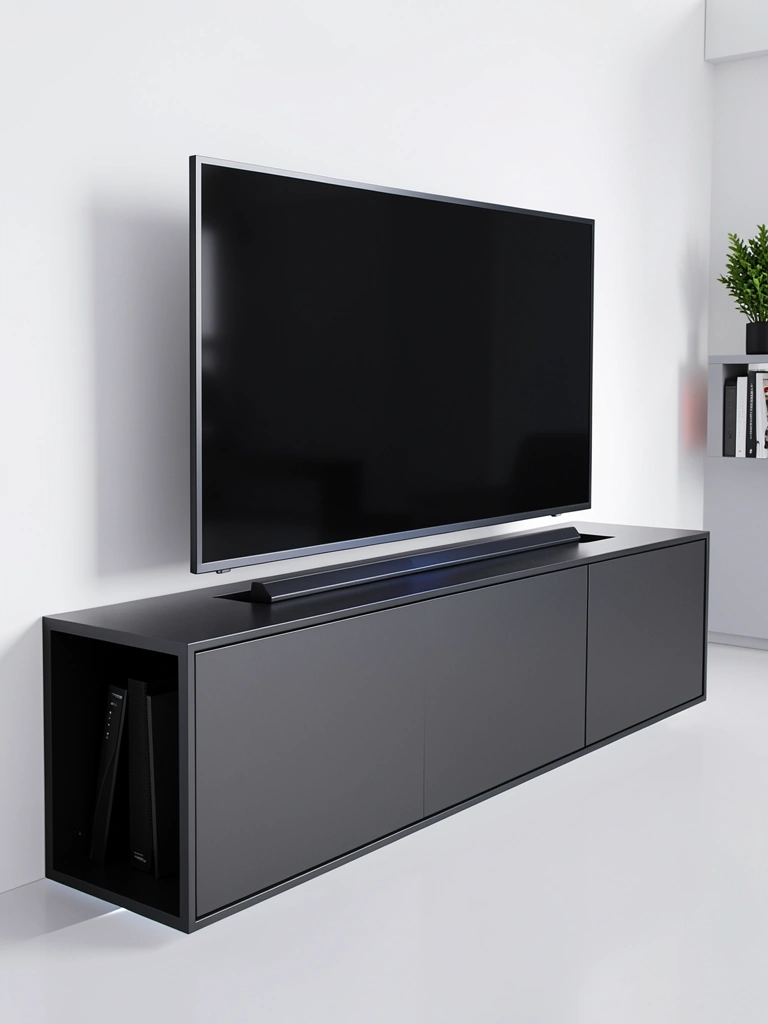
16. Mount a Slim Soundbar and Hide All Cables
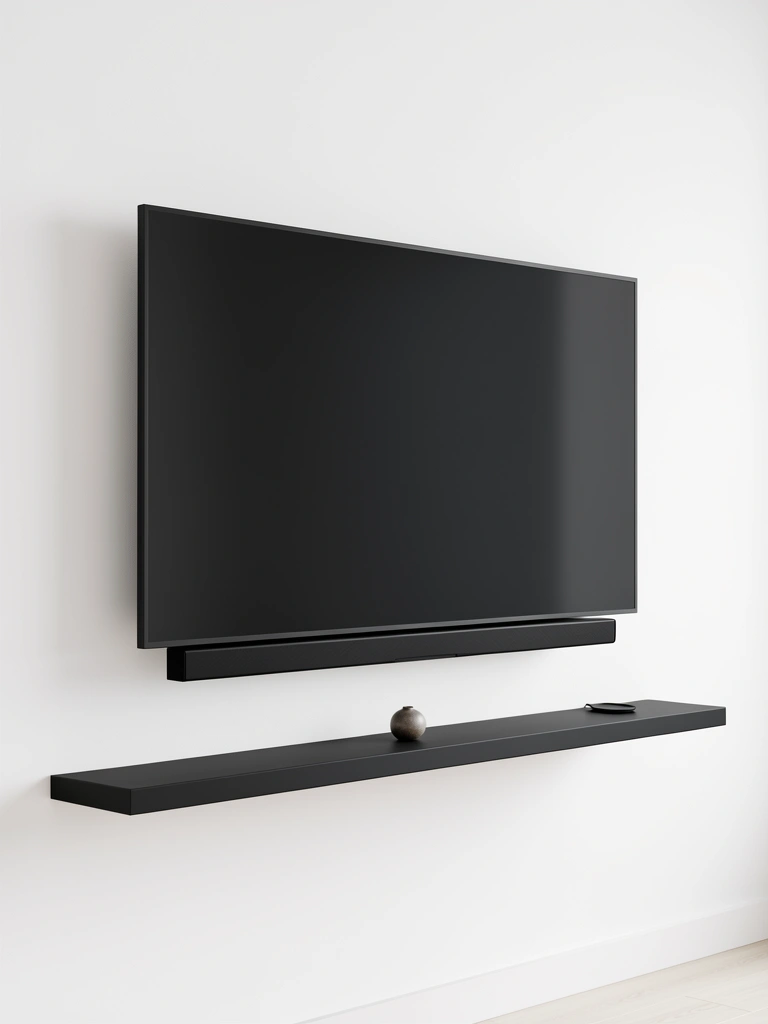
A soundbar improves your TV experience dramatically, but only if cables don’t destroy your clean aesthetic. Strategic mounting and cable management make all the difference.
Get a slim soundbar ($80–$300 depending on quality—Sonos, Bose, or LG all make good options). Mount directly below your TV using included brackets. Thread all cables through in-wall cable channels ($15–$30 at Home Depot) so nothing shows. If your TV is already installed and in-wall channels aren’t possible, use cable covers ($10–$20 for adhesive-backed fabric channels). Installation takes 1 hour total. The result is that your entertainment setup looks intentional and uncluttered.
Pro tip: Choose a soundbar color that matches your TV or wall for maximum invisibility.
Your audio improves, and your wall stays clean and minimal—the best of both worlds.
17. Add Sculptural Objects and Plants to Break Up Flatness
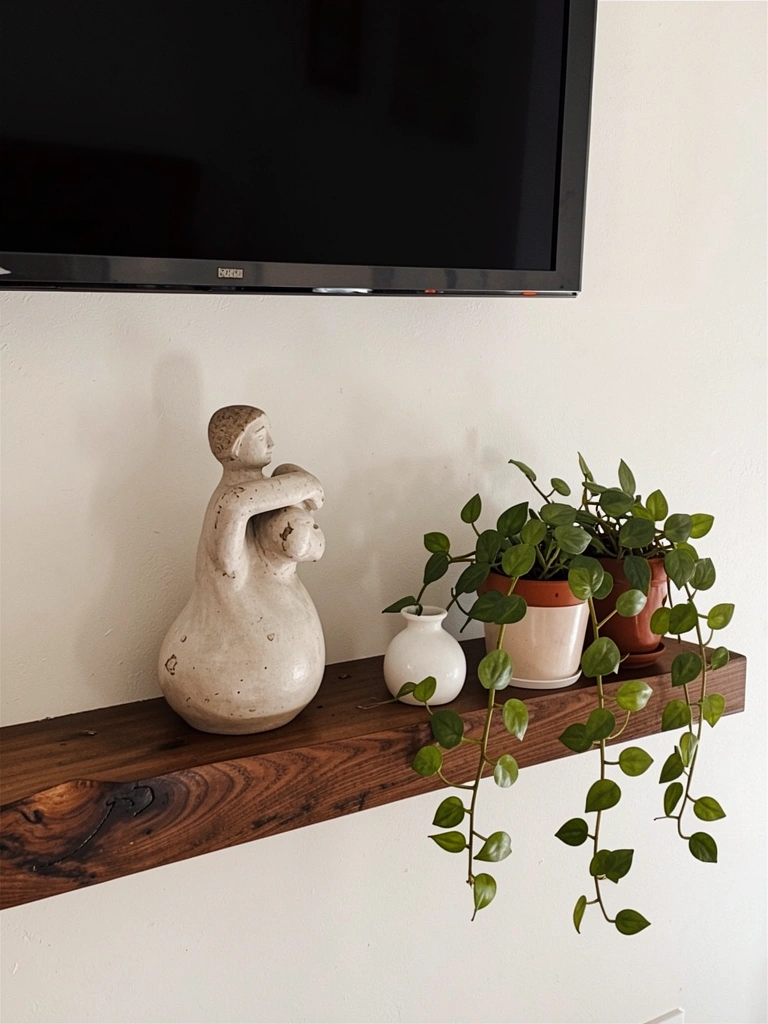
A completely bare TV wall can feel sterile. Strategic styling with plants and objects adds personality and visual warmth without clutter.
Keep it minimal—three to five items maximum on your floating shelf. Choose a mix: one larger sculptural piece ($30–$100 from West Elm, Wayfair, or a thrift store), trailing plants in small pots ($10–$30 each), and one neutral vessel or book. Vary heights and shapes so the shelf reads as intentional. Styling takes 15 minutes and can be changed seasonally.
Budget hack: Thrift stores and HomeGoods have affordable sculptural pieces perfect for styling.
Your wall becomes personal and lived-in instead of looking like a showroom—it tells a story about you.
18. Use Marble or Stone Veneer for Luxury Impact
Marble or stone veneer adds instant luxury without full-scale renovation. It’s surprisingly affordable compared to real marble and much easier to maintain.
Choose peel-and-stick stone veneer ($1–$3 per square foot) or go for permanent porcelain tiles ($2–$5 per square foot). You can frame just the screen or cover the entire wall. Installation varies: peel-and-stick takes 2–3 hours for a full wall, permanent tiles need professional installation ($300–$800 labor). The veneer gives you genuine luxury aesthetics with durability and easy cleaning. Pair with minimal styling so the material does the talking.
Budget alternative: Marble-look paint ($50–$100 with special technique) gives the illusion for way less.
Your TV wall instantly reads as elevated and designed, and stone veneer is genuine and durable enough to last years.
19. Install a Motorized Lift System for TV That Rises and Falls
A motorized TV lift hides your screen completely when not in use, making your wall feel like actual furniture rather than a tech wall. It’s the ultimate “disappearing TV.”
Budget motorized lifts start around $300–$500 and can go up to $2,000+ for premium systems. They install into an entertainment unit or cabinet and raise/lower with a remote. This takes professional installation ($200–$400 labor) or advanced DIY skills. The payoff? Your TV completely disappears when you’re not watching, and your room becomes a beautiful furniture display instead of a tech showcase.
Alternative: For renters, a simpler solution is a curtain or sliding panel that hides the TV.
When you actually use this, guests won’t believe it’s the same space—technology becomes invisible until you need it.
20. Paint a Ombré or Color-Block Accent Wall
A subtle ombré or color-block pattern adds art-like sophistication without reading as trendy or childish. This is minimalism with personality.
Choose two coordinating paint colors in varying tones (like soft white fading to warm sage, or cream to soft gray). Use painter’s tape to create a clean line where colors meet, or freehand a soft gradient for a more artistic feel. Paint takes 3–4 hours and costs $40–$60 total. An ombré wall photographs beautifully and adds visual interest without pattern or texture—it’s pure color harmony.
Pro tip: Test your color combo on large poster board first so you’re confident before committing.
The subtle gradient adds sophistication and feels like intentional design rather than decoration.
21. Build a Custom Built-In Media Wall With Storage

A custom built-in takes your TV wall from nice to “you had someone design this.” This is an investment but transforms your entire room.
Work with a local carpenter or cabinetry company ($2,000–$8,000+ depending on size and materials). Specs include your TV dimensions, desired shelf depths, closed storage for components, and trim details. Installation takes 2–4 weeks from design to completion. The result is a wall that looks built into your home’s architecture, maximizes storage, and hides all tech. You get a room that photographs like a magazine spread and functions perfectly.
Budget alternative: Hire someone to build simple open shelving with drywall backing ($800–$2,000).
When it’s done, you have a wall that feels like it’s always been part of your home—no more “TV wall” energy, just stunning design.
22. Mount Your TV Inside a Statement Frame or Surround
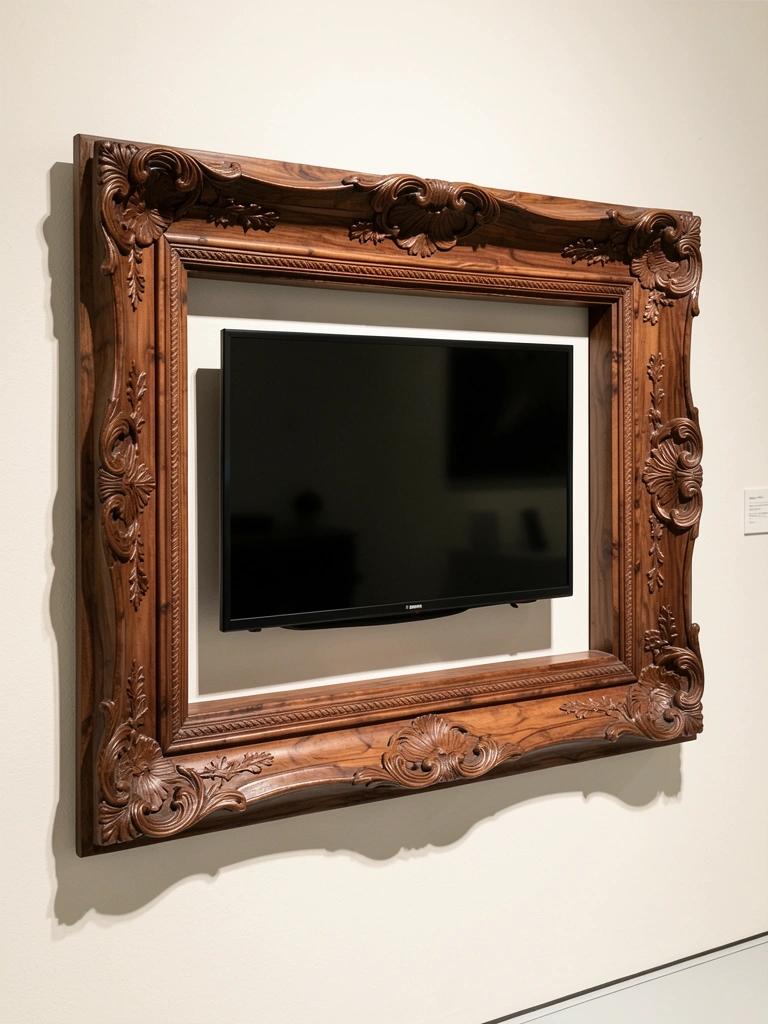
A decorative frame around your TV makes it look like art. This sounds fancy but is surprisingly achievable and affordable.
Buy a large decorative frame from Wayfair, Amazon, or an art framer ($100–$400) or build one with trim and wood ($50–$150 materials). Mount the frame to the wall, then mount your TV inside it. The frame draws attention to the screen while creating a finished, intentional look. This works beautifully with minimalist walls because the frame does all the visual heavy lifting. It’s the opposite of trying to hide your TV—you’re celebrating it.
Pro tip: Choose a frame finish that complements your wall color or wood tones elsewhere in the room.
Your TV transforms from a floating tech object into a genuine focal point that looks collected and designed.
23. Add a Wallpaper Accent Strip Behind a Minimalist TV Wall
A vertical wallpaper accent behind your screen adds pattern and personality without overwhelming a clean space. It’s subtle but noticeable.
Choose a high-quality wallpaper in a complementary color or pattern ($20–$50 per roll). Apply it vertically behind your TV from ceiling to floor or just around the screen area. Install over 2–3 hours using standard wallpaper tools. The pattern frames your TV naturally and gives the wall personality while keeping the surrounding space calm. Limit other patterns in the room so this reads as intentional.
Renter option: Use peel-and-stick wallpaper for zero permanent damage.
The pattern creates visual interest and makes your TV wall feel like a designed feature rather than a blank canvas with a screen attached.
24. Incorporate Brass or Gold Accents for Warmth
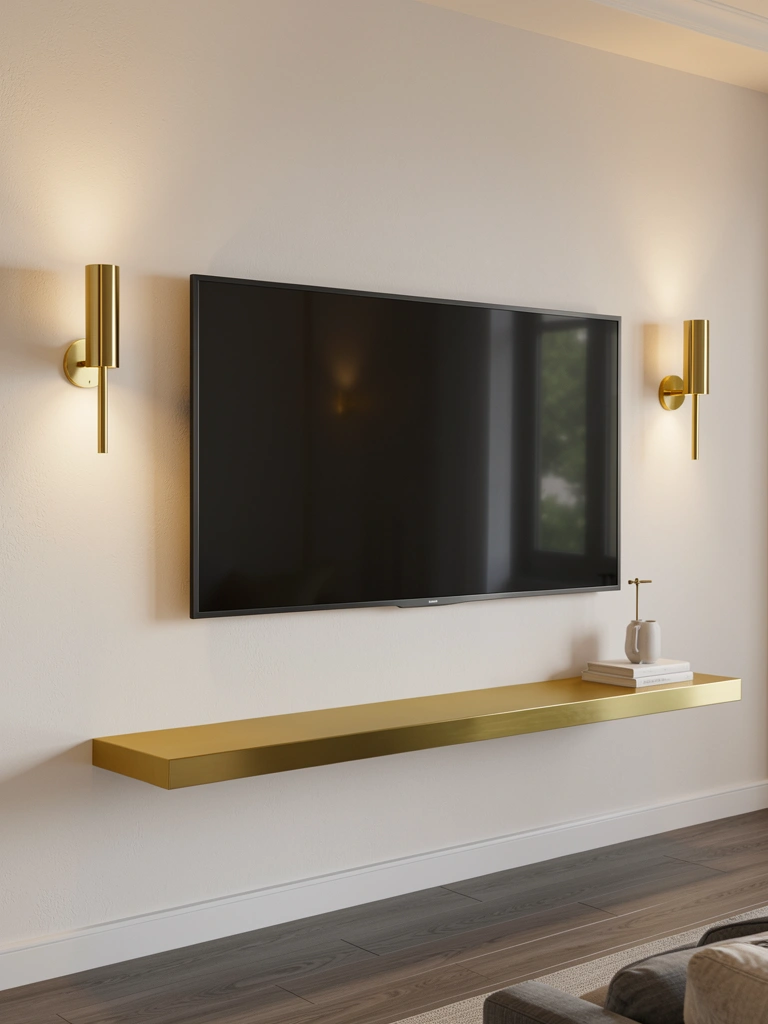
Brass and gold accents add warmth and luxury to even the simplest TV wall. These metals catch light and create sophistication with minimal effort.
Add brass elements through your floating shelf brackets ($40–$80 for quality brackets from Rejuvenation or West Elm), wall sconces ($60–$150 each), or decorative objects. Even if your wall is plain white or minimally styled, brass accents read as intentional and upscale. Installation for shelves and sconces takes 1–2 hours with basic tools. The warm finish makes your room feel elegant and collected.
Budget option: Brass spray paint ($8–$15 per can) can update existing hardware you already own.
The warmth of brass adds depth and sophistication without requiring a complete redesign—just a few strategic touches.
25. Create a Rhythm With Repeated Open Shelving
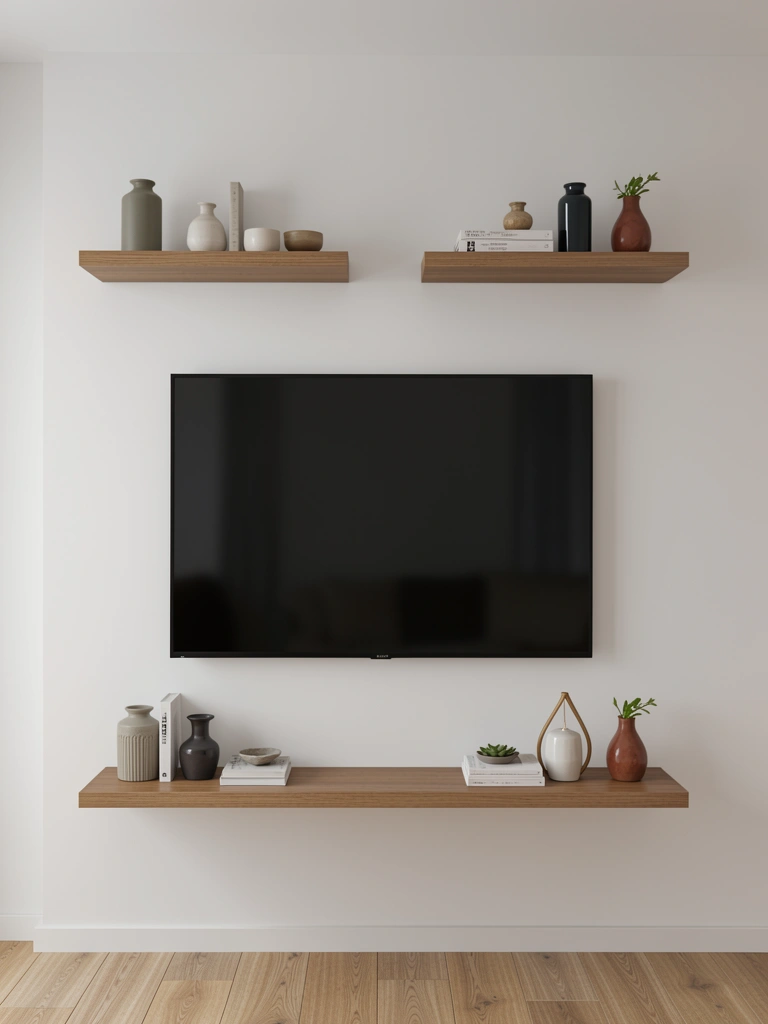
Repetition and rhythm in shelf placement create visual harmony. Multiple shelves at consistent intervals frame your TV and feel architectural.
Install floating shelves ($20–$50 each) at regular intervals—perhaps 12 inches apart—around your TV. Use the same shelf finish and bracket style for consistency. Style each shelf similarly (plant, object, empty space) to create visual rhythm. This takes half a day to install and style. The repeated pattern feels intentional and architectural rather than random. It also gives you practical storage and display without the wall feeling cluttered.
Pro tip: Asymmetry can work too—just use odd numbers of shelves (3, 5, 7) and vary heights for organic flow.
The repetition creates rhythm and balance that makes your TV wall feel like it was designed by someone who knows what they’re doing.
Save this guide and try just one idea this weekend. Whether you paint, add texture, or go minimal, your TV wall deserves intentional design. Pick the approach that matches your style and budget—there’s something here for every space.
Leave a Reply